Push Notifications
Push Notifications provide a way to deliver some information to users while they are not using your app actively. The following use cases can be covered additionally with push notifications:
- send a chat message when a recipient is offline (a push notification will be initiated automatically in this case)
- make a video call with offline opponents (need to send a push notification manually)
Configuration
Section titled “Configuration”In order to start work with push notifications you need to configure it.
First of all we need to install nativescript-plugin-firebase lib. Just follow the guide.
Then follow the platform specific steps.
-
First of all you need to generate Apple push certificate (*.p12 file) and upload it to ConnectyCube dashboard. Here is a guide on how to create a certificate https://developers.connectycube.com/ios/how-to-create-apns-certificate
-
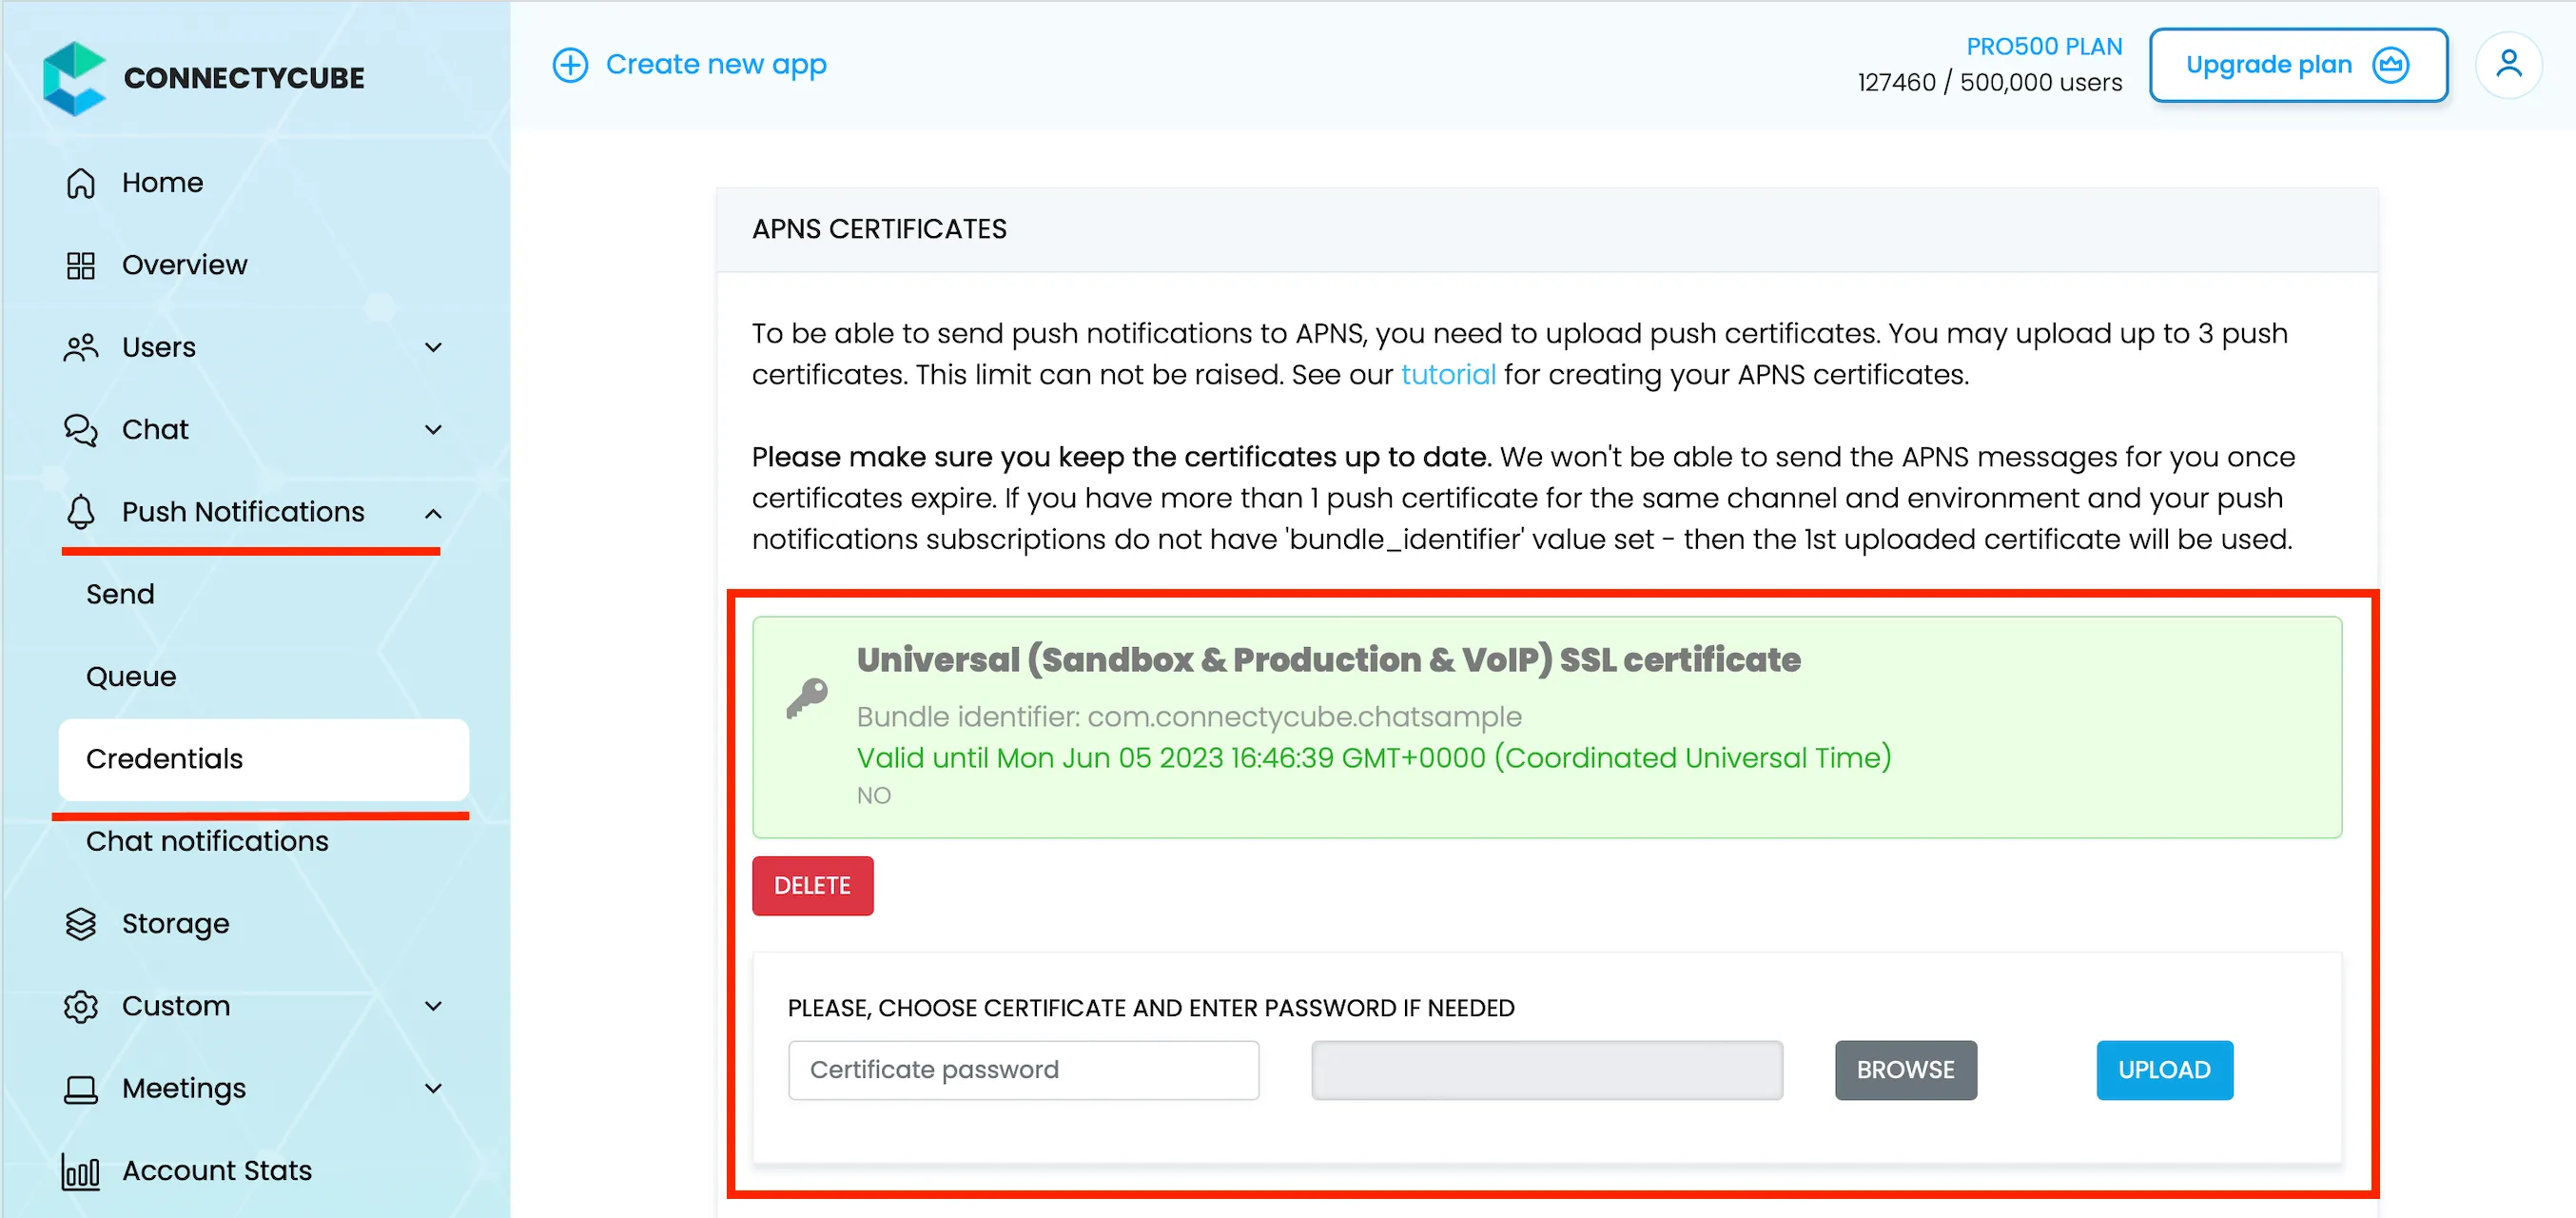
Upload Apple push certificate (*.p12 file) to ConnectyCube dashboard:
- Open your ConnectyCube Dashboard at admin.connectycube.com
- Go to Push notifications module, Credentials page
- Upload the newly created APNS certificate on Apple Push Notification Service (APNS) form.
-
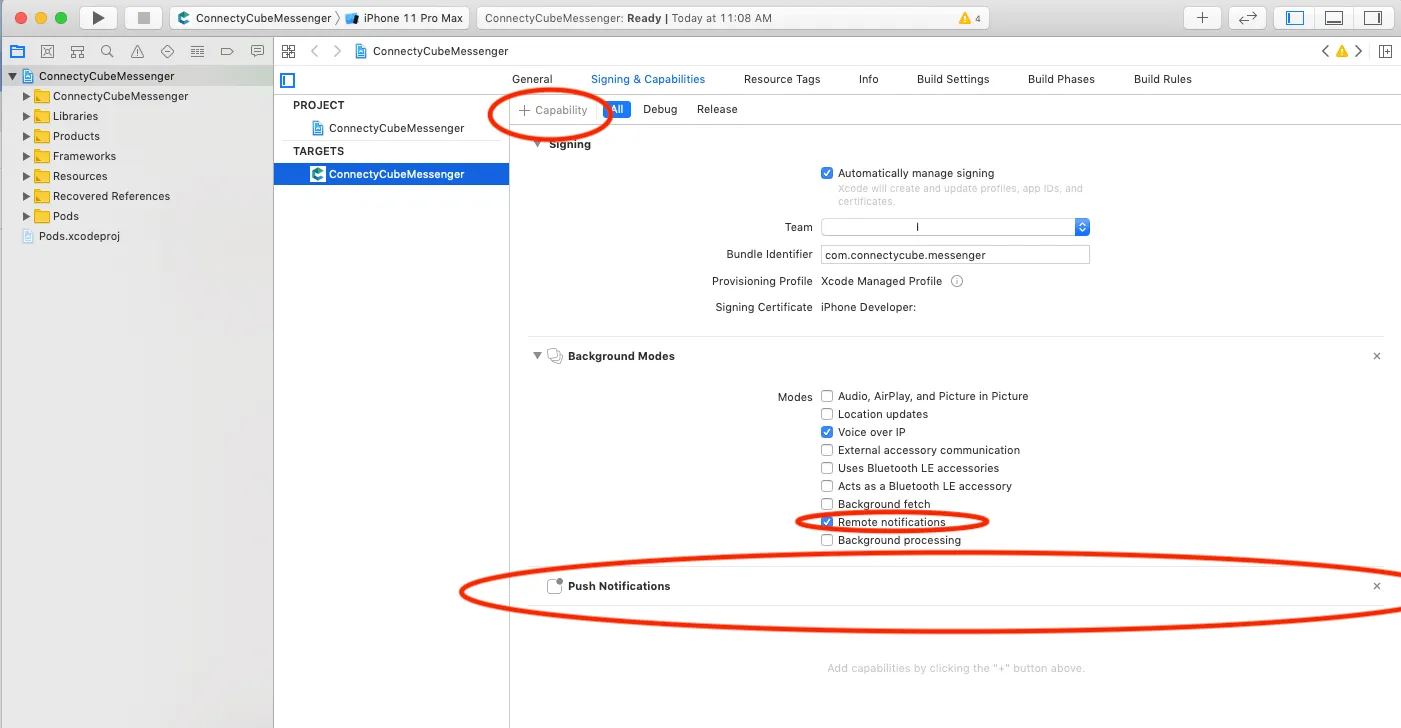
Lastly, open Xcode project of your Flutter app and enable Push Notifications capabilities. Open Xcode, choose your project file, Signing & Capabilities tab and then add a Push Notifications capability. Also - tick a ‘Remote notifications’ checkbox in Background Modes section.
Android
Section titled “Android”Configure Firebase project and Service account key (recommended)
Section titled “Configure Firebase project and Service account key (recommended)”In order to start working with push notifications functionality you need to configure it.
-
Create and configure your Firebase project and obtain the Service account key. If you have any difficulties with Firebase project registration, follow our guide.
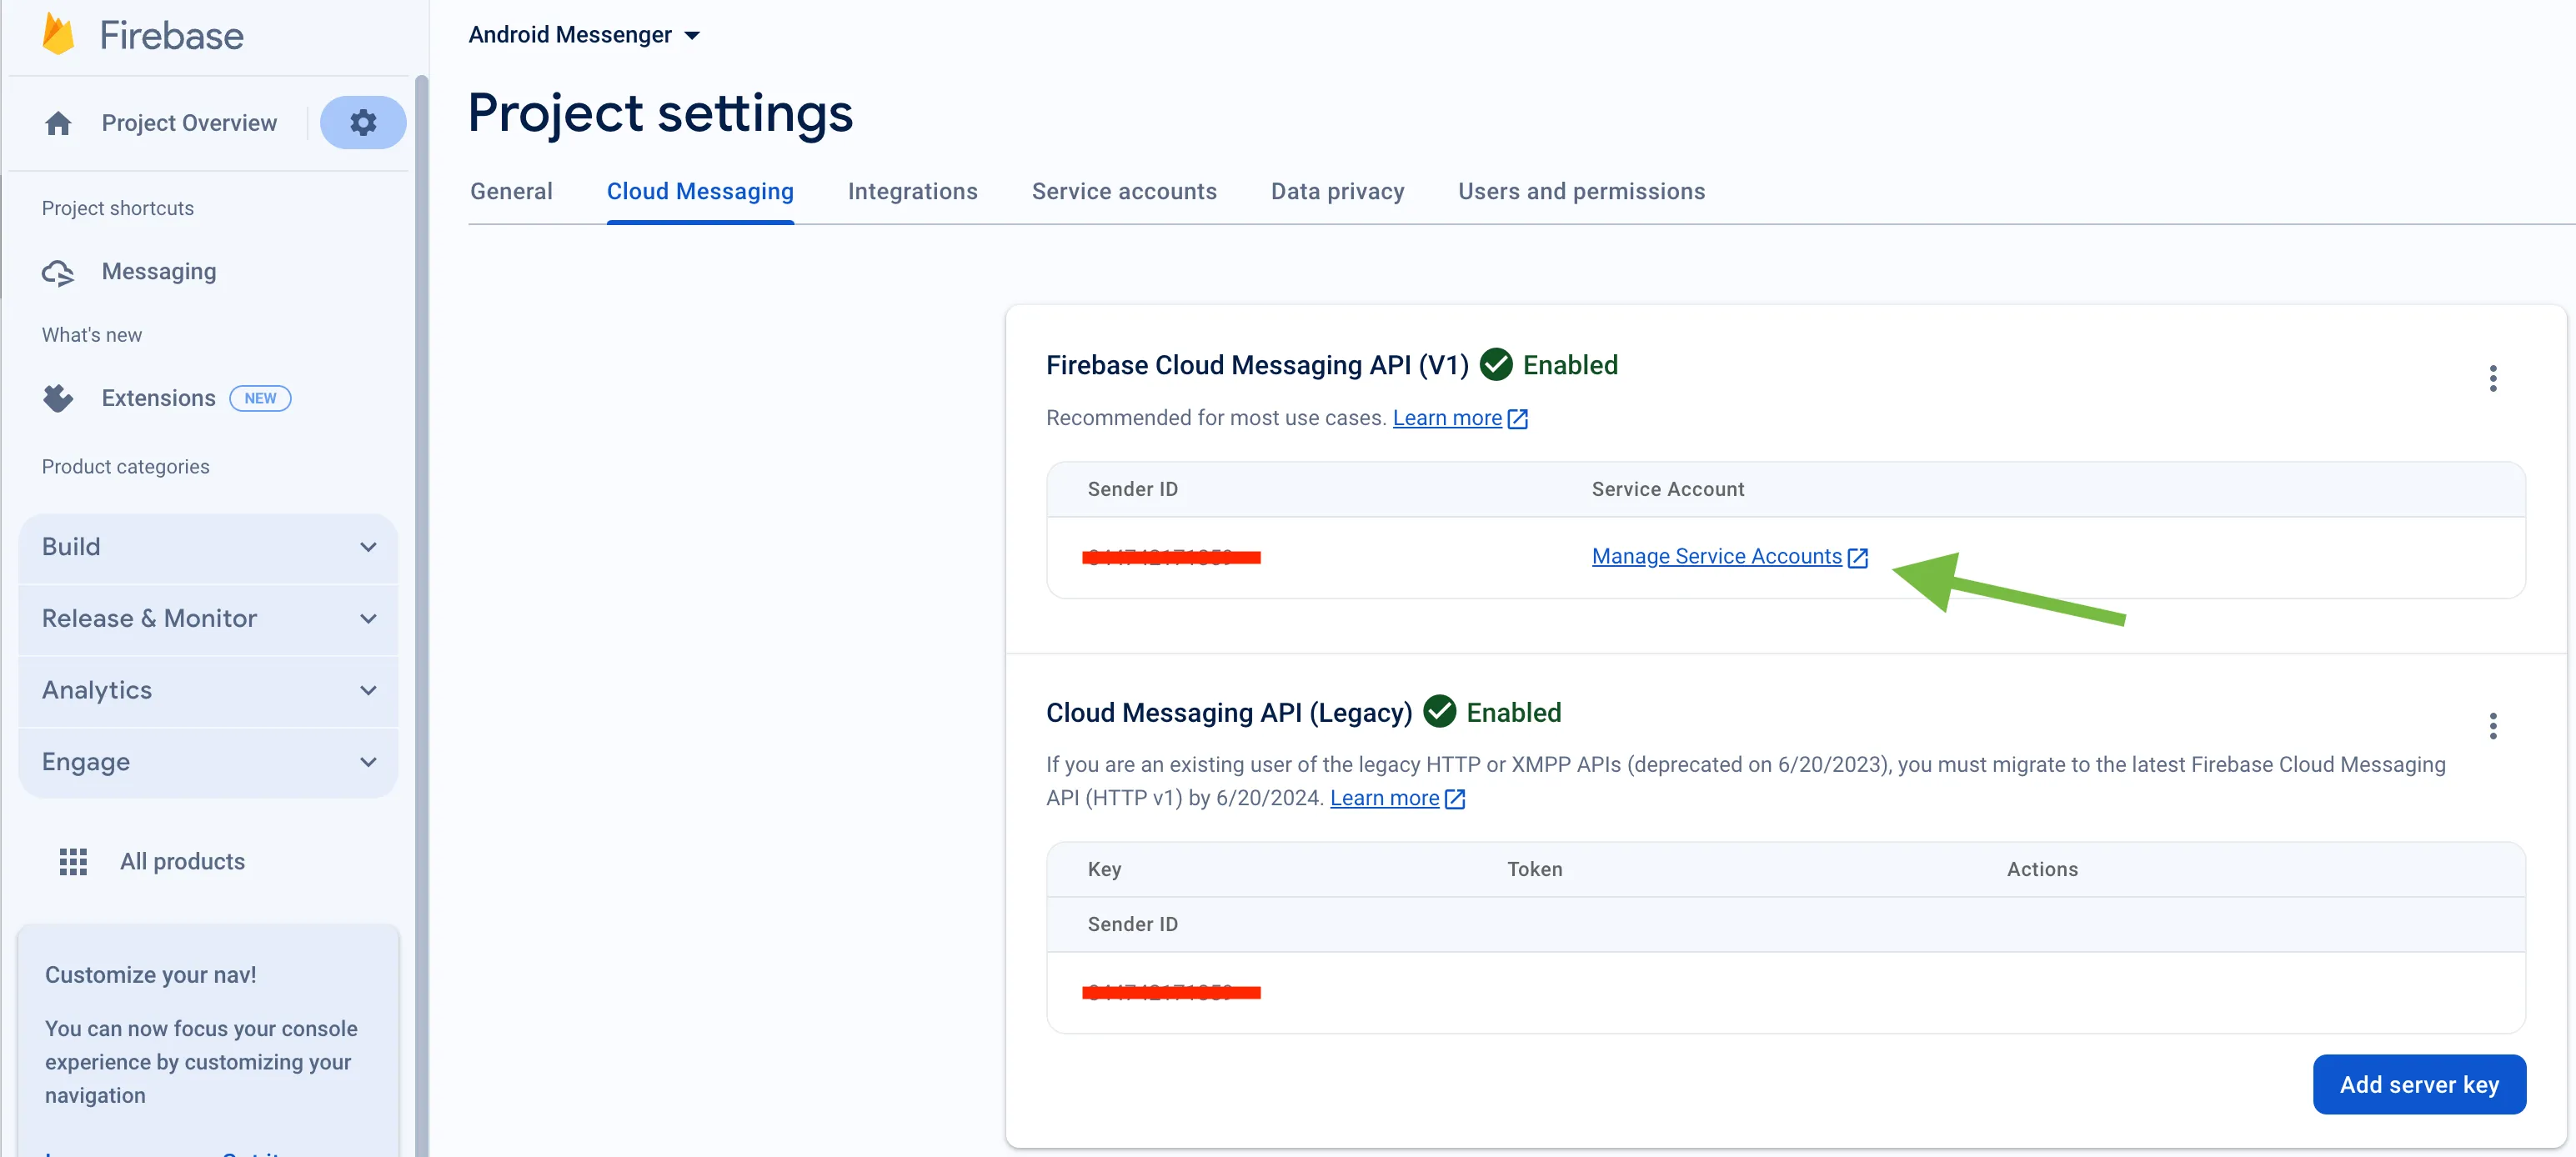
To find your FCM service account key go to your Firebase console > Cloud Messaging > Manage Service Accounts section:
-
Select and configure Manage Keys option:

-
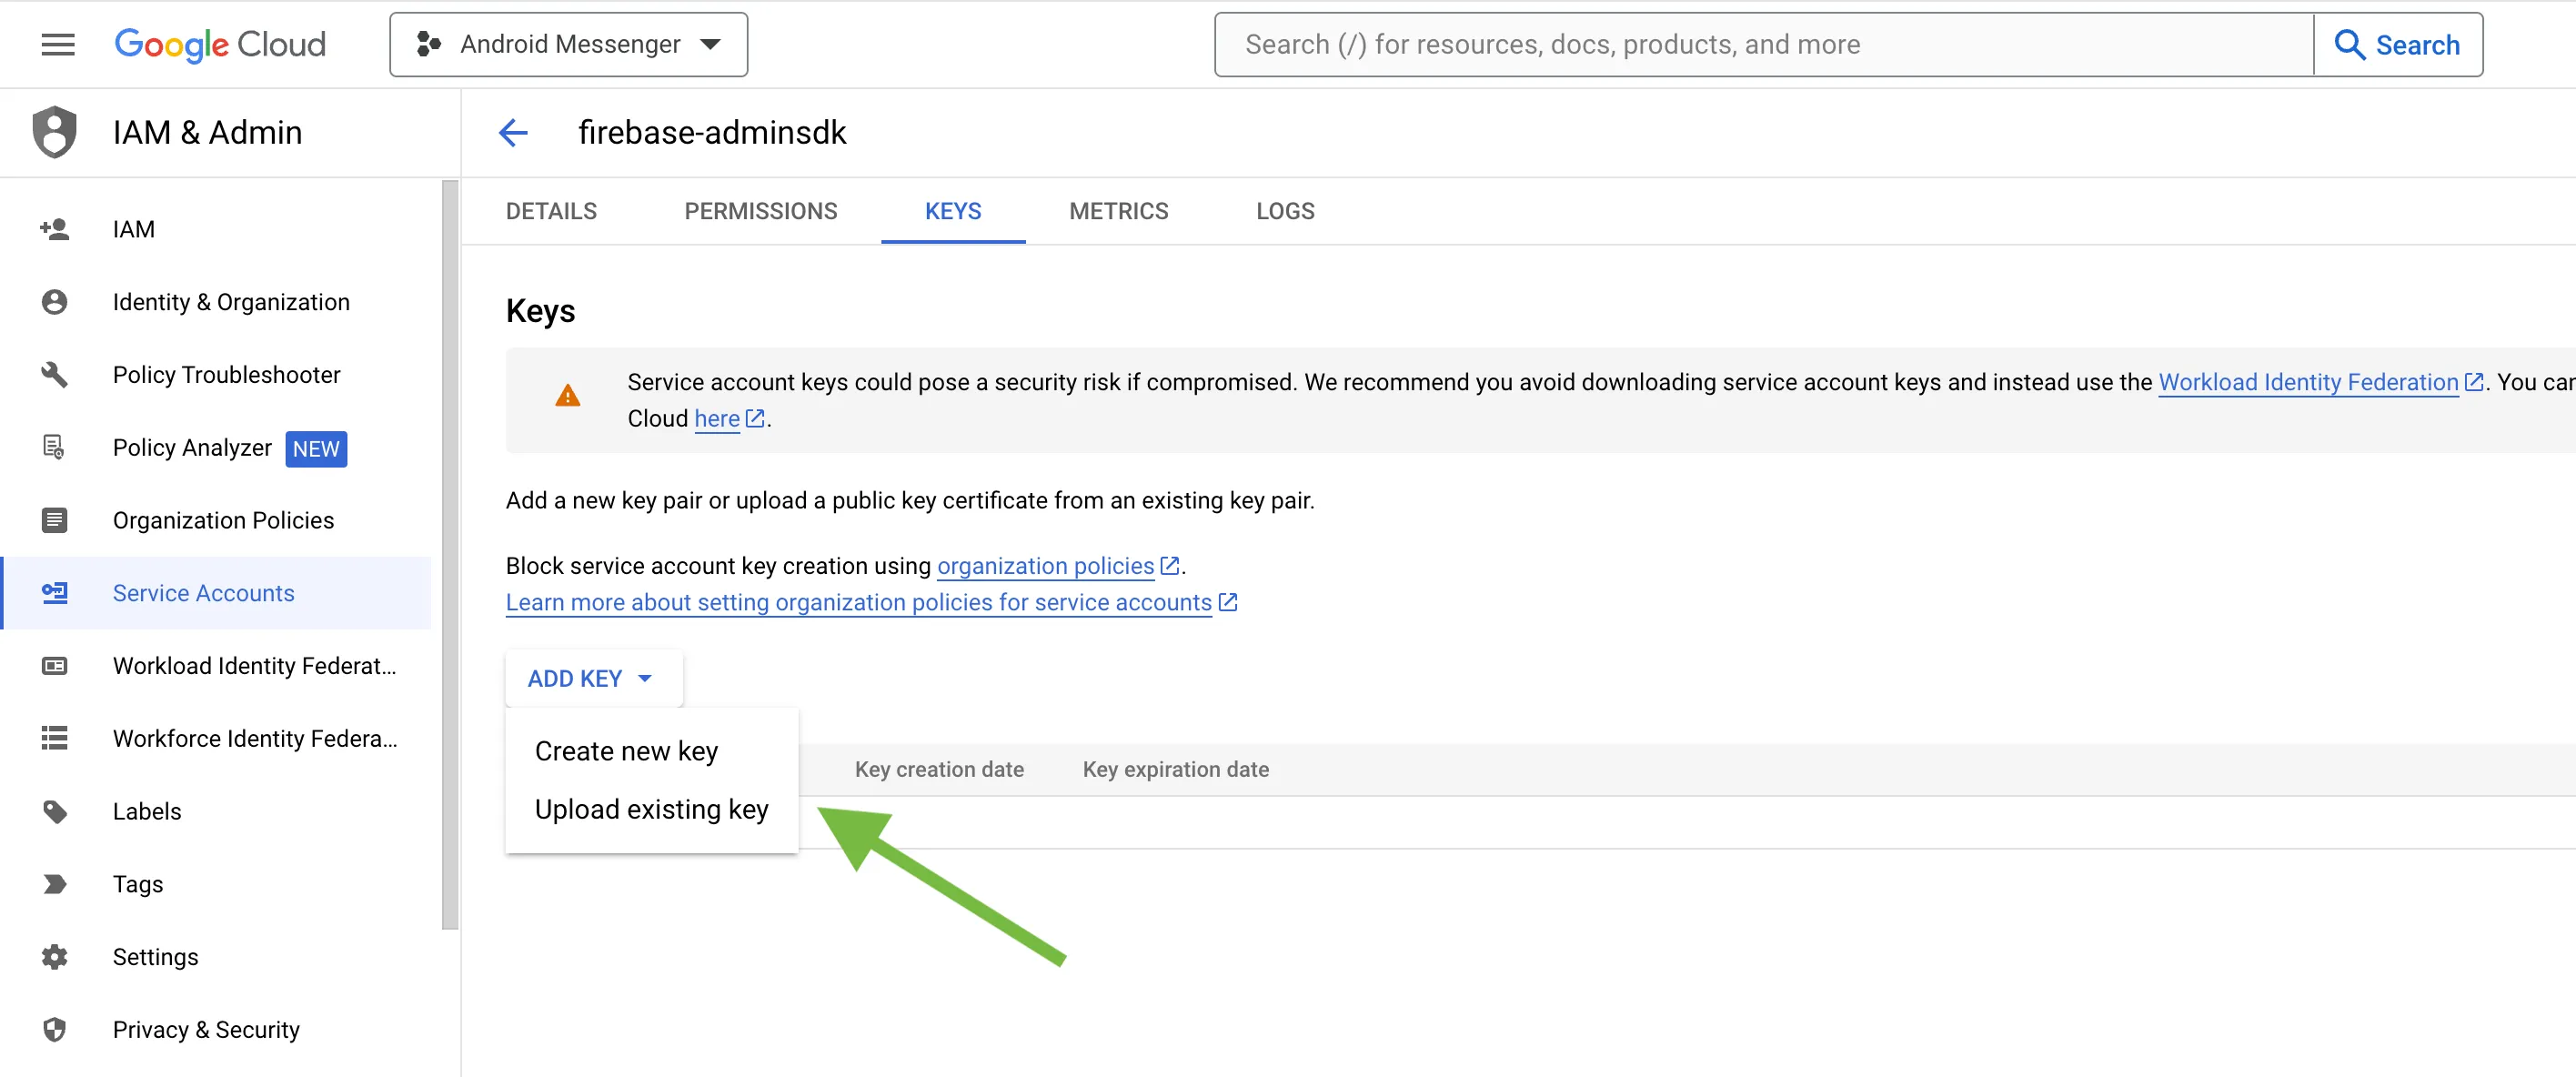
Select ADD KEY, Create new key:
-
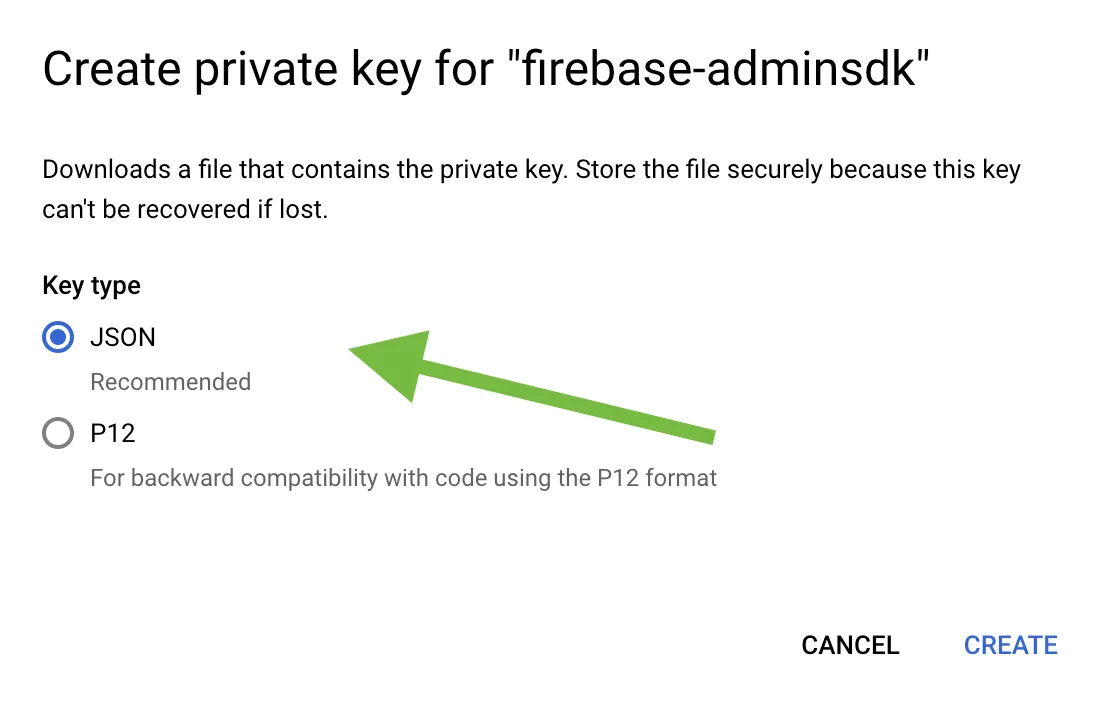
Select Key type (json recommended) and create:
-
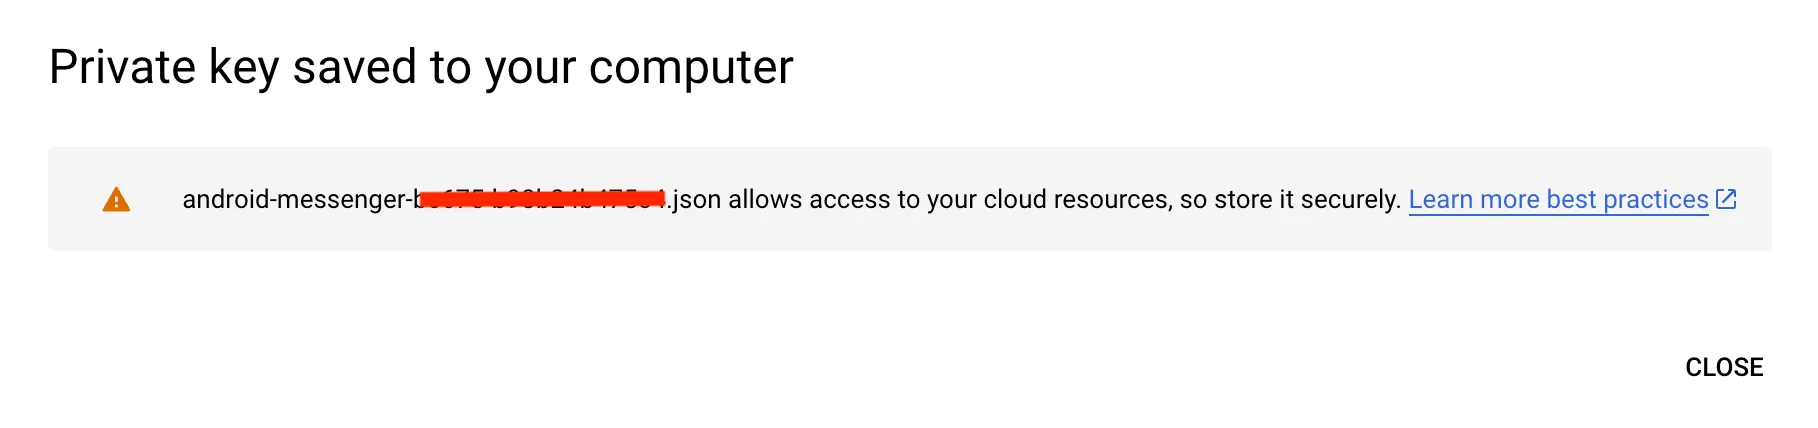
Save it locally:
-
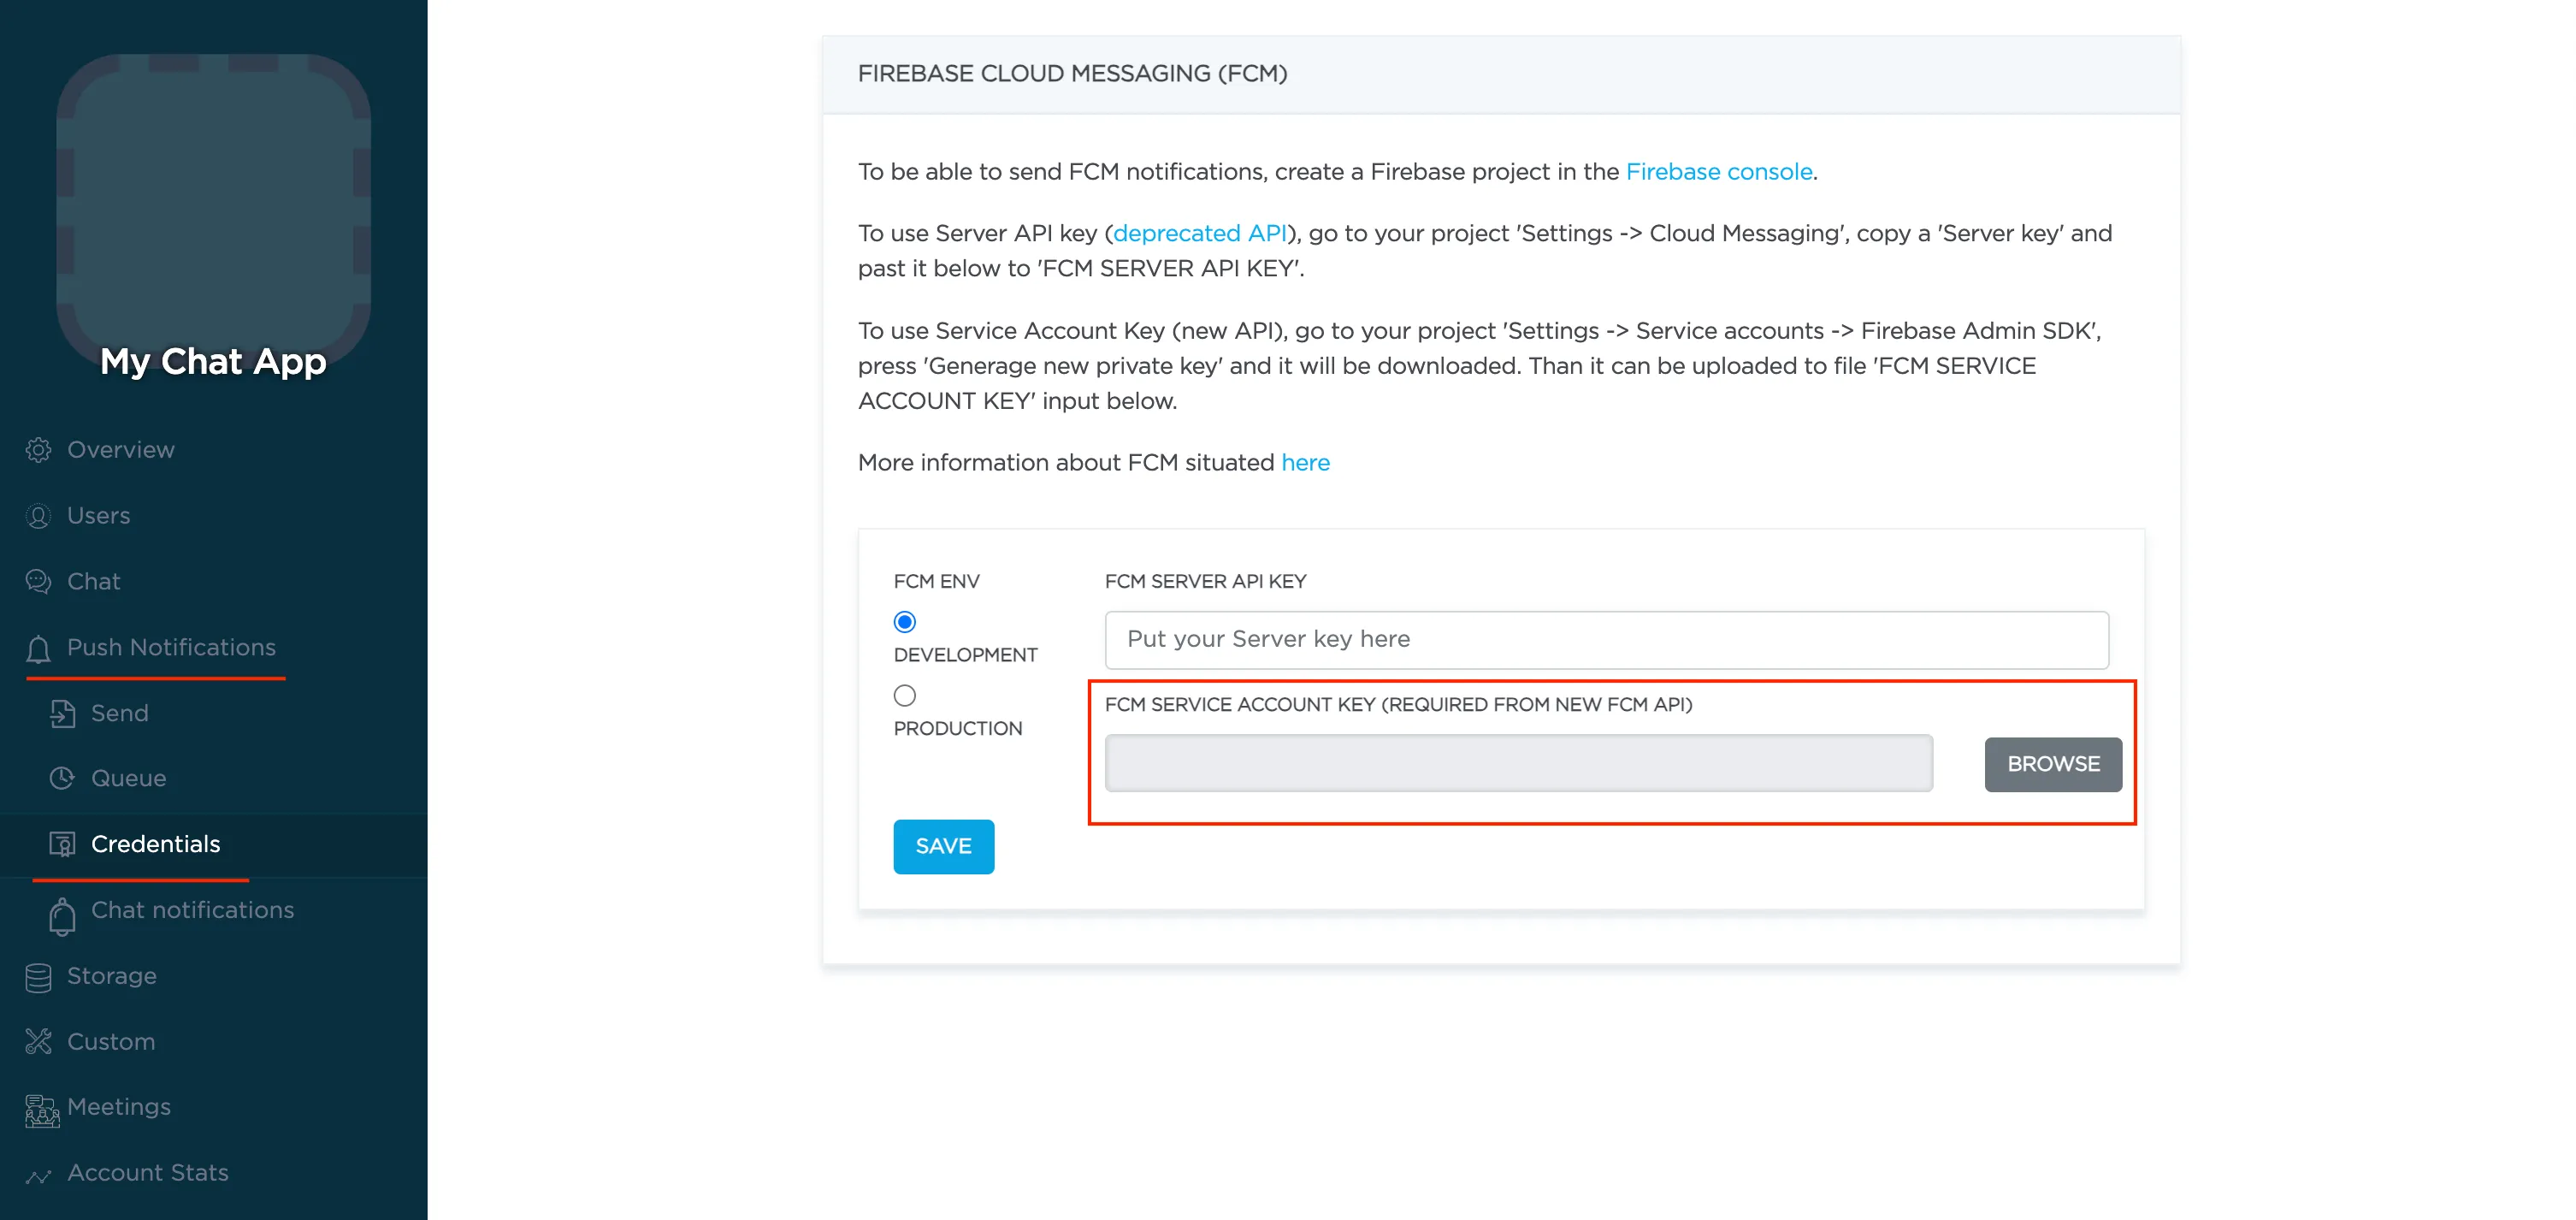
Browse your saved FCM Service account key in your Dashboard > Your App > Push Notifications > Credentials, select the environment for which you are adding the key. Use the same key for development and production zones.
-
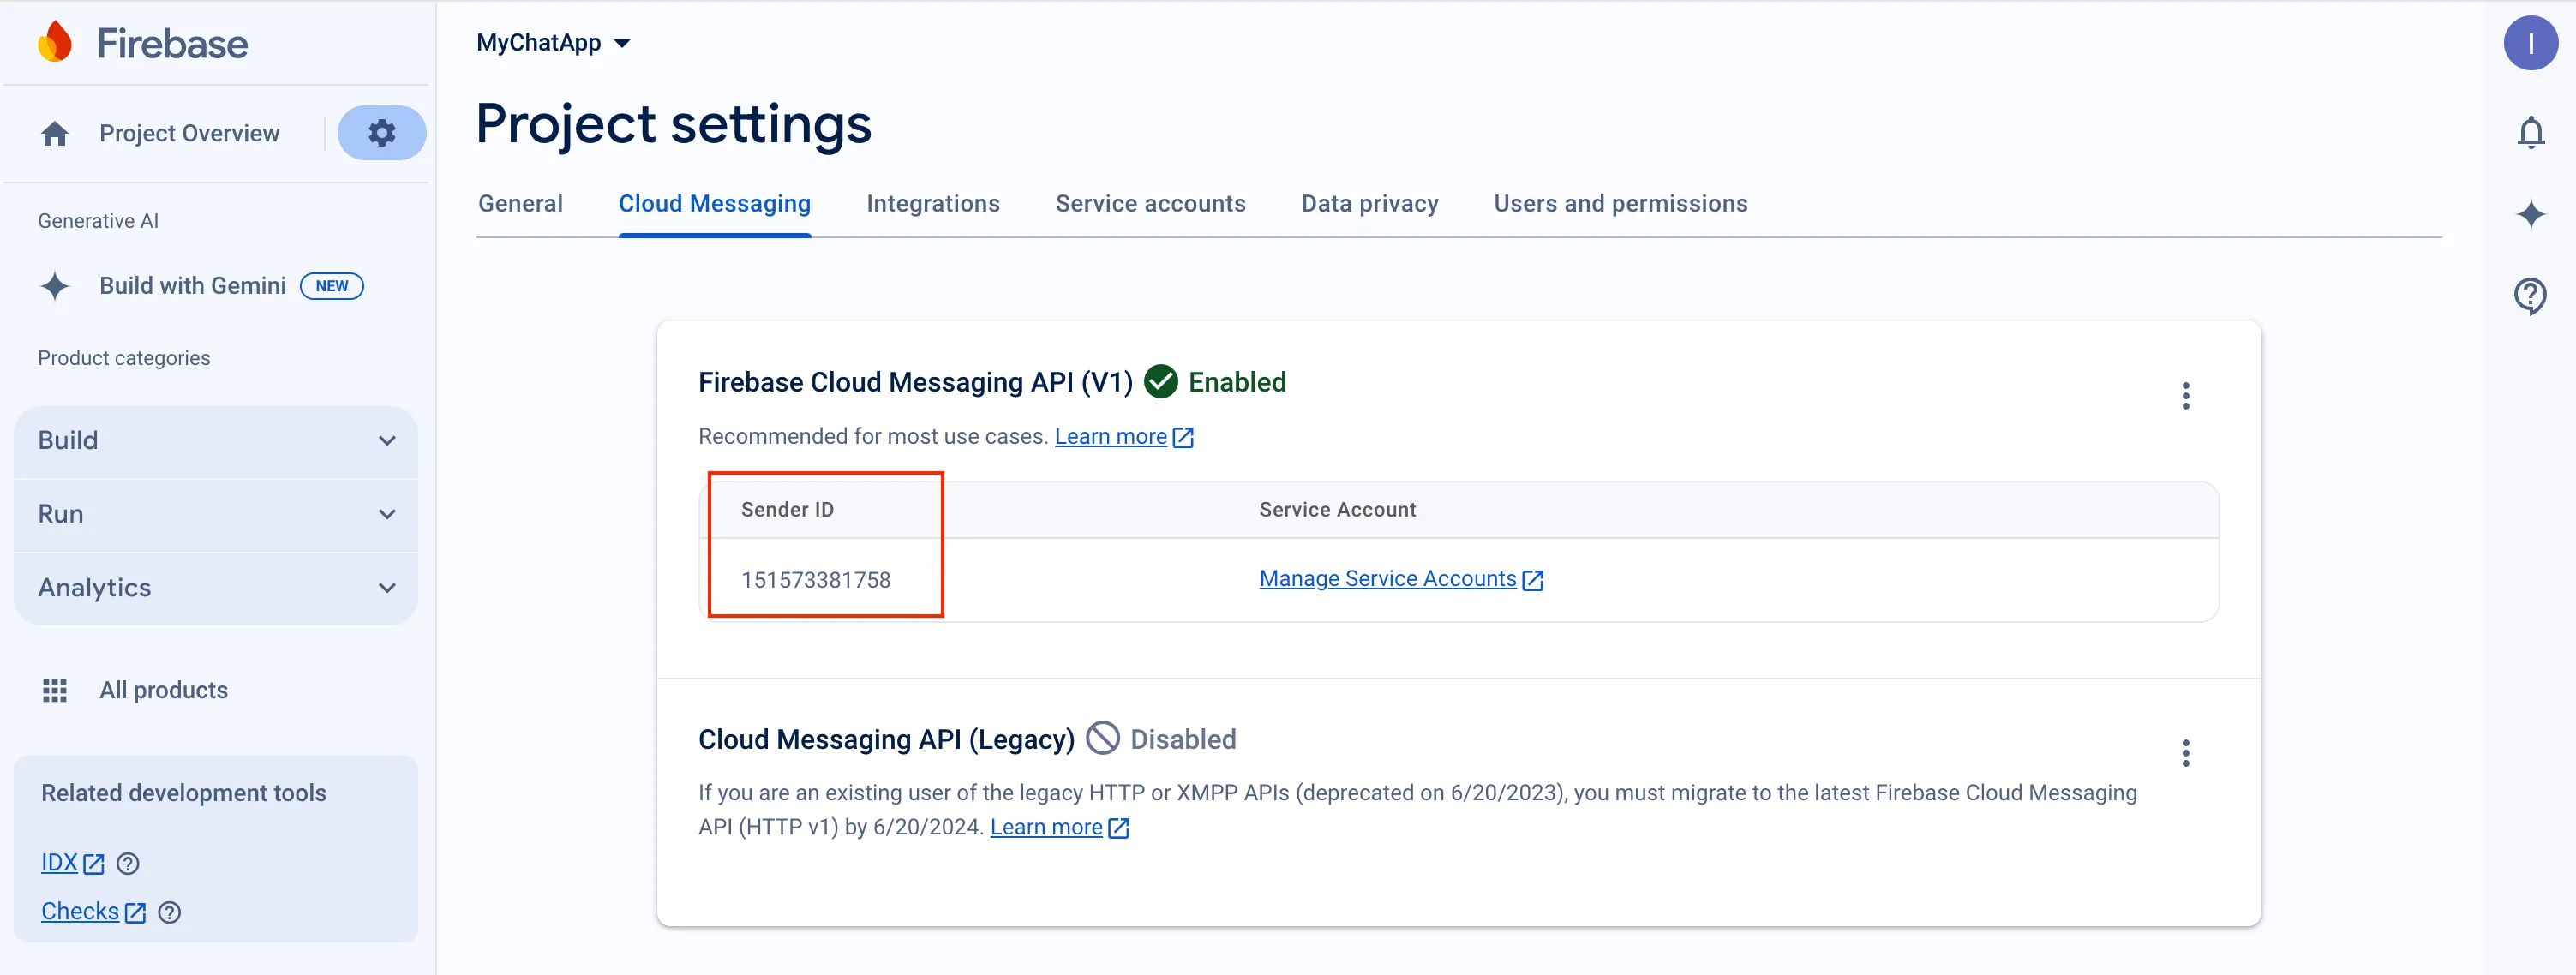
Copy Sender ID value from your Firebase console Cloud Messaging section. You may require it later.
-
In order to use push notifications on Android, you need to create
google-services.jsonfile and copy it into project’sandroid/appfolder. Also, you need to update theapplicationIdinandroid/app/build.gradleto the one which is specified ingoogle-services.json, so they must match. If you have no existing API project yet, the easiest way to go about in creating one is using this step-by-step installation process
Configure Firebase project and Server key (DEPRECATED)
Section titled “Configure Firebase project and Server key (DEPRECATED)”-
Create and configure your Firebase project and obtain the Server key. If you have any difficulties with Firebase project registration, follow our guide.
To find your FCM server key go to your Firebase console > Cloud Messaging section:
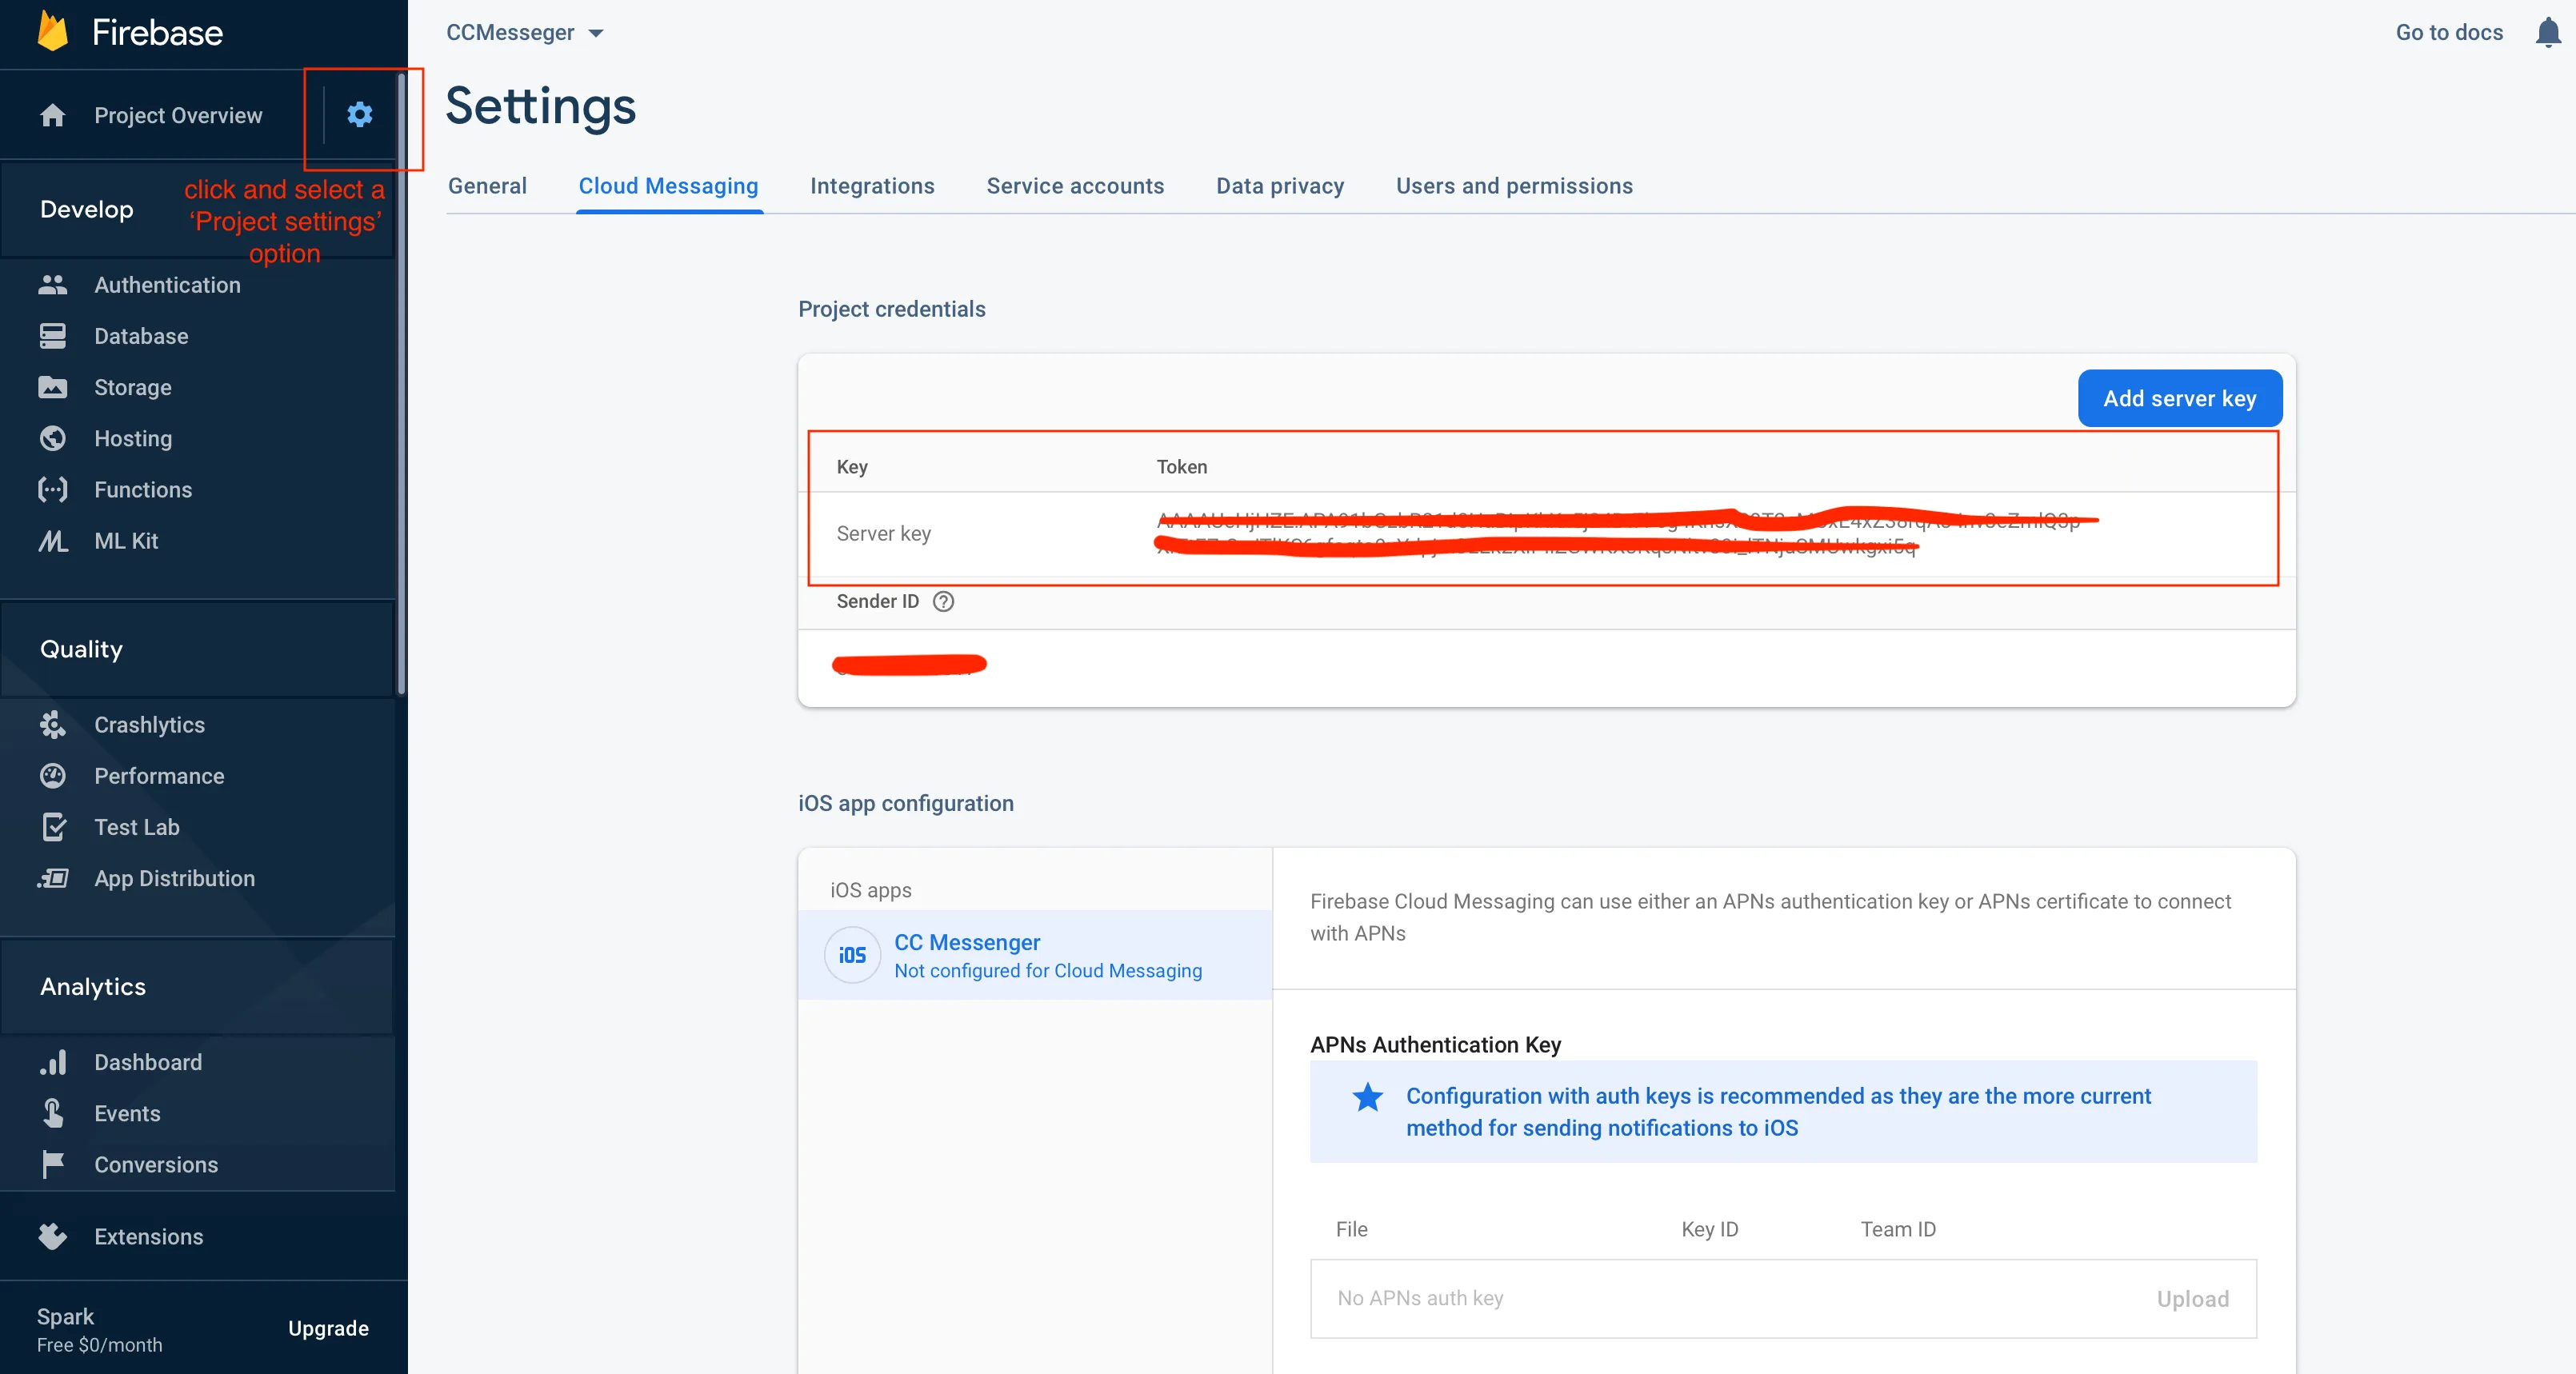
-
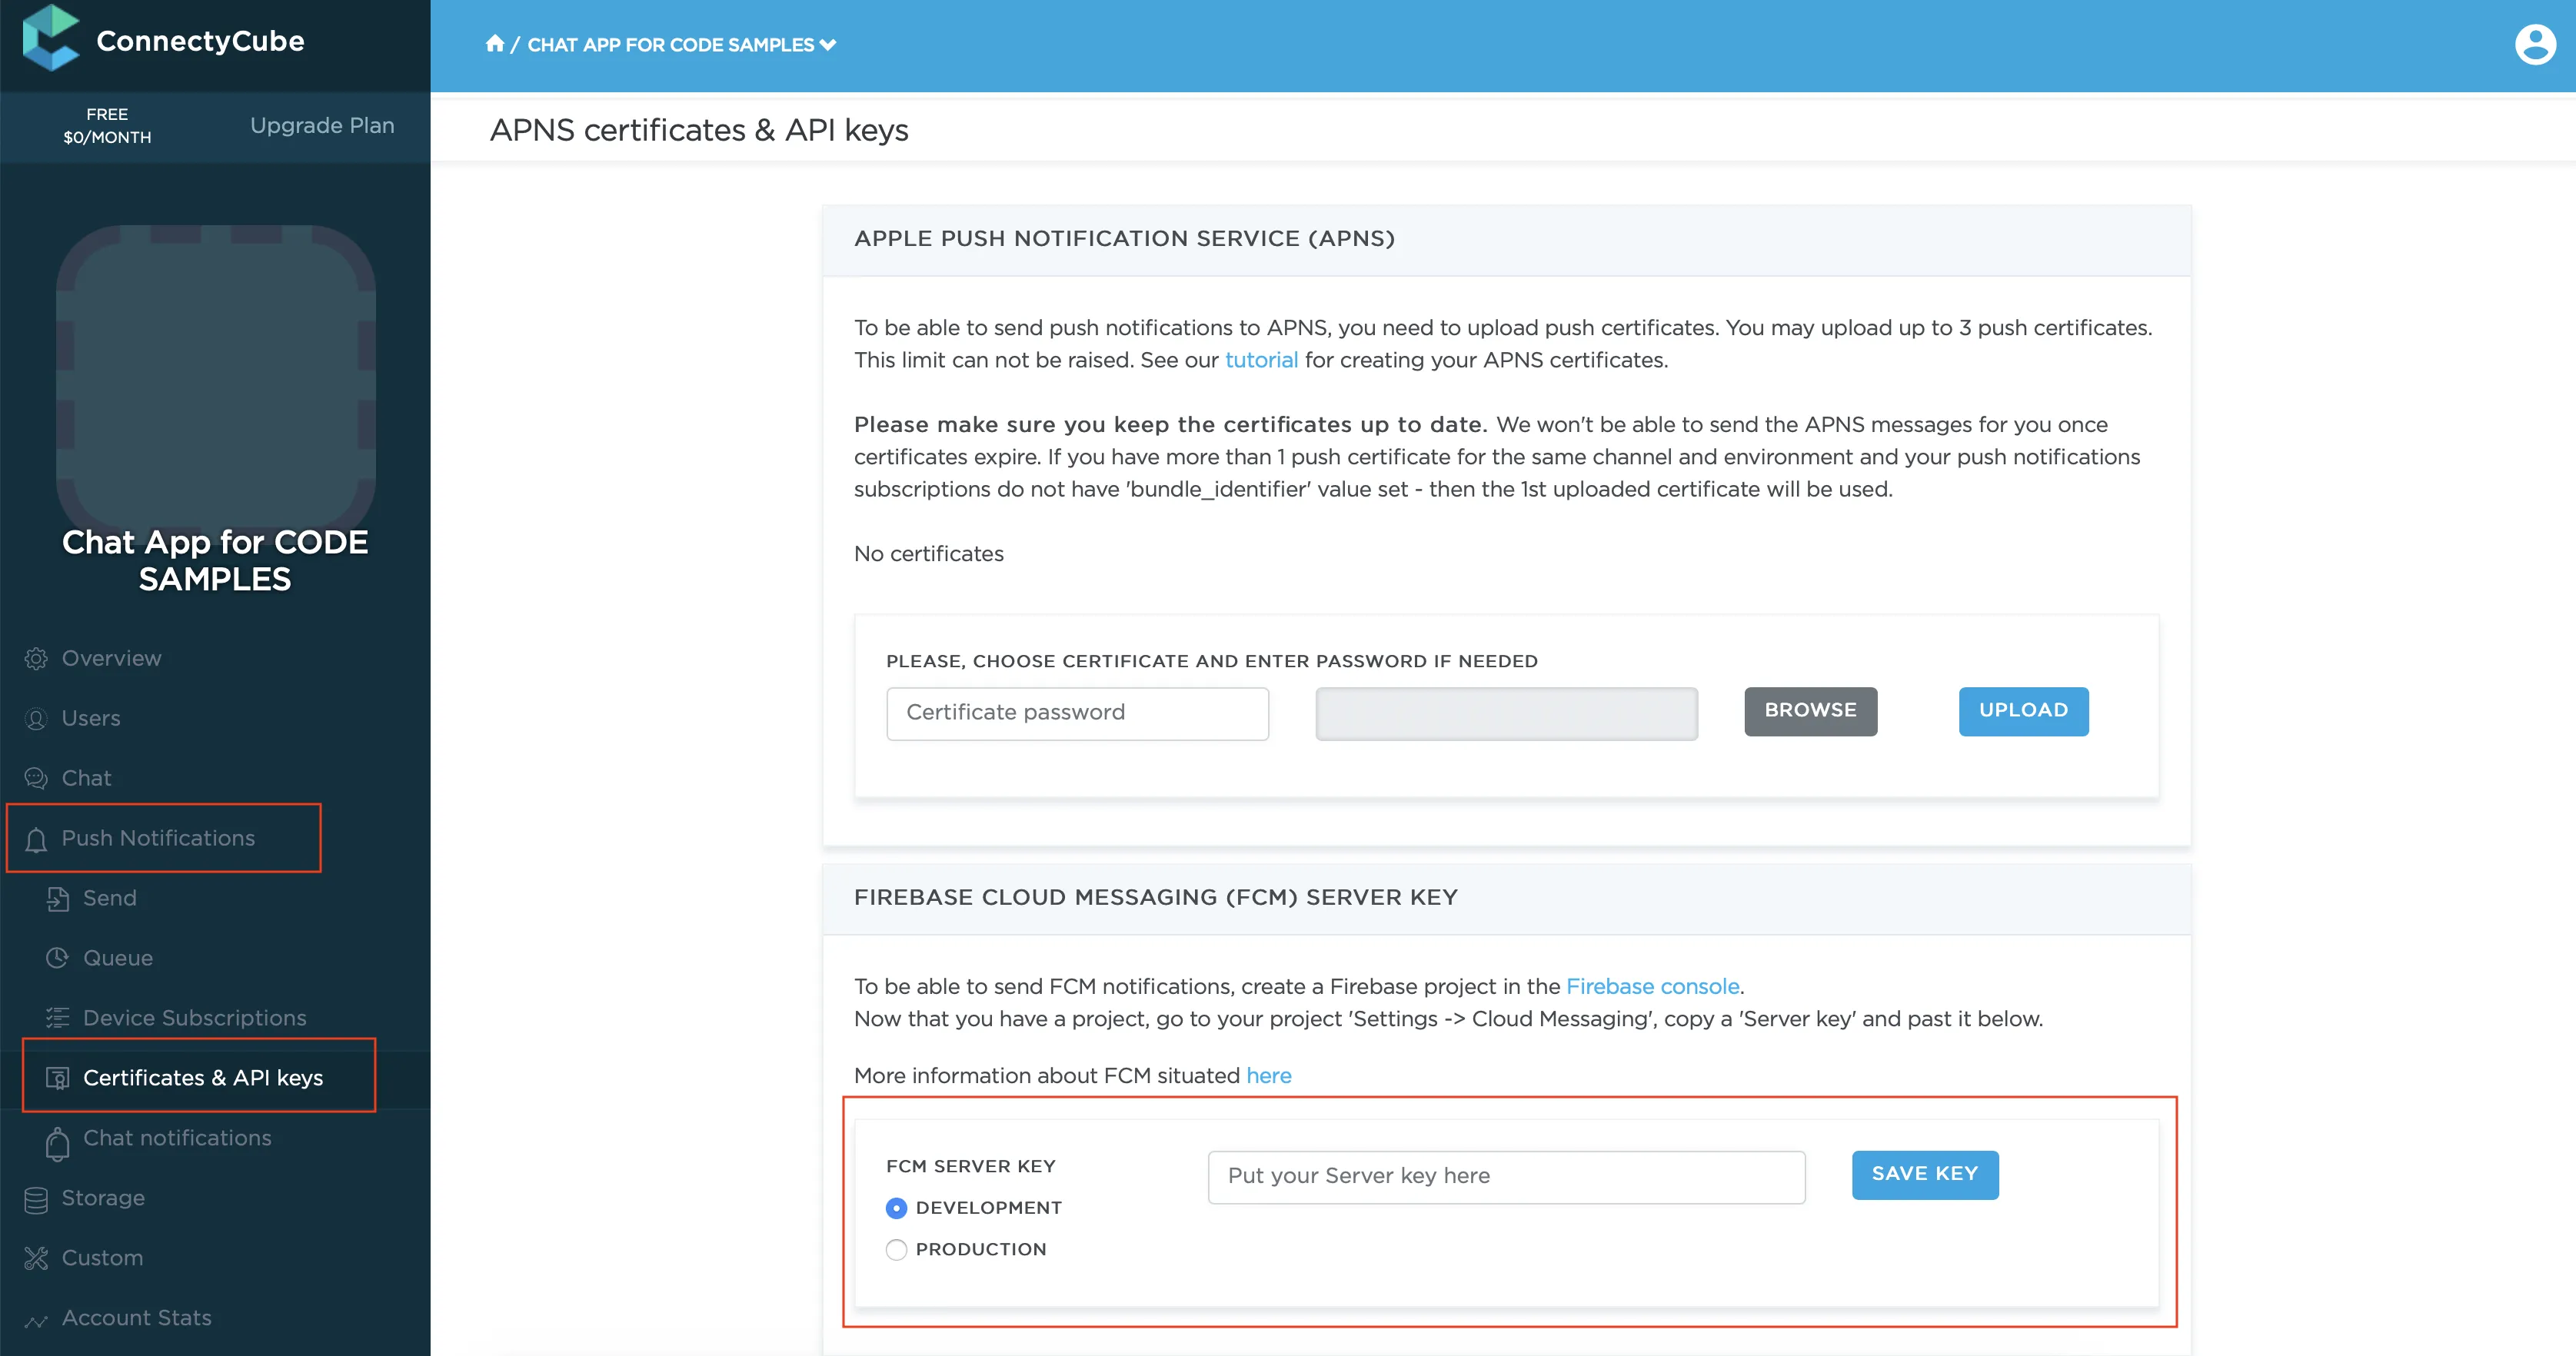
Copy your FCM server key to your Dashboard > Your App > Push Notifications > Credentials, select the environment for which you are adding the key and hit Save key. Use the same key for development and production zones.
-
Copy Sender ID value from your Firebase console Cloud Messaging section. You may require it later.
-
In order to use push notifications on Android, you need to create
google-services.jsonfile and copy it into project’sandroid/appfolder. Also, you need to update theapplicationIdinandroid/app/build.gradleto the one which is specified ingoogle-services.json, so they must match. If you have no existing API project yet, the easiest way to go about in creating one is using this step-by-step installation process
Setup nativescript-plugin-firebase lib
Section titled “Setup nativescript-plugin-firebase lib”Next step is to setup the nativescript-plugin-firebase lib:
import { messaging, Message } from "nativescript-plugin-firebase/messaging";
messaging.registerForPushNotifications({  onPushTokenReceivedCallback: (token: string): void => {    console.log("Firebase plugin received a push token: " + token);  },
  onMessageReceivedCallback: (message: Message) => {    console.log("Push message received: " + message.title);  },
  // Whether you want this plugin to automatically display the notifications or just notify the callback. Currently used on iOS only. Default true.  showNotifications: true,
  // Whether you want this plugin to always handle the notifications when the app is in foreground. Currently used on iOS only. Default false.  showNotificationsWhenInForeground: true}).then(() => console.log("Registered for push"));
Subscribe to push notifications
Section titled “Subscribe to push notifications”In order to start receiving push notifications you need to subscribe your current device as follows:
import ConnectyCube from "react-native-connectycube";
...
onPushTokenReceivedCallback: (token: string): void => {  console.log("TOKEN:", token);
  this.subscribeToPushNotification(token);}
...
subscribeToPushNotification(deviceToken) {  const deviceUDID = "..."; // unique device identifier  const platform = "ios"; // "android"  const env = 'development'; // 'production'
  const params = {    // for iOS VoIP it should be 'apns_voip'    notification_channel: platform === 'ios' ? 'apns' : 'gcm',    device: {      platform: platform,      udid: deviceUDID    },    push_token: {      environment: env,      client_identification_sequence: deviceToken,      bundle_identifier: "com.your.app.package.id"    }  }
  ConnectyCube.pushnotifications.subscriptions.create(params)    .then(result => {})    .catch(error => {});}
Send push notifications
Section titled “Send push notifications”You can manually initiate a push notification to user/users on any event in your application. To do so you need to form a push notification parameters (payload) and set the push recipients:
const payload = JSON.stringify({  message: "Alice is calling you",  ios_badge: 1,  // ios_voip: 1});
const env = 'development'; // 'production'
const pushParameters = {  notification_type: "push",  user: { ids: [21, 12] }, // recipients.  environment: env,  message: ConnectyCube.pushnotifications.base64Encode(payload),};
ConnectyCube.pushnotifications.events  .create(pushParameters)  .then((result) => {})  .catch((error) => {});
Please refer Universal Push Notifications standard parameters section on how to form the payload.
Unsubscribe from push notifications
Section titled “Unsubscribe from push notifications”In order to unsubscribe and stop receiving push notifications you need to list your current subscriptions and then choose those to be deleted:
const deviceUDID = "..."; // unique device identifierconst platform = "ios"; // "android"
const deleteSubscription = (subscriptions) => {  let subscriptionIdToDelete;
  subscriptions.forEach((sbs) => {    if (sbs.subscription.device.platform === platform && sbs.subscription.device.udid === deviceUDID) {      subscriptionIdToDelete = sbs.subscription.id;    }  });
  if (subscriptionIdToDelete) {    ConnectyCube.pushnotifications.subscriptions.delete(subscriptionIdToDelete);  }};
ConnectyCube.pushnotifications.subscriptions  .list()  .then(deleteSubscription)  .catch((error) => {});
CallKit and VoIP push notifications
Section titled “CallKit and VoIP push notifications”In a case you need to show a native calling interface on incoming call - you need to integrate a CallKit functionality via NativeScript Call plugin.
For iOS, this will also require to integrate VoIP push notifications along with CallKit.
ConnectyCube supports iOS VoIP push notifications via same API described above:
- for VoIP pushes it requires to generate a separated VoIP device token.
- then when token is retrieved, you need to subscribe to voip pushes by passing a
notification_channel: apns_voipchannel in a subscription request - then when you want to send a voip push notification, use
ios_voip: 1parameter in a push payload in a create event request.