How to Setup Firebase
You might need to use Firebase for the following reasons:
- Firebase authentication of users in your app via phone number.
- Firebase Cloud Messaging (FCM) push notifications (former GCM).
It might look a bit scary at first. But don’t panic and let’s check how to do this right step by step.
Firebase account and project registration
Section titled “Firebase account and project registration”Follow these steps to register your Firebase account and create a Firebase project:
-
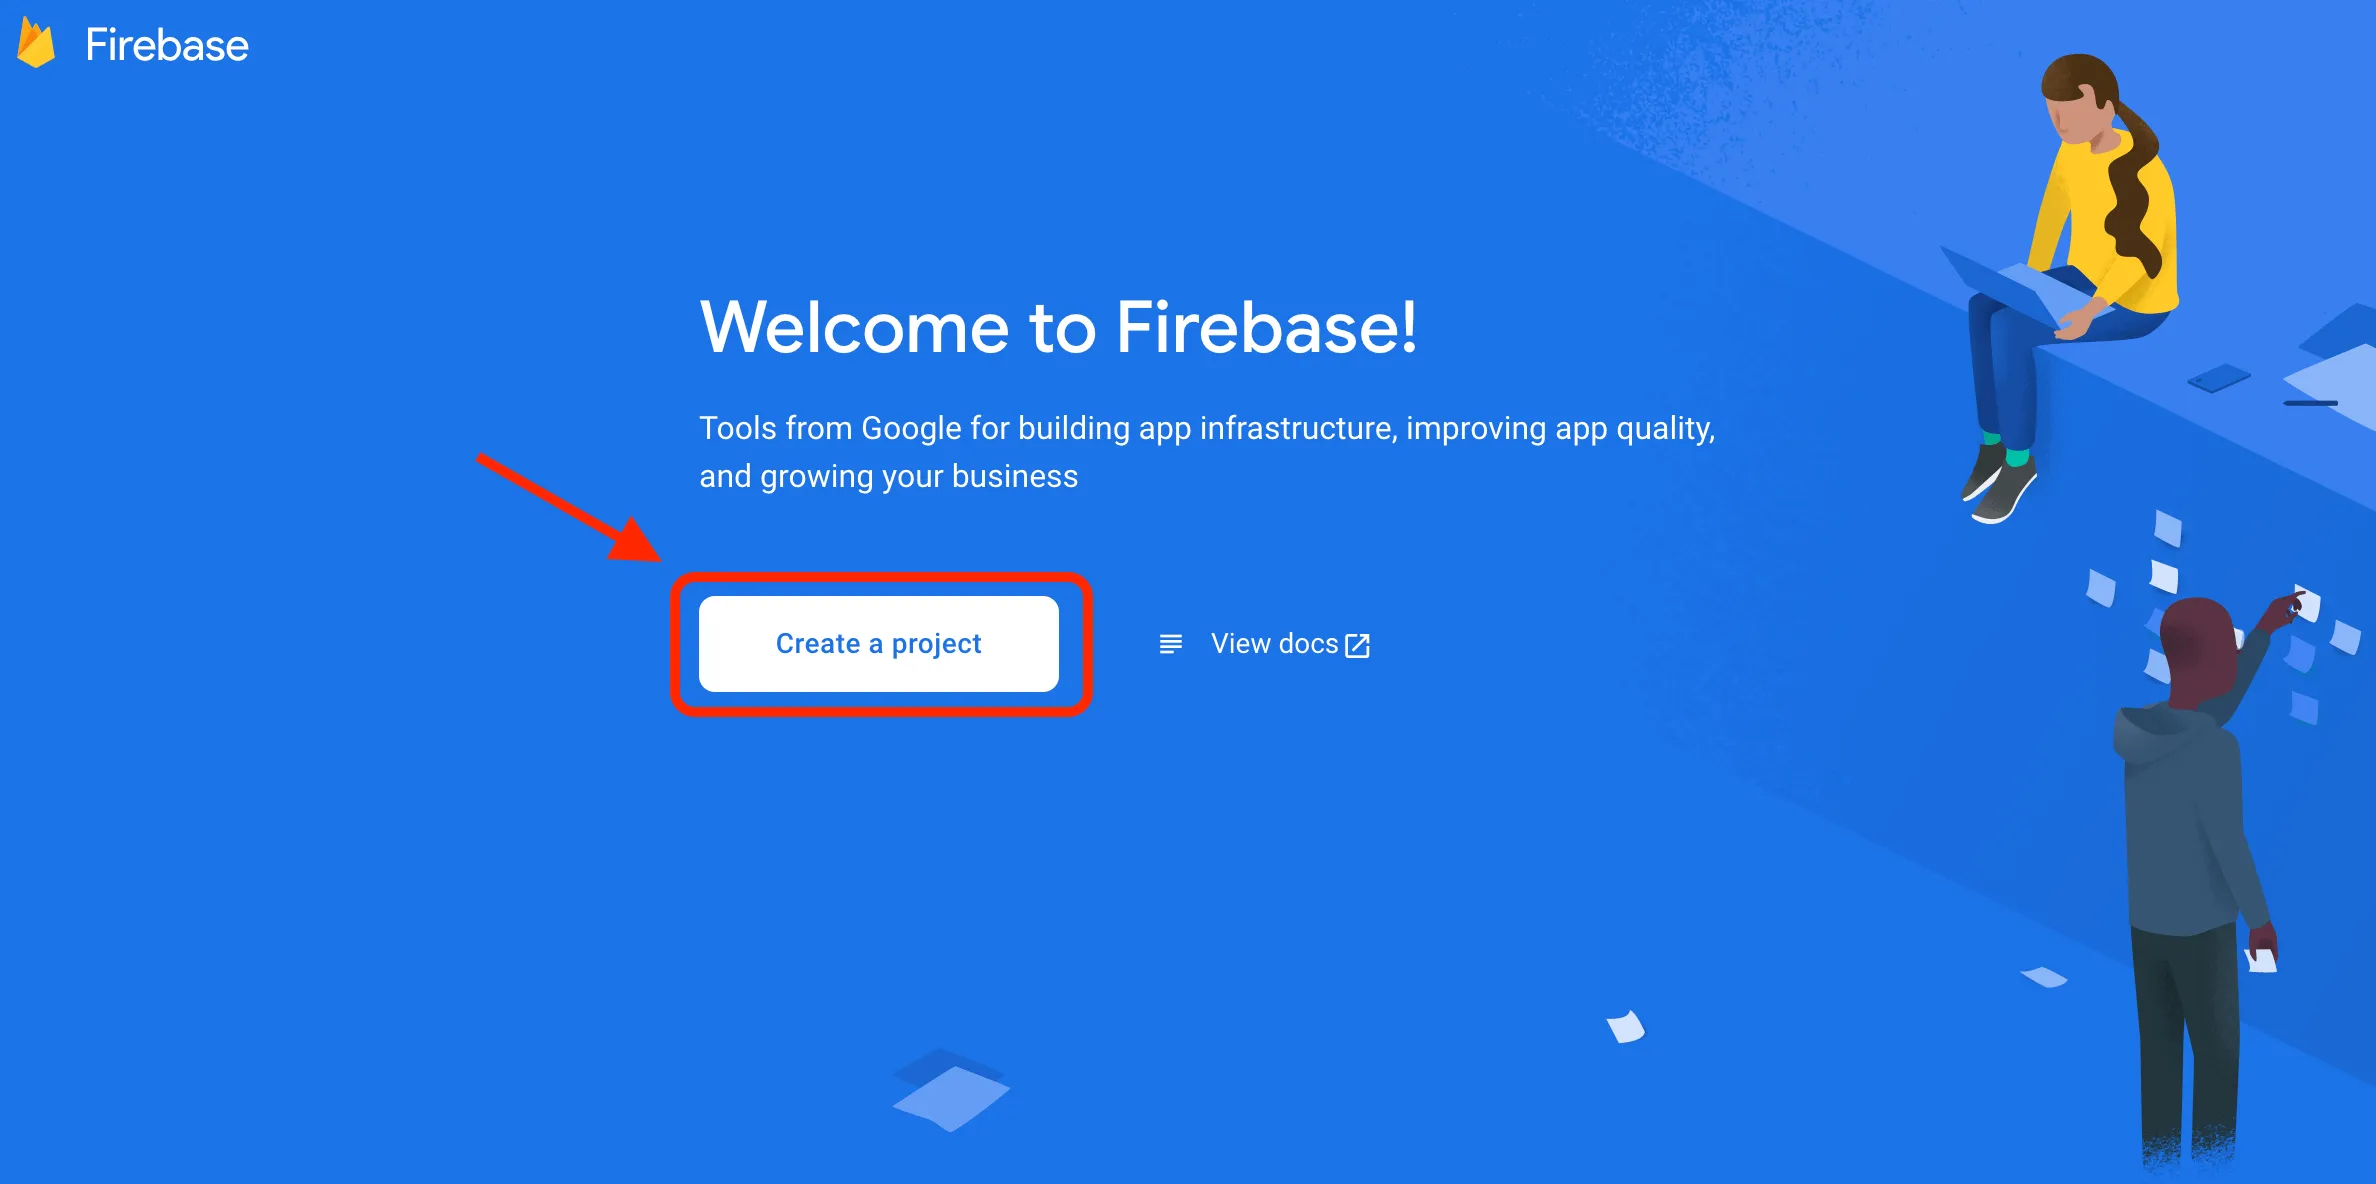
Register a Firebase account at Firebase console . You can use your Google account to authenticate at Firebase.
-
Click Create project
Note
If you have a Google project registered for your mobile app, select it from the Project name dropdown menu.
You can also edit your Project ID if you need. A unique ID is assigned automatically to each project. This ID is used in publicly visible Firebase features. For example, it will be used in database URLs and in your Firebase Hosting subdomain. If you need to use a specific subdomain, you can change it.
-
Fill in the fields required (Project name, Project ID, etc.) and click Continue.


-
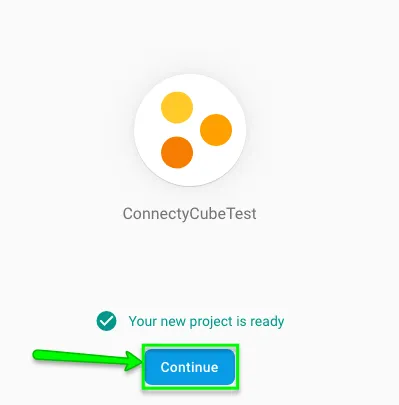
Configure Google Analytics for your project and click Create project.

Then click Continue.
-
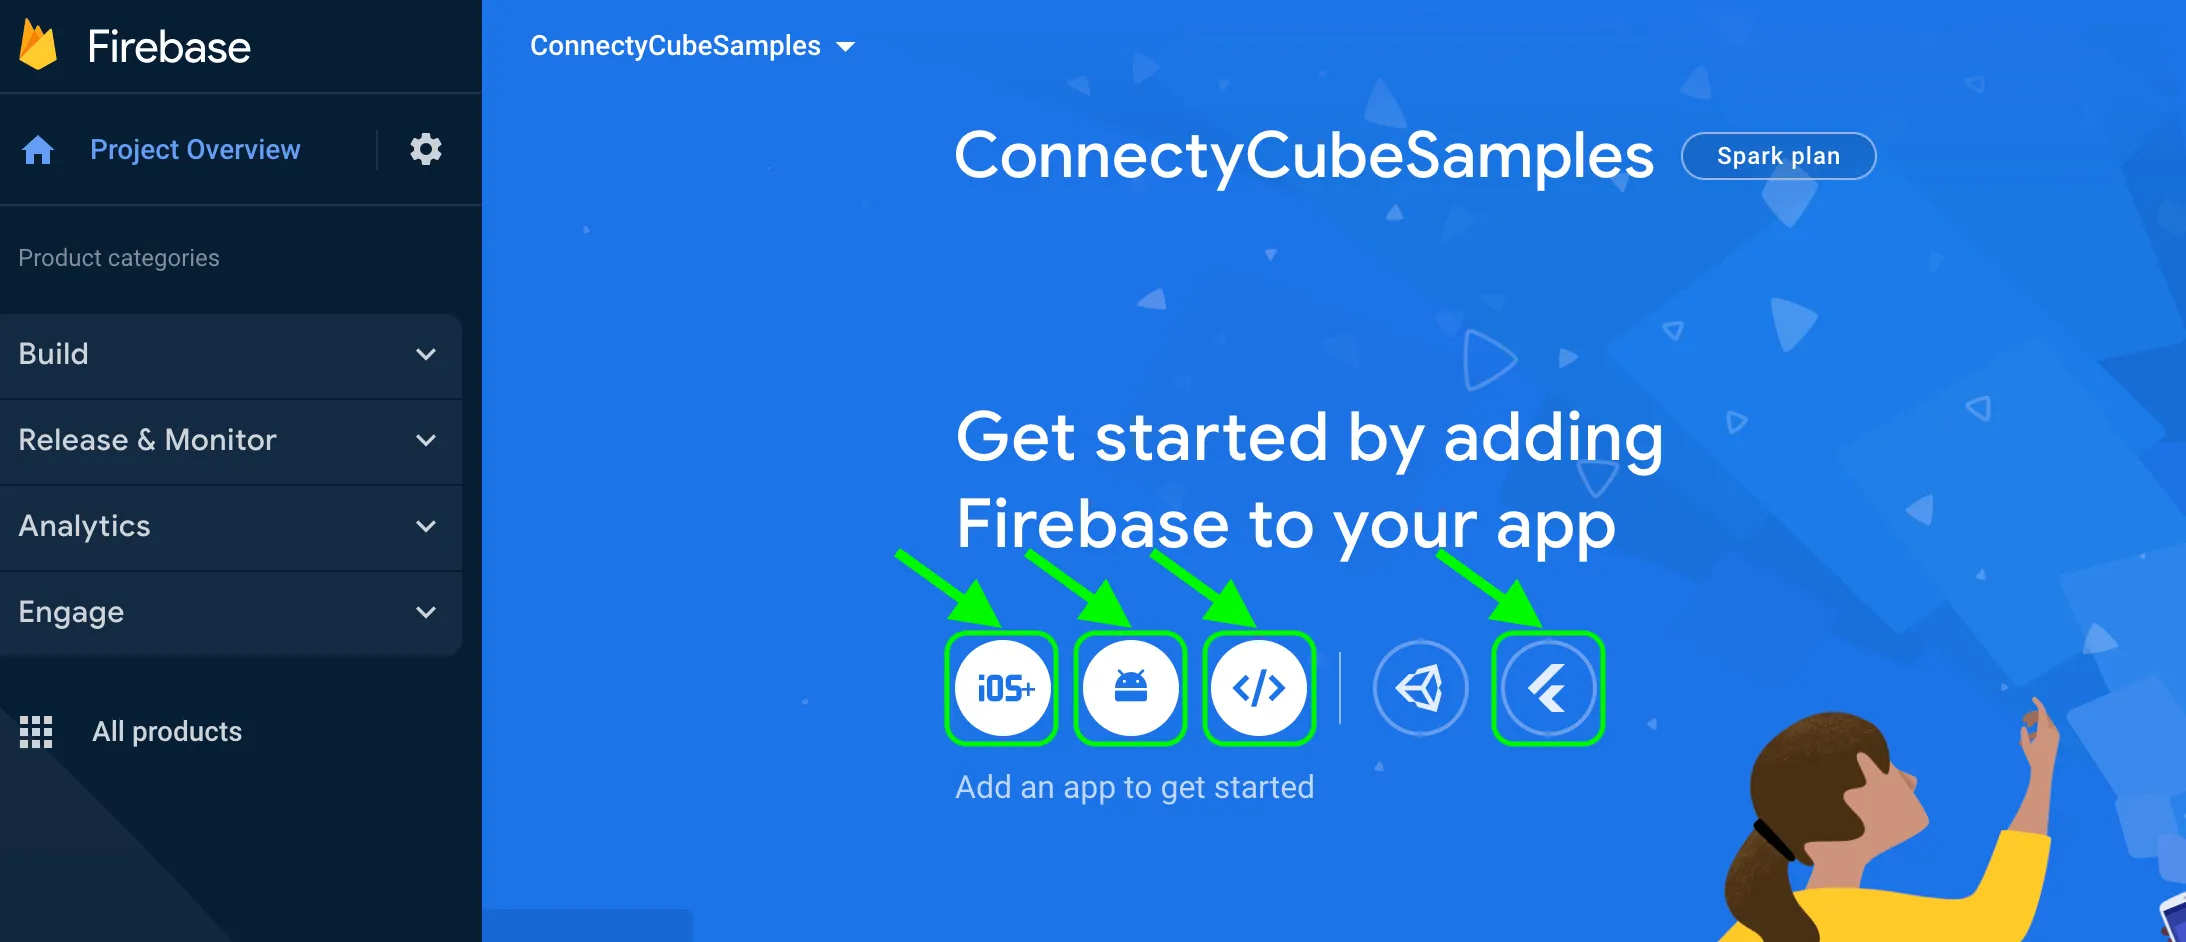
Select platform for which you need Firebase
-
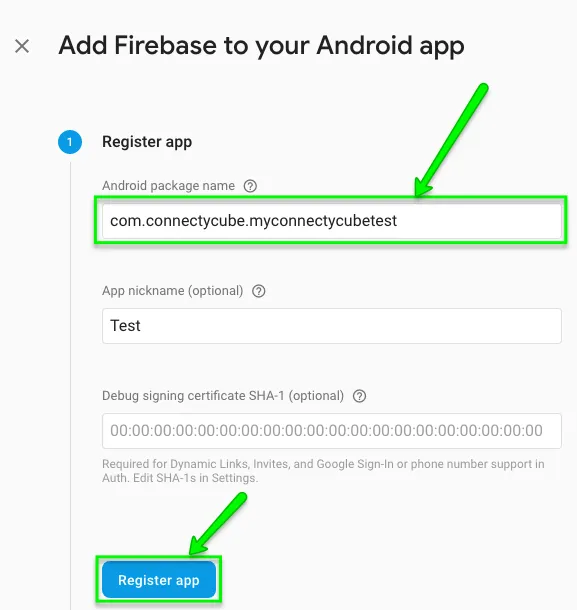
Fill in the fields on Add Firebase to your Android App screen and click Register App
Connect Firebase SDK
Section titled “Connect Firebase SDK”For Android projects Firebase has the following requirements to be added successfully:
- Android OS 4.0 or newer
- Google Play Services 15.0.0 or higher
- The latest version of Android Studio
Here is a step by step guide how to connect Firebase SDK to your Android Project:
-
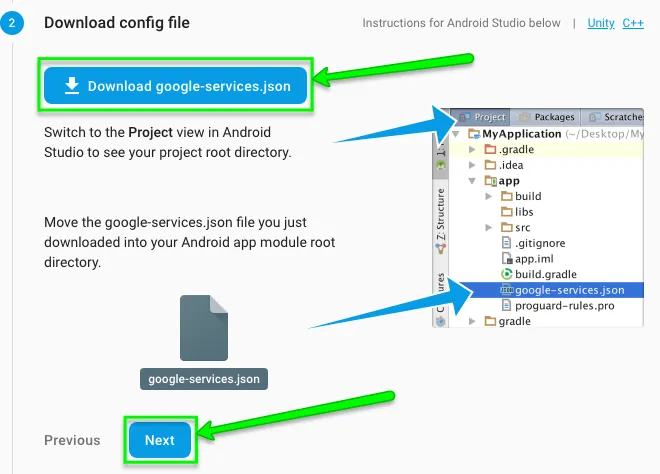
Download Google-Services.json config file
-
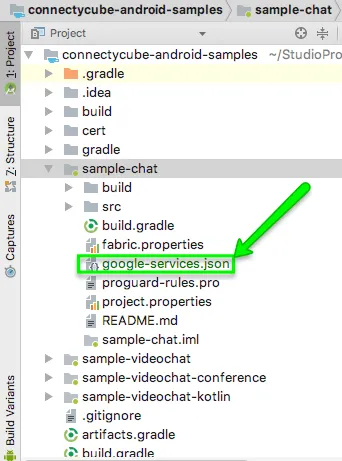
Open Project view in Android Studio and upload Google-Services.json file you have just downloaded into the root directory of your Android app module.
-
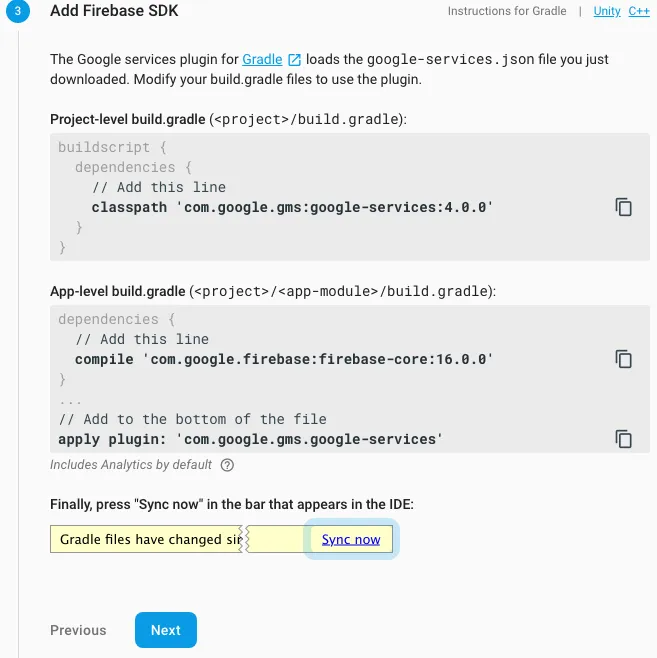
Add Firebase SDK according to the instructions in your Firebase console
-
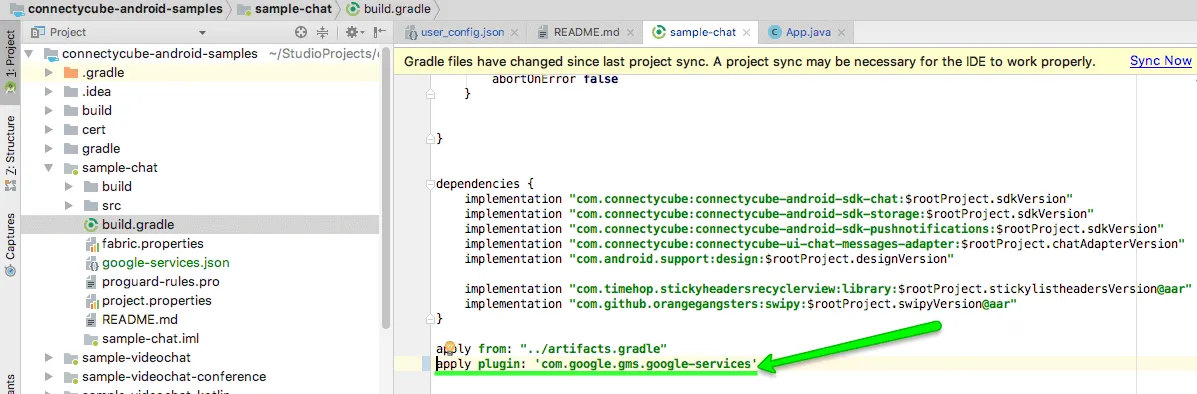
Add Google services plugin to your project build.gradle file

-
Add Google services plugin in the bottom of your module build.gradle file.
-
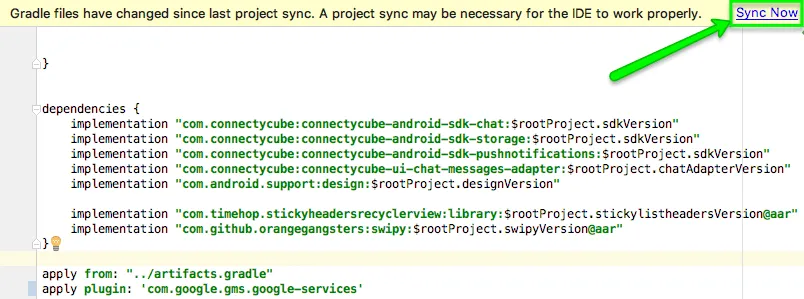
Click Sync Now at the pop-up in your Android Studio
You are done now.
Firebase authentication
Section titled “Firebase authentication”This option allows users in your app authenticate themselves via phone number. If you use this method for user authentication, the user receives an SMS with verification code and authenticates via that code in your app.
You need to follow these steps to add Firebase authentication to your Android project:
-
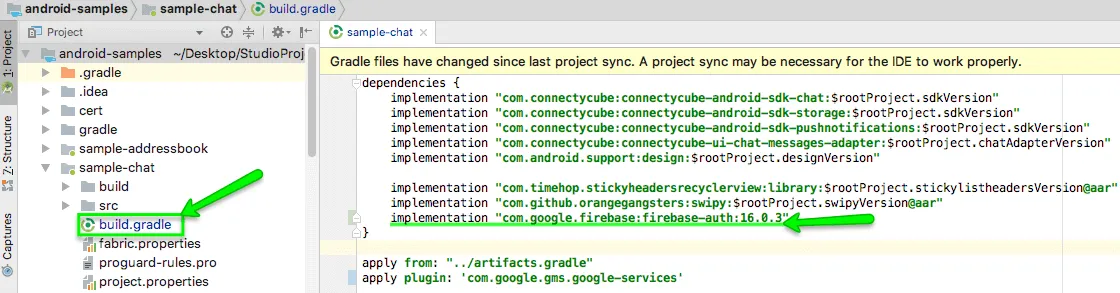
Add Firebase authentication dependency to your Module build.gradle file:
-
Sync your project as prompted by Android Studio:

-
Find your app’s SHA-1 hash - check Authenticating Your Client guide.
-
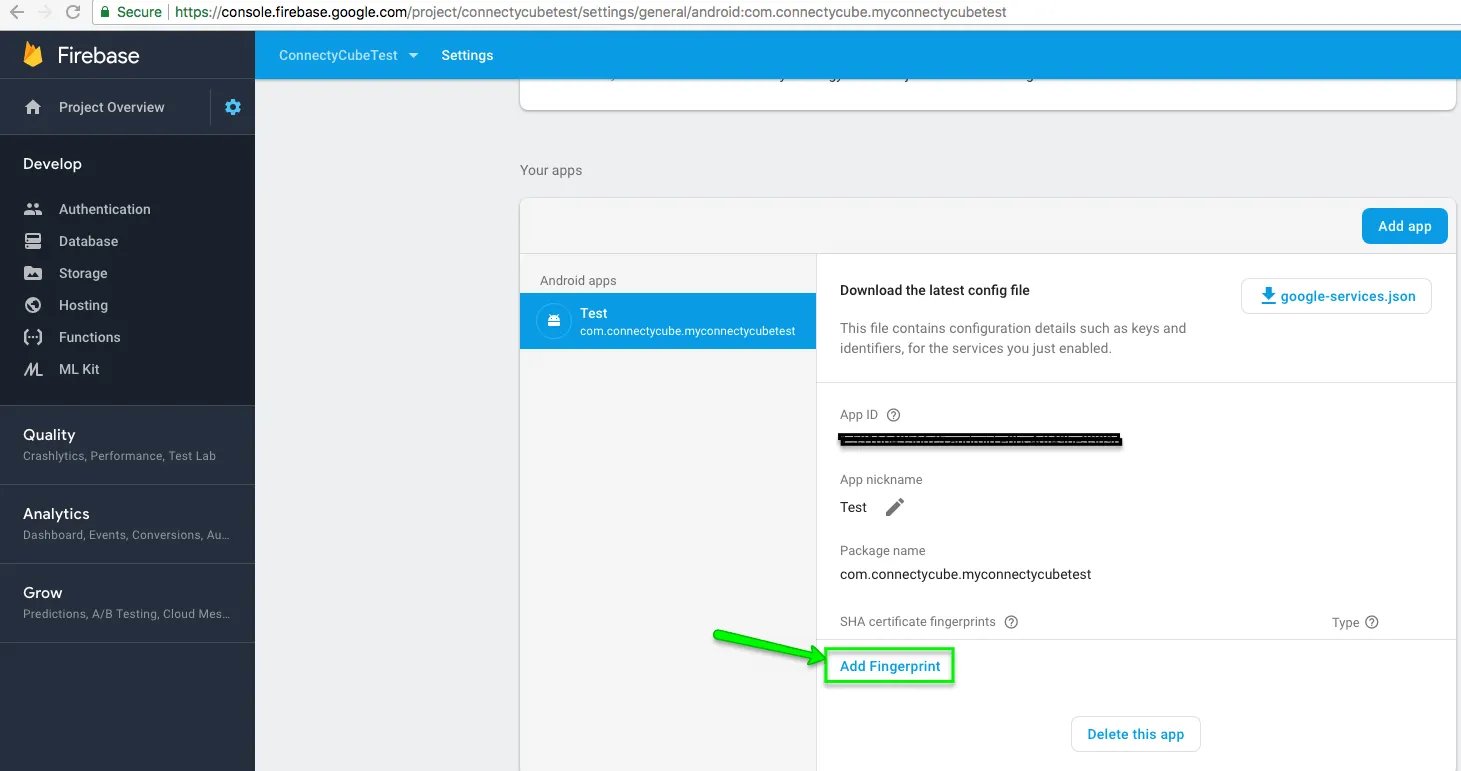
Add your app’s SHA-1 hash in your Firebase console >> Project settings tab:
And then:

-
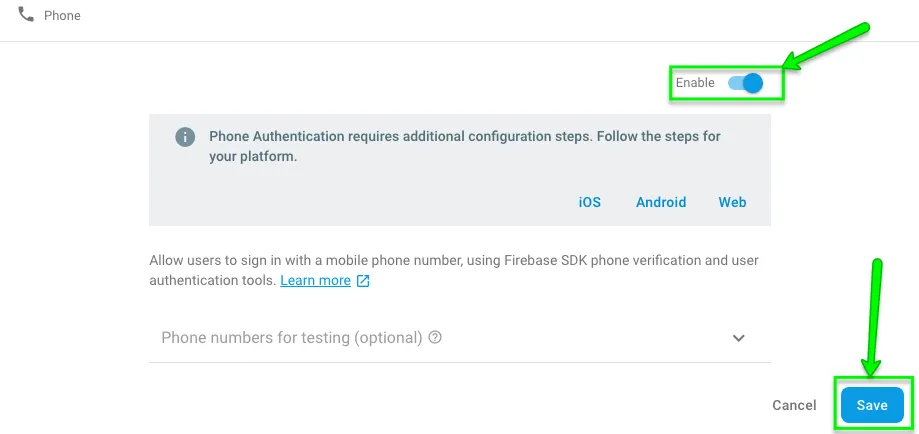
Go to Firebase console >> Authentication >> Sign-in method section:
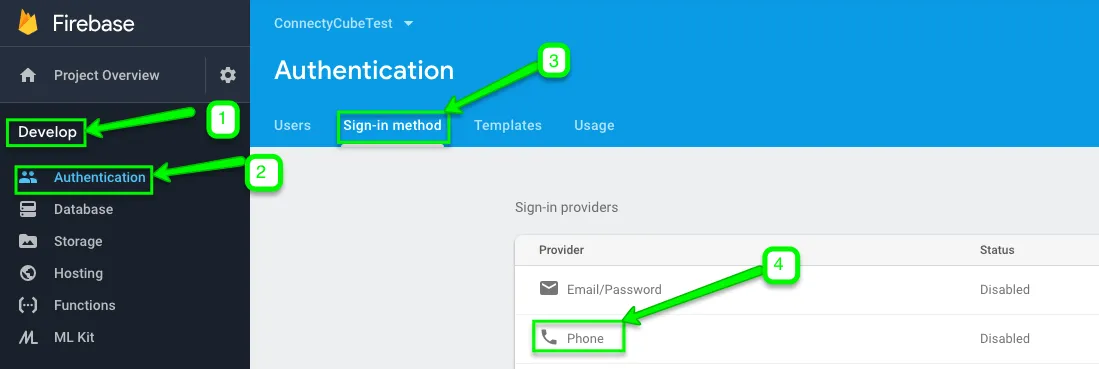
-
Enable Phone number sign-in method:
-
Add
PhoneAuthProvider.verifyPhoneNumbermethod to request that Firebase verify the user’s phone number:
PhoneAuthProvider.getInstance().verifyPhoneNumber( phoneNumber, // Phone number to verify 60, // Timeout duration TimeUnit.SECONDS, // Unit of timeout this, // Activity (for callback binding) mCallbacks); // OnVerificationStateChangedCallbacksPhoneAuthProvider.getInstance().verifyPhoneNumber( phoneNumber, // Phone number to verify 60, // Timeout duration TimeUnit.SECONDS, // Unit of timeout this, // Activity (for callback binding) mCallbacks) // OnVerificationStateChangedCallbacksNote
verifyPhoneNumbermethod is reentrant: if you call it multiple times, such as in an activity’sonStartmethod,verifyPhoneNumbermethod will not send a second SMS unless the original request has timed out.
Note
As a best practice please do not forget to inform your users that if they use phone sign-in, they might receive an SMS message for verification and standard rates apply.
-
(Optional) To resume the phone number sign in process if your app closes before the user can sign in (if the user checks SMS app, for instance), after
verifyPhoneNumbermethod is called, set a flag that indicates verification is in progress. Then, save the flag in your Activity’sonSaveInstanceStatemethod and restore the flag inonRestoreInstanceState. In your Activity’sonStartmethod, check if verification is already in progress, and if it is not, callverifyPhoneNumberagain. Be sure to clear the flag when verification completes or fails. Check this guide for more details. -
setLanguageCodemethod on your Auth instance allows specifying the auth language and therefore localize SMS message sent by Firebase:
auth.setLanguageCode("fr");// To apply the default app language instead of explicitly setting it.// auth.useAppLanguage();auth.setLanguageCode("fr")// To apply the default app language instead of explicitly setting it.// auth.useAppLanguage();- When you call
PhoneAuthProvider.verifyPhoneNumbermethod, you must also provide an instance ofOnVerificationStateChangedCallbacks, which contains implementations of the callback functions that handle the results of the request:
mCallbacks = new PhoneAuthProvider.OnVerificationStateChangedCallbacks() {
    @Override    public void onVerificationCompleted(PhoneAuthCredential credential) {        // This callback will be invoked in two situations:        // 1 - Instant verification. In some cases the phone number can be instantly        //     verified without needing to send or enter a verification code.        // 2 - Auto-retrieval. On some devices Google Play services can automatically        //     detect the incoming verification SMS and perform verification without        //     user action.        Log.d(TAG, "onVerificationCompleted:" + credential);
        signInWithPhoneAuthCredential(credential);    }
    @Override    public void onVerificationFailed(FirebaseException e) {        // This callback is invoked in an invalid request for verification is made,        // for instance if the the phone number format is not valid.        Log.w(TAG, "onVerificationFailed", e);
        if (e instanceof FirebaseAuthInvalidCredentialsException) {            // Invalid request            // ...        } else if (e instanceof FirebaseTooManyRequestsException) {            // The SMS quota for the project has been exceeded            // ...        }
        // Show a message and update the UI        // ...    }
    @Override    public void onCodeSent(String verificationId,                           PhoneAuthProvider.ForceResendingToken token) {        // The SMS verification code has been sent to the provided phone number, we        // now need to ask the user to enter the code and then construct a credential        // by combining the code with a verification ID.        Log.d(TAG, "onCodeSent:" + verificationId);
        // Save verification ID and resending token so we can use them later        mVerificationId = verificationId;        mResendToken = token;
        // ...    }};
mCallbacks = object : OnVerificationStateChangedCallbacks() { override fun onVerificationCompleted(credential: PhoneAuthCredential) { // This callback will be invoked in two situations: // 1 - Instant verification. In some cases the phone number can be instantly // verified without needing to send or enter a verification code. // 2 - Auto-retrieval. On some devices Google Play services can automatically // detect the incoming verification SMS and perform verification without // user action. Log.d(TAG, "onVerificationCompleted:$credential") signInWithPhoneAuthCredential(credential) }
override fun onVerificationFailed(e: FirebaseException) { // This callback is invoked in an invalid request for verification is made, // for instance if the the phone number format is not valid. Log.w(TAG, "onVerificationFailed", e) if (e is FirebaseAuthInvalidCredentialsException) { // Invalid request // ... } else if (e is FirebaseTooManyRequestsException) { // The SMS quota for the project has been exceeded // ... } // Show a message and update the UI // ... }
override fun onCodeSent(verificationId: String, token: ForceResendingToken ) { // The SMS verification code has been sent to the provided phone number, we // now need to ask the user to enter the code and then construct a credential // by combining the code with a verification ID. Log.d(TAG, "onCodeSent:$verificationId") // Save verification ID and resending token so we can use them later mVerificationId = verificationId mResendToken = token // ... }}- Create a
PhoneAuthCredentialobject using the verification code and the verification ID that was passed toonCodeSentcallback. You get aPhoneAuthCredentialobject whenonVerificationCompletedis called. To createPhoneAuthCredentialobject, callPhoneAuthProvider.getCredential:
PhoneAuthCredential credential = PhoneAuthProvider.getCredential(verificationId, code);val credential = PhoneAuthProvider.getCredential(verificationId, code)- Complete the sign-in flow by passing the
PhoneAuthCredentialobject toFirebaseAuth.signInWithCredential:
private void signInWithPhoneAuthCredential(PhoneAuthCredential credential) {   mAuth.signInWithCredential(credential)            .addOnCompleteListener(this, new OnCompleteListener<AuthResult>() {                @Override                public void onComplete(@NonNull Task<AuthResult> task) {                    if (task.isSuccessful()) {                        // Sign in success, update UI with the signed-in user's information                        Log.d(TAG, "signInWithCredential:success");
                        FirebaseUser user = task.getResult().getUser();                        // ...                    } else {                        // Sign in failed, display a message and update the UI                        Log.w(TAG, "signInWithCredential:failure", task.getException());                        if (task.getException() instanceof FirebaseAuthInvalidCredentialsException) {                            // The verification code entered was invalid                        }                    }                }            });}
private fun signInWithPhoneAuthCredential(credential: PhoneAuthCredential) { mAuth.signInWithCredential(credential) .addOnCompleteListener(this) { task -> if (task.isSuccessful) { // Sign in success, update UI with the signed-in user's information Log.d(TAG, "signInWithCredential:success") val user = task.result?.user // ... } else { // Sign in failed, display a message and update the UI Log.w(TAG, "signInWithCredential:failure", task.exception) if (task.exception is FirebaseAuthInvalidCredentialsException) { // The verification code entered was invalid } } } }- Get Firebase
access_tokenafter SMS code verification as follows:
public Task<GetTokenResult> getIdToken (boolean forceRefresh)fun getIdToken(forceRefresh: Boolean): Task<GetTokenResult>Example of the method implementation:
FirebaseAuth.getInstance().getCurrentUser().getIdToken(forceRefresh);FirebaseAuth.getInstance().currentUser?.getIdToken(forceRefresh)- Add ConnectyCube user sign in to your project as follows:
- Get your Project ID from your Firebase console:

- Pass your Firebase
project_idand Firebaseaccess_tokenparameters tosignInUsingFirebasemethod:
//Coming soonString projectId = "...";String accessToken = "...";
ConnectycubeUsers.signInUsingFirebase(projectId, accessToken).performAsync(new EntityCallback<ConnectycubeUser>() {@Overridepublic void onSuccess(ConnectycubeUser user, Bundle args) {
}
@Override public void onError(ResponseException error) {
}
});val projectId = "..."val accessToken = "..."
ConnectycubeUsers.signInUsingFirebase(projectId, accessToken) .performAsync(object : EntityCallback<ConnectycubeUser> { override fun onSuccess(user: ConnectycubeUser, args: Bundle?) {
}
override fun onError(error: ResponseException) {
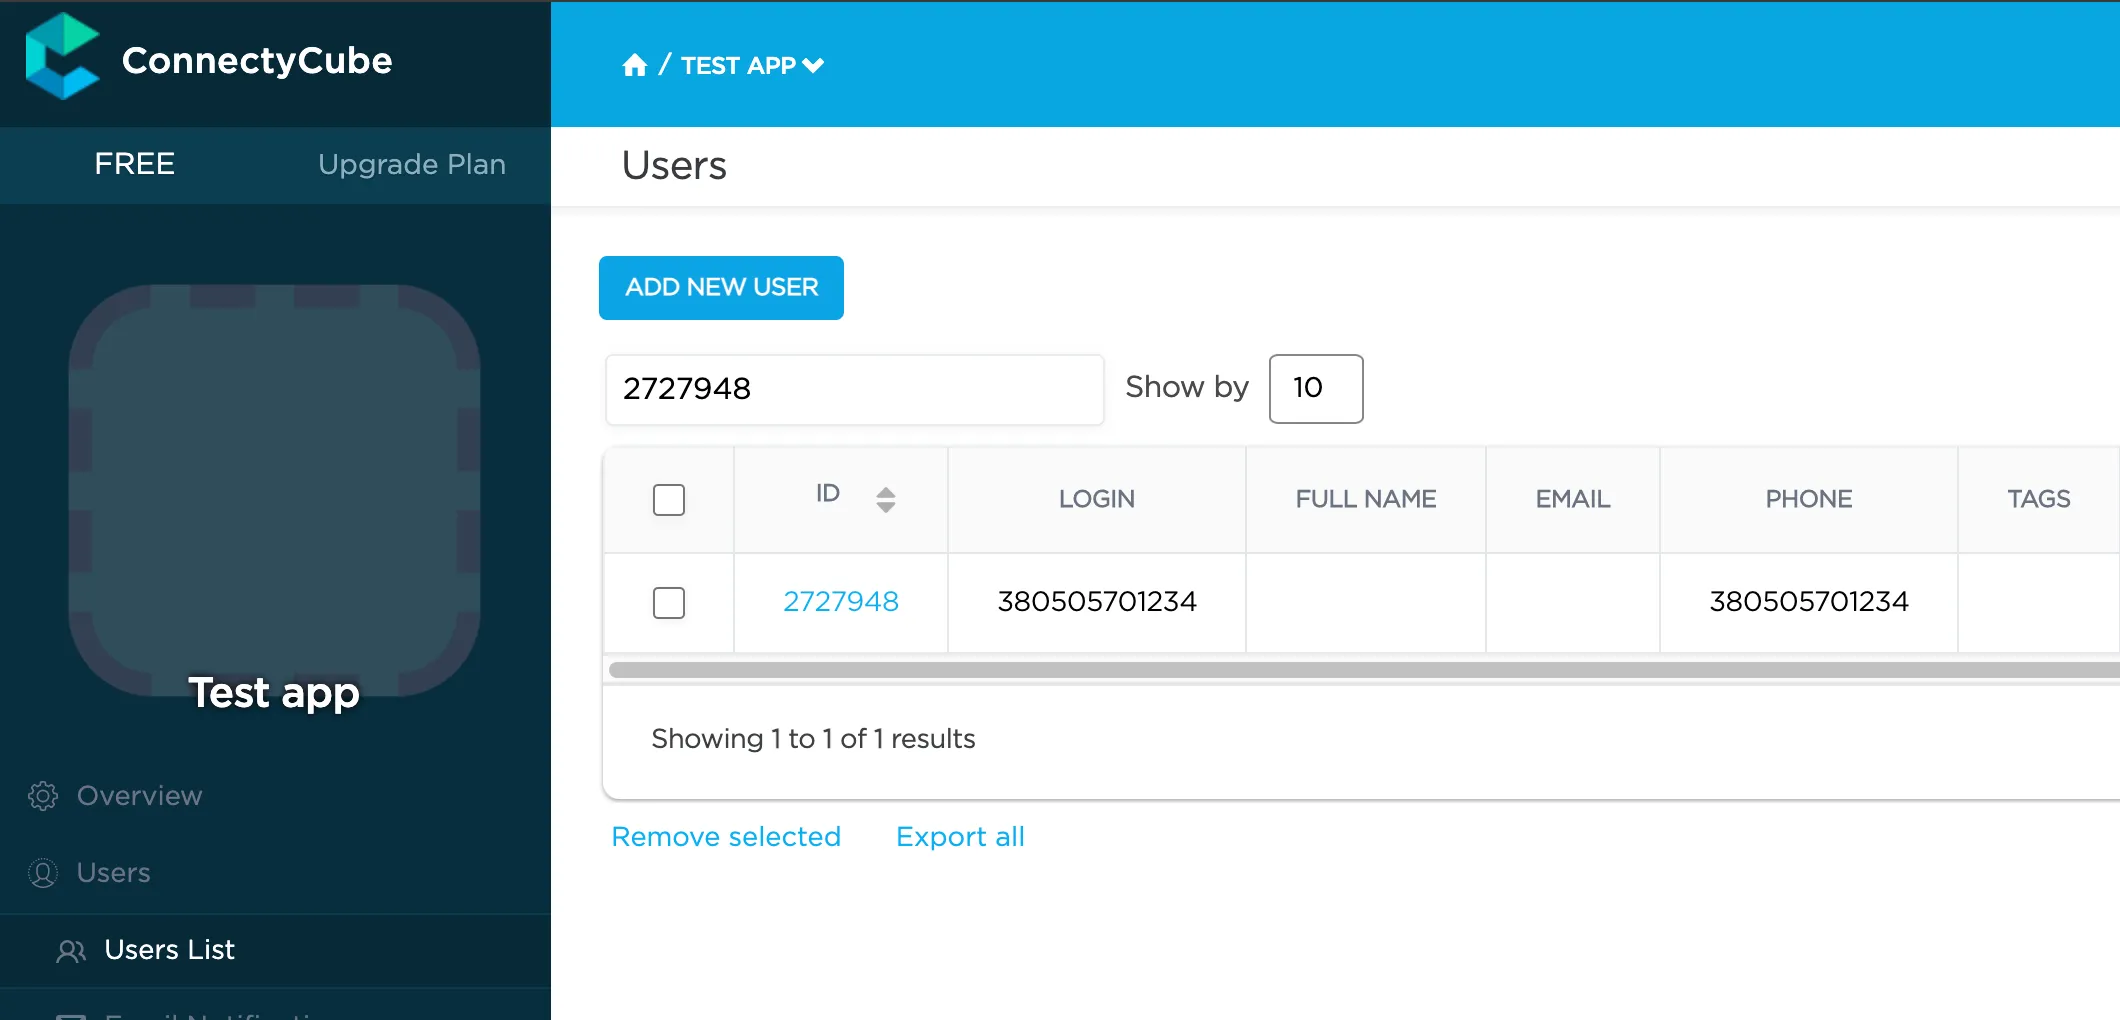
} })- Try running a test. Once your user is logged in successfully, you will find him/her in your Dashboard >> Your App >> Users section.
So now you know how to use Firebase features in your ConnectyCube apps. If you have any difficulties - please let us know via support channel