How to Setup Firebase
You might need to use Firebase for the following reasons:
- Firebase authentication of users in your app via phone number.
- Firebase Cloud Messaging (FCM) push notifications (former GCM).
It might look a bit scary at first. But don’t panic and let’s check how to do this right step by step.
Firebase account and project registration
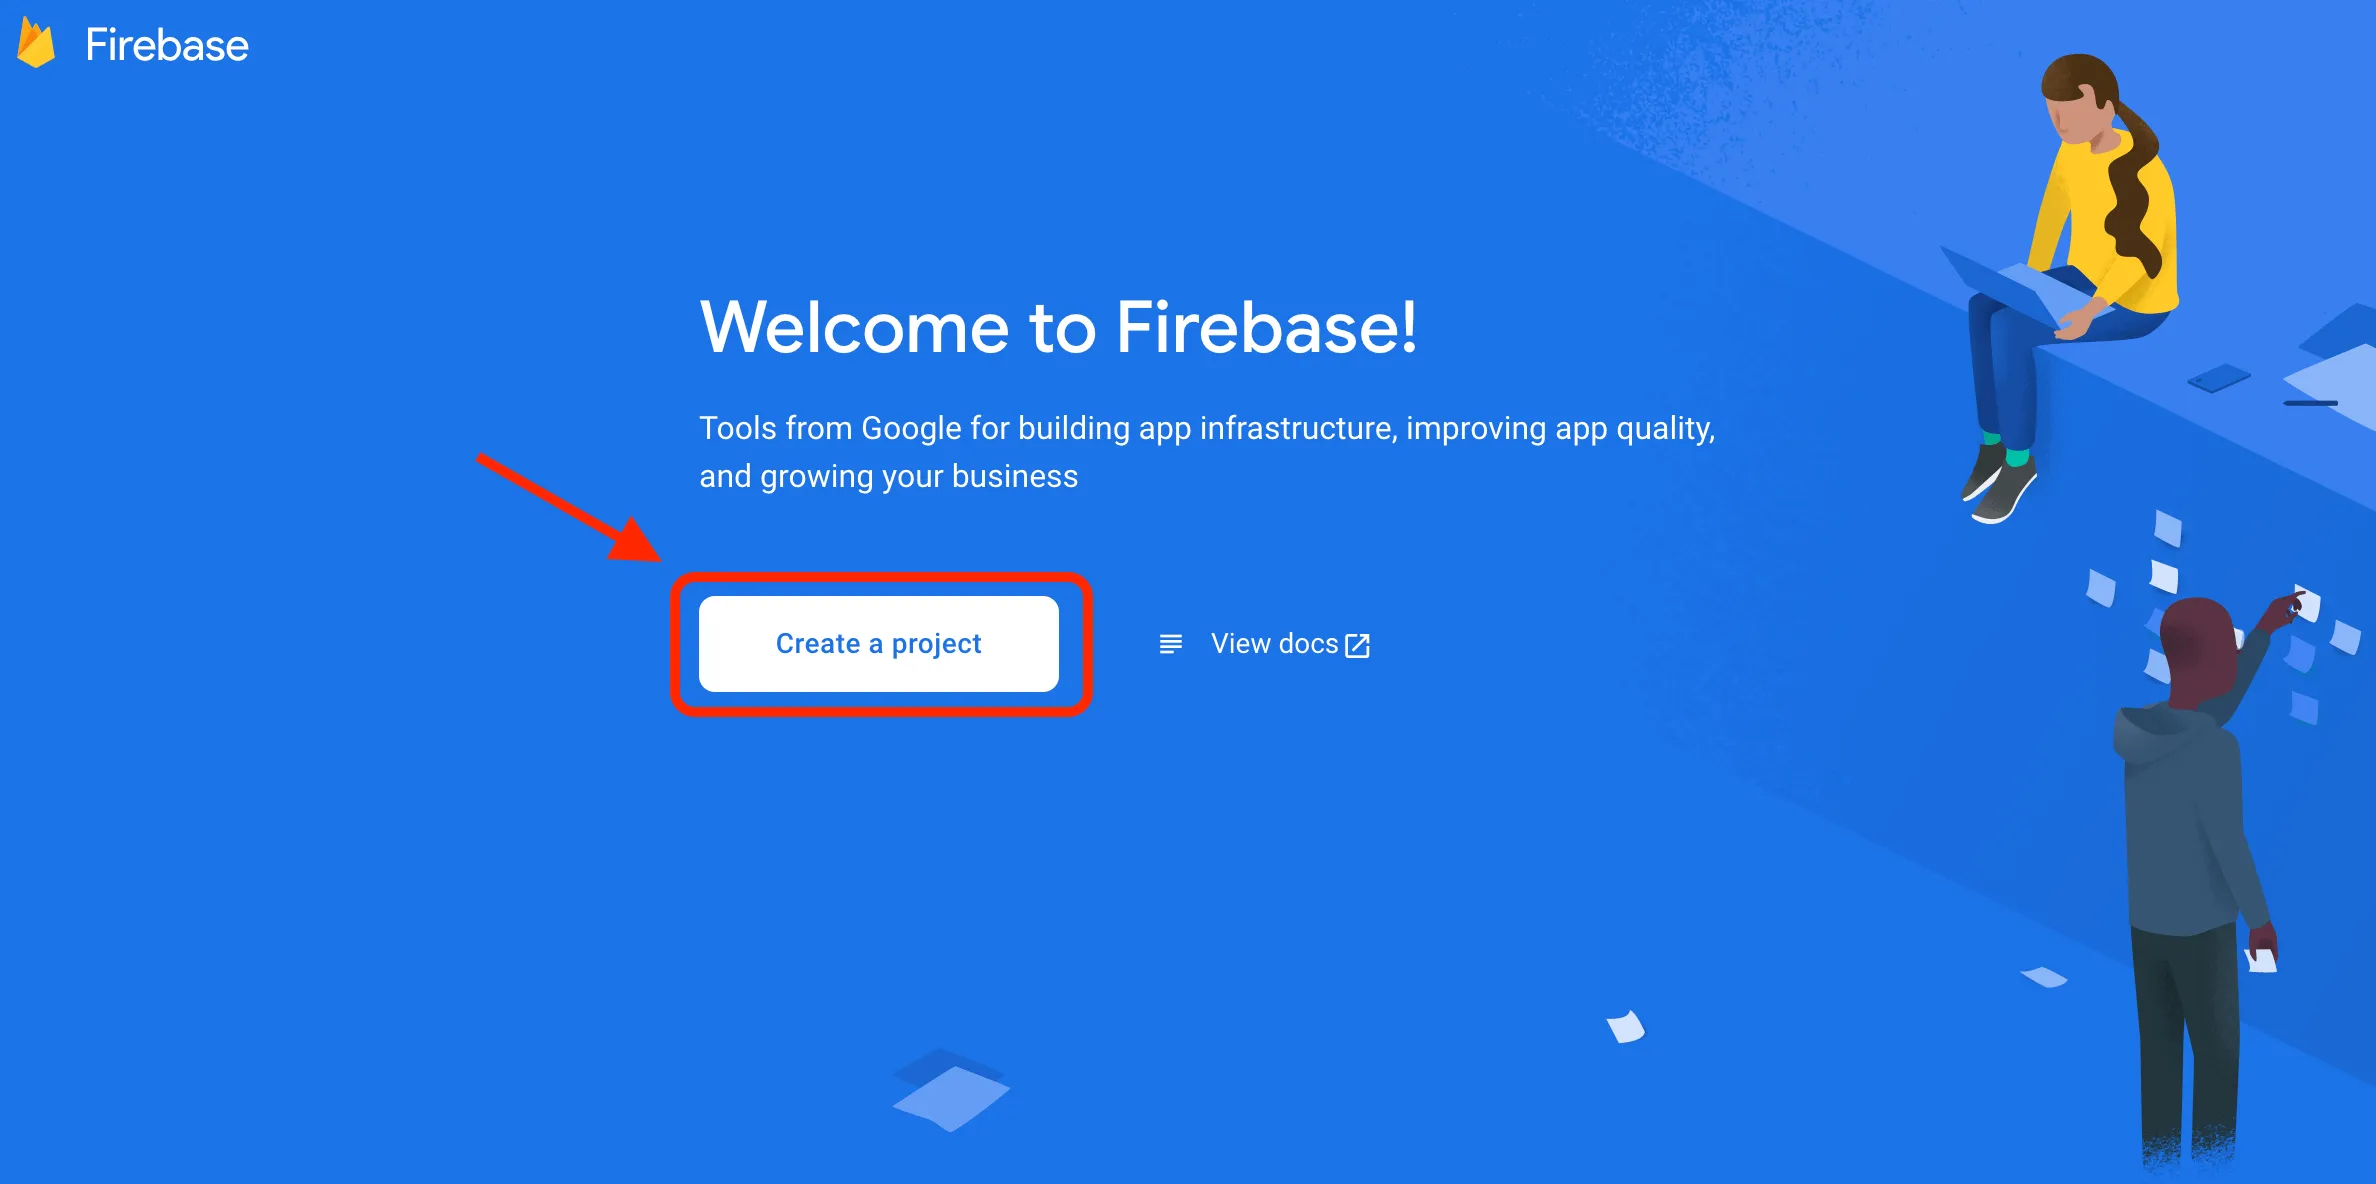
Section titled “Firebase account and project registration”Follow these steps to register your Firebase account and create a Firebase project:
-
Register a Firebase account at Firebase console . You can use your Google account to authenticate at Firebase.
-
Click Create a project
Note: If you have a Google project registered for your mobile app, select it from the ** Project name** dropdown menu.
You can also edit your Project ID if you need. A unique ID is assigned automatically to each project. This ID is used in publicly visible Firebase features. For example, it will be used in database URLs and in your Firebase Hosting subdomain. If you need to use a specific subdomain, you can change it.
-
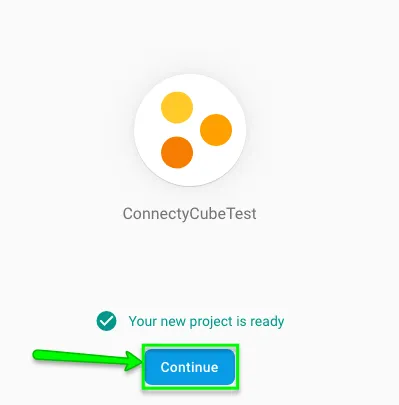
Fill in the fields required (Project name, Project ID, etc.) and click Continue.


-
Configure Google Analytics for your project and click Create project.

Then click Continue.
-
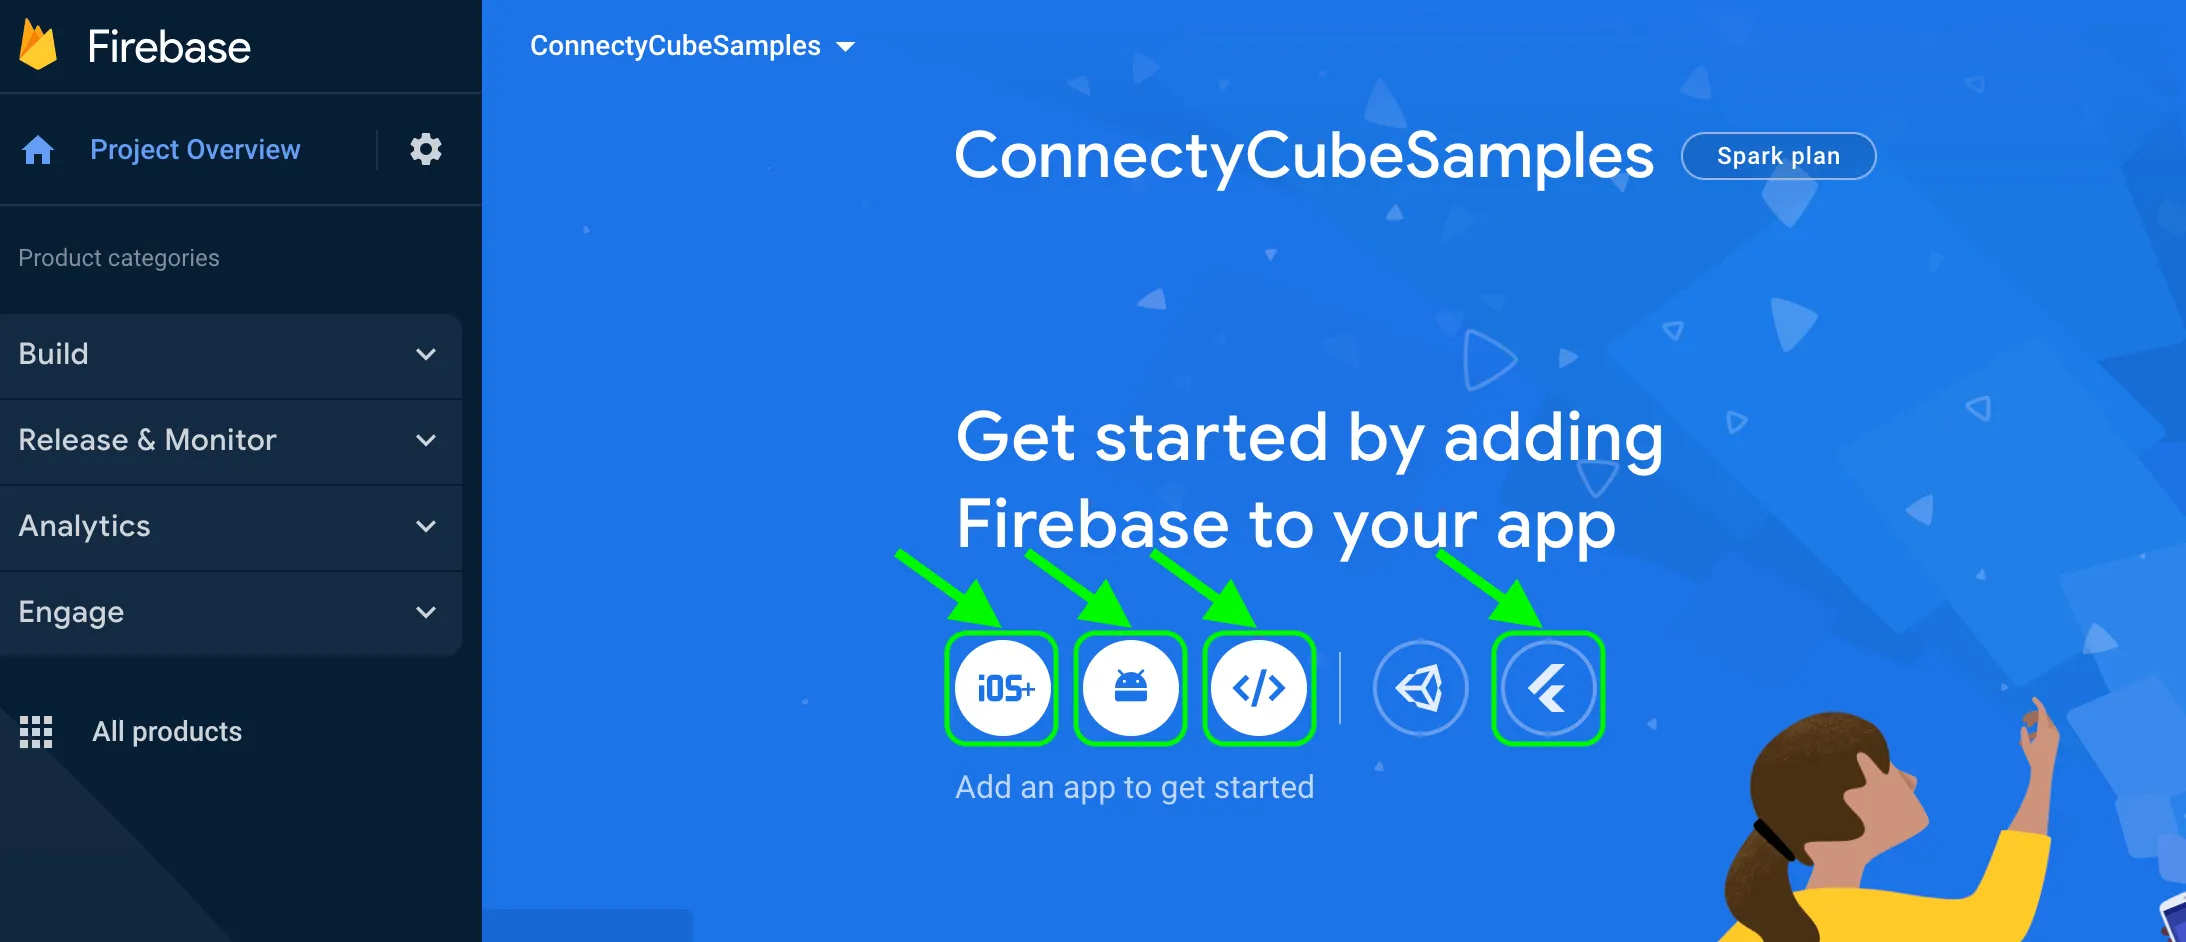
Select platform for which you need Firebase
Connect Firebase SDK
Section titled “Connect Firebase SDK”The Firebase team has developed the convenient tool for integration the Firebase features to your Flutter project. For using this tool just do few steps provided in the guide.
The main steps include:
You can install the Firebase CLI using a method that matches your operating system, experience
level, and/or use case. Regardless of how you install the CLI, you have access to the same
functionality and the firebase command.
After installing the CLI, you must authenticate. Then you can confirm authentication by listing your Firebase projects.
- Log into Firebase using your Google account by running the following command:
firebase loginThis command connects your local machine to Firebase and grants you access to your Firebase projects.
- Install the FlutterFire CLI by running the following command from any directory:
dart pub global activate flutterfire_cliUse the FlutterFire CLI to configure your Flutter apps to connect to Firebase.
From your Flutter project directory, run the following command to start the app configuration workflow:
flutterfire configureThe flutterfire configure workflow does the following:
-
Asks you to select the platforms (iOS, Android, Web) supported in your Flutter app. For each selected platform, the FlutterFire CLI creates a new Firebase app in your Firebase project.
You can select either to use an existing Firebase project or to create a new Firebase project. If you already have apps registered in an existing Firebase project, the FlutterFire CLI will attempt to match them based on your current Flutter project configuration. -
Creates a Firebase configuration file (
firebase_options.dart) and adds it to yourlib/directory. -
(for Crashlytics or Performance Monitoring on Android) Adds the required product-specific Gradle plugins to your Flutter app.
Note: After this initial running of
flutterfire configure, you need to re-run the command any time that you:
- Start supporting a new platform in your Flutter app.
- Start using a new Firebase service or product in your Flutter app, especially if you start using sign-in with Google, Crashlytics, Performance Monitoring, or Realtime Database.
Re-running the command ensures that your Flutter app’s Firebase configuration is up-to-date
and (for Android) automatically adds any required Gradle plugins to your app.
- From your Flutter project directory, run the following command to install the core plugin:
flutter pub add firebase_core- From your Flutter project directory, run the following command to ensure that your Flutter app’s Firebase configuration is up-to-date:
flutterfire configure- In your
lib/main.dartfile, import the Firebase core plugin and the configuration file you generated earlier:
import 'package:firebase_core/firebase_core.dart';import 'firebase_options.dart';- Also in your
lib/main.dartfile, initialize Firebase using theDefaultFirebaseOptionsobject exported by the configuration file:
await Firebase.initializeApp(options: DefaultFirebaseOptions.currentPlatform);- Rebuild your Flutter application:
flutter runFirebase Phone authentication
Section titled “Firebase Phone authentication”This option allows users in your app authenticate themselves via phone number. If you use this method for user authentication, the user receives an SMS with verification code and authenticates via that code in your app.
You need to follow these steps to add Firebase authentication to your Flutter project:
-
Setup the Firebase console for using Phone auth per every supported platform your project support according this guide.
-
Install the Firebase UI Auth plugin in your project using next command:
flutter pub add firebase_ui_auth- Configure the routing of your project for opening needed screens according to the plugin logic:
MaterialApp( routes: { // ...other routes '/phone': (context) => PhoneInputScreen( actions: [ SMSCodeRequestedAction((context, action, flowKey, phoneNumber) { Navigator.of(context).push( MaterialPageRoute( builder: (context) => SMSCodeInputScreen( flowKey: flowKey, ), ), ); }), ] ), });- Add the action for listening the auth state changes and using it for the ConnectyCube API requests:
AuthStateChangeAction<SignedIn>( (context, state) { state.user?.getIdToken().then((idToken) { signInUsingFirebasePhone( DefaultFirebaseOptions.currentPlatform.projectId, idToken ).then((cubeUser) { // the user was successfully signed in // start required logic (processing the user, opening screen with chats, etc.) Navigator.of(context).popUntil((route) { return route.isFirst; }); }); });});After it the rout will look similar to the next:
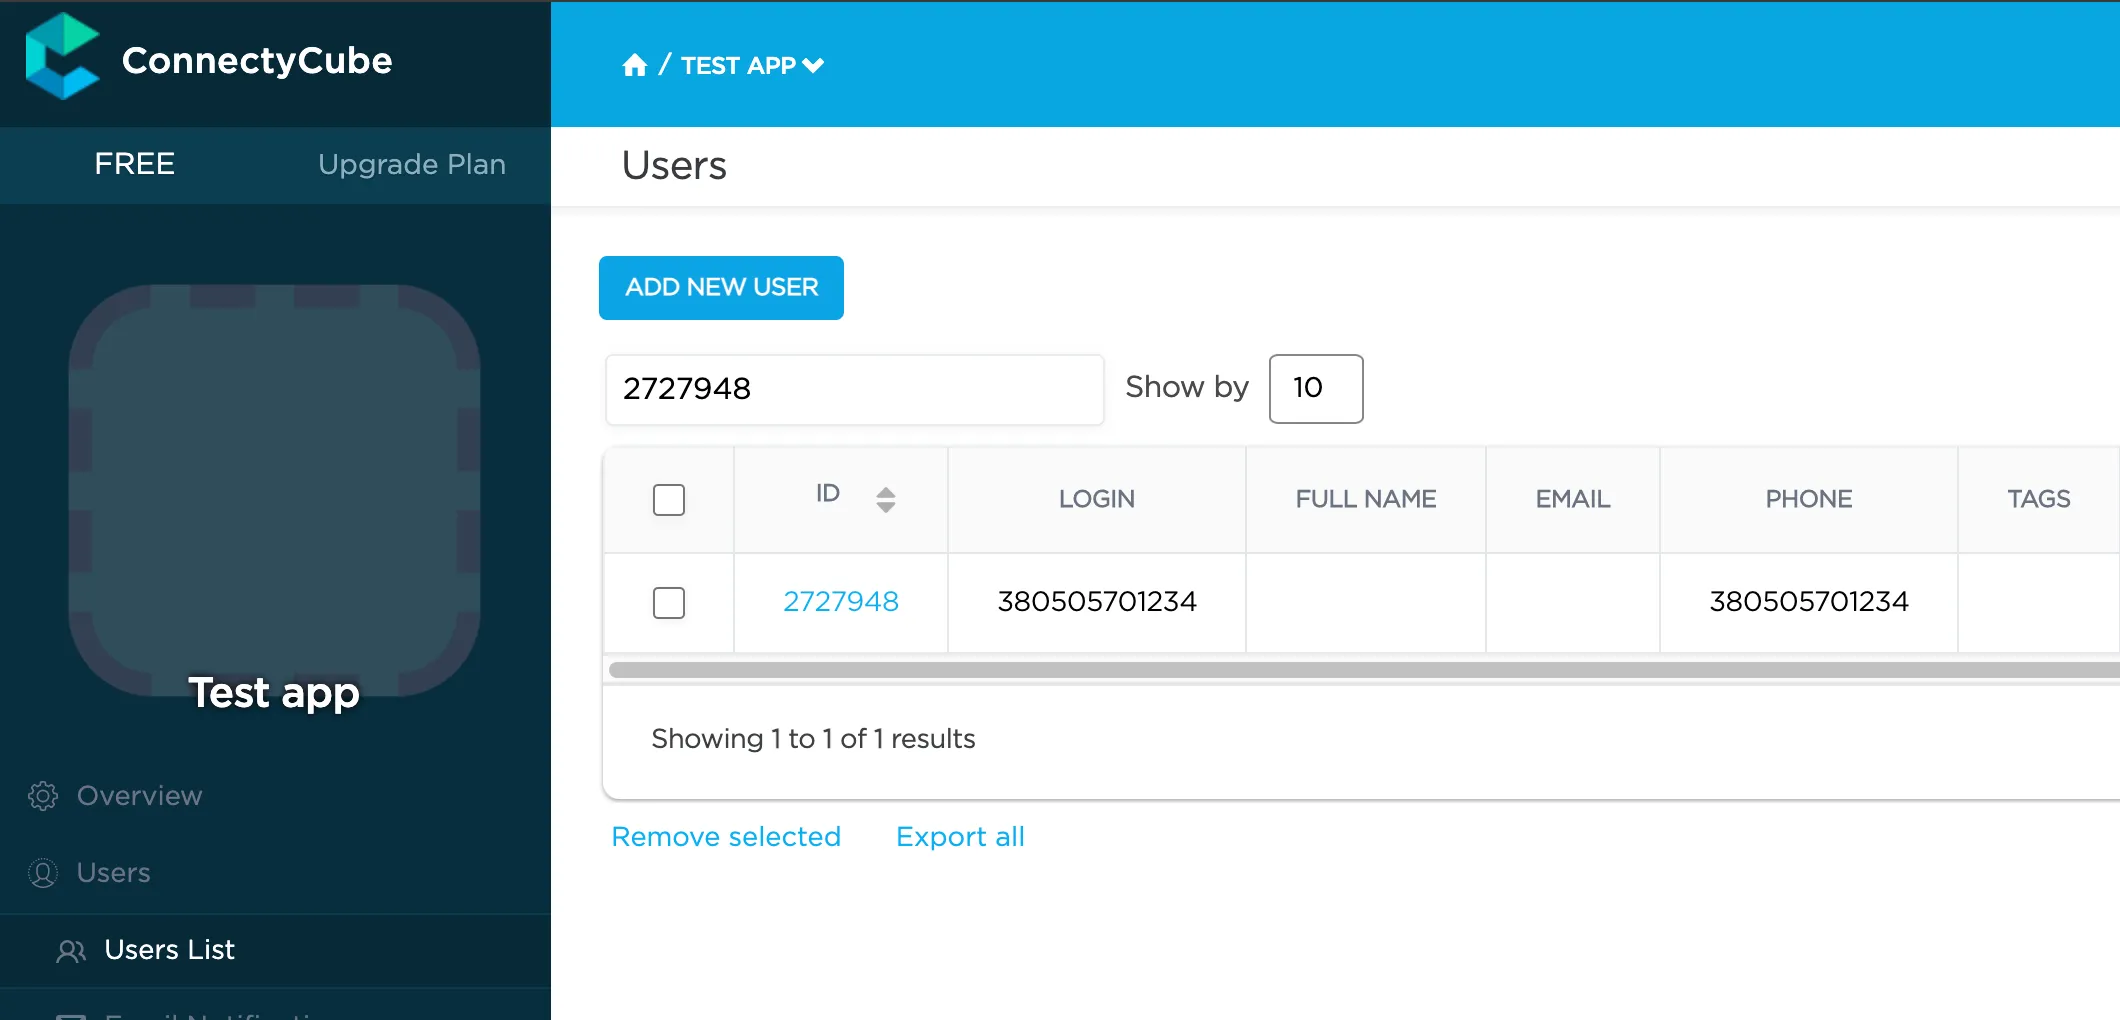
MaterialApp( routes: { // ...other routes '/phone': (context) => PhoneInputScreen( actions: [ SMSCodeRequestedAction((context, action, flowKey, phoneNumber) { Navigator.of(context).push( MaterialPageRoute( builder: (context) => SMSCodeInputScreen( flowKey: flowKey, actions: [ AuthStateChangeAction<SignedIn>( (context, state) { state.user?.getIdToken().then((idToken) { signInUsingFirebasePhone( DefaultFirebaseOptions.currentPlatform.projectId, idToken ).then((cubeUser) { // the user was successfully signed in // start required logic (processing the user, opening screen with chats, etc.) // in our example we just go to the first screen Navigator.of(context).popUntil((route) { return route.isFirst; }); }); }); }) ], ), ), ); }), ] ), });- Try running a test. Once your user is logged in successfully, you will find him/her in your Dashboard >> Your App >> Users >> Users List section.
The simplest method for using the Firebase Phone Auth feature in your Flutter project was provided. It is available the manual user verification without using the
firebase_ui_authplugin too. Use this guide for manual implementation of the Firebase Phone Auth feature.
Firebase E-mail authentication
Section titled “Firebase E-mail authentication”This option allows users in your app authenticate themselves via Firebase Email/Password or Firebase OAuth (Google Sign In).
The Firebase E-mail authentication setup flow is very similar to the Firebase Phone authentication but has its own features.
As this authentication type supports two auth providers EmailAuthProvider and GoogleProvider we will separate this guide on two sub-sections:
Firebase Email auth provider
Section titled “Firebase Email auth provider”The official FlutterFire guide is detailed enough and we will just provide the main aspects of required configurations.
-
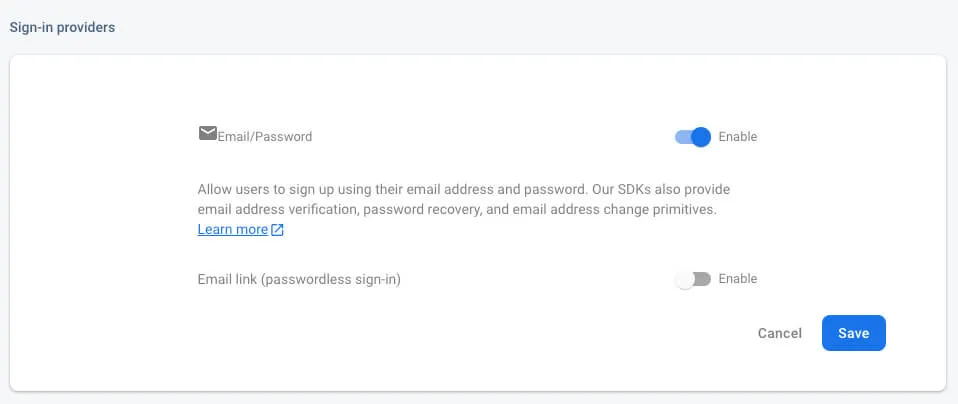
To support email as a provider, first ensure that the “Email/Password” provider is enabled in the Firebase Console:
- In the Firebase console’s Authentication section, open the Sign in method page;
- From the Sign in method page, enable the Email/password sign-in method and click Save.
-
Install the Firebase UI Auth plugin in your project using next command:
flutter pub add firebase_ui_auth- Configure the routing of your project for opening the
SignInScreenthat contains the suggestion to input the e-mail and password of the Firebase user:
MaterialApp( routes: { // ...other routes '/firebase-email': (context) => SignInScreen( providers: [EmailAuthProvider()], ), } );- Add the action(s) for listening the auth state changes and using it for the ConnectyCube API requests:
actions: [ AuthStateChangeAction<SignedIn>((context, state) { state.user?.getIdToken().then((idToken) { if (idToken != null) { signInUsingFirebaseEmail( DefaultFirebaseOptions.currentPlatform.projectId, idToken) .then((cubeUser) { // user successfully authenticated on the Connectycube }).catchError((onError) { // error occurs during authentication on the Connectycube }); } }); }),],After it the rout will look similar to the next: MaterialApp( routes: { // ...other routes '/firebase-email': (context) => SignInScreen( providers: [EmailAuthProvider()], actions: [ AuthStateChangeAction<SignedIn>((context, state) { state.user?.getIdToken().then((idToken) { if (idToken != null) { signInUsingFirebaseEmail( DefaultFirebaseOptions.currentPlatform.projectId, idToken) .then((cubeUser) { // user successfully authenticated on the Connectycube }).catchError((onError) { // error occurs during authentication on the Connectycube }); } }); }), ], );, } );Starting this point the app will show separated screen for authentication via Firebase Email provider.
After successful login to the Firebase the action SignedIn will be performed and the request to the
Connectycube will run.
Google Sign In
Section titled “Google Sign In”The configuration of the Firebase Google OAuth requires few veri simple steps:
-
Install the official google_sign_in plugin to your project as described in the README.
Note: you need go through configuration steps for each platform as described on the README.
-
Enable the “Google” provider in the Firebase Console and configure it:
- In the Firebase console’s Authentication section, open the Sign in method page;
- From the Sign in method page, enable the Google method and click Save.
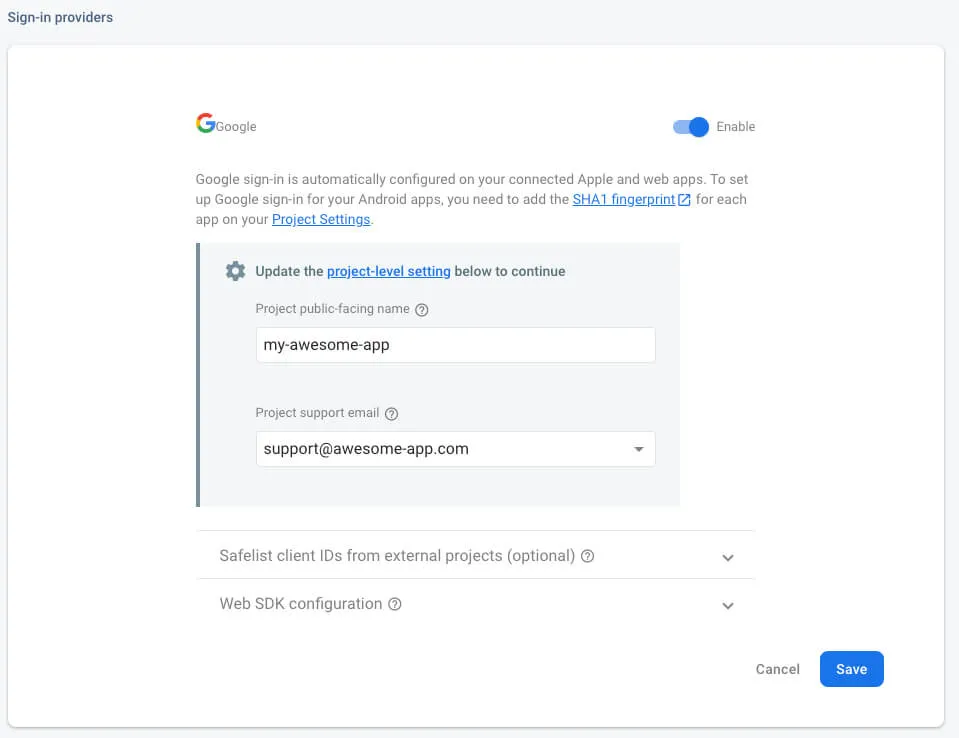
To ensure cross-platform support, please ensure you have followed installation instructions for both the
google_sign_inpackage and the provider on the Firebase Console (such as adding a SHA1 fingerprint for Android applications). -
Install the firebase_ui_oauth_google plugin:
flutter pub add firebase_ui_oauth_google- Copy and save the
clientIdproperty (which can be found in the Firebase Console):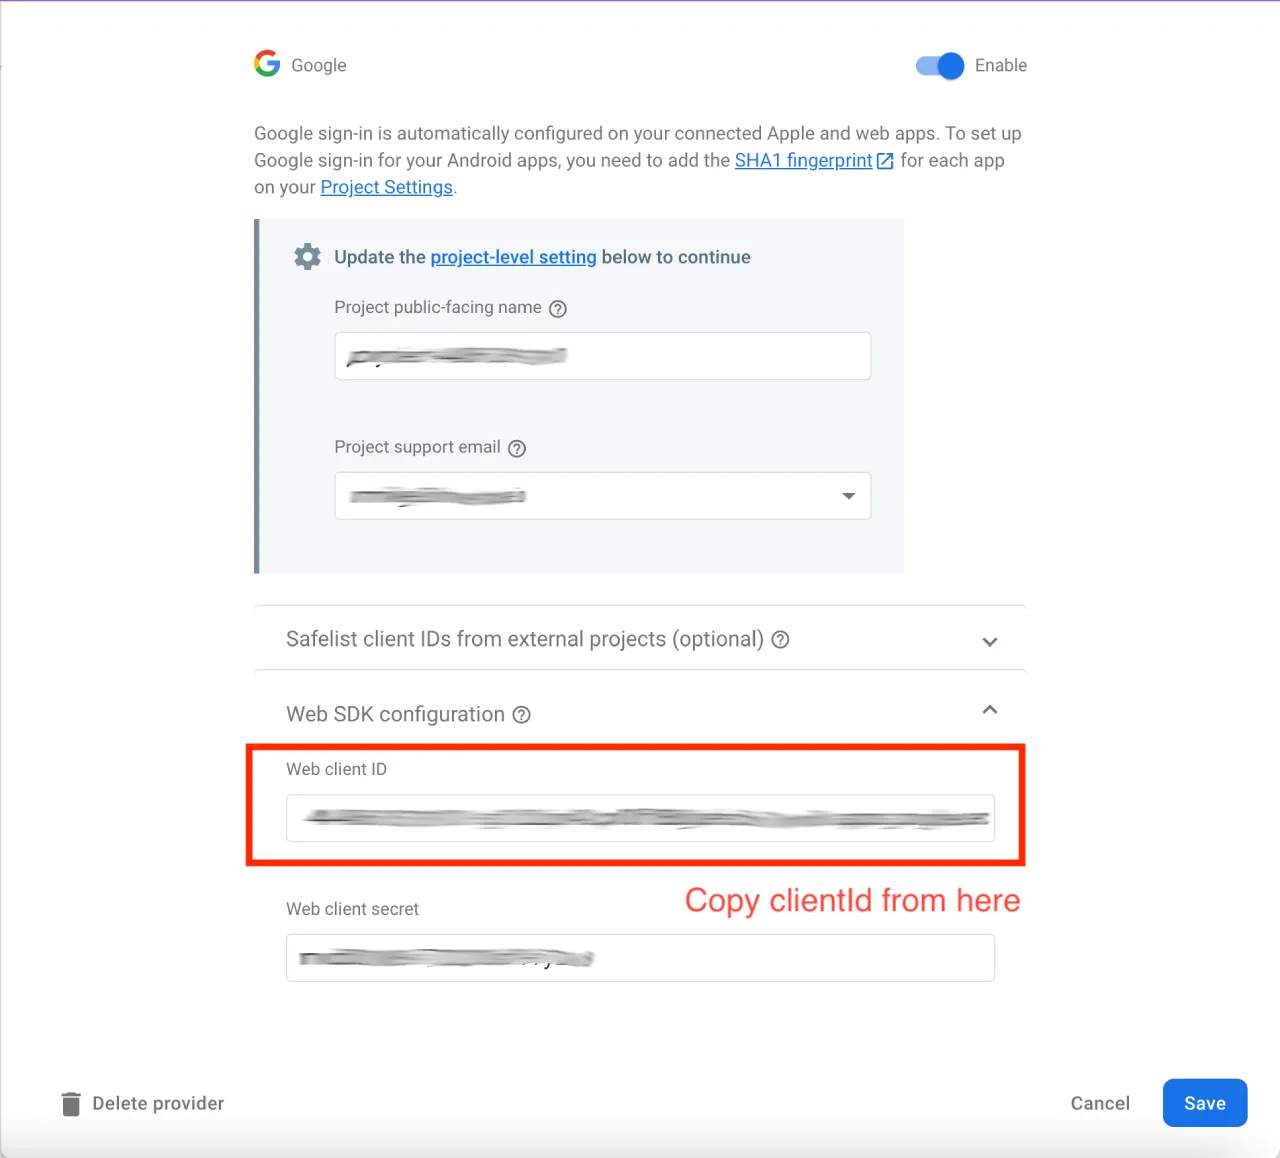
Almost done. After these configurations your app is ready for requesting the Google data from user.
The firebase_ui_oauth_google support few variants of requesting the data. We will use the OAuthProviderButton
with the GoogleProvider:
AuthStateListener<OAuthController>( listener: (oldState, newState, controller) { if (newState is SignedIn) { newState.user?.getIdToken().then((idToken) { if (idToken != null) { signInUsingFirebaseEmail( DefaultFirebaseOptions.currentPlatform.projectId, idToken) .then((cubeUser) { // user successfully authenticated on the Connectycube }).catchError((onError) { // error occurs during authentication on the Connectycube }); } }); } }, child: OAuthProviderButton( provider: GoogleProvider( clientId: ''), // set the `clientId` from the value copied in the p.4 of this guide ),)So now you know how to use Firebase features in your ConnectyCube apps. If you have any difficulties - please let us know via support channel