Multiparty Video Conferencing feature overview
ConnectyCube Multiparty Video Conferencing API is built on top of WebRTC protocol and based on top of WebRTC SFU architecture.
Max people per Conference call is 12.
Video Conferencing is available starting from Advanced plan.
To get a difference between P2P calling and Conference calling please read our ConnectyCube Calling API comparison blog page.
Features supported
Section titled “Features supported”- Video/Audio Conference with up to 12 people
- Join-Rejoin video room functionality (like Skype)
- Guest rooms (coming soon)
- Mute/Unmute audio/video streams
- Display bitrate
- Display mic level
- Switch video input device (camera)
- Switch audio input device (microphone)
- Switch audio output device (desktop platforms and chrome-based browsers)
- Screen sharing
- Simulcasting
Preparations
Section titled “Preparations”Required preparations for supported platforms
Section titled “Required preparations for supported platforms”Add the following entries to your Info.plist file, located in <project root>/ios/Runner/Info.plist:
<key>NSCameraUsageDescription</key><string>$(PRODUCT_NAME) Camera Usage!</string><key>NSMicrophoneUsageDescription</key><string>$(PRODUCT_NAME) Microphone Usage!</string>This entries allow your app to access the camera and microphone.
Android
Section titled “Android”Ensure the following permission is present in your Android Manifest file, located in <project root>/android/app/src/main/AndroidManifest.xml:
<uses-feature android:name="android.hardware.camera" /><uses-feature android:name="android.hardware.camera.autofocus" /><uses-permission android:name="android.permission.CAMERA" /><uses-permission android:name="android.permission.RECORD_AUDIO" /><uses-permission android:name="android.permission.ACCESS_NETWORK_STATE" /><uses-permission android:name="android.permission.CHANGE_NETWORK_STATE" /><uses-permission android:name="android.permission.MODIFY_AUDIO_SETTINGS" />If you need to use a Bluetooth device, please add:
<uses-permission android:name="android.permission.BLUETOOTH" /><uses-permission android:name="android.permission.BLUETOOTH_ADMIN" />The Flutter project template adds it, so it may already be there.
Also you will need to set your build settings to Java 8, because official WebRTC jar now uses static methods in EglBase interface. Just add this to your app level build.gradle:
android { //... compileOptions { sourceCompatibility JavaVersion.VERSION_1_8 targetCompatibility JavaVersion.VERSION_1_8 }}If necessary, in the same build.gradle you will need to increase minSdkVersion of defaultConfig up to 18 (currently default Flutter generator set it to 16).
Add the following entries to your *.entitlements files, located in <project root>/macos/Runner:
<key>com.apple.security.network.client</key><true/><key>com.apple.security.device.audio-input</key><true/><key>com.apple.security.device.camera</key><true/>This entries allow your app to access the internet, microphone, and camera.
Windows
Section titled “Windows”It does not require any special preparations.
It does not require any special preparations.
It does not require any special preparations.
Create meeting
Section titled “Create meeting”In order to have a conference call, a meeting object has to be created.
int now = DateTime.now().millisecondsSinceEpoch ~/ 1000;CubeMeeting meeting = CubeMeeting()  ..name = 'My meeting'  ..attendees = [    CubeMeetingAttendee(userId: 123, email: '...'),    CubeMeetingAttendee(userId: 124, email: '...')  ]  ..startDate = now  ..endDate = now + 60 * 60  ..withChat = false  ..record = false  ..public = true// ..notify = true //notify feature is available starting from the [Advanced plan](https://connectycube.com/pricing/)// ..notifyBefore = CubeMeetingNotifyBefore(TimeMetric.HOURS, 1) //notify feature is available starting from the [Advanced plan](https://connectycube.com/pricing/)  ..scheduled = false;
createMeeting(meeting) .then((createdMeeting) { var confRoomId = createdMeeting.meetingId; }) .catchError((onError) {});name- the meeting name.- As for
attendees- either ConnectyCube users ids or external emails can be provided. start_date- the date when meeting starts.end_date- the date when meeting ends.- Pass
withChat = trueif you want to have a chat connected to meeting. - Pass
record = trueif you want to have a meeting call recorded. Read more about Recording feature https://connectycube.com/2021/02/23/connectycube-releases-server-side-calls-recording-along-with-new-meetings-api/
Once meeting is created, you can use meeting.meetingId as a conf room identifier in the below requests when join a call.
ConferenceClient setup
Section titled “ConferenceClient setup”To manage Conference calls in flutter you should use ConferenceClient. Please see code below to find out possible functionality.
ConferenceClient callClient = ConferenceClient.instance; // returns instance of ConferenceClientCreate call session
Section titled “Create call session”In order to use Conference Calling API you need to create a call session object - set your current user and a type of session (VIDEO or AUDIO optional). ConferenceSession creates via ConferenceClient :
ConferenceClient callClient = ConferenceClient.instance;
int callType = CallType.VIDEO_CALL; // or CallType.AUDIO_CALL
ConferenceSession callSession = await callClient.createCallSession(currentUserId, callType: callType);
Events
Section titled “Events”There are following events you can listen for:
callSession.onLocalStreamReceived = (mediaStream) {  // called when local media stream completely prepared
  // display the stream in UI  // ...};
callSession.onRemoteStreamTrackReceived = (callSession, opponentId, mediaStream, {String? trackId}) {  // called when remote media stream received from opponent};
callSession.onPublishersReceived = (publishers) {  // called when received new opponents/publishers};
callSession.onPublisherLeft= (publisher) {  // called when opponent/publisher left room};
callSession.onError= (ex) {  // called when received some exception from conference};
callSession.onSessionClosed = (callSession){  // called when current session was closed};
Also, there are a few callbacks in the callSession to manage the connection state with user:
callSession.onPublisherLeft = (userId){
};
callSession.onSubscribedOnPublisher = (userId){
};
callSession.onSubscriberAttached = (userId){
};
Join video room
Section titled “Join video room”Just join the room and for example, send invite to some opponent:
callSession.joinDialog(roomId, ((publishers) { startCall(roomId, opponents, callSession.currentUserId);// event by system message e.g. }}));List online participants
Section titled “List online participants”To list online users in a room:
callSession.listOnlineParticipants().then((participants) {
}).catchError((error) {});
Subscribe/unsubscribe
Section titled “Subscribe/unsubscribe”The SDK automatically subscribes to publishers when get the onPublishersReceived event, but you may need to subscribe manually (for example after unsubscribing) to the active publisher:
callSession.subscribeToPublisher(publisher)To unsubscribe from publisher:
callSession.unsubscribeFromPublisher(publisher);To leave current room session:
callSession.leave();Mute audio
Section titled “Mute audio”bool mute = true; // false - to unmute, default value is falsecallSession.setMicrophoneMute(mute);Switch audio output
Section titled “Switch audio output”For iOS/Android platforms use:
bool enabled = false; // true - to switch to sreakerphone, default value is falsecallSession.enableSpeakerphone(enable);For Chrome-based browsers and Desktop platforms use:
if (kIsWeb) { remoteRenderers.forEach(renderer) { renderer.audioOutput(deviceId); });} else { callSession.selectAudioOutput(deviceId);}Mute video
Section titled “Mute video”bool enabled = false; // true - to enable local video track, default value for video calls is truecallSession.setVideoEnabled(enabled);Switch video cameras
Section titled “Switch video cameras”For iOS/Android platforms use:
callSession.switchCamera().then((isFrontCameraSelected){ if(isFrontCameraSelected) { // front camera selected } else { // back camera selected }}).catchError((error) { // switching camera failed});For the Web platform and Desktop platforms use:
callSession.switchCamera(deviceId: deviceId);Get available cameras list
Section titled “Get available cameras list”var cameras = await callSession.getCameras(); // call only after `initLocalMediaStream()`Get available Audio input devices list
Section titled “Get available Audio input devices list”var audioInputs = await callSession.getAudioInputs(); // call only after `initLocalMediaStream()`Get available Audio output devices list
Section titled “Get available Audio output devices list”var audioOutputs = await callSession.getAudioOutputs(); // call only after `initLocalMediaStream()`Use the custom media stream
Section titled “Use the custom media stream”MediaStream customMediaStream;
callSession.replaceMediaStream(customMediaStream);Toggle the torch
Section titled “Toggle the torch”var enable = true; // false - to disable the torch
callSession.setTorchEnabled(enable);Screen Sharing
Section titled “Screen Sharing”The Screen Sharing feature allows you to share the screen from your device to other call members. Currently the Connectycube Flutter SDK supports the Screen Sharing feature for all supported platforms.
For switching to the screen sharing during the call use next code snippet:
ConferenceSession callSession; // the existing call session
callSession.enableScreenSharing(true, requestAudioForScreenSharing: true); // for switching to the screen sharing
callSession.enableScreenSharing(false); // for switching to the camera streaming
Android specifics of targeting the targetSdkVersion to the version 31 and above
Section titled “Android specifics of targeting the targetSdkVersion to the version 31 and above”After updating the targetSdkVersion to the version 31 you can encounter an error:
java.lang.SecurityException: Media projections require a foreground service of type ServiceInfo.FOREGROUND_SERVICE_TYPE_MEDIA_PROJECTIONTo avoid it do the next changes and modifications in your project:
1. Connect the flutter_background plugin to your project using:
flutter_background: ^x.x.x2. Add to the file app_name/android/app/src/main/AndroidManifest.xml to section manifest next permissions:
<uses-permission android:name="android.permission.WAKE_LOCK" /><uses-permission android:name="android.permission.FOREGROUND_SERVICE"/><uses-permission android:name="android.permission.REQUEST_IGNORE_BATTERY_OPTIMIZATIONS" />3. Add to the file app_name/android/app/src/main/AndroidManifest.xml to section application next service:
<service android:name="de.julianassmann.flutter_background.IsolateHolderService" android:foregroundServiceType="mediaProjection" android:enabled="true" android:exported="false"/>4. Create the next function somewhere in your project:
Future<bool> initForegroundService() async { final androidConfig = FlutterBackgroundAndroidConfig( notificationTitle: 'App name', notificationText: 'Screen sharing is in progress', notificationImportance: AndroidNotificationImportance.Default, notificationIcon: AndroidResource( name: 'ic_launcher_foreground', defType: 'drawable'), ); return FlutterBackground.initialize(androidConfig: androidConfig);}and call it somewhere after the initialization of the app or before starting the screen sharing.
5. Call the function FlutterBackground.enableBackgroundExecution() just before starting the screen
sharing and function FlutterBackground.disableBackgroundExecution() after ending the screen sharing
or finishing the call.
IOS screen sharing using the Screen Broadcasting feature.
Section titled “IOS screen sharing using the Screen Broadcasting feature.”The Connectycube Flutter SDK supports two types of Screen sharing on the iOS platform. There are In-app screen sharing and Screen Broadcasting. The In-app screen sharing doesn’t require any additional preparation on the app side. But the Screen Broadcasting feature requires some.
All required features we already added to our P2P Calls sample.
Below is the step-by-step guide on adding it to your app. It contains the following steps:
- Add the
Broadcast Upload Extension; - Add required files from our sample to your iOS project;
- Update project configuration files with your credentials;
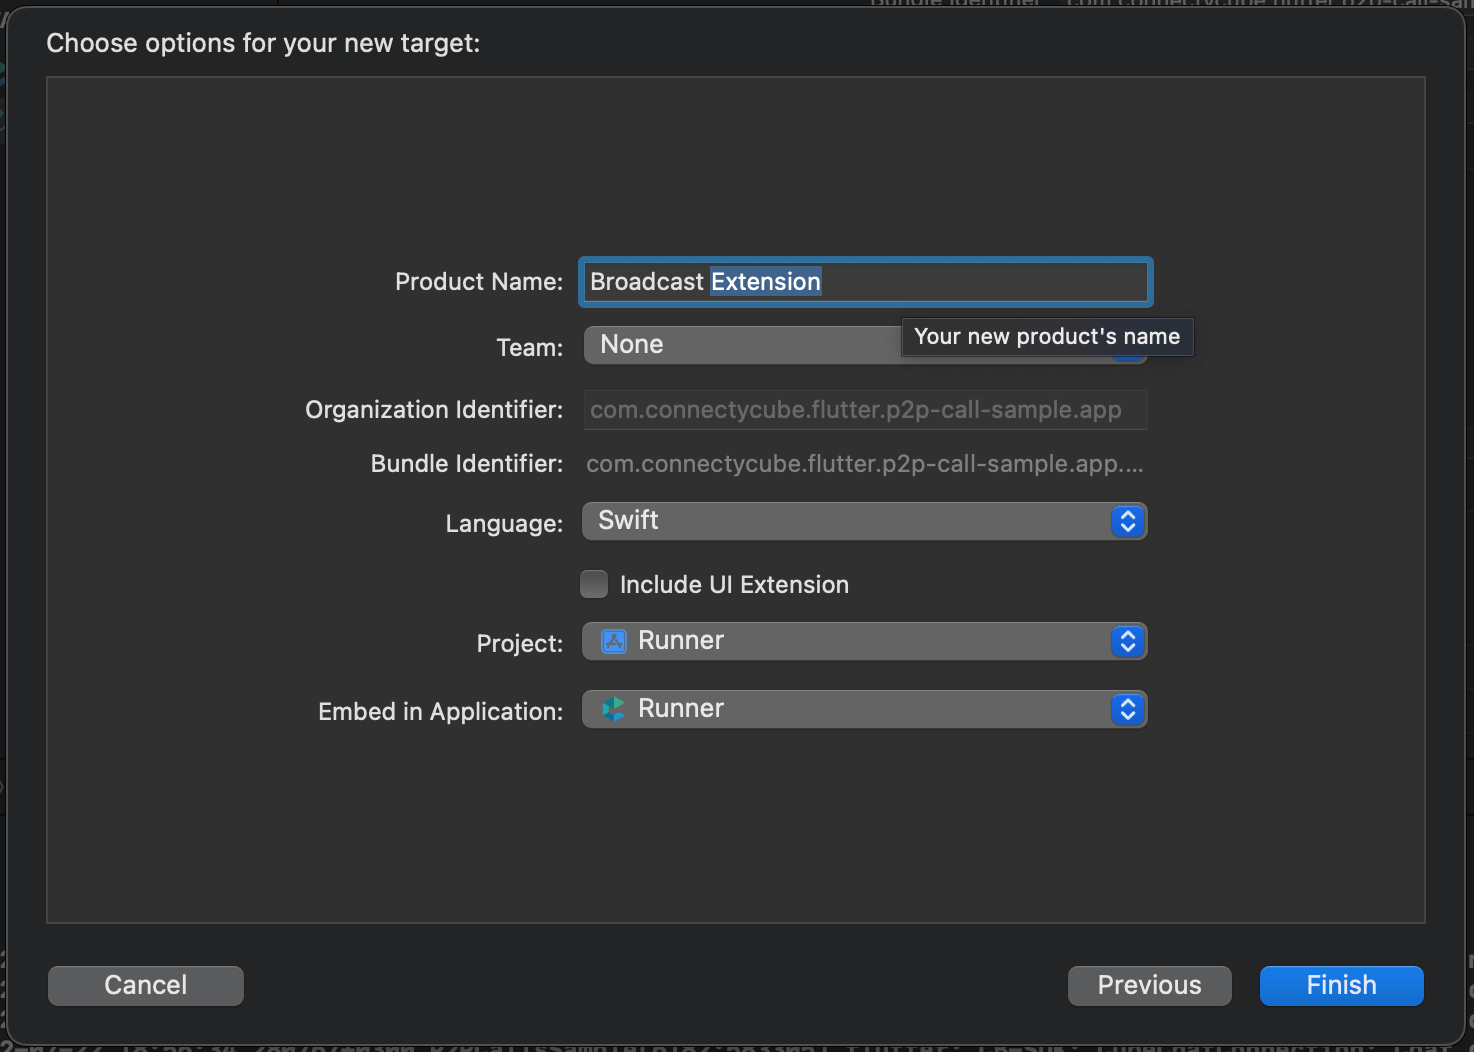
Add the Broadcast Upload Extension
Section titled “Add the Broadcast Upload Extension”For creating the extension you need to add a new target to your application, selecting the
Broadcast Upload Extension template. Fill in the desired name, change the language to Swift, make
sure Include UI Extension (see screenshot) is not selected, as we don’t need custom UI for our case, then press
Finish. You will see that a new folder with the extension’s name was added to the project’s tree,
containing the SampleHandler.swift class. Also, make sure to update the Deployment Info, for the
newly created extension, to iOS 14 or newer. To learn more about creating App Extensions check the
official documentation.
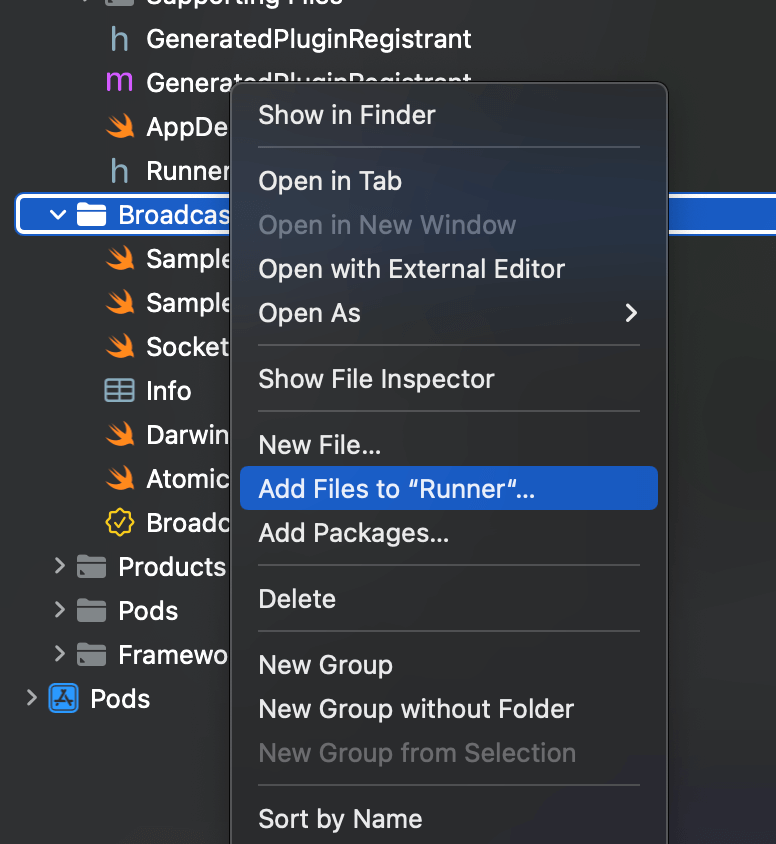
Add the required files from our sample to your own iOS project
Section titled “Add the required files from our sample to your own iOS project”After adding the extension you should add prepared files from our sample to your own project. Copy
next files from our Broadcast Extension directory: Atomic.swift,
Broadcast Extension.entitlements (the name can be different according to your extension’s name),
DarwinNotificationCenter.swift, SampleHandler.swift (replace the automatically created file),
SampleUploader.swift, SocketConnection.swift. Then open your project in Xcode and link these files
with your iOS project using Xcode tools. For it, call the context menu of your extension directory, select
‘Add Files to “Runner”…’ (see screenshot) and select files copied to your extension directory before.
Update project configuration files
Section titled “Update project configuration files”Do the following for your iOS project configuration files:
1. Add both the app and the extension to the same App Group. For it, add to both (app and extension)
*.entitlements files next lines:
<key>com.apple.security.application-groups</key><array> <string>group.com.connectycube.flutter</string></array>where the group.com.connectycube.flutter is your App group. To learn about working with app groups,
see Adding an App to an App Group.
We recommend you create the app group in the Apple Developer Console before.
Next, add the App group id value to the
app’s Info.plist of your app for the RTCAppGroupIdentifier key:
<key>RTCAppGroupIdentifier</key><string>group.com.connectycube.flutter</string>where the group.com.connectycube.flutter is your App group.
2. Add a new key RTCScreenSharingExtension to the app’s Info.plist with the extension’s Bundle Identifier
as the value:
<key>RTCScreenSharingExtension</key><string>com.connectycube.flutter.p2p-call-sample.app.Broadcast-Extension</string>where the com.connectycube.flutter.p2p-call-sample.app.Broadcast-Extension is the Bundle ID of your
Broadcast Extension. Take it from the Xcode

3. Update SampleHandler.swift’s appGroupIdentifier constant with the App Group name your
app and extension are both registered to.
static let appGroupIdentifier = "group.com.connectycube.flutter"where the group.com.connectycube.flutter is your app group.
4. Make sure voip is added to UIBackgroundModes, in the app’s Info.plist, in order to work when
the app is in the background.
<key>UIBackgroundModes</key><array> <string>remote-notification</string> <string>voip</string> <string>audio</string></array>After performing mentioned actions you can switch to Screen sharing during the call using useIOSBroadcasting = true:
_callSession.enableScreenSharing(true, useIOSBroadcasting: true);Requesting desktop capture source
Section titled “Requesting desktop capture source”Desktop platforms require the capture source (Screen or Window) for screen sharing. We prepared a widget ready for using that requests the available sources from the system and provides them to a user for selection. After that, you can use it as the source for screen sharing.
In code it can look in a next way:
var desktopCapturerSource = isDesktop    ? await showDialog<DesktopCapturerSource>(      context: context,      builder: (context) => ScreenSelectDialog())    : null;

callSession.enableScreenSharing(true, desktopCapturerSource: desktopCapturerSource);
The default capture source (usually it is the default screen) will be captured if set null as a capture source
for the desktop platform.
WebRTC Stats reporting
Section titled “WebRTC Stats reporting”Stats reporting is an insanely powerful tool that can provide detailed info about a call.
There is info about the media, peer connection, codecs, certificates, etc. To enable stats report you should first set stats
reporting frequency using RTCConfig.
RTCConfig.instance.statsReportsInterval = 200; // receive stats report every 200 millisecondsThen you can subscribe to the stream with reports using the instance of the call session:
_callSession.statsReports.listen((event) { var userId = event.userId; // the user's id the stats related to var stats = event.stats; // available stats});To disable fetching Stats reports set this parameter as 0.
Monitoring mic level and video bitrate using Stats
Section titled “Monitoring mic level and video bitrate using Stats”Also, we prepared the helpful manager CubeStatsReportsManager for processing Stats reports and getting
some helpful information like the opponent’s mic level and video bitrate.
For its work, you just need to configure the RTCConfig as described above. Then create the
instance of CubeStatsReportsManager and initialize it with the call session.
final CubeStatsReportsManager _statsReportsManager = CubeStatsReportsManager();
_statsReportsManager.init(_callSession);
After that you can subscribe on the interested data:
_statsReportsManager.micLevelStream.listen((event) {  var userId = event.userId;  var micLevel = event.micLevel; // the mic level from 0 to 1});
_statsReportsManager.videoBitrateStream.listen((event) {  var userId = event.userId;  var bitRate = event.bitRate; // the video bitrate in kbits/sec});
After finishing the call you should dispose of the manager for avoiding memory leaks. You can do it in
the onSessionClosed callback:
void _onSessionClosed(session) {  // ...
  _statsReportsManager.dispose();
  // ..}
Configurations
Section titled “Configurations”ConnectyCube Flutter SDK provides possibility to change some default parameters for call session.
Media stream configurations
Section titled “Media stream configurations”Use instance of RTCMediaConfig class to change some default media stream configs.
RTCMediaConfig mediaConfig = RTCMediaConfig.instance;mediaConfig.minHeight = 720; // sets preferred minimal height for local video stream, default value is 320mediaConfig.minWidth = 1280; // sets preferred minimal width for local video stream, default value is 480mediaConfig.minFrameRate = 30; // sets preferred minimal framerate for local video stream, default value is 25mediaConfig.simulcastConfig = SimulcastConfig( highVideoBitrate: 1024, mediumVideoBitrate: 512, lowVideoBitrate: 96,); // sets the bitrate for different stream's qualitiesCall connection configurations
Section titled “Call connection configurations”ConferenceConfig.instance.url = SERVER_ENDPOINT // 'wss://...:8989';Signaling implementation
Section titled “Signaling implementation”To implement regular calls with events such as call, reject, hang up there should be used some signaling mechanism.
Signaling
Section titled “Signaling”As signaling mechanism there can be used ConnectyCube system-messages with predefined custom properties.
Start Call
Section titled “Start Call”Just join the room and send an invitation start call message to opponents:
 var systemMessagesManager = CubeChatConnection.instance.systemMessagesManager;...
sendCallMessage(String roomId, List<int> participantIds) { List<CubeMessage> callMsgList = _buildCallMessages(roomId, participantIds); callMsgList.forEach((callMsg) {   callMsg.properties["callStart"] = '1';   callMsg.properties["participantIds"] = participantIds.join(','); }); callMsgList.forEach((msg) => systemMessagesManager.sendSystemMessage(msg));}
List<CubeMessage> buildCallMessages(String roomId, List<int> participantIds) {  return participantIds.map((userId) {    var msg = CubeMessage();    msg.recipientId = userId;    msg.properties = {"janusRoomId": roomId};    return msg;  }).toList();}
Reject Call
Section titled “Reject Call”Send reject message when decline/busy call:
sendRejectMessage(String roomId, bool isBusy, int participantId) { List<CubeMessage> callMsgList = buildCallMessages(roomId, [participantId]); callMsgList.forEach((callMsg) { callMsg.properties["callRejected"] = '1'; callMsg.properties["busy"] = isBusy.toString(); }); callMsgList.forEach((msg) => systemMessagesManager.sendSystemMessage(msg));}End call
Section titled “End call”Send end call message when hangup/answer_timeout call:
sendEndCallMessage(String roomId, List<int> participantIds) { List<CubeMessage> callMsgList = _buildCallMessages(roomId, participantIds); callMsgList.forEach((callMsg) { callMsg.properties["callEnd"] = '1'; }); callMsgList.forEach((msg) => systemMessagesManager.sendSystemMessage(msg));}Get call events
Section titled “Get call events”Listen and parse all call events with systemMessagesManager:
systemMessagesManager.systemMessagesStream.listen((cubeMessage) => parseCallMessage(cubeMessage));...
parseCallMessage(CubeMessage cubeMessage) {  final properties = cubeMessage.properties;  if(properties.containsKey("callStart")) {    String roomId = properties["janusRoomId"];    List<int> participantIds = properties["participantIds"].split(',').map((id) => int.parse(id)).toList();    if(this._roomId == null) {      this._roomId = roomId;      this._initiatorId = cubeMessage.senderId;      this._participantIds = participantIds;//    handleNewCall();    }  } else if(properties.containsKey("callRejected")) {    String roomId = properties["janusRoomId"];    bool isBusy = properties["busy"] == 'true';    if(this._roomId == roomId) {//    handleRejectCall();    }  } else if(properties.containsKey("callEnd")) {    String roomId = properties["janusRoomId"];    if(this._roomId == roomId) {//    handleEndCall();    }  }}
Adding user to call
Section titled “Adding user to call”For adding user to current call you can send invite message with current roomId and participantIds:
sendCallMessage(String roomId, List<int> participantIds) { List<CubeMessage> callMsgList = _buildCallMessages(roomId, participantIds); callMsgList.forEach((callMsg) { callMsg.properties["callStart"] = '1'; callMsg.properties["participantIds"] = participantIds.join(','); }); callMsgList.forEach((msg) => systemMessagesManager.sendSystemMessage(msg));}And then on the receiver side when the new user successfully joins the room, he automatically subscribes to all active participants in current call (at the same time, other participants will receive onPublishersReceived and will be able to subscribe to that new user).
Retrieve meetings
Section titled “Retrieve meetings”Retrieve a meeting by id:
getMeetings({'_id': meetingId}) .then((meetings) {}) .catchError((onError) {});Retrieve a list of meetings:
getMeetings() .then((meetings) {}) .catchError((onError) {});or use the getMeetingsPaged for requesting meeting using the pagination feature:
getMeetingsPaged(limit: 10, skip: 20, params: {'scheduled': true}) .then((result) async { var meetings = result.items; }) .catchError((onError) {});Edit meeting
Section titled “Edit meeting”A meeting creator can edit a meeting:
CubeMeeting originalMeeting; //some meeting which was created before, should cantain `meetingId`originalMeeting.name = updatedName;originalMeeting.startDate = updatedStartDate;originalMeeting.endDate = updatedEndDate;originalMeeting.attendees = [  CubeMeetingAttendee(    userId: 125, email: 'test@email.com'),];
updateMeeting(originalMeeting)  .then((updatedMeeting) {})  .catchError((onError){});
or use the method updateMeetingById for updating only some fields of the meeting model:
updateMeetingById(meetingId, {'record': true}) .then((updatedMeeting) {}) .catchError((onError){});Delete meeting
Section titled “Delete meeting”A meeting creator can delete a meeting:
deleteMeeting(meetingId) .then((voidResult) {}) .catchError((onError) {});Recording
Section titled “Recording”Server-side recording is available. Read more about Recording feature https://connectycube.com/2021/02/23/connectycube-releases-server-side-calls-recording-along-with-new-meetings-api/
Simulcasting
Section titled “Simulcasting”Simulcast is a feature in video conferencing that enables the simultaneous broadcasting of multiple versions of the same video stream, each with different resolutions and bitrates. This feature is commonly used to optimize the video quality for all participants in a video call, especially when some participants have slower or less reliable internet connections.
In a video call, the video stream is sent from the sender’s device to the recipient’s device. If the recipient has a slow or unreliable internet connection, the video quality may suffer, and the video may lag or freeze. Simulcast allows the sender to send multiple versions of the video stream, each with different resolutions and bitrates.
Overall, simulcast is a useful feature in video conferencing that can help improve the quality and reliability of video calls, especially when participants have different network conditions.
Request preferred quality of incoming streams
Section titled “Request preferred quality of incoming streams”Use the next code snippet to request the preferred quality of the remote stream for user:
var confCallSession; // some `ConferenceSession`var userId; // user's id you want to change the quality of the received streamvar streamType = StreamType.low; // the type of the stream you want to request for user, there are tree possible values `StreamType.high`, `StreamType.medium` and `StreamType.low`
confCallSession.requestPreferredStreamForOpponent(userId, streamType);
Or there is a separate method for requesting the different qualities using a single request for the set of users:
var confCallSession; // some `ConferenceSession`var config = {  123: StreamType.low,  124: StreamType.high}; // is the map where key is the opponent's id and the value is the required quality of the video stream
confCallSession.requestPreferredStreamsForOpponents(config);
Limit the bitrate of your own stream
Section titled “Limit the bitrate of your own stream”The sender can limit the bitrate of the own video stream according to the app logic using the next code snippet:
var confCallSession; // some `ConferenceSession`
confCallSession.setMaxBandwidth(960); // set `0` or `null` to remove any limitations
Listen to the stream quality changes
Section titled “Listen to the stream quality changes”When the sender limits the stream’s quality or the server limits the stream’s bitrate according to its internal logic the receivers will receive a notification about it. To listen to these events just subscribe to the next event broadcaster:
var confCallSession; // some `ConferenceSession`
confCallSession.onSubStreamChanged = onSubStreamChanged;
void onSubStreamChanged(int userId, StreamType streamType) {  log("[onSubStreamChanged] userId: $userId, streamType: $streamType", TAG);}
Temporal layers
Section titled “Temporal layers”During a conference call, video is typically transmitted in real-time between multiple participants. However, the quality of the video may suffer due to network bandwidth limitations, especially when there are multiple participants with varying network conditions.
Temporal layers allow for the efficient transmission of video by dividing the video frames into different layers. The lower layers contain basic information about the video, such as color and shape, while the higher layers contain more detailed information, such as facial expressions or small movements.
Request the layer of the stream
Section titled “Request the layer of the stream”By default, the server sends the layer with the highest quality but you can request another one according to your app needs.
Use the next code snippet for requesting of the preferred layer:
var confCallSession; // some `ConferenceSession`var userId; // user's id you want to change the FPS of the received streamvar layer; // there available three layers: `0` - lowest FPS, `1` - medium FPS and `2` - highest FPS
confCallSession.requestPreferredLayerForOpponentStream(userId, layer)
Or use the next method for requesting different layers for a lot of users in a single request:
var confCallSession; // some `ConferenceSession`var config = {  123: 0,  124: 2,};
confCallSession.requestPreferredLayersForOpponentsStreams(config);Note: Pay attention: not all platforms support the layer feature in full. For example, iOS/Android platforms support three layers and the Chrome browser supports only one layer, etc.
Listen to the stream layer changes
Section titled “Listen to the stream layer changes”After manually requesting the preferred layer the server sends the event the about success of changing the layer for user. To listen to these events just subscribe to the next event broadcaster:
var confCallSession; // some `ConferenceSession`
confCallSession.onLayerChanged = onLayerChanged;
void onLayerChanged(int userId, int layer) {  log("[onLayerChanged] userId: $userId, layer: $layer", TAG);}