Push Notifications
Push Notifications provide a way to deliver some information to users while they are not using your app actively. The following use cases can be covered additionally with push notifications:
- send a chat message when a recipient is offline (a push notification will be initiated automatically in this case)
- make a video call with offline opponents (need to send a push notification manually)
Configuration
Section titled “Configuration”In order to start work with push notifications you need to configure it for all required platforms.
iOS and macOS
Section titled “iOS and macOS”-
First of all you need to generate Apple push certificate (*.p12 file) and upload it to ConnectyCube dashboard. Here is a guide on how to create a certificate https://developers.connectycube.com/ios/how-to-create-apns-certificate
-
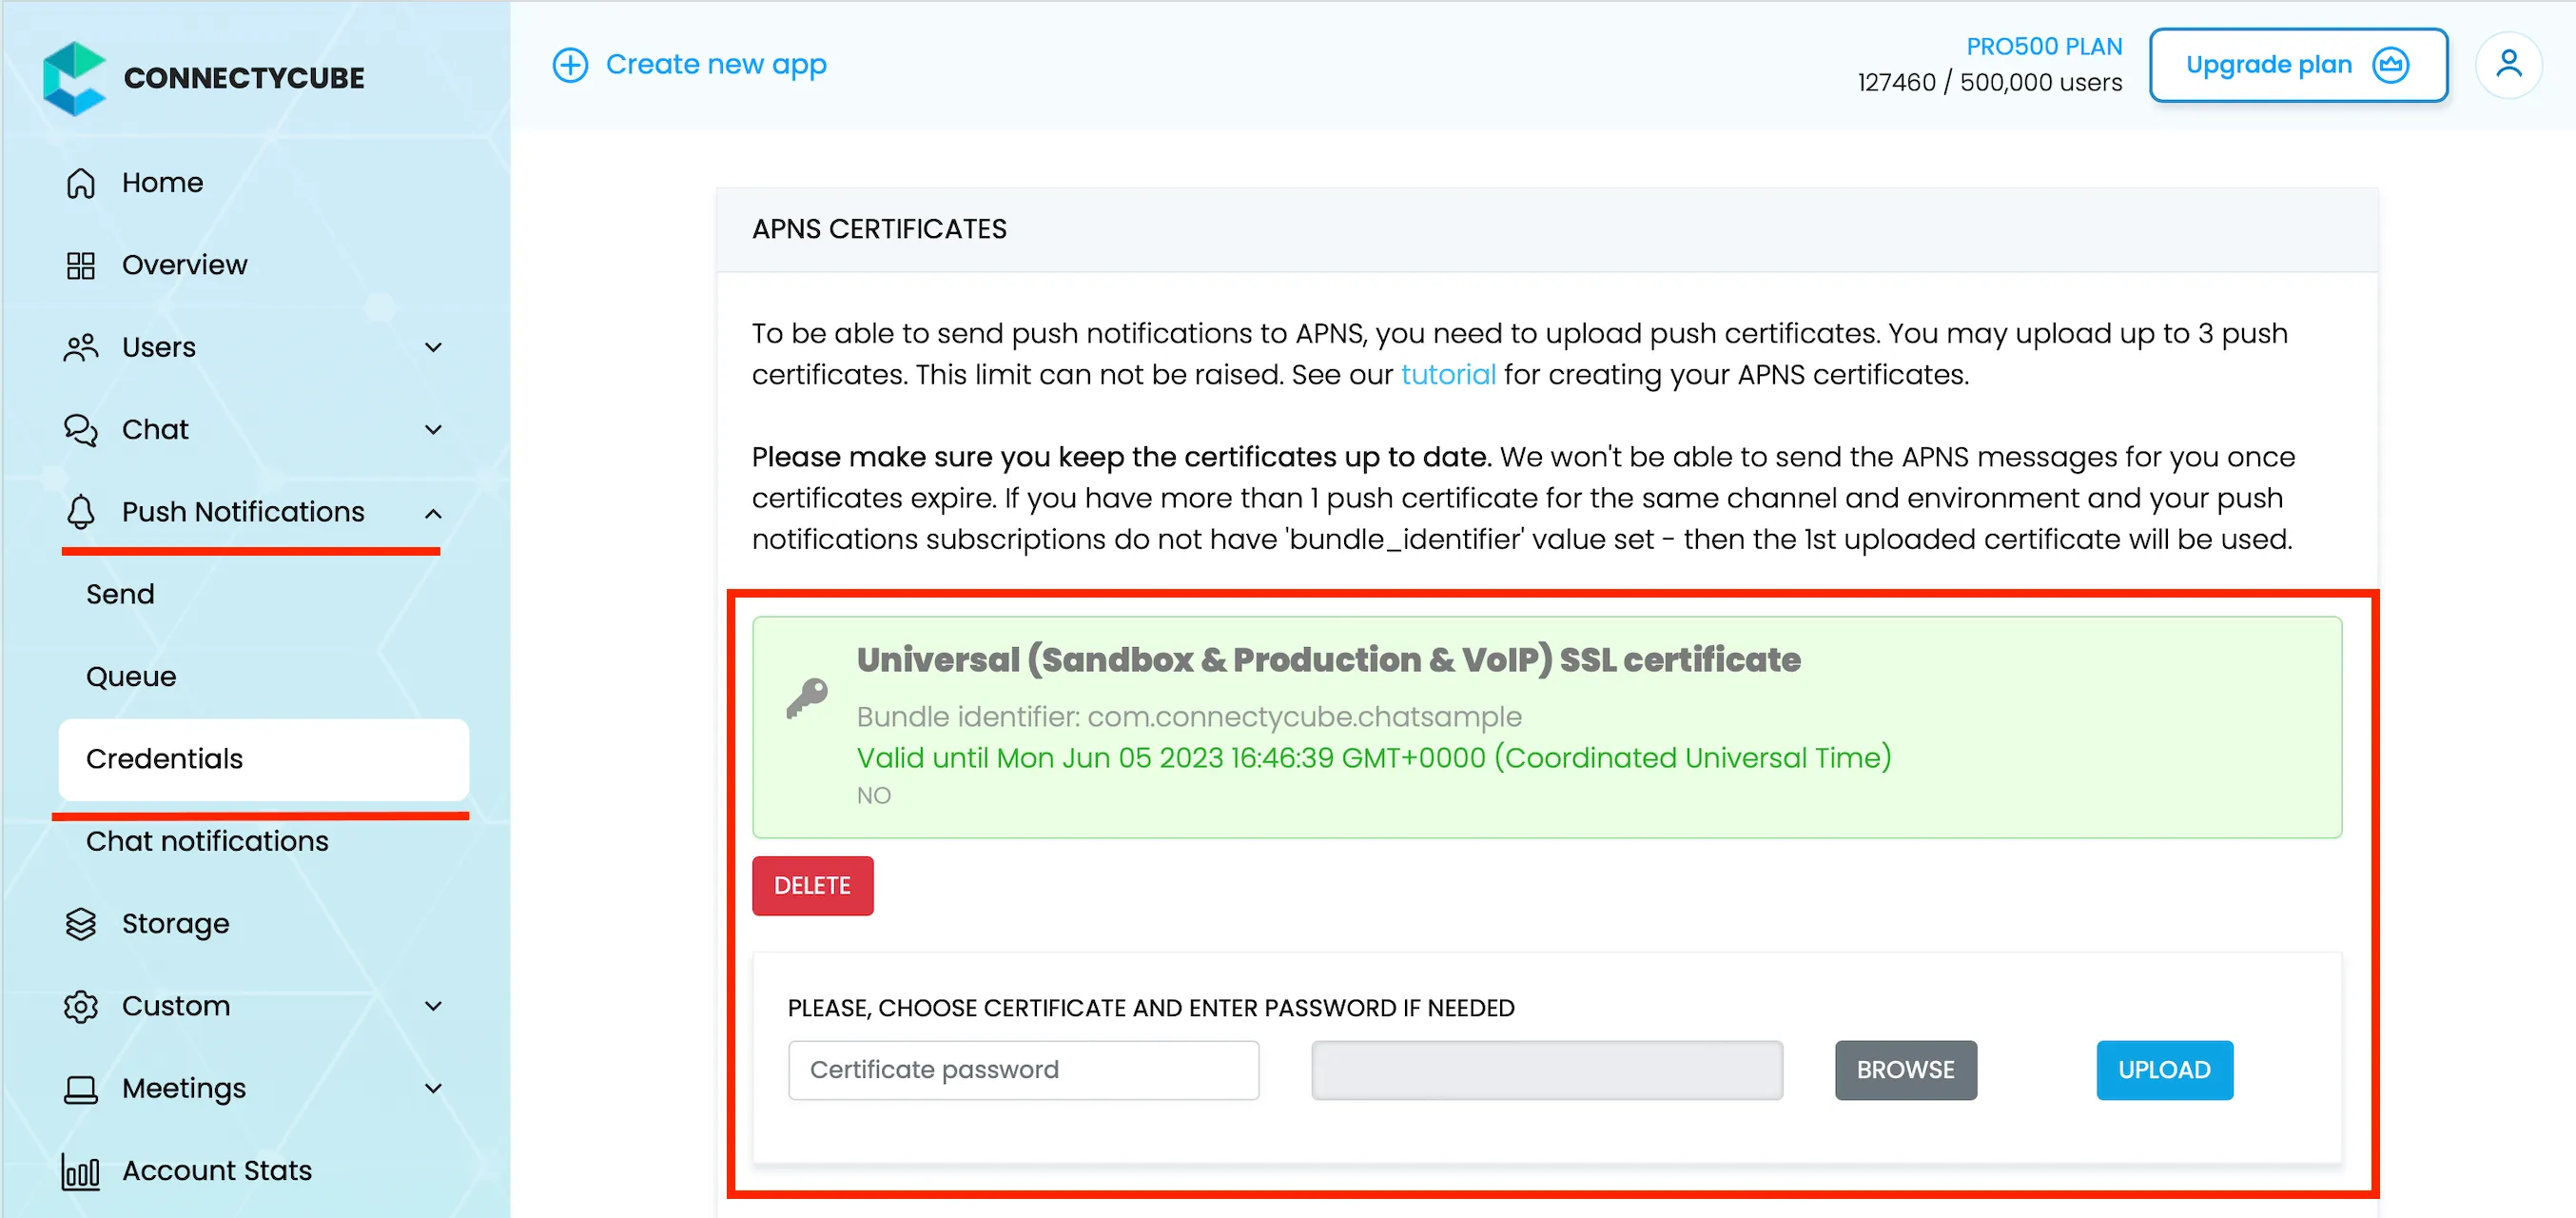
Upload Apple push certificate (*.p12 file) to ConnectyCube dashboard:
- Open your ConnectyCube Dashboard at admin.connectycube.com
- Go to Push notifications module, Credentials page
- Upload the newly created APNS certificate on Apple Push Notification Service (APNS) form.
-
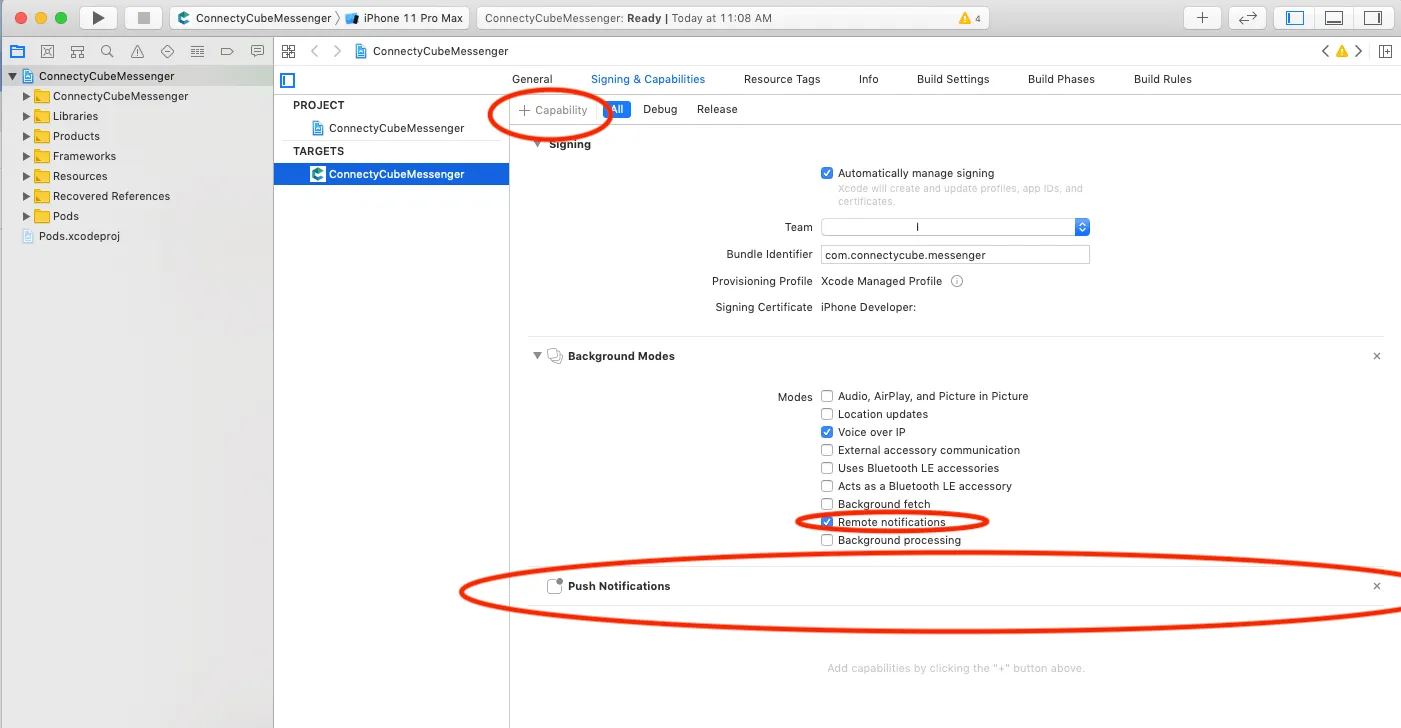
Lastly, open Xcode project of your Flutter app and enable Push Notifications capabilities. Open Xcode, choose your project file, Signing & Capabilities tab and then add a Push Notifications capability. Also - tick a ‘Remote notifications’ checkbox in Background Modes section.
Android and Web
Section titled “Android and Web”Configure Firebase project and Service account key (recommended)
Section titled “Configure Firebase project and Service account key (recommended)”In order to start working with push notifications functionality you need to configure it.
-
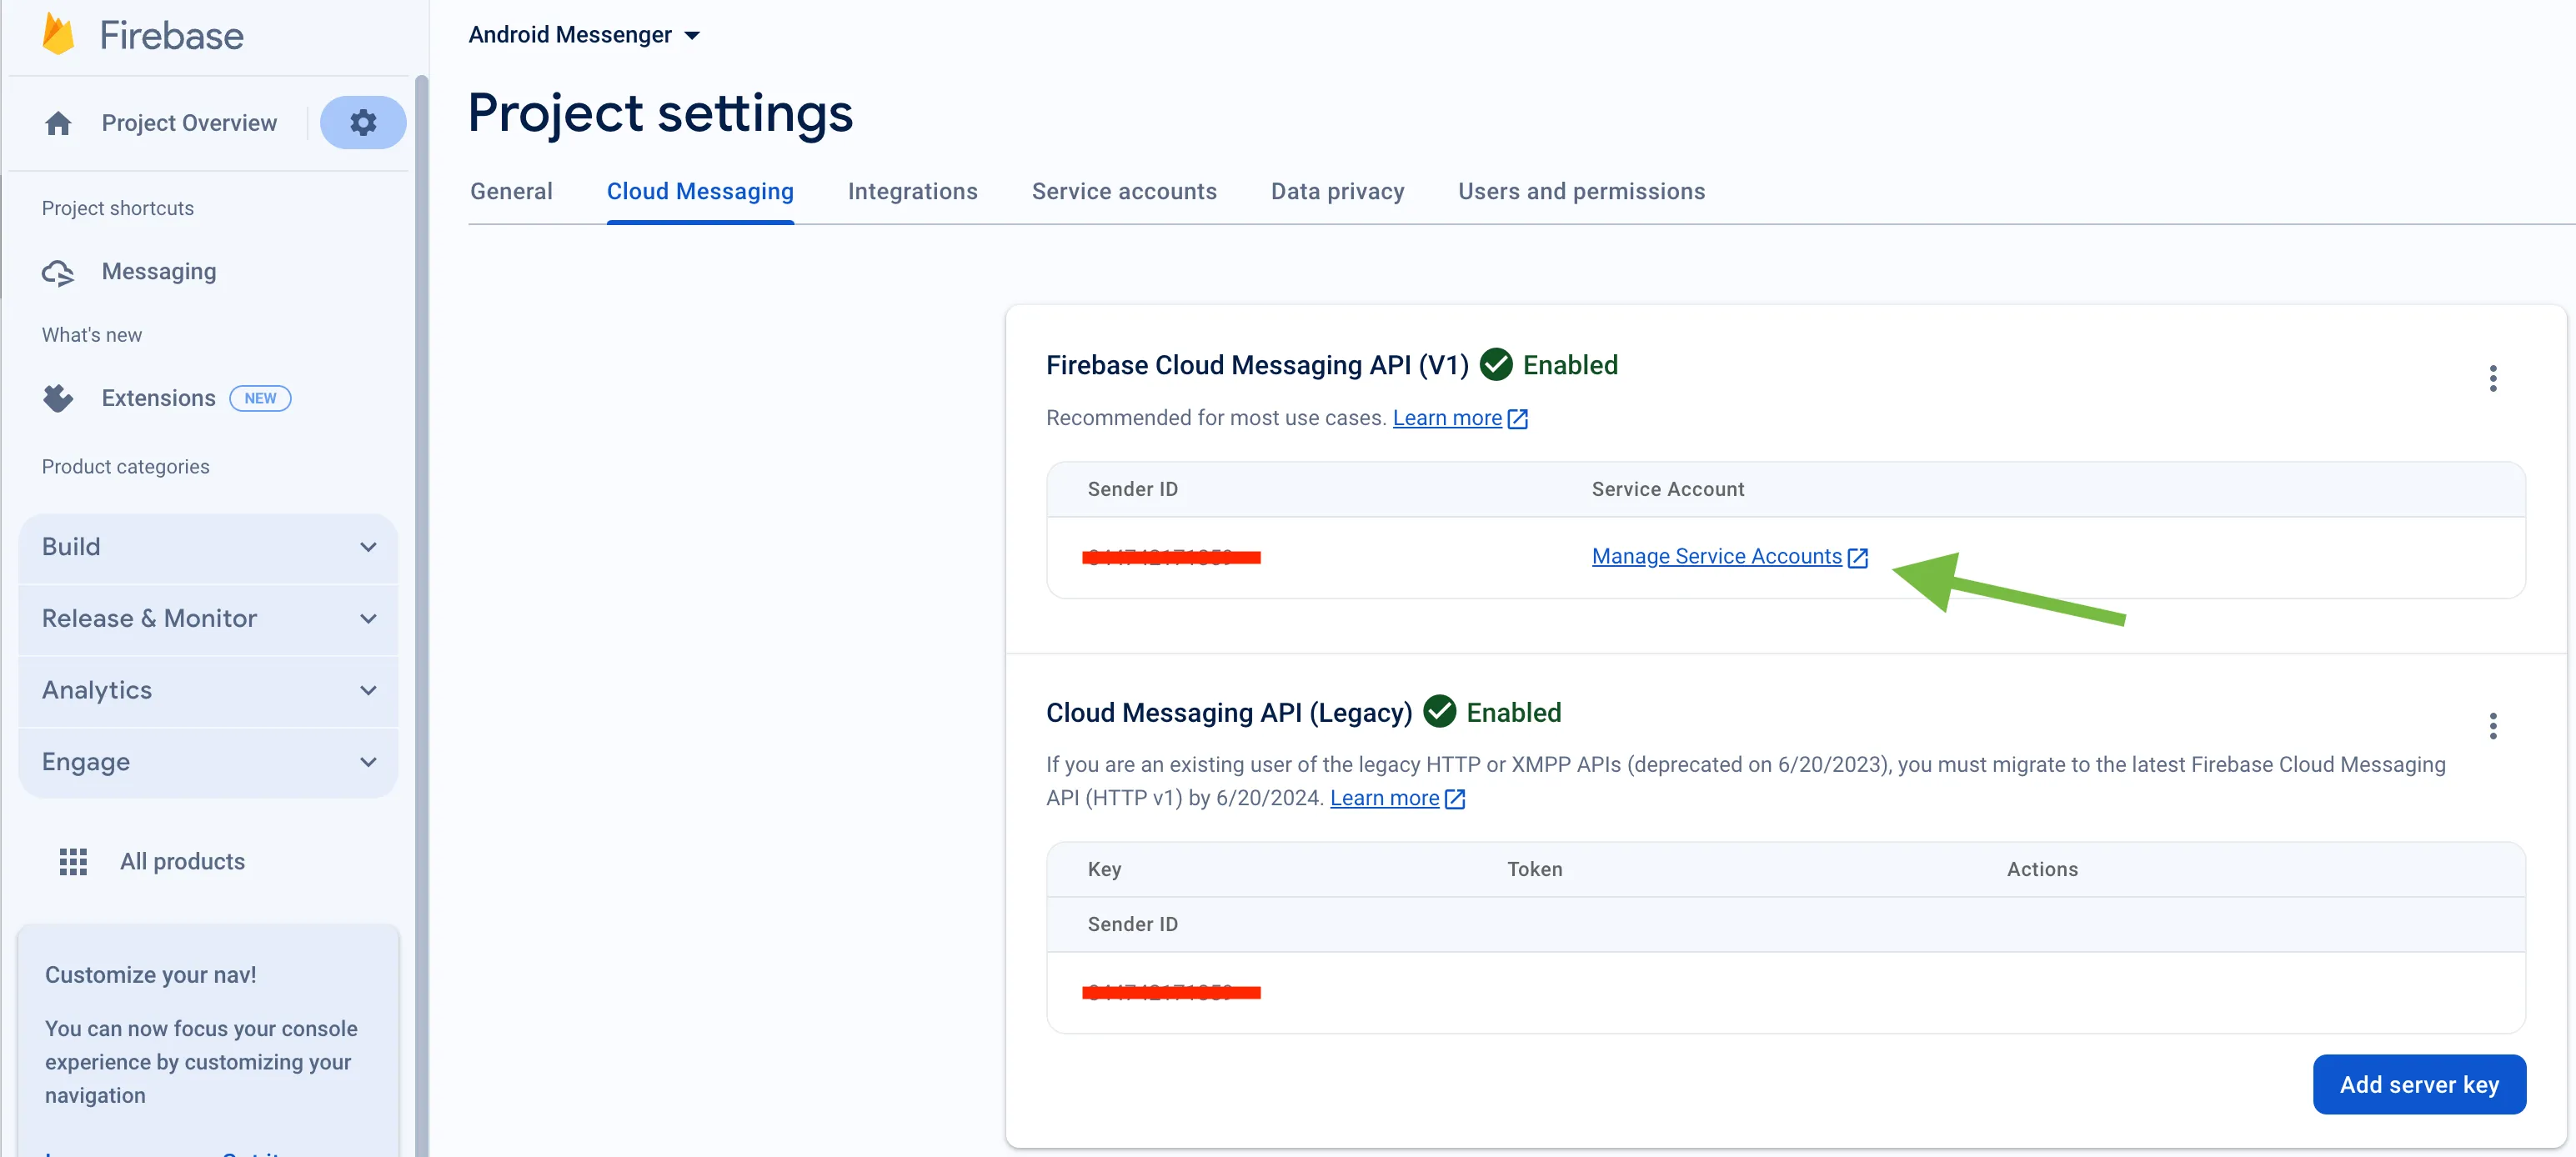
Create and configure your Firebase project and obtain the Service account key. If you have any difficulties with Firebase project registration, follow our guide.
To find your FCM service account key go to your Firebase console > Cloud Messaging > Manage Service Accounts section:
-
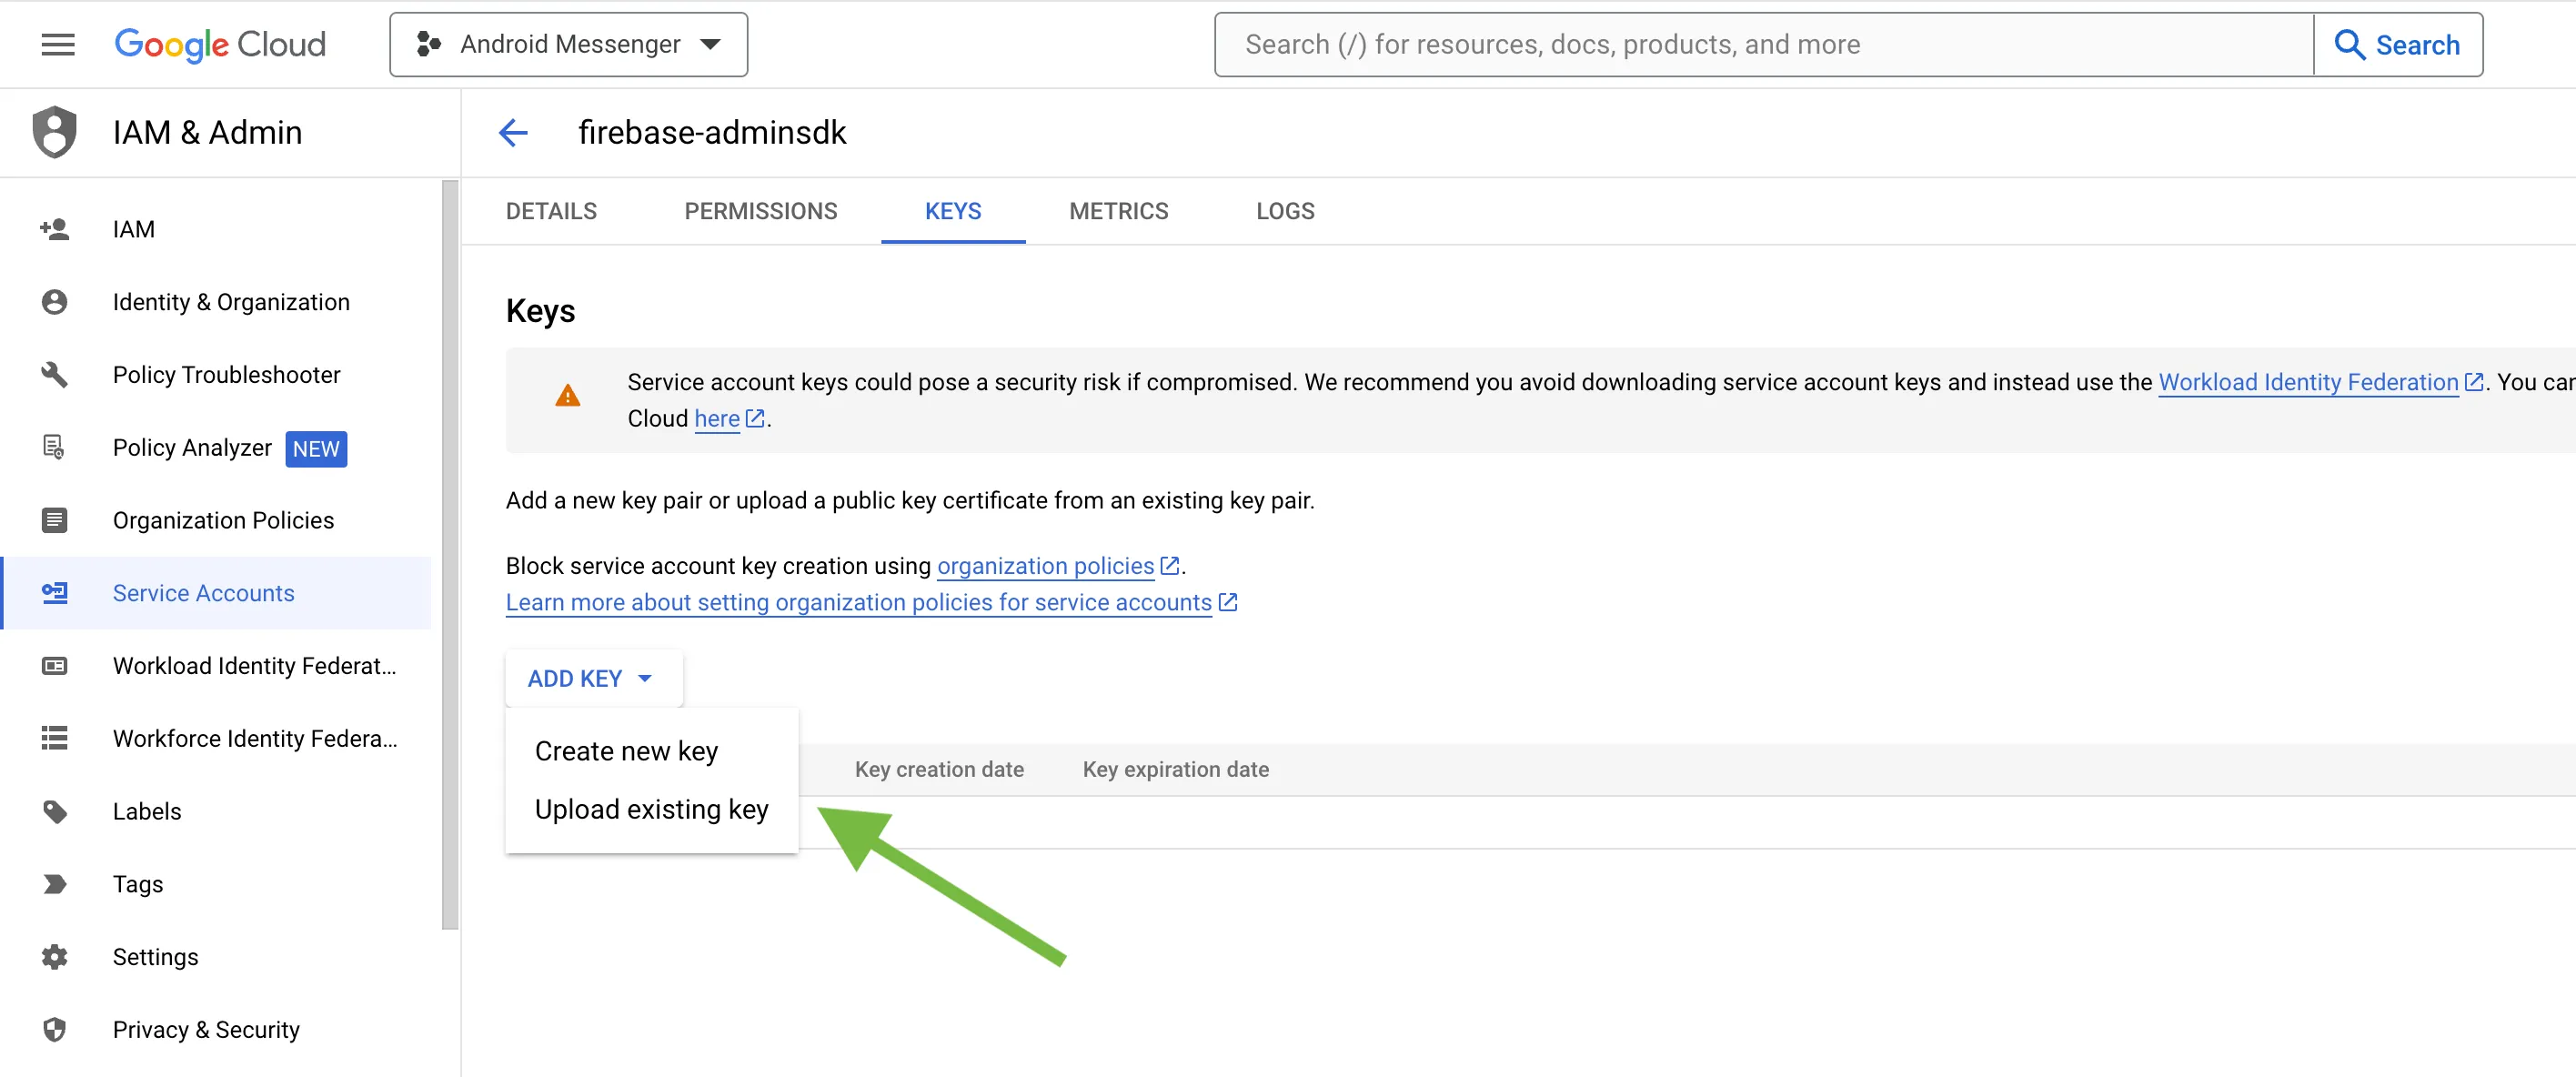
Select and configure Manage Keys option:

-
Select ADD KEY, Create new key:
-
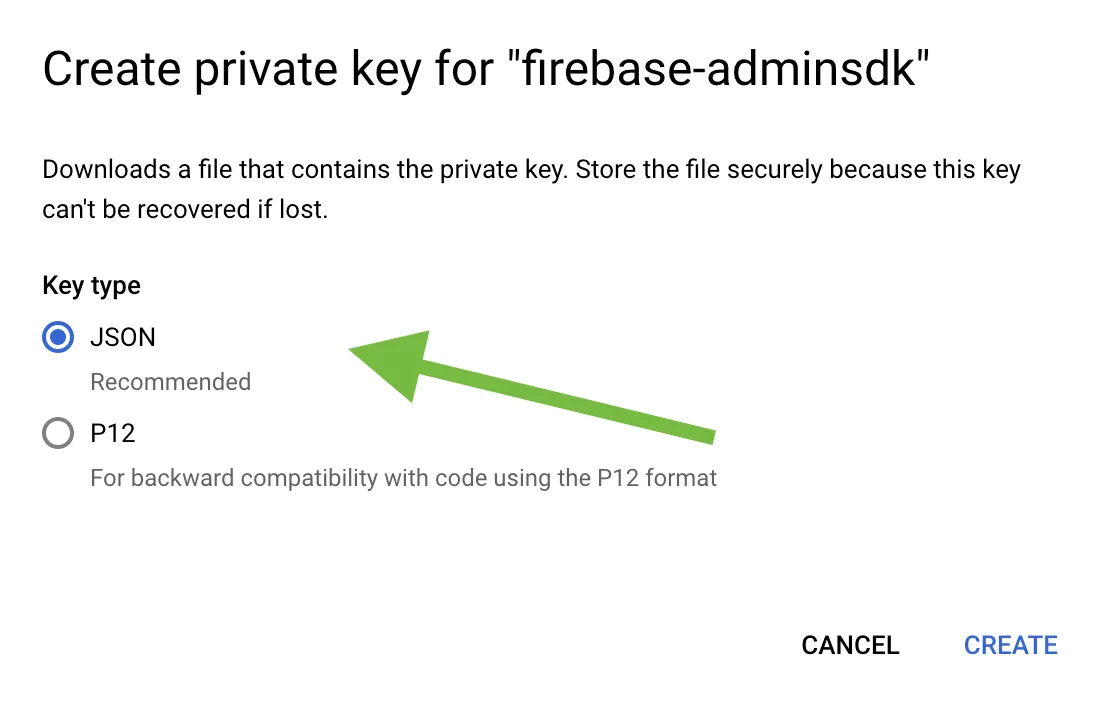
Select Key type (json recommended) and create:
-
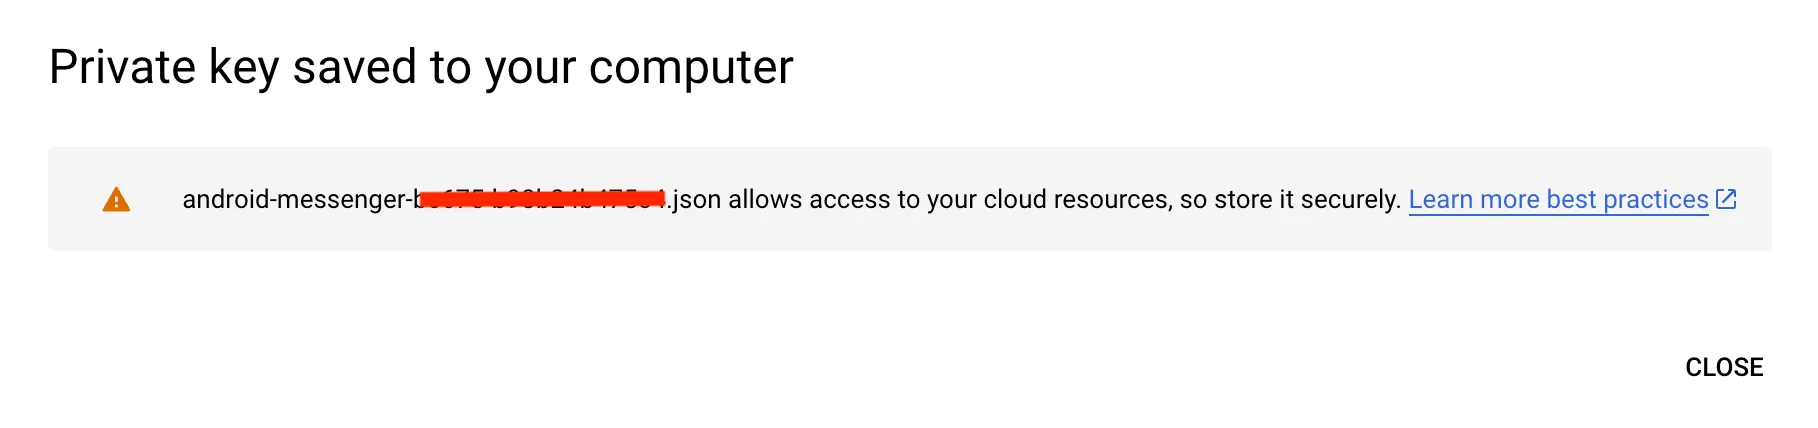
Save it locally:
-
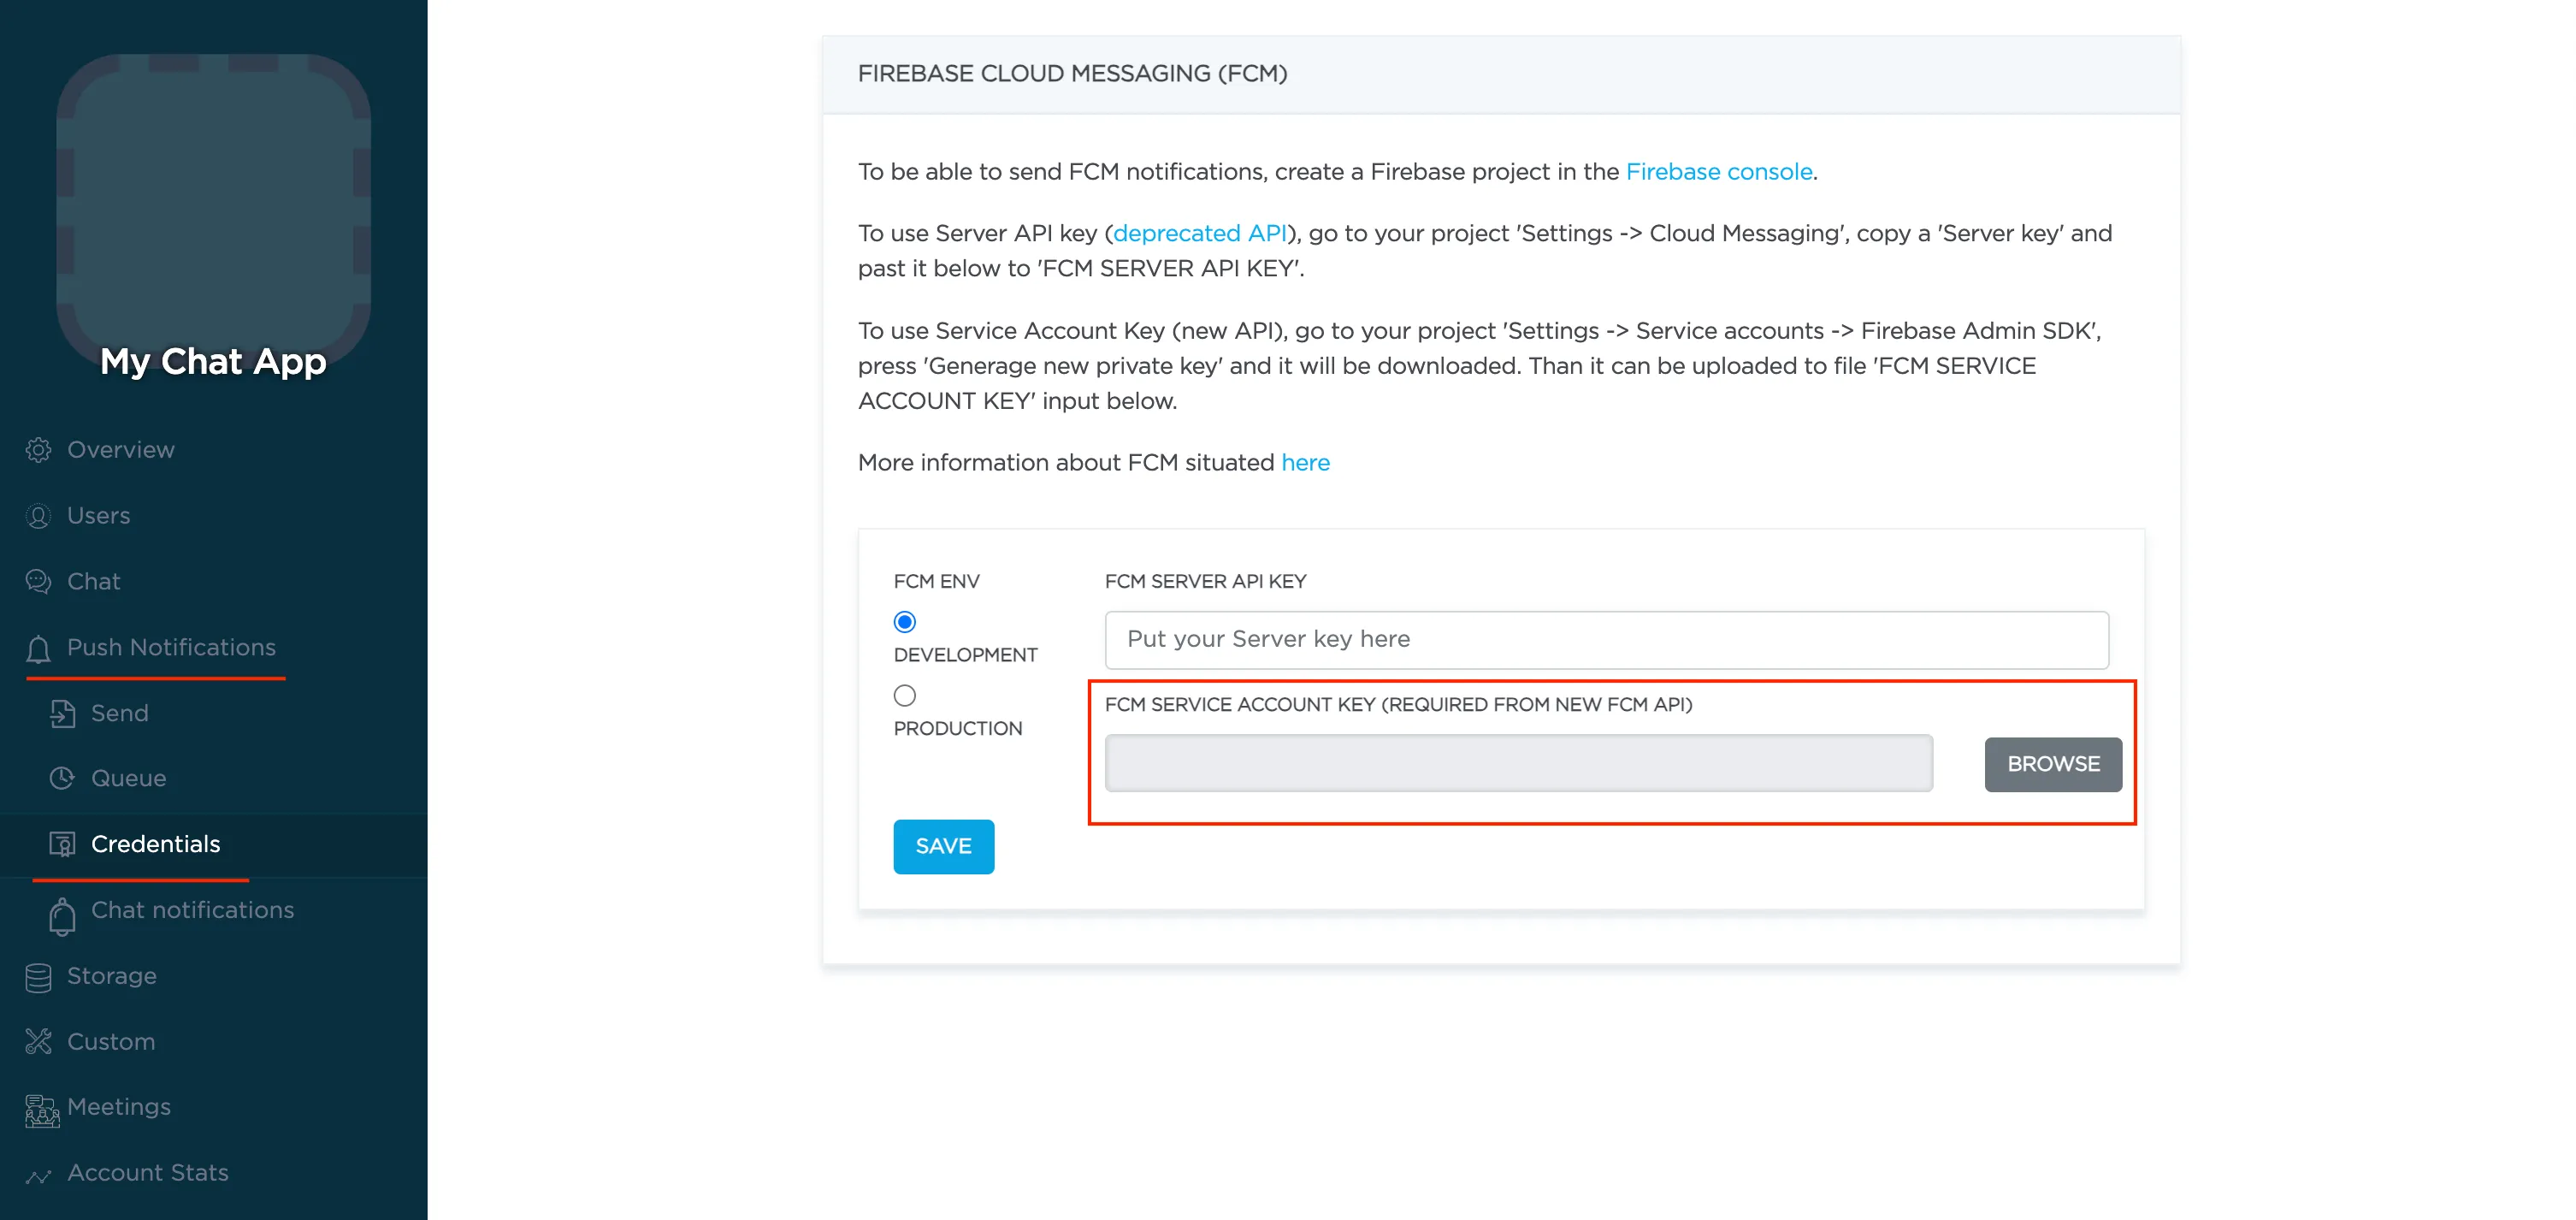
Browse your saved FCM Service account key in your Dashboard > Your App > Push Notifications > Credentials, select the environment for which you are adding the key. Use the same key for development and production zones.
-
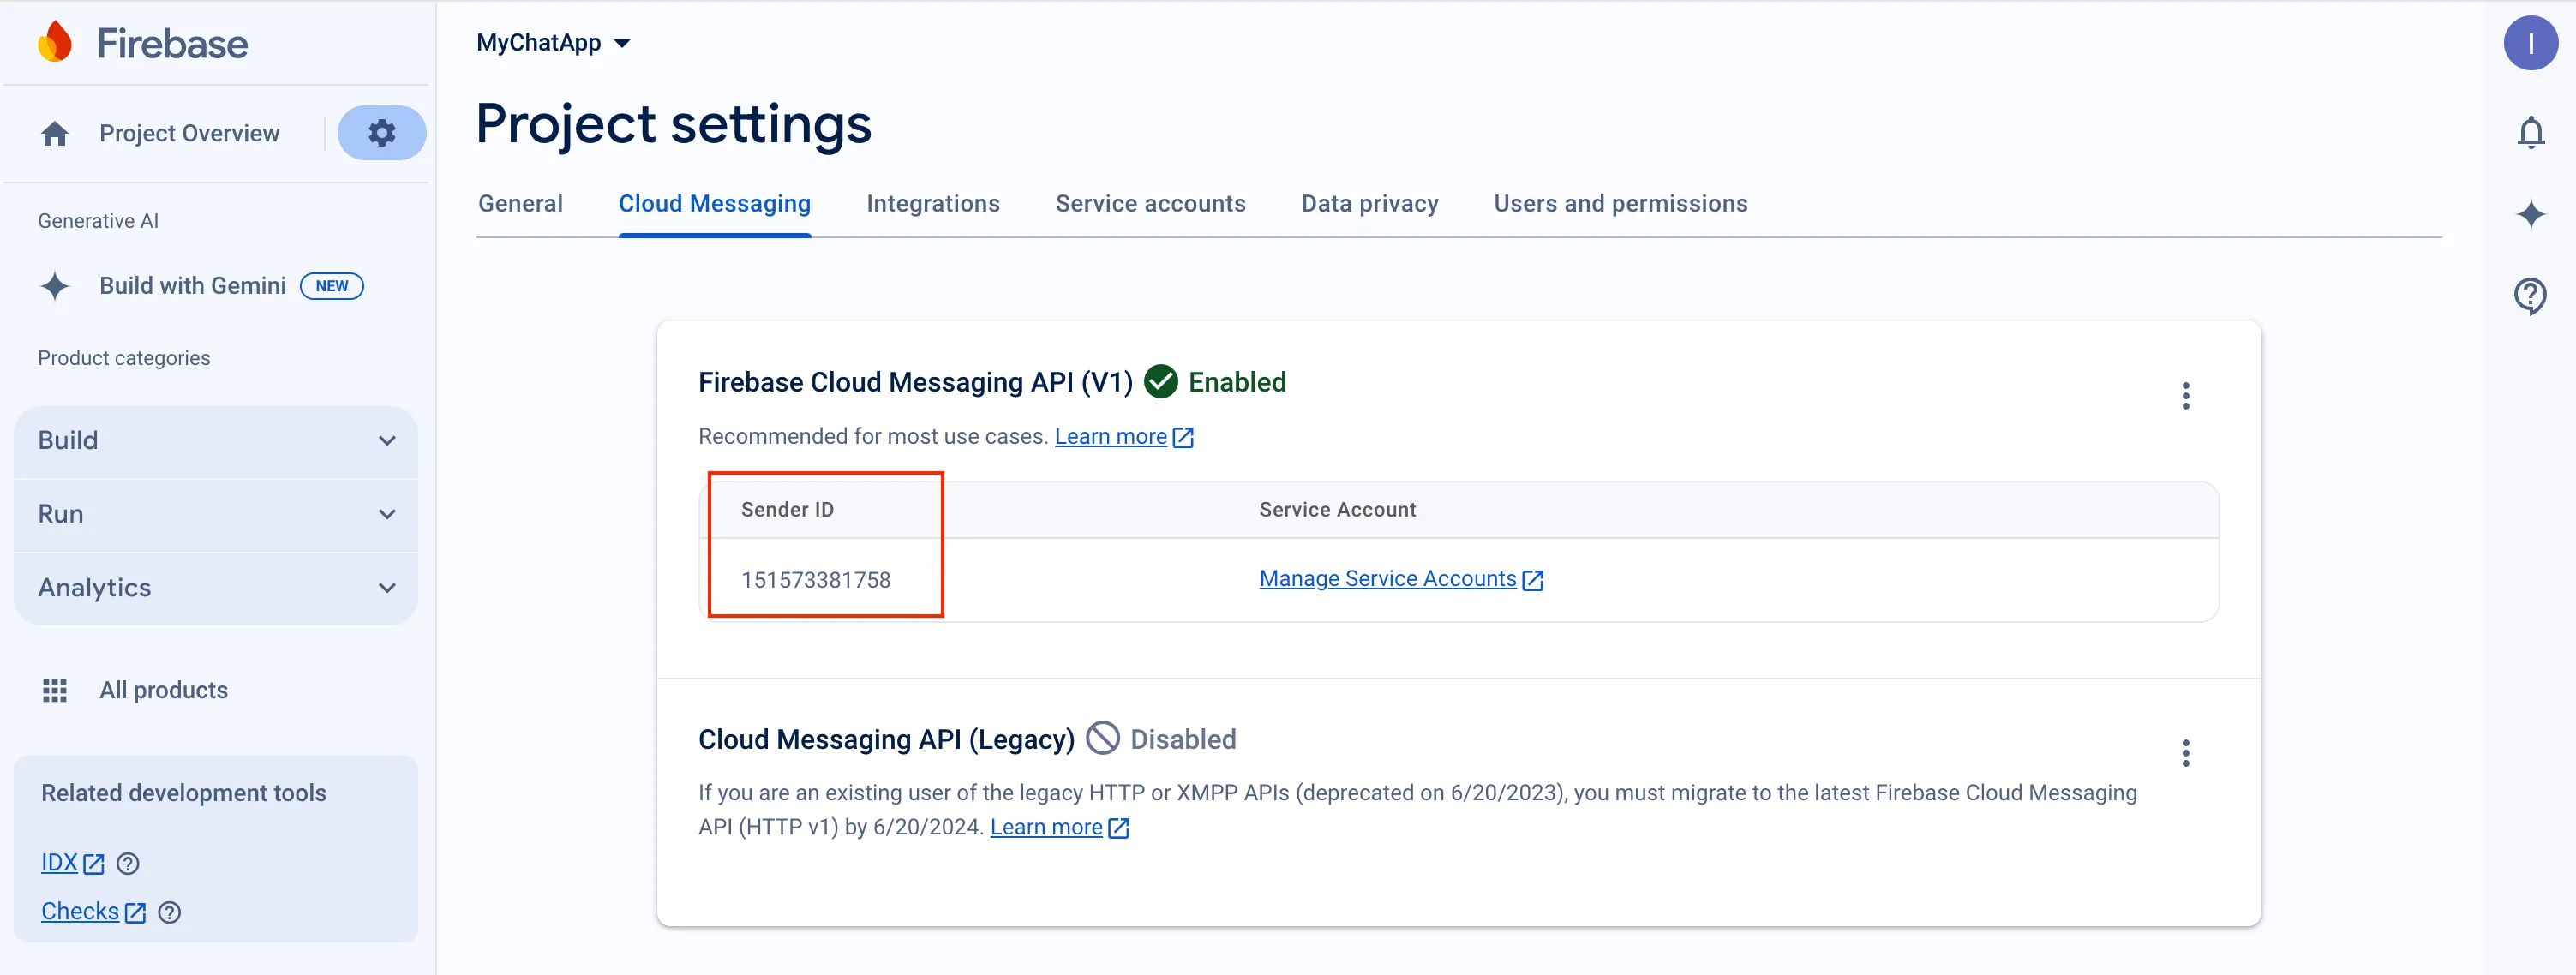
Copy Sender ID value from your Firebase console Cloud Messaging section. You may require it later.
-
In order to use push notifications on Android, you need to create
google-services.jsonfile and copy it into project’sandroid/appfolder. Also, you need to update theapplicationIdinandroid/app/build.gradleto the one which is specified ingoogle-services.json, so they must match. If you have no existing API project yet, the easiest way to go about in creating one is using this step-by-step installation process
Configure Firebase project and Server key (DEPRECATED)
Section titled “Configure Firebase project and Server key (DEPRECATED)”-
Create and configure your Firebase project and obtain the Server key. If you have any difficulties with Firebase project registration, follow our guide.
To find your FCM server key go to your Firebase console > Cloud Messaging section:
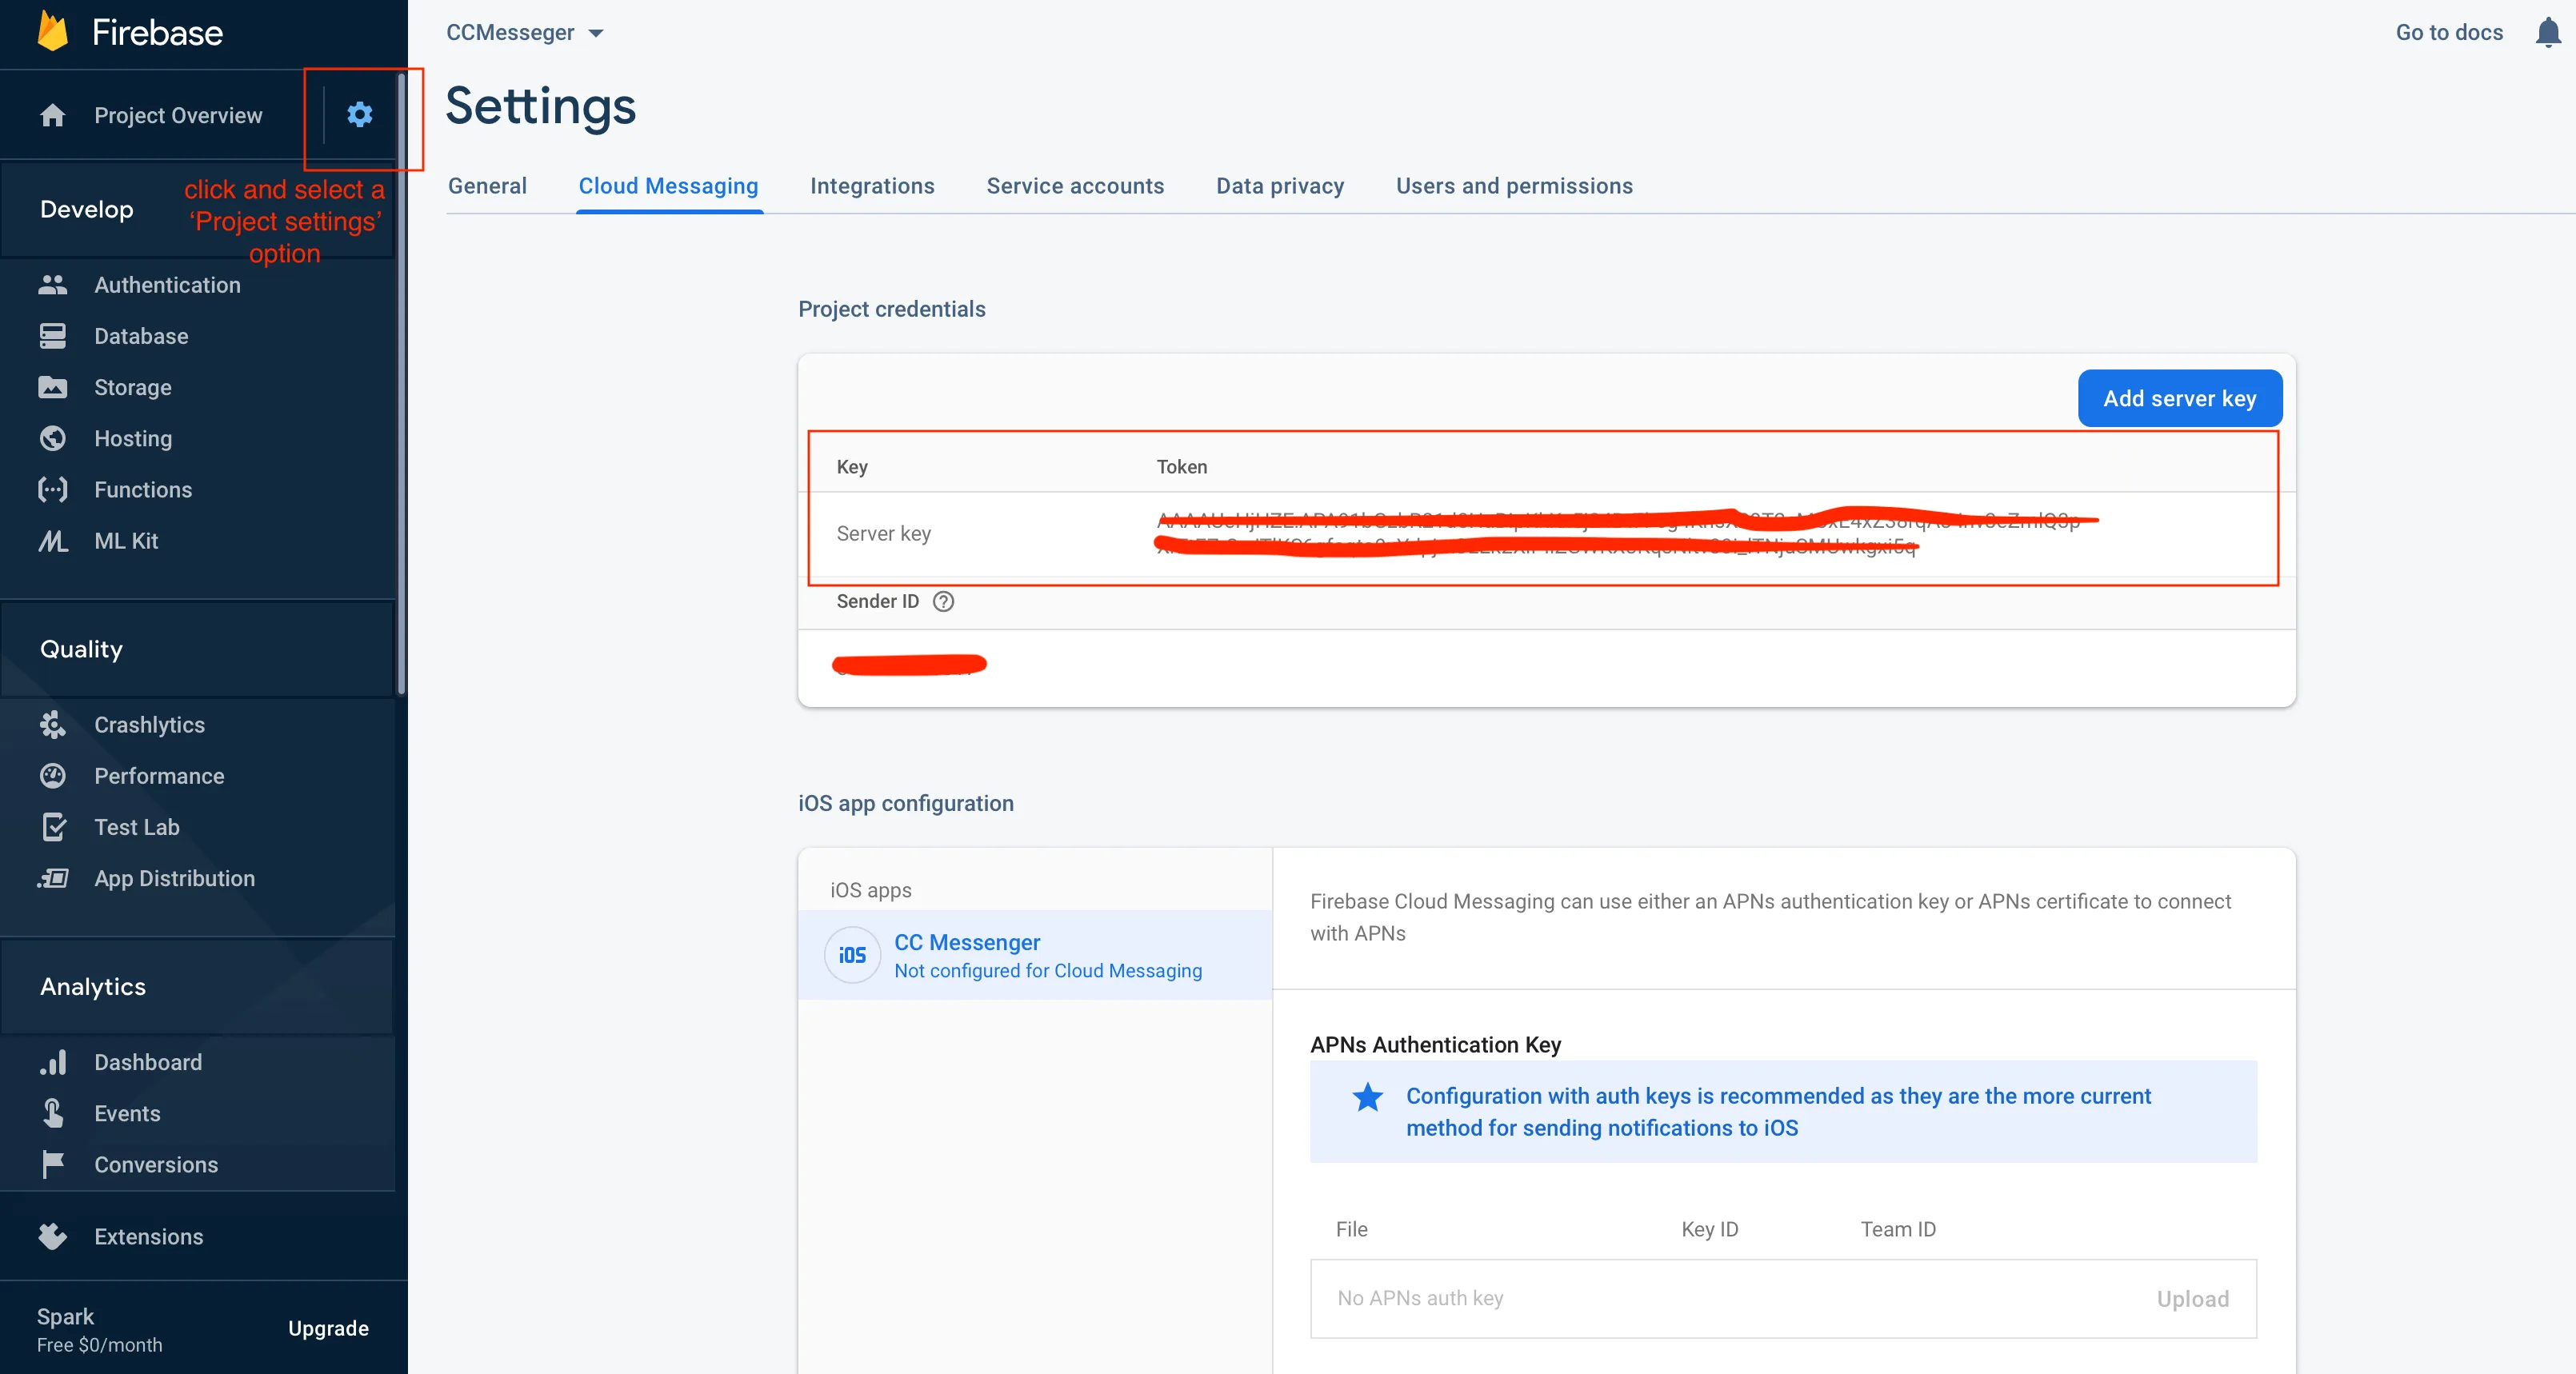
-
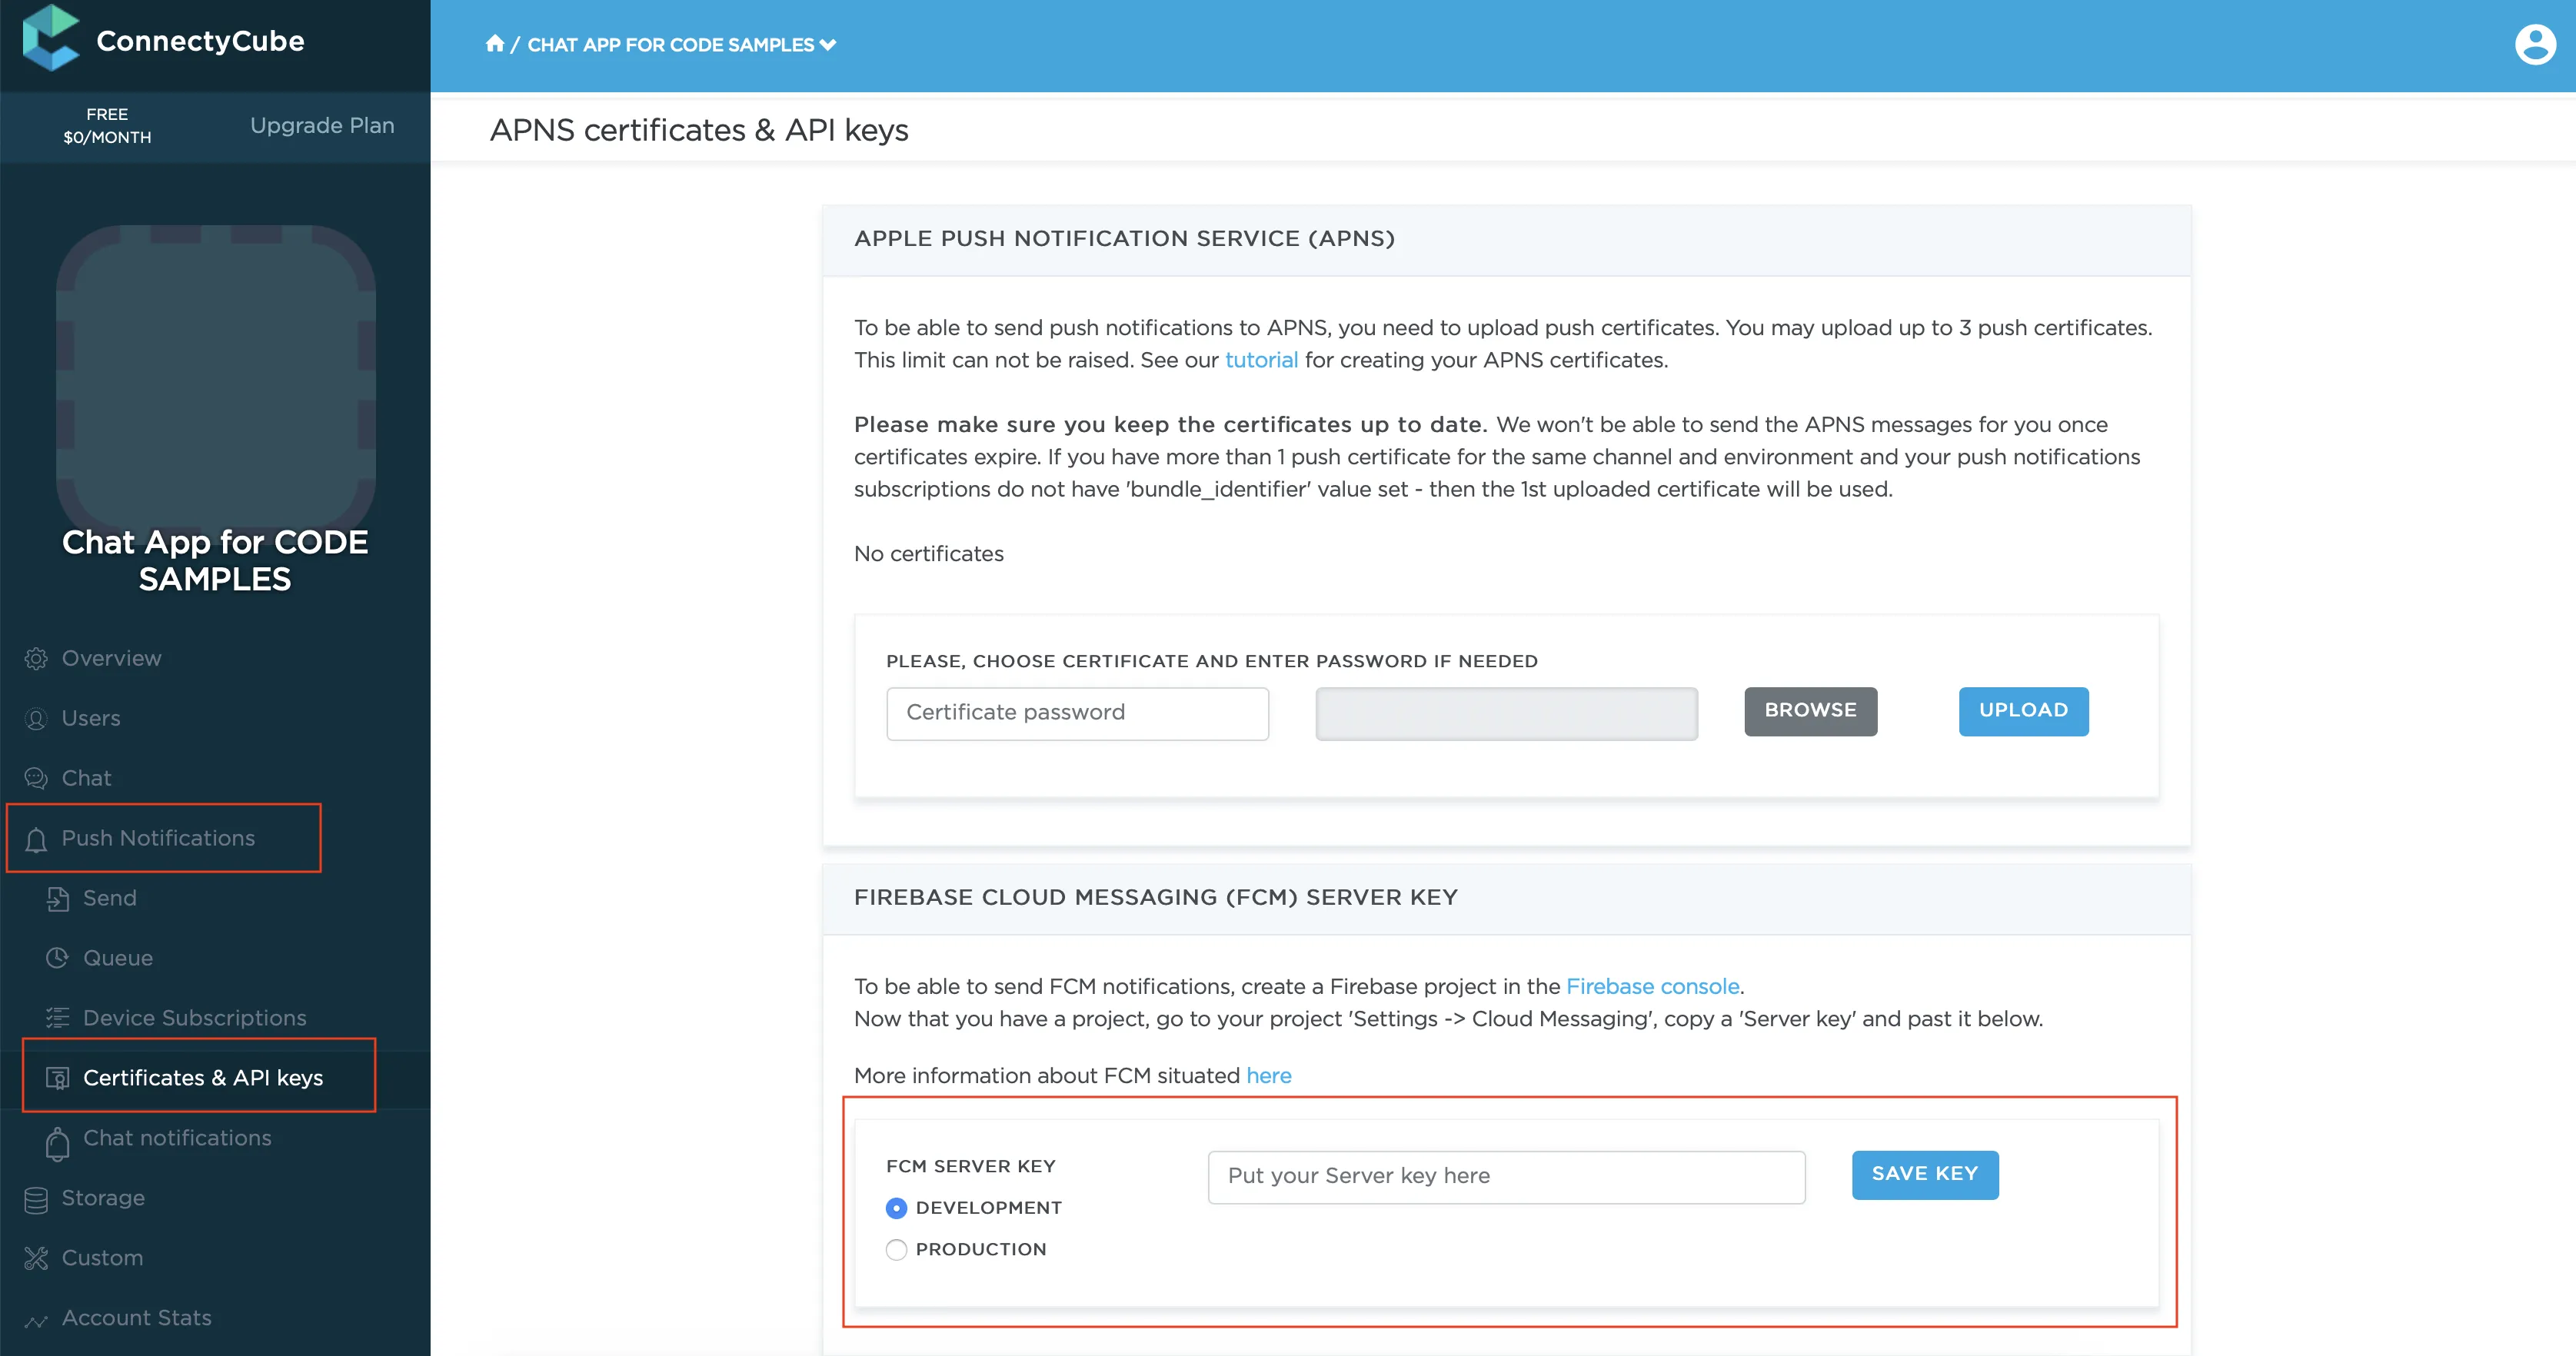
Copy your FCM server key to your Dashboard > Your App > Push Notifications > Credentials, select the environment for which you are adding the key and hit Save key. Use the same key for development and production zones.
-
Copy Sender ID value from your Firebase console Cloud Messaging section. You may require it later.
-
In order to use push notifications on Android, you need to create
google-services.jsonfile and copy it into project’sandroid/appfolder. Also, you need to update theapplicationIdinandroid/app/build.gradleto the one which is specified ingoogle-services.json, so they must match. If you have no existing API project yet, the easiest way to go about in creating one is using this step-by-step installation process
Config firebase_messaging plugin
Section titled “Config firebase_messaging plugin”Note: Below provided the short guide for configuring the
firebase_messaging. For more details and specific platform configs please follow the FlutterFire official documentation.
There is firebase_messaging plugin’s official repo.
Add dependency
Section titled “Add dependency”Add this to your package’s pubspec.yaml file:
dependencies: ... firebase_core: ^x.x.x firebase_messaging: ^x.x.x ...Install it
Section titled “Install it”You can install packages from the command line:
flutter pub getAdd classpath for goggle services plugin
Section titled “Add classpath for goggle services plugin”Add classpath to your build.gradle file by path android/build.gradle
buildscript {    ...    }
    dependencies {        ...        classpath 'com.google.gms:google-services:4.3.3'    }}
Apply Google Services plugin
Section titled “Apply Google Services plugin”Add at bottom of android/app/build.gradle next line:
apply plugin: 'com.google.gms.google-services'Add required files from Firebase development console
Section titled “Add required files from Firebase development console”- add
google-services.jsonto Android project; - add
GoogleService-Info.plistto iOS project;
Add imports
Section titled “Add imports”import 'package:firebase_core/firebase_core.dart';import 'package:firebase_messaging/firebase_messaging.dart';Init and configure plugin in your app
Section titled “Init and configure plugin in your app”...
void init() { Firebase.initializeApp(); FirebaseMessaging firebaseMessaging = FirebaseMessaging.instance;
// request permissions for showing notification in iOS firebaseMessaging.requestPermission(alert: true, badge: true, sound: true);
// add listener for foreground push notifications FirebaseMessaging.onMessage.listen((remoteMessage) { log('[onMessage] message: $remoteMessage'); showNotification(remoteMessage); });
// set listener for push notifications, which will be received when app in background or killed FirebaseMessaging.onBackgroundMessage(onBackgroundMessage);}Automatic config using FlutterFire CLI
Section titled “Automatic config using FlutterFire CLI”There is alternative way for configuring the FCM in your Flutter project. It is the FlutterFire CLI. Using this tool you can configure FCM in automatic mode. Just follow the guide on how to generate and use the configuration file.
Subscribe to push notifications
Section titled “Subscribe to push notifications”In order to start receiving push notifications you need to subscribe your current device.
First of all you have to get token:
FirebaseMessaging firebaseMessaging = FirebaseMessaging.instance;String token;if (Platform.isAndroid || kIsWeb) {    token = await firebaseMessaging.getToken();} else if (Platform.isIOS || Platform.isMacOS) {    token = await firebaseMessaging.getAPNSToken();}
if (!isEmpty(token)) {    subscribe(token);}
firebaseMessaging.onTokenRefresh.listen((newToken) {    subscribe(newToken);});
Then you can subscribe for push notifications using token:
subscribe(String token) async {    log('[subscribe] token: $token');
    bool isProduction = bool.fromEnvironment('dart.vm.product');
    CreateSubscriptionParameters parameters = CreateSubscriptionParameters();    parameters.environment =        isProduction ? CubeEnvironment.PRODUCTION : CubeEnvironment.DEVELOPMENT;
    if (Platform.isAndroid) {      parameters.channel = NotificationsChannels.GCM;      parameters.platform = CubePlatform.ANDROID;      parameters.bundleIdentifier = "com.connectycube.flutter.chat_sample";    } else if (Platform.isIOS) {      parameters.channel = NotificationsChannels.APNS;      parameters.platform = CubePlatform.IOS;      parameters.bundleIdentifier = Platform.isIOS          ? "com.connectycube.flutter.chatSample.app"          : "com.connectycube.flutter.chatSample.macOS";    }
    String deviceId = await DeviceId.getID;    parameters.udid = deviceId;    parameters.pushToken = token;
    createSubscription(parameters.getRequestParameters())        .then((cubeSubscription) {})        .catchError((error) {});}
FCM on the iOS/macOS
Section titled “FCM on the iOS/macOS”Alternatively, there is a way to use Firebase (FCM) push notifications on the iOS and macOS platforms. While we recommend use native Apple push notifications on iOS (as described above), you may have a requirement to use (FCM) push notifications on iOS.
The configuration of the Flutter project is easy and you can do it in a few simple steps by following the official FlutterFire documentation. The main steps include:
- Configuring your app;
- Enable Push Notifications (in the same way as for APNS);
- Enable Background Modes (iOS only) (in the same way as for APNS);
- Linking APNs with FCM;
After that you can use the FCM push notifications on the iOS/macOS in the same way as the Android/Web. It means that you should use the FCM configuration for making the subscription on the iOS/macOS, namely:
CreateSubscriptionParameters parameters = CreateSubscriptionParameters();
if (Platform.isAndroid || kIsWeb) {  parameters.channel = NotificationsChannels.GCM;  parameters.platform = CubePlatform.ANDROID;} else if (Platform.isIOS || Platform.isMacOS) {  parameters.channel = NotificationsChannels.GCM;  parameters.platform = CubePlatform.IOS;}
FirebaseMessaging firebaseMessaging = FirebaseMessaging.instance;var token = await firebaseMessaging.getToken();parameters.pushToken = token;// and other required parameters for subscription on the push notifications
Send push notifications
Section titled “Send push notifications”You can manually initiate a push notification to user/users on any event in your application. To do so you need to form a push notification parameters (payload) and set the push recipients:
bool isProduction = bool.fromEnvironment('dart.vm.product');
CreateEventParams params = CreateEventParams();params.parameters = {  'message': "Some message in push", // 'message' field is required  'custom_parameter1': "custom parameter value 1",  'custom_parameter2': "custom parameter value 2",  'ios_voip': 1 // to send VoIP push notification to iOS  //more standard parameters you can found by link https://developers.connectycube.com/server/push_notifications#universal-push-notifications};
params.notificationType = NotificationType.PUSH;params.environment = isProduction ? CubeEnvironment.PRODUCTION : CubeEnvironment.DEVELOPMENT;params.usersIds = [88707, 88708];
createEvent(params.getEventForRequest())  .then((cubeEvent) {})  .catchError((error) {});
Receive push notifications
Section titled “Receive push notifications”Depending on a devices state, incoming messages are handled differently. They will be received in one of the registered callbacks which you set during initialisation plugin according to documentation.
FirebaseMessaging.onMessage.listen((RemoteMessage message) {    log('[onMessage] message: $message', TAG);    showNotification(message);});
FirebaseMessaging.onBackgroundMessage(onBackgroundMessage);
Future<void> onBackgroundMessage(RemoteMessage message) {  log('[onBackgroundMessage] message: $message');  showNotification(message);  return Future.value();}
Here you can add an appropriate logic in your app. The things can be one of the following:
- If this is a chat message, once clicked on it - we can redirect a user to an appropriate chat by dialog_id data param
- Raise a local notification https://pub.dev/packages/flutter_local_notifications with an alternative info to show for a user
Unsubscribe
Section titled “Unsubscribe”In order to unsubscribe and stop receiving push notifications you need to list your current subscriptions and then choose those to be deleted:
getSubscriptions() .then((subscriptionsList) { int subscriptionIdToDelete = subscriptionsList[0].id; // or other subscription's id return deleteSubscription(subscriptionIdToDelete); }) .then((voidResult) {}) .catchError((error) {});VoIP push notifications
Section titled “VoIP push notifications”ConnectyCube supports iOS VoIP push notifications via same API described above. The main use case for iOS VoIP push notifications is to show a native calling interface on incoming call when an app is in killed/background state - via CallKit.
The common flow of using VoIP push notifications is the following:
-
for VoIP pushes it requires to generate a separated VoIP device token. The Flutter platform has a lot of plugins for getting the VoIP token from the system. There are:
We will use our own development connectycube_flutter_call_kit in examples below.
So, get the VoIP token:
var token = await ConnectycubeFlutterCallKit.getToken(); -
then when token is retrieved, you need to subscribe to voip pushes by passing a
notification_channel: apns_voipchannel in a subscription request:var token = await ConnectycubeFlutterCallKit.getToken();subscribe(String token) async {CreateSubscriptionParameters parameters = CreateSubscriptionParameters();parameters.pushToken = token;bool isProduction = kReleaseMode ? CubeEnvironment.PRODUCTION : CubeEnvironment.DEVELOPMENT;if (Platform.isIOS) {parameters.channel = NotificationsChannels.APNS_VOIP;parameters.platform = CubePlatform.IOS;}String? deviceId = await PlatformDeviceId.getDeviceId;parameters.udid = deviceId;var packageInfo = await PackageInfo.fromPlatform();parameters.bundleIdentifier = packageInfo.packageName;createSubscription(parameters.getRequestParameters()).then((cubeSubscriptions) {log('[subscribe] subscription SUCCESS', TAG);}).catchError((error) {log('[subscribe] subscription ERROR: $error', TAG);});} -
then when you want to send a voip push notification, use
ios_voip: 1parameter in a push payload in a create event request:P2PSession callSession; // the call session created beforeCreateEventParams params = CreateEventParams();params.parameters = {'message': "Incoming ${callSession.callType == CallType.VIDEO_CALL ? "Video" : "Audio"} call",'call_type': callSession.callType,'session_id': callSession.sessionId,'caller_id': callSession.callerId,'caller_name': callerName,'call_opponents': callSession.opponentsIds.join(','),'signal_type': 'startCall','ios_voip': 1,};params.notificationType = NotificationType.PUSH;params.environment = kReleaseMode ? CubeEnvironment.PRODUCTION : CubeEnvironment.DEVELOPMENT;params.usersIds = callSession.opponentsIds.toList();createEvent(params.getEventForRequest()).then((cubeEvent) {// event was created}).catchError((error) {// something went wrong during event creation});