Push Notifications
Push Notifications provide a way to deliver some information to user while he is not using your app actively. The following use cases can be covered additionally with push notifications:
- send a chat message if recipient is offline (a push notification will be send automatically)
- make a video call with offline opponents (need to send a push notification manually)
- request to add a user to contact list (need to send a push notification manually)
Configure Firebase project and Service account key (recommended)
Section titled “Configure Firebase project and Service account key (recommended)”In order to start working with push notifications functionality you need to configure it.
-
Create and configure your Firebase project and obtain the Service account key. If you have any difficulties with Firebase project registration, follow our guide.
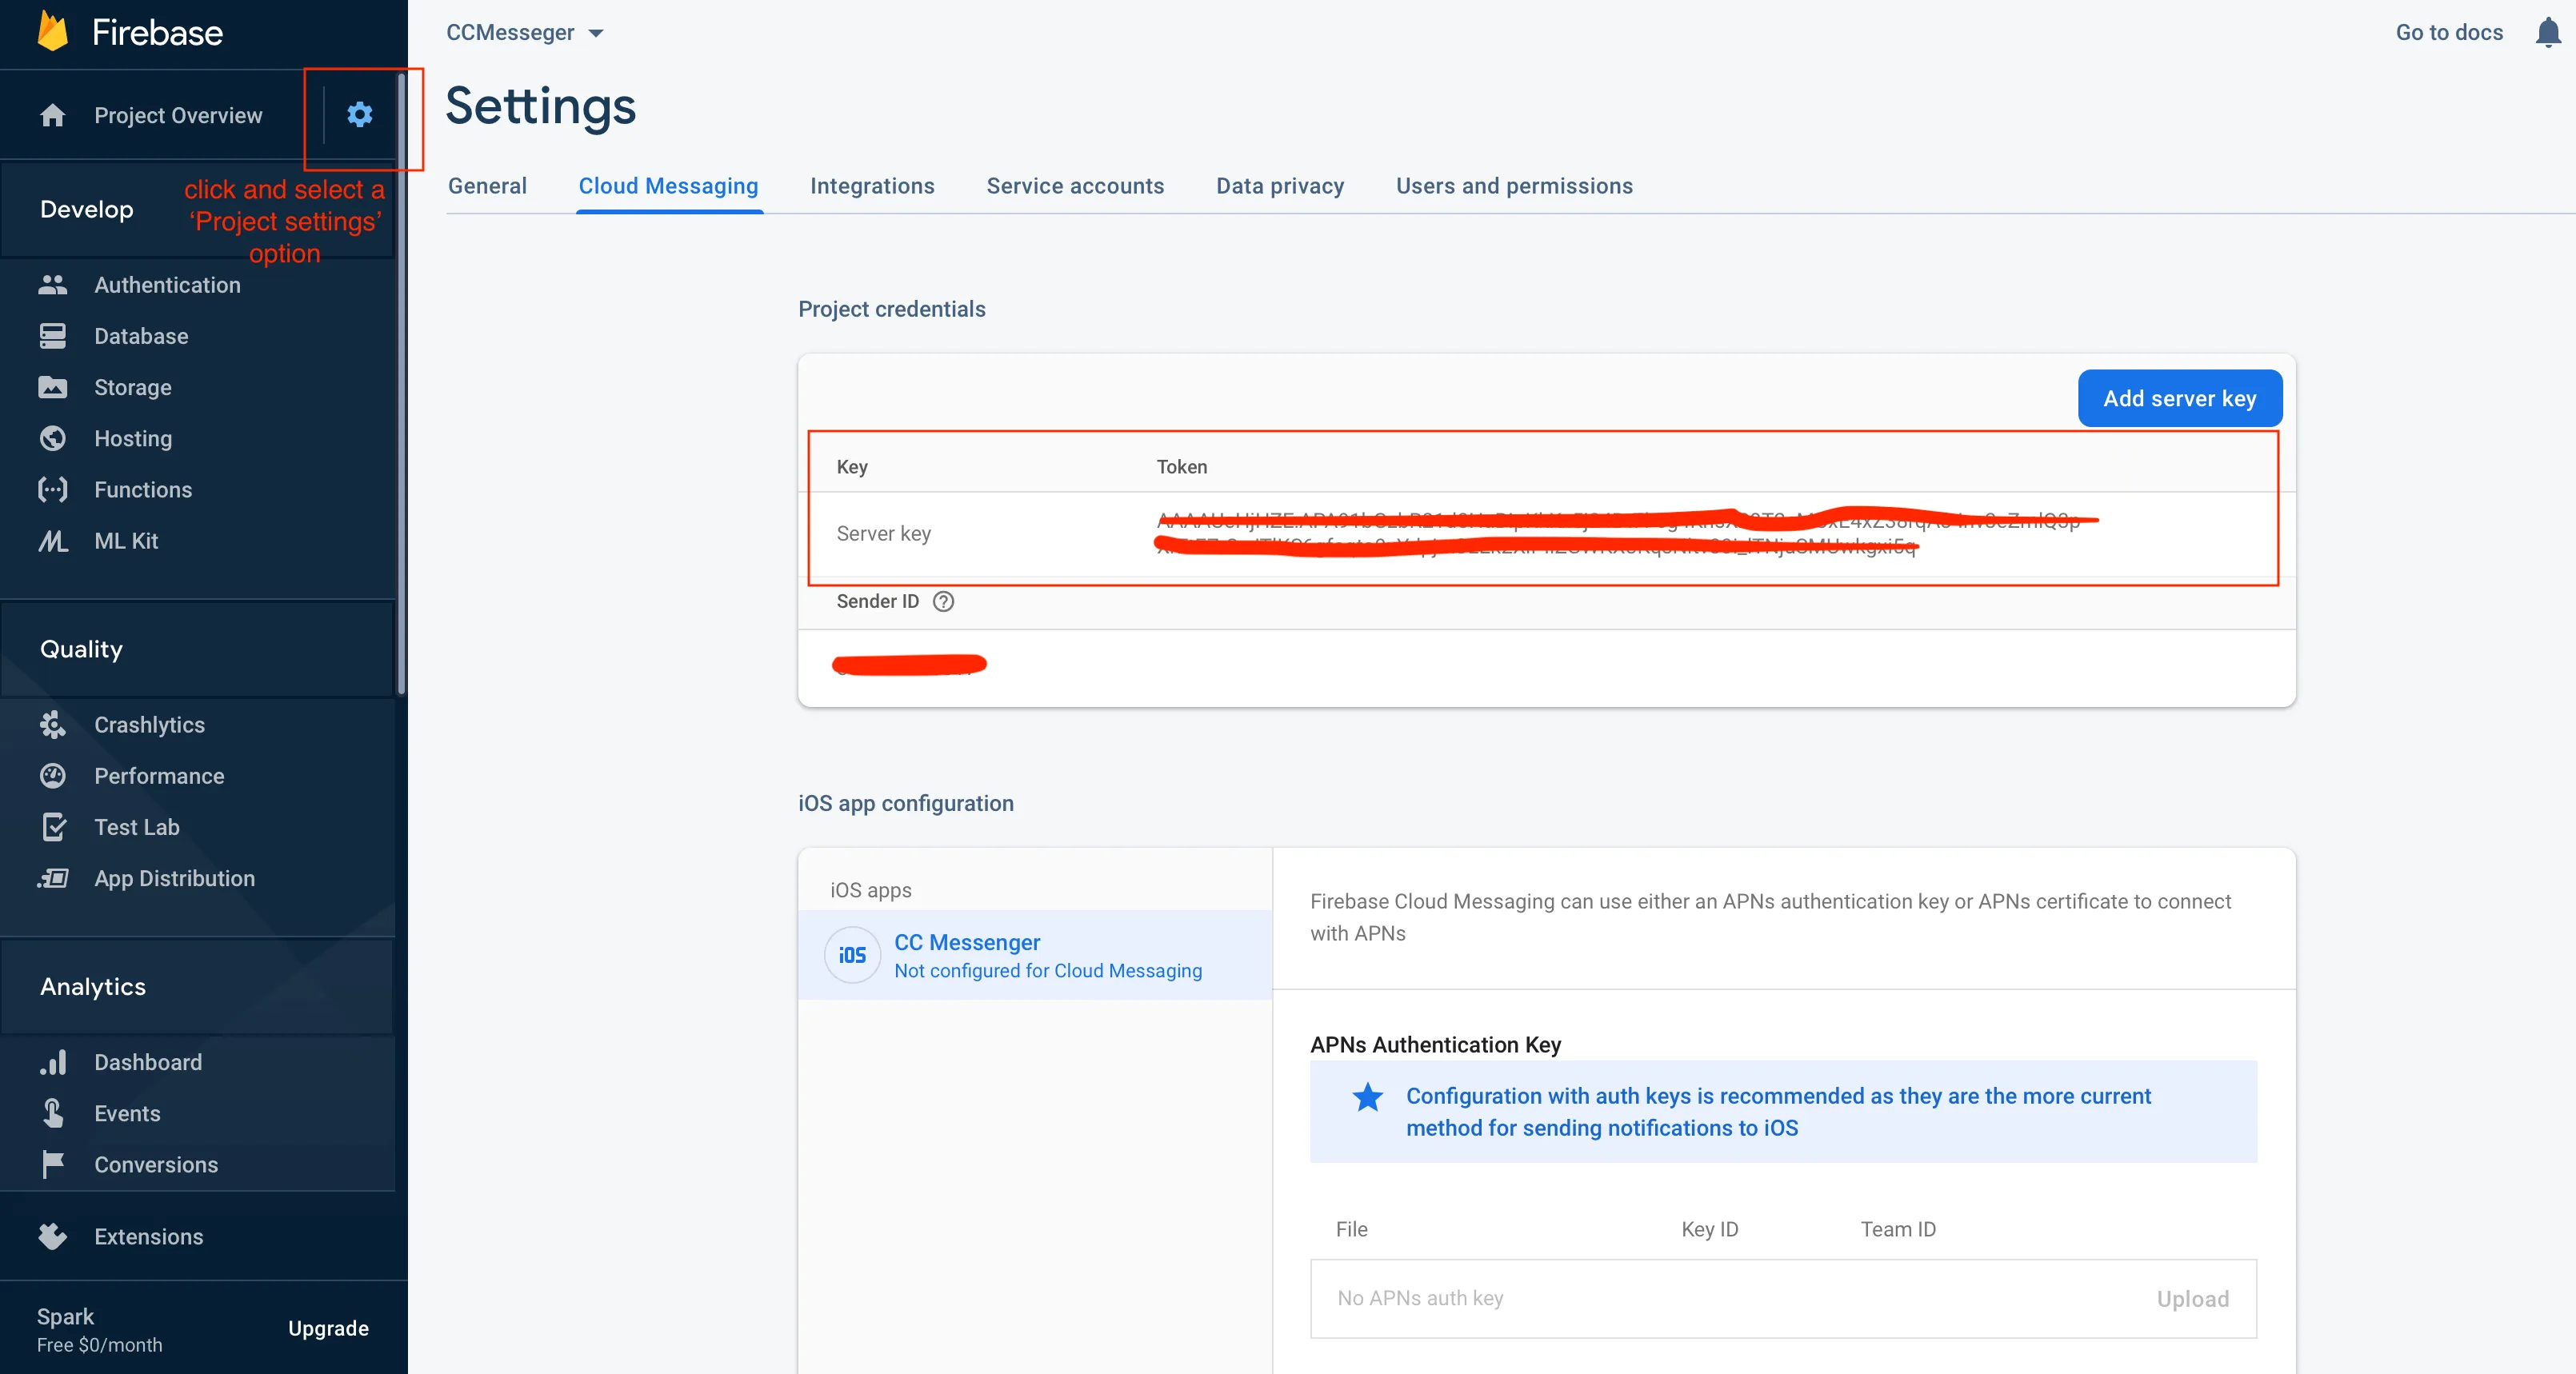
To find your FCM service account key go to your Firebase console > Cloud Messaging > Manage Service Accounts section:
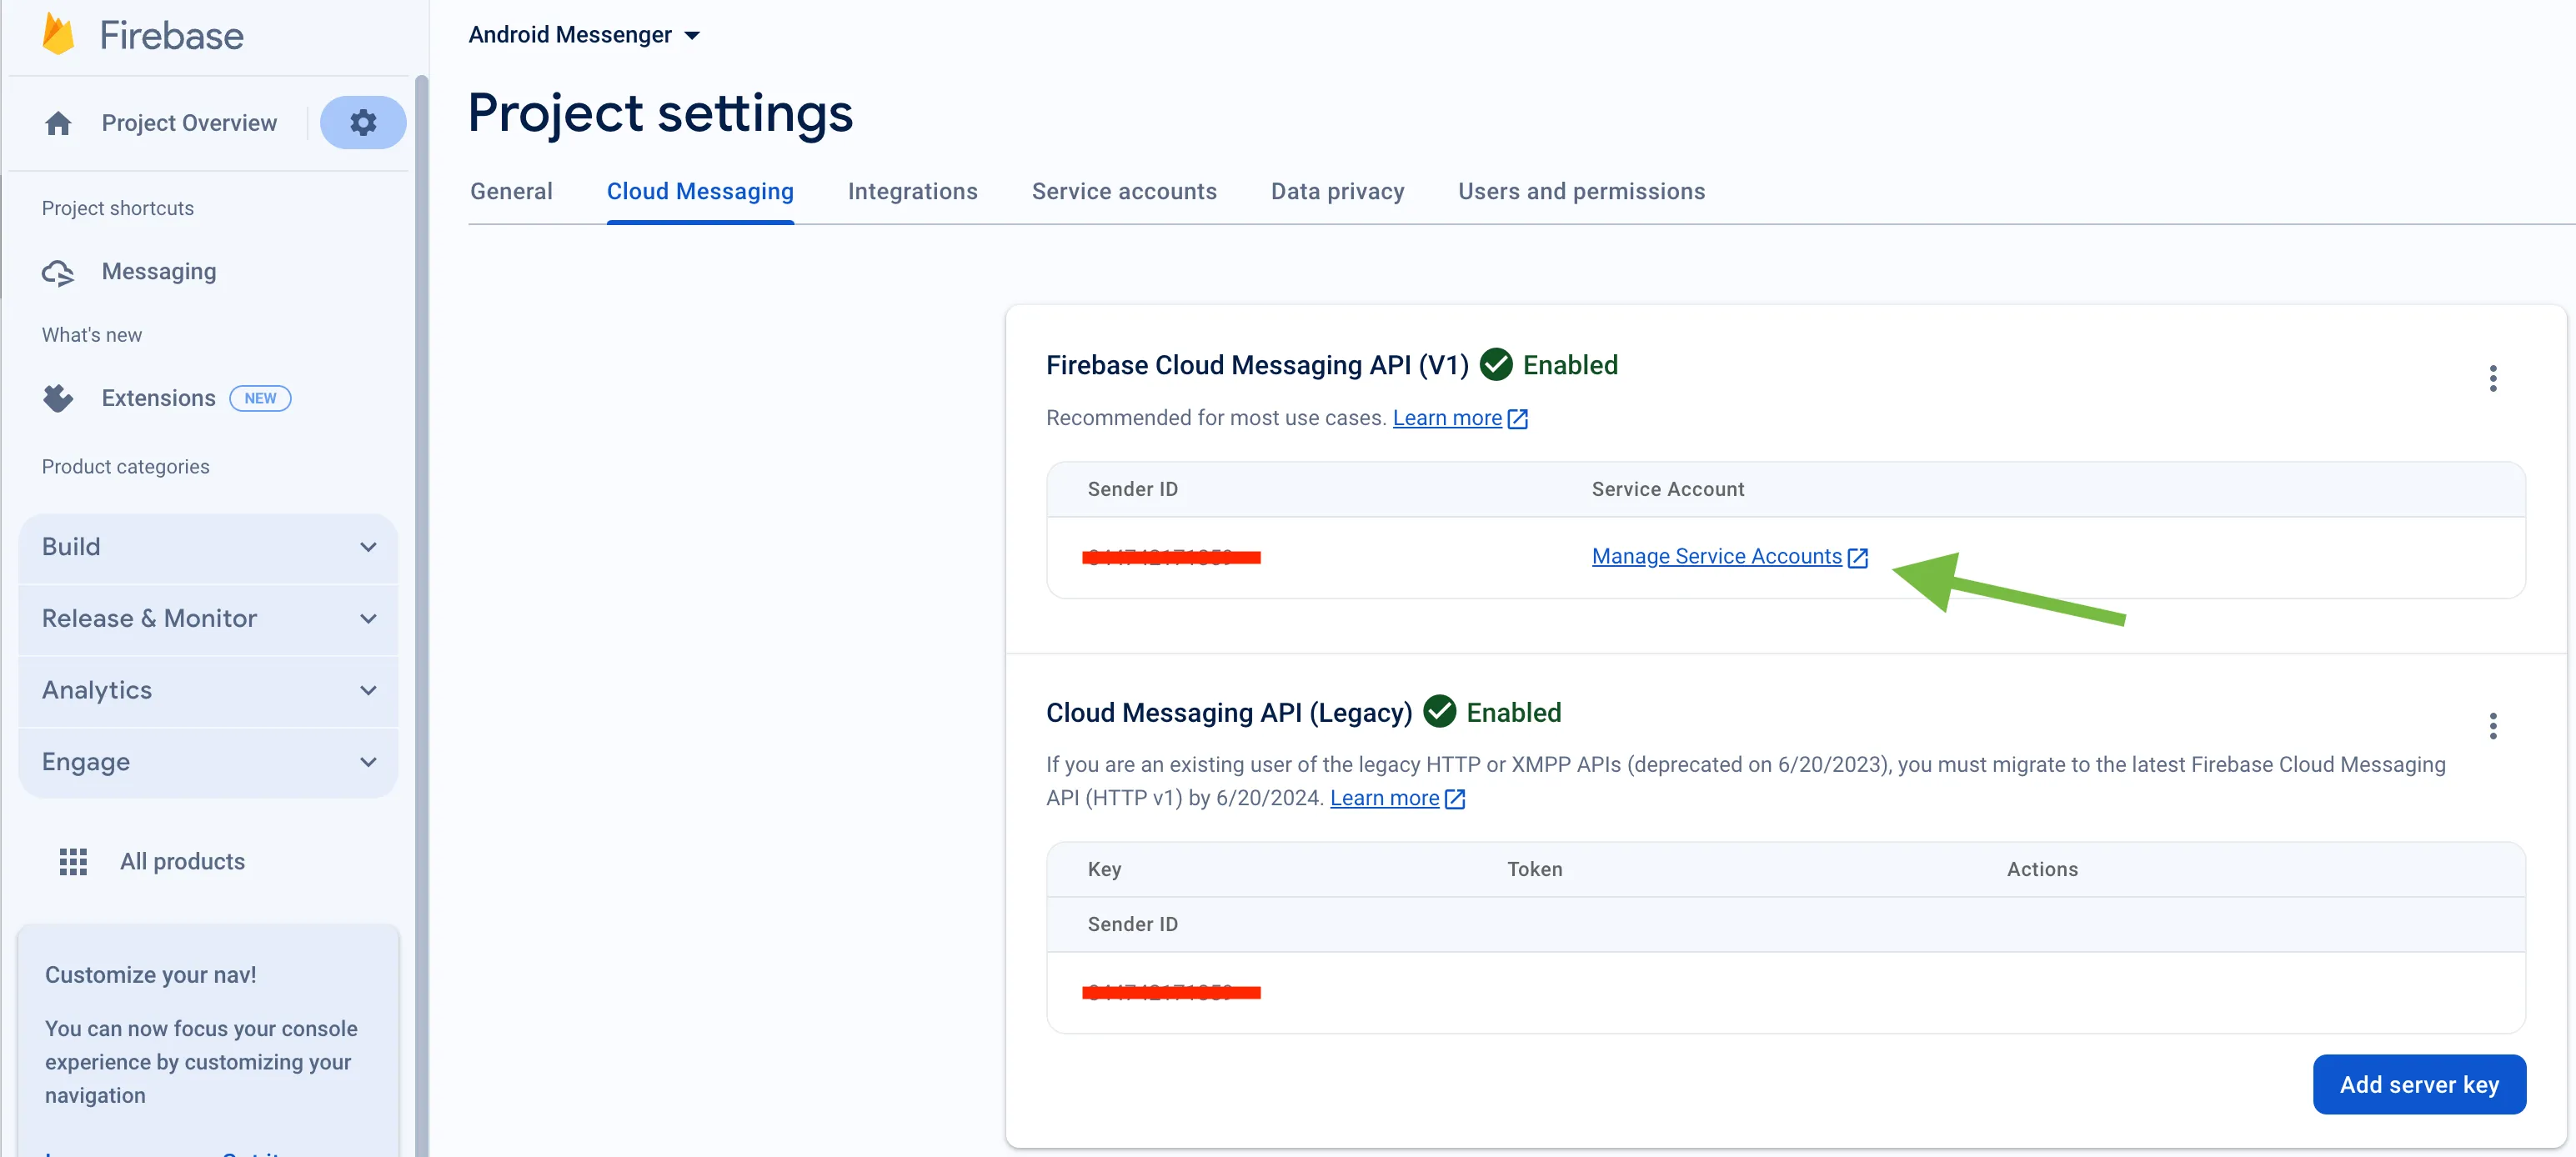
-
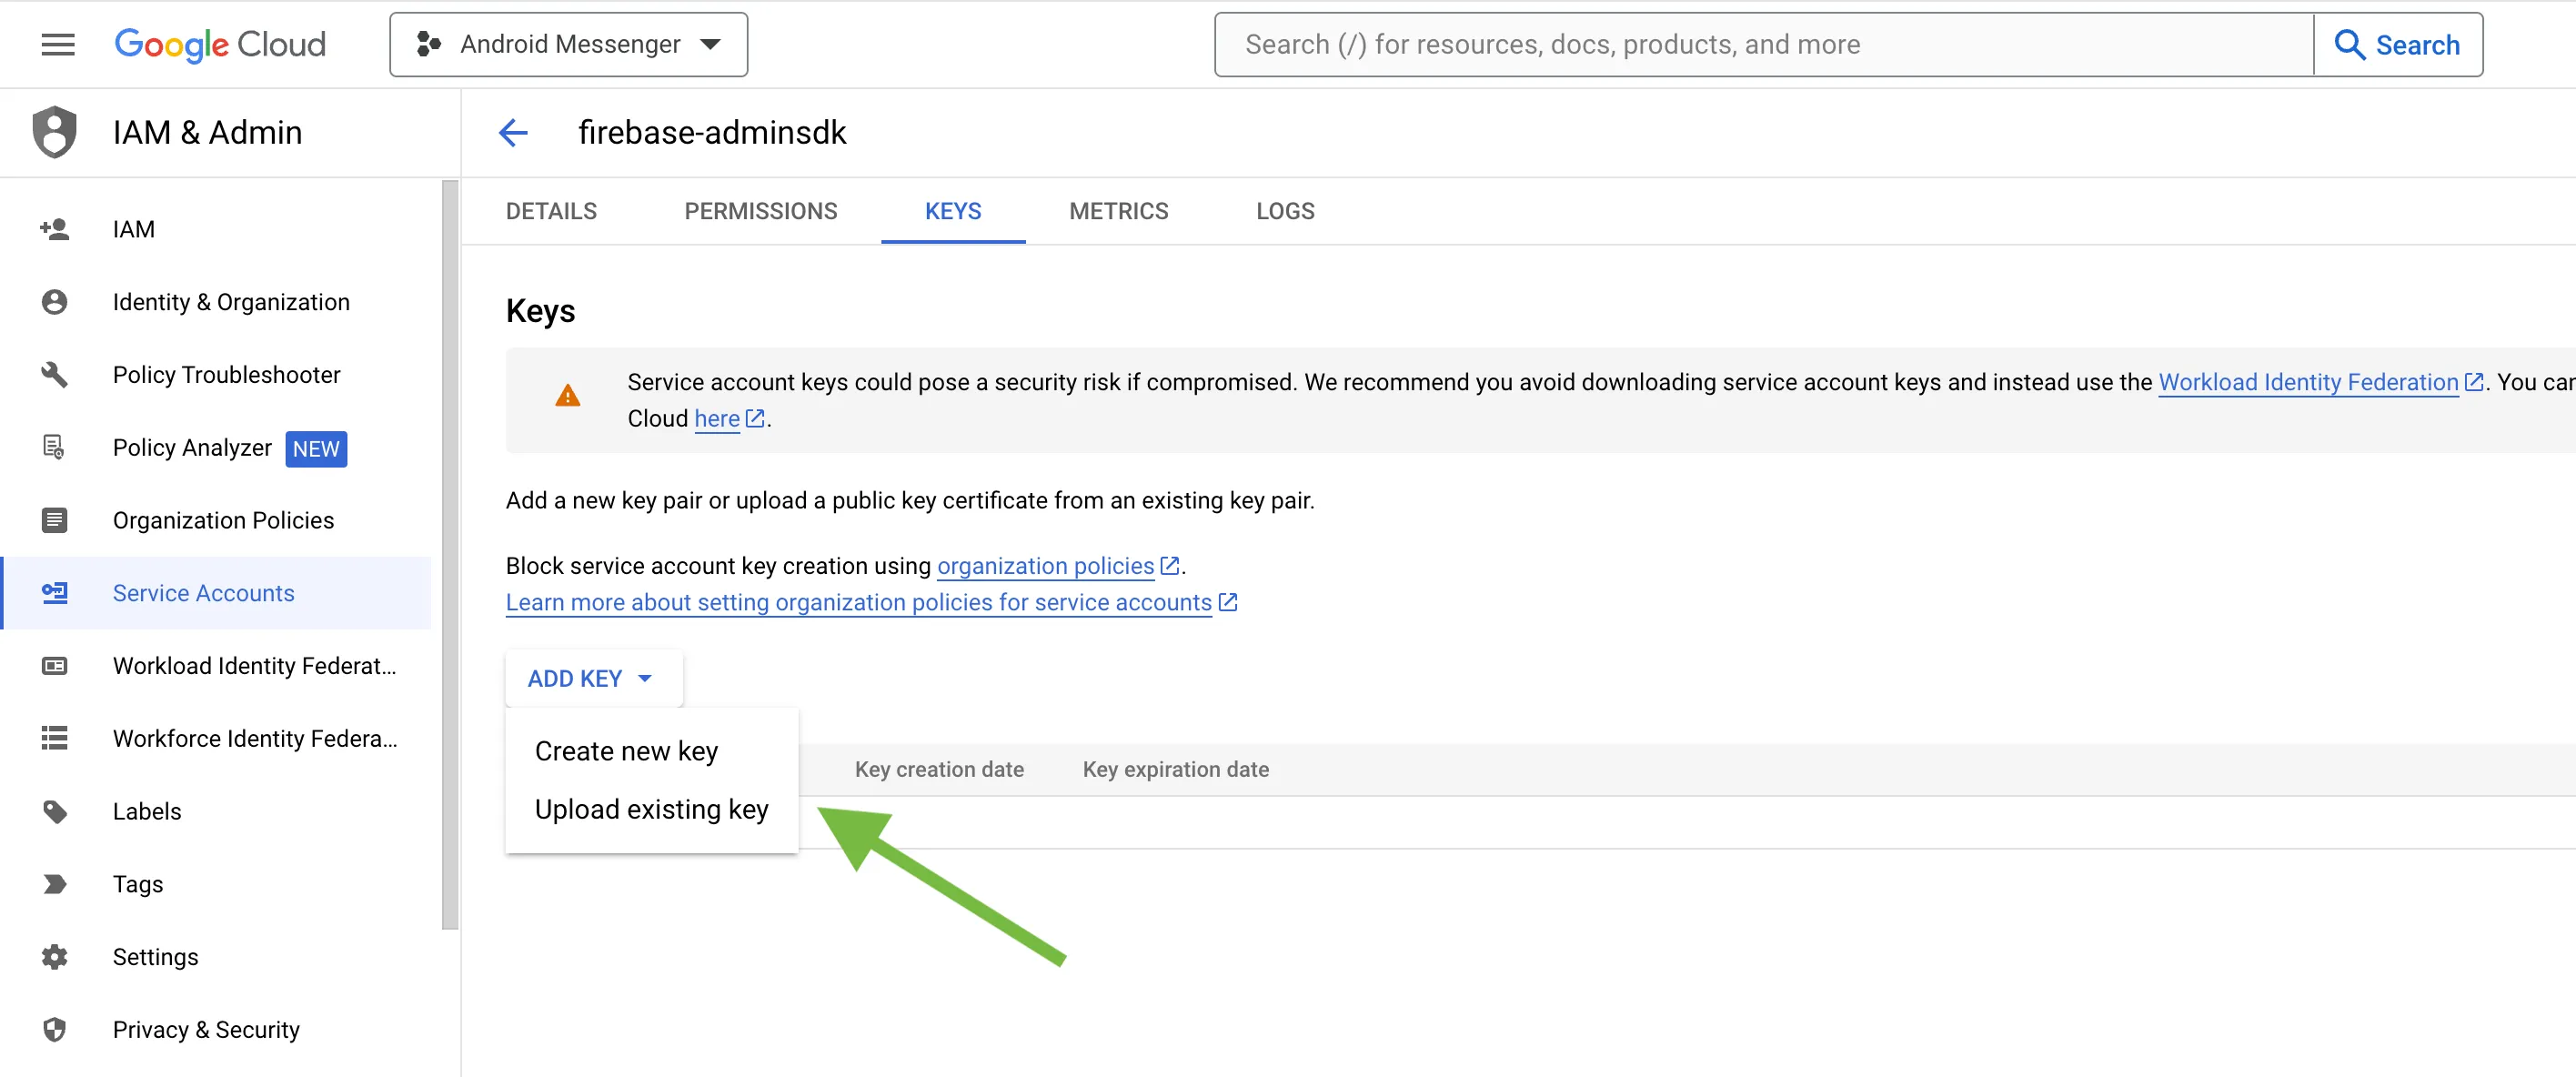
Select and configure Manage Keys option:

-
Select ADD KEY, Create new key:
-
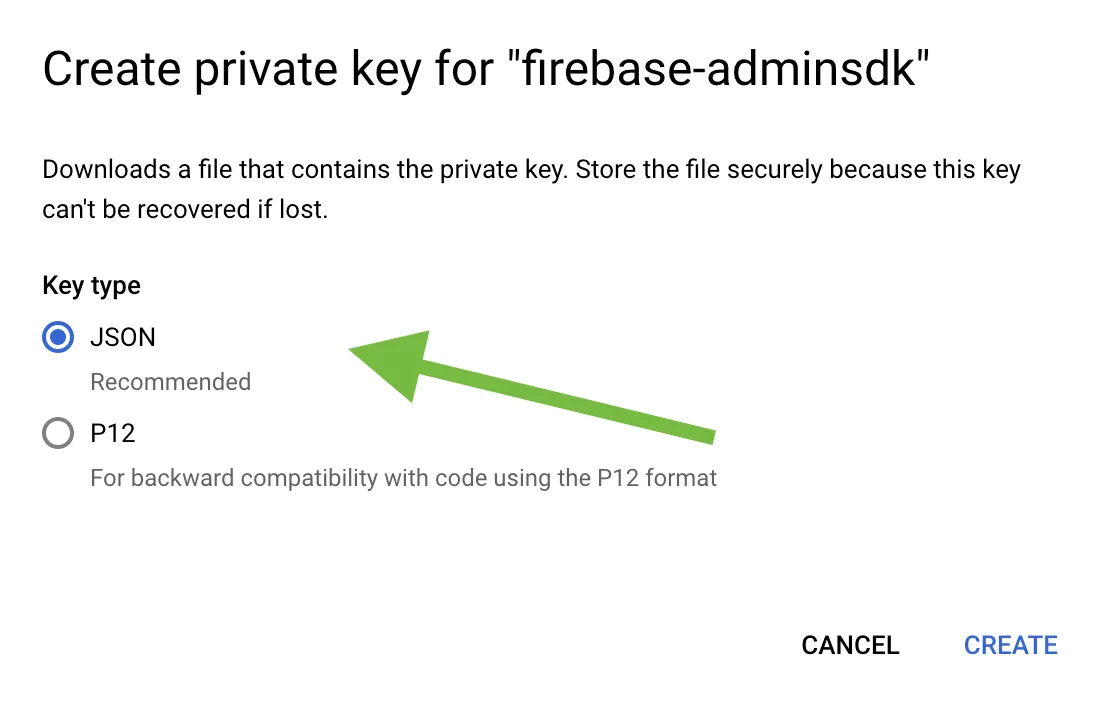
Select Key type (json recommended) and create:
-
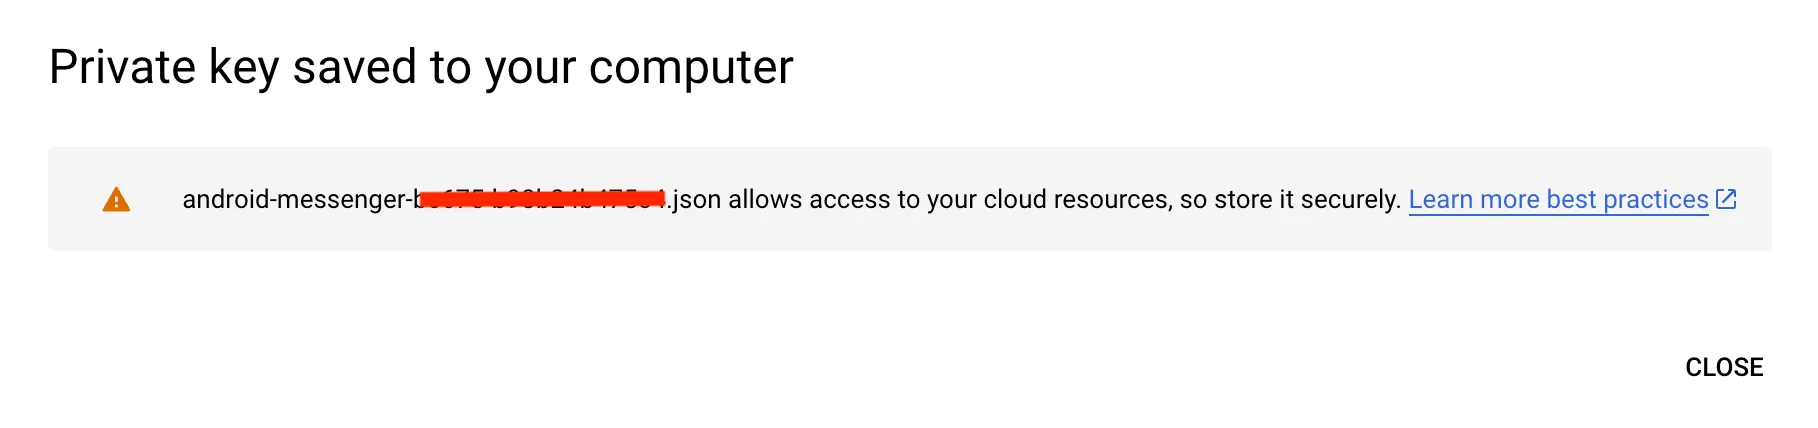
Save it locally:
-
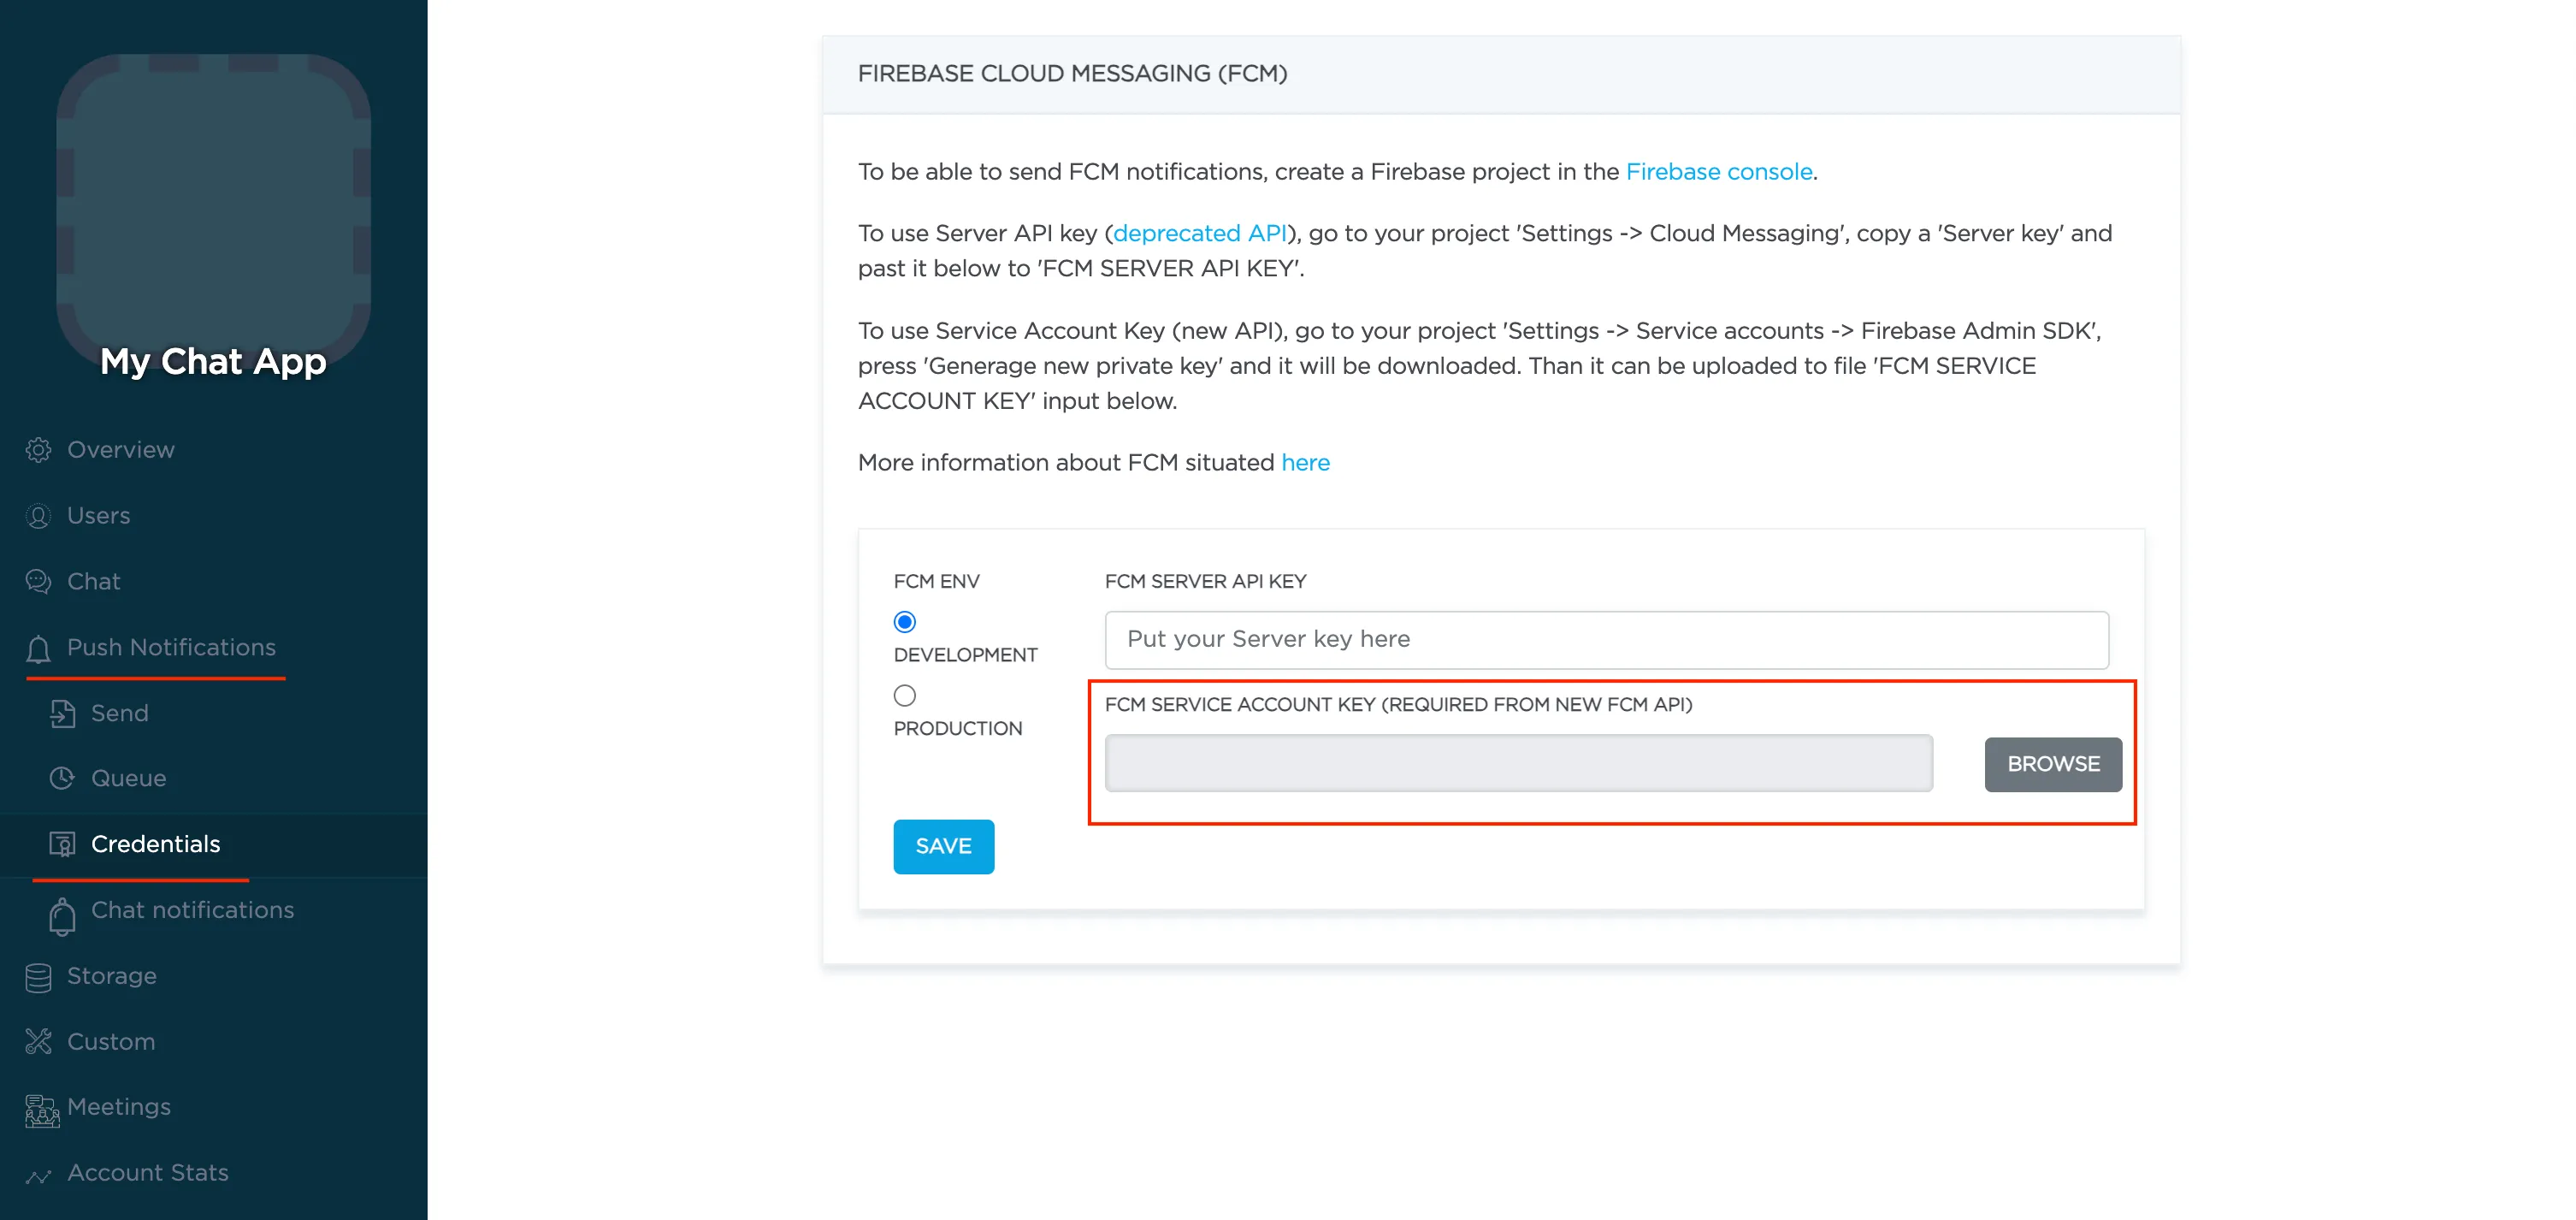
Browse your saved FCM Service account key in your Dashboard > Your App > Push Notifications > Credentials, select the environment for which you are adding the key. Use the same key for development and production zones.
Configure Firebase project and Server key (DEPRECATED)
Section titled “Configure Firebase project and Server key (DEPRECATED)”-
Create and configure your Firebase project and obtain the Server key. If you have any difficulties with Firebase project registration, follow our guide.
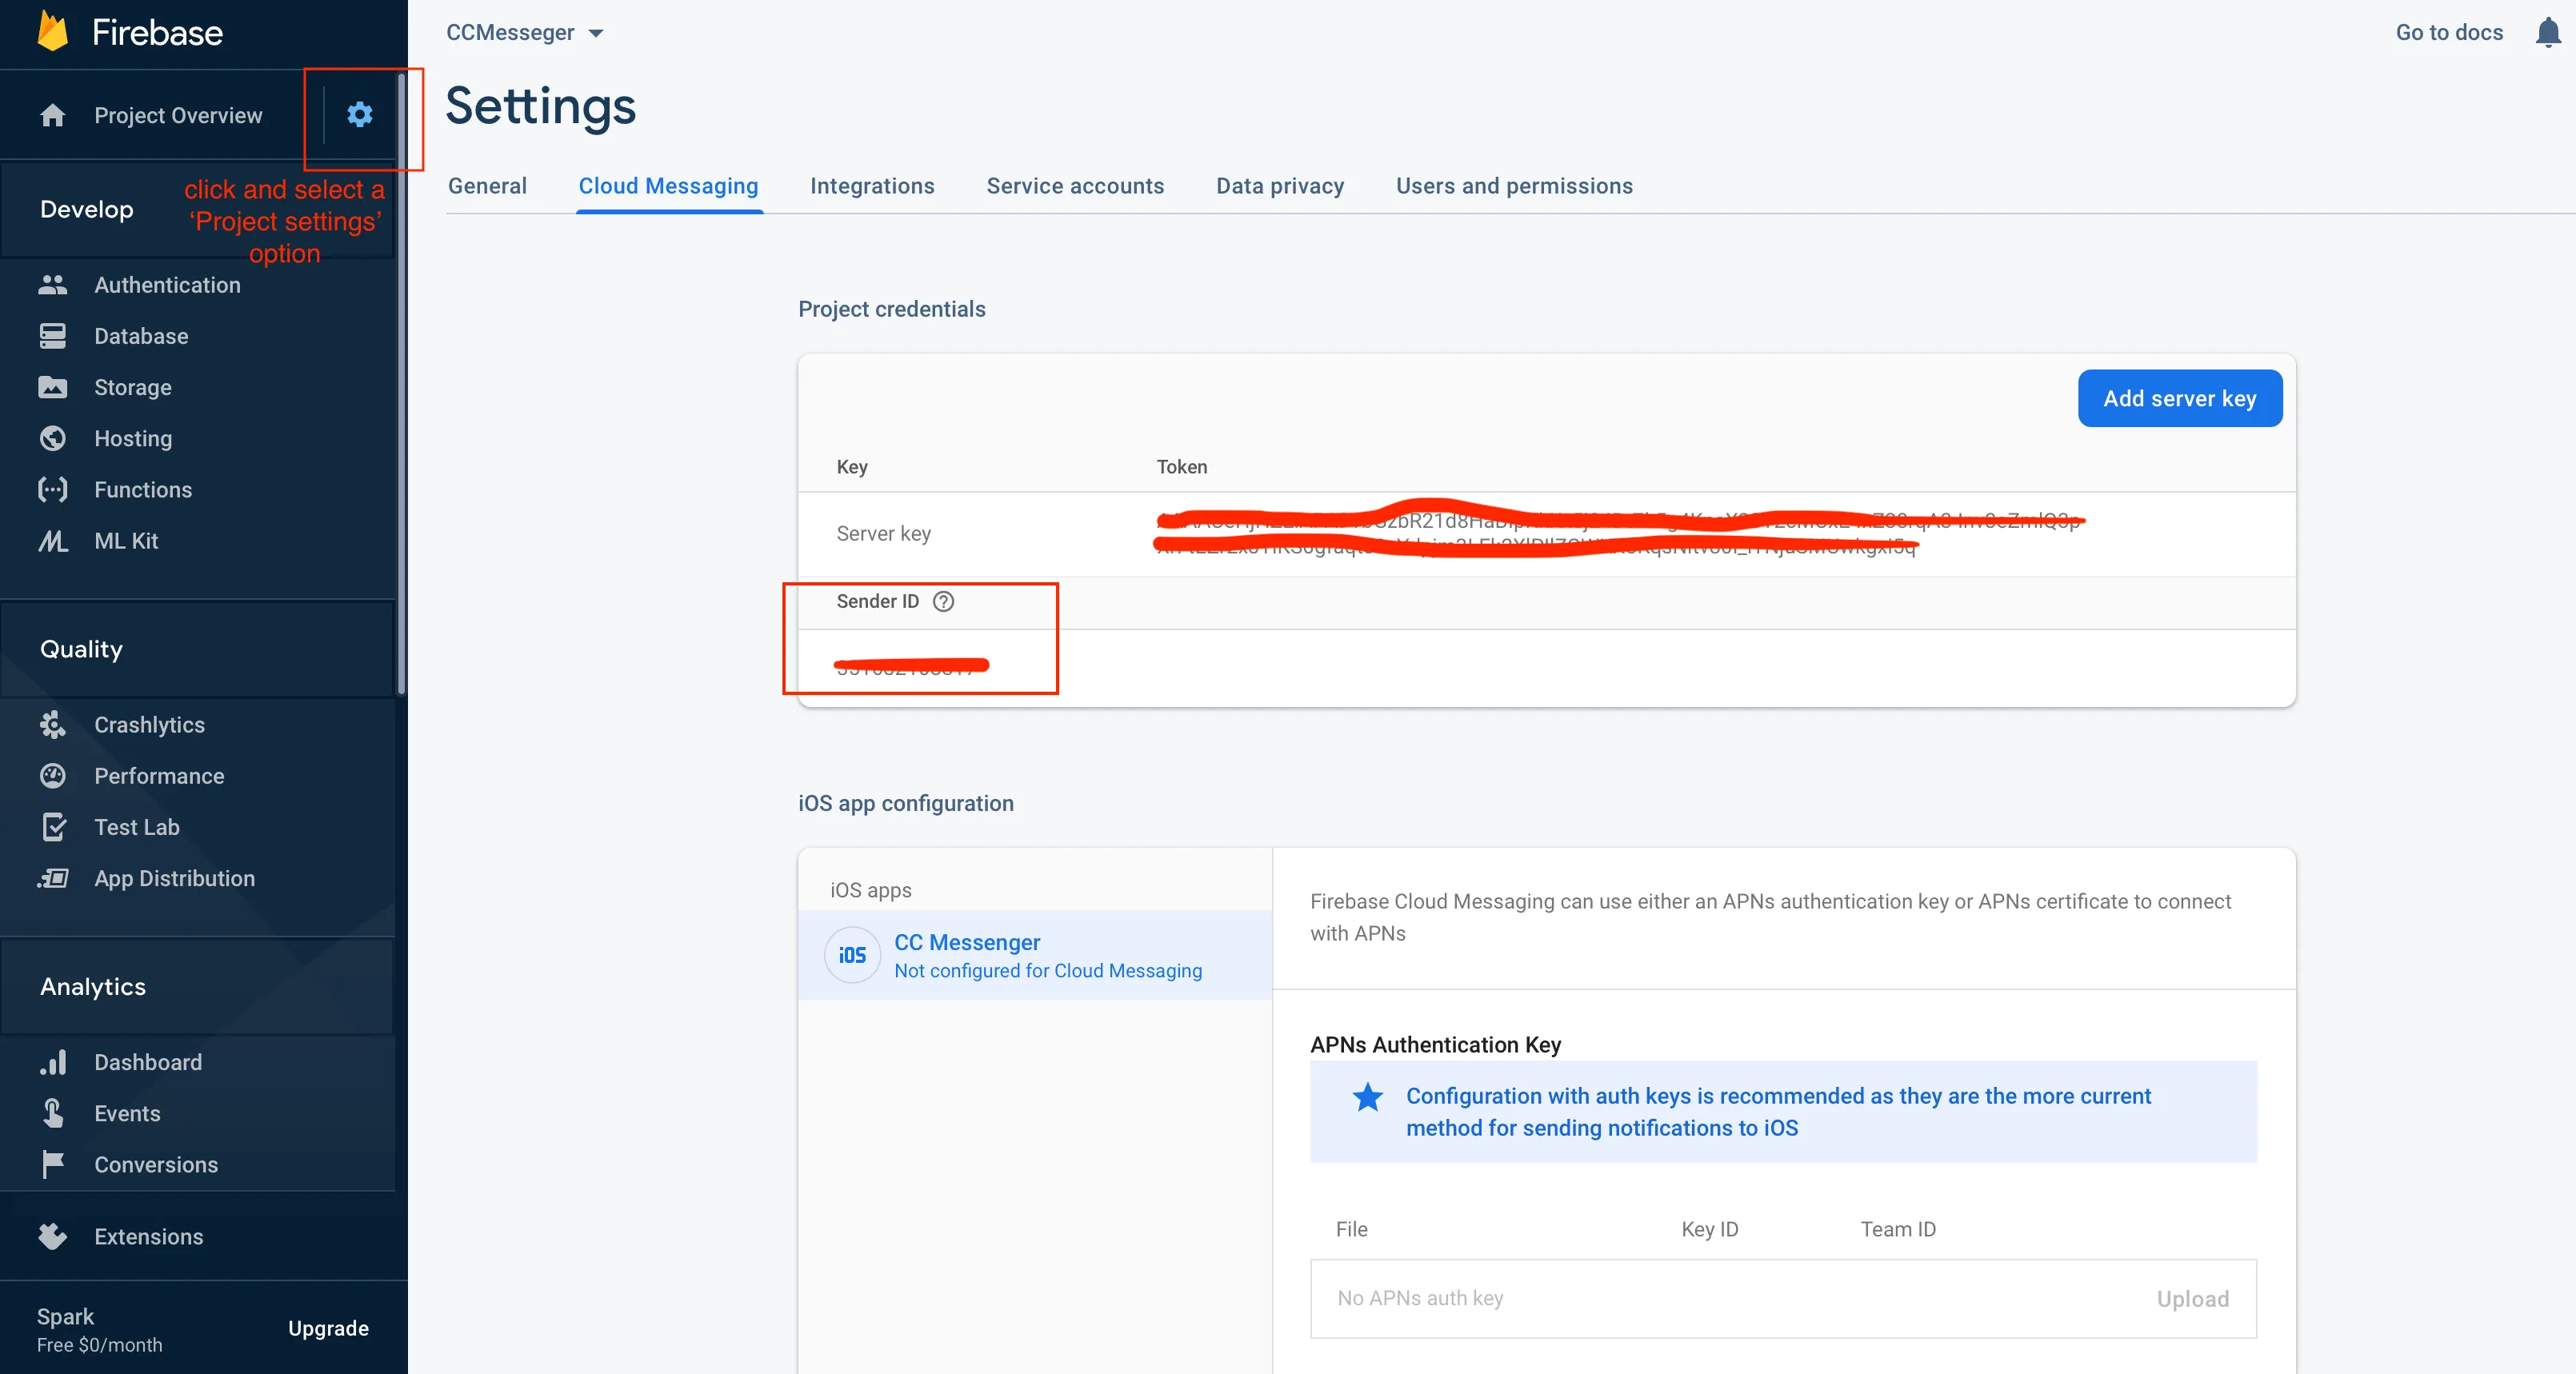
To find your FCM server key go to your Firebase console > Cloud Messaging section:
-
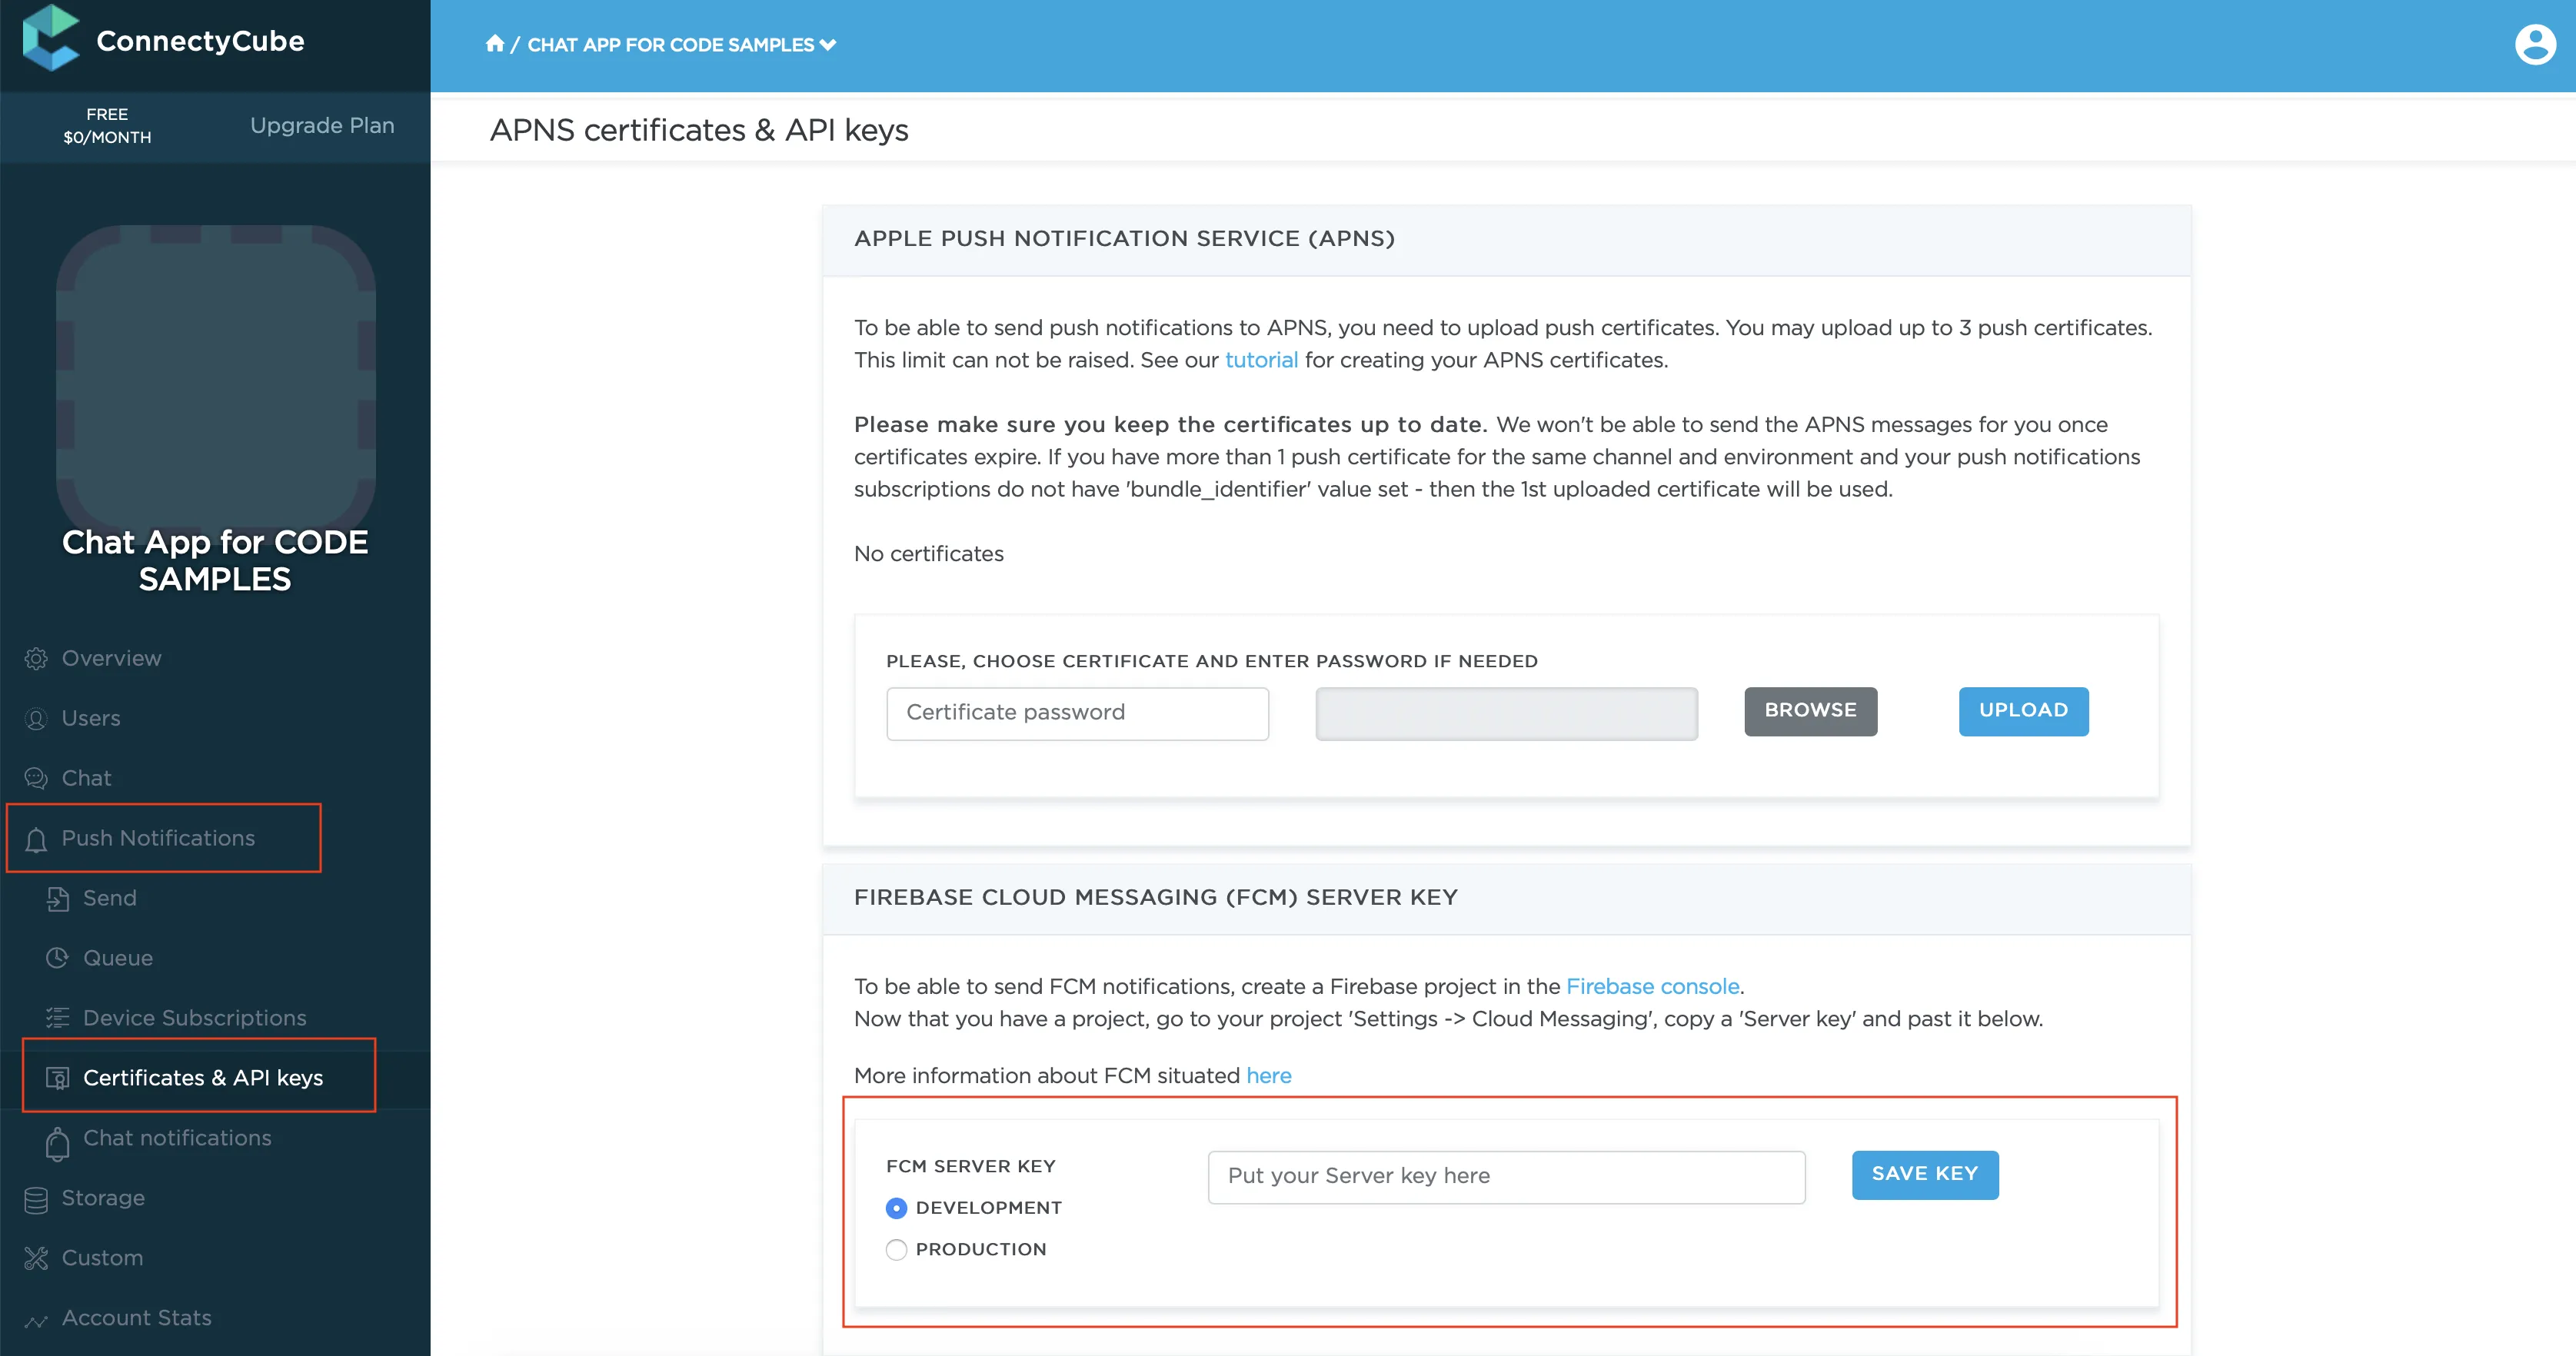
Copy your FCM server key to your Dashboard > Your App > Push Notifications > Credentials, select the environment for which you are adding the key and hit Save key. Use the same key for development and production zones.
Prepare app dependencies
Section titled “Prepare app dependencies”1. As part of enabling Firebase services in your Android application you need to add the google-services plugin to your Project build.gradle file:
dependencies { classpath 'com.google.gms:google-services:3.0.0' ...}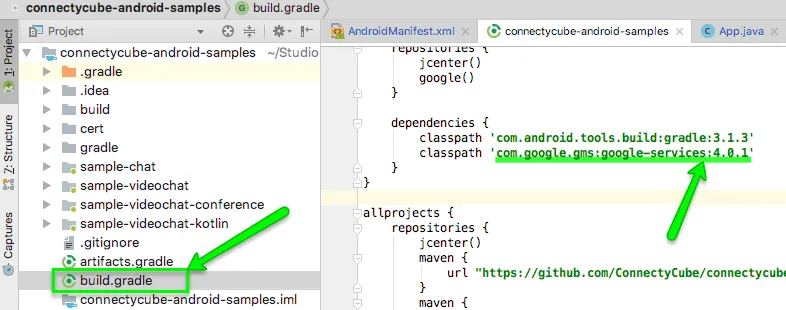
Note: If you use google play services in your project, use version 11.8.0 or higher (version we use in our SDK) as all com.google.android.gms libraries must use the exact same version specification.
If you use version higher than 11.8.0, then just add explicit dependency:
compile "com.google.android.gms:play-services-gcm:17.0.0"compile "com.google.firebase:firebase-messaging:17.0.0"compile "com.google.firebase:firebase-core:17.0.0"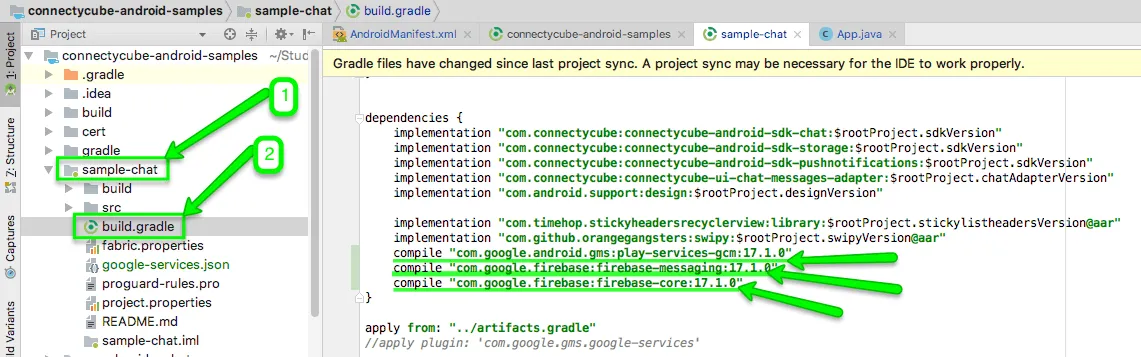
2. Include gms plugin in the bottom of your module build.gradle :
apply plugin: 'com.google.gms.google-services'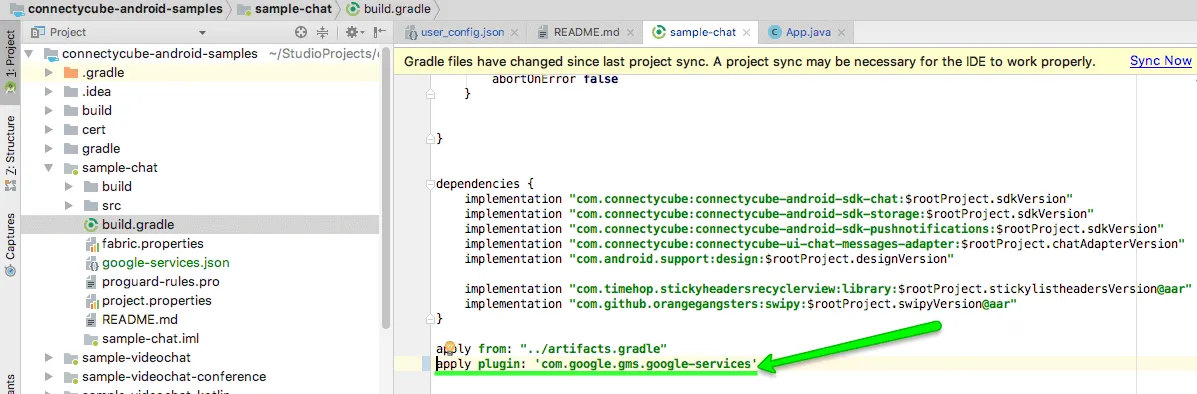
3. For GCM push type add an empty current_key settings into your google-services.json file for your package name (this paragraph relates to GCM. If you use FCM and already have some value in current_key field, leave it as is):
"client": [ { "client_info": { "mobilesdk_app_id": "1:861750218637:android:c7299bc46191b2d7", "client_id": "android:com.your.app.package.id", "client_type": 1, "android_client_info": { "package_name": "com.your.app.package.id" } }, "api_key": [ { "current_key": "" } ], } ]
Prepare app AndroidManifest (only v1)
Section titled “Prepare app AndroidManifest (only v1)”-
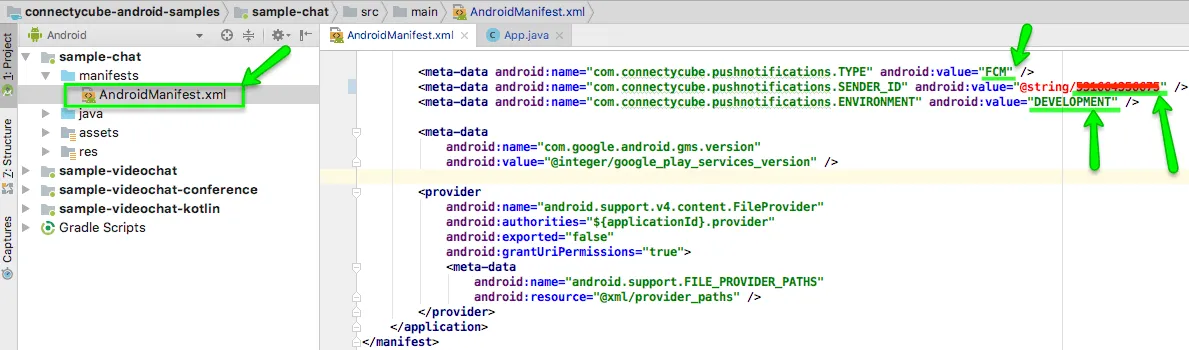
Copy Sender ID value from your Firebase console:
-
Edit your app AndroidManifest.xml file and add your Firebase Sender ID as well as notification type and environment there:
To integrate automatic push subscription you just need set values in AndroidManifest:
<meta-data android:name="com.connectycube.pushnotifications.TYPE" android:value="FCM" /><meta-data android:name="com.connectycube.pushnotifications.SENDER_ID" android:value="@string/sender_id" /><meta-data android:name="com.connectycube.pushnotifications.ENVIRONMENT" android:value="DEVELOPMENT" />- com.connectycube.pushnotifications.TYPE - can be FCM
- com.connectycube.pushnotifications.SENDER_ID - your sender id from google console (for ex.8617520217632)
- com.connectycube.pushnotifications.ENVIRONMENT - can be DEVELOPMENT or PRODUCTION
Then you need to setup FcmPushListenerService and FcmPushInstanceIDService:
<service android:name="com.connectycube.pushnotifications.services.fcm.FcmPushListenerService"> <intent-filter> <action android:name="com.google.firebase.MESSAGING_EVENT" /> </intent-filter></service><service android:name="com.connectycube.pushnotifications.services.fcm.FcmPushInstanceIDService"> <intent-filter> <action android:name="com.google.firebase.INSTANCE_ID_EVENT"/> </intent-filter></service>Automatic push subscription (only v1)
Section titled “Automatic push subscription (only v1)”ConnectyCube Android SDK provides automatic push subscription management. It means you don’t need bother how to get FCM device token, create push subscription and what to do with the received data. Thus, you can reduce your code and make it cleaner.
Here are the requirements on how to integrate automatic push subscription feature to your app:
Enable/Disable push subscription
Section titled “Enable/Disable push subscription”Here you can use global setting to enable or disable delivery of push notifications (means to set this parameter only one time):
ConnectycubeSettings.getInstance().isEnablePushNotification = false // default is 'true'
val isEnabled = ConnectycubeSettings.getInstance().isEnablePushNotificationConnectycubeSettings.getInstance().setEnablePushNotification(false); // default is 'true'
boolean isEnabled = ConnectycubeSettings.getInstance().isEnablePushNotification();Track subscription status (only v1)
Section titled “Track subscription status (only v1)”To be aware about what is happening with your push subscription, whether you’re subscribed successfully or not, you can use the SubscribeListener. Just add SubscribeListener right after the ConnectycubeSettings.getInstance().init() code:
ConnectycubePushManager.getInstance()    .addListener(object : ConnectycubePushManager.SubscribeListener {        override fun onSubscriptionCreated() {}
        override fun onSubscriptionError(e: Exception, resultCode: Int) {            Log.d(TAG, "onSubscriptionError$e")
            if (resultCode >= 0) {                Log.d(TAG, "Google play service exception$resultCode")            }        }
        override fun onSubscriptionDeleted(success: Boolean) {
} })ConnectycubePushManager.getInstance().addListener(new ConnectycubePushManager.SubscribeListener() { @Override public void onSubscriptionCreated() {
}
@Override public void onSubscriptionError(final Exception e, int resultCode) { Log.d(TAG, "onSubscriptionError" + e); if (resultCode >= 0) { Log.d(TAG, "Google play service exception" + resultCode); } }
@Override public void onSubscriptionDeleted(boolean success) {
}});Manual push subscription
Section titled “Manual push subscription”If you don’t want to use automatic push subscription feature (only v1), then do the following:
- Set SubscribePushStrategy.MANUAL as the main strategy:
// default SubscribePushStrategy.ALWAYSConnectycubeSettings.getInstance().subscribePushStrategy = SubscribePushStrategy.MANUAL// default SubscribePushStrategy.ALWAYSConnectycubeSettings.getInstance().setSubscribePushStrategy(SubscribePushStrategy.MANUAL)In this case you need to subscribe and unsubscribe manually using the following methods:
//create push subscriptionval subscriptionParameters = CreatePushSubscriptionParameters(environment = "development",                channel = "gcm", udid = deviceId, platform = "android", pushToken = registrationID)
ConnectyCube.createPushSubscription(subscriptionParameters.getRequestParameters(), { subscriptions -> },{ ex -> })
//delete push subscriptionConnectyCube.deletePushSubscription(subscriptionId, {},{ ex -> })
val tokenRefreshed = falseSubscribeService.subscribeToPushes(context, tokenRefreshed)SubscribeService.unSubscribeFromPushes(context)
// this comes from 'InstanceIDListenerService'override fun onTokenRefresh() { val tokenRefreshed = true SubscribeService.subscribeToPushes(context, tokenRefreshed)}boolean tokenRefreshed = false;SubscribeService.subscribeToPushes(context, tokenRefreshed);SubscribeService.unSubscribeFromPushes(context);
// this comes from 'InstanceIDListenerService'@Overridepublic void onTokenRefresh() {boolean tokenRefreshed = true;SubscribeService.subscribeToPushes(context, tokenRefreshed);}Send push notifications
Section titled “Send push notifications”You can manually initiate sending of push notifications to user/users on any event in your application. To do so you need to form a push notification parameters (payload) and set the push recipients:
val cubeEventParams = CreateEventParams()cubeEventParams.parameters["message"] = "Some text"cubeEventParams.notificationType = NotificationType.PUSHcubeEventParams.environment = ConnectycubeEnvironment.DEVELOPMENTcubeEventParams.eventType = PushEventType.ONE_SHOTcubeEventParams.usersIds.add(373737)val cubeEvent = cubeEventParams.getEventForRequest()
ConnectyCube.createPushEvent(cubeEvent, successCallback = {result -> }, errorCallback = { error ->})
val userIds = StringifyArrayList<Int>().apply { add(21) add(22)}
val event = ConnectycubeEvent().apply {this.userIds = userIdsenvironment = ConnectycubeEnvironment.DEVELOPMENTnotificationType = ConnectycubeNotificationType.PUSH}
val json = JSONObject()json.put("message", "New bitcoin trends today")
// custom parametersjson.put("user_id", "56")json.put("dialog_id", "54123123123416234614263123")
event.message = json.toString()
ConnectycubePushNotifications.createEvent(event).performAsync(object : EntityCallback<ConnectycubeEvent> {override fun onSuccess(event: ConnectycubeEvent, args: Bundle?) {// sent}
override fun onError(errors: ResponseException) {
}
})ArrayList<Integer> recipientsUserIds = new StringifyArrayList<Integer>();userIds.add(21);userIds.add(22);
ConnectycubeEvent event = new ConnectycubeEvent();event.setUserIds(userIds);event.setEnvironment(ConnectycubeEnvironment.DEVELOPMENT);event.setNotificationType(ConnectycubeNotificationType.PUSH);
JSONObject json = new JSONObject();try { json.put("message", "New bitcoin trends today"); // custom parameters json.put("user_id", "56"); json.put("dialog_id", "54123123123416234614263123");} catch (Exception e) { e.printStackTrace();}
event.setMessage(json.toString());
ConnectycubePushNotifications.createEvent(event).performAsync(new EntityCallback<ConnectycubeEvent>() { @Override public void onSuccess(ConnectycubeEvent event, Bundle args) { // sent }
@Override public void onError(ResponseException errors) {
}});Receive push notifications
Section titled “Receive push notifications”To receive push notifications extend FirebaseMessagingService and register it in AndroidManifest:
class PushListenerService: FirebaseMessagingService() {
    override fun onNewToken(token: String) {        Timber.d("Refreshed token: $token")
        if( ConnectycubeSessionManager.activeSession?.user?.id != 0) {            //need to createPushSubscription() with new token        }    }
    override fun onMessageReceived(remoteMessage: RemoteMessage) {        //need to process push notification        Log.d(TAG, "From: ${remoteMessage.from}")        if (remoteMessage.data.isNotEmpty()) {            Log.d(TAG, "remoteMessage.data ${remoteMessage.data}")            AppNotificationManager.getInstance().processPushNotification(this, remoteMessage.data)        }    }
}
// register service in AndroidManifest
<service android:name=".fcm.PushListenerService" android:exported="false">  <intent-filter>    <action android:name="com.google.firebase.MESSAGING_EVENT" />  </intent-filter></service>
or you need to register the BroadcastReceiver (only v1) :
val pushBroadcastReceiver: BroadcastReceiver = object : BroadcastReceiver() {    override fun onReceive(context: Context, intent: Intent) {        val message = intent.getStringExtra("message")        val from = intent.getStringExtra("from")        Log.i(TAG, "New push message: $message, from $from")    }}
LocalBroadcastManager.getInstance(context).registerReceiver(pushBroadcastReceiver,IntentFilter("new-push-event"))
private BroadcastReceiver pushBroadcastReceiver = new BroadcastReceiver() { @Override public void onReceive(Context context, Intent intent) { String message = intent.getStringExtra("message"); String from = intent.getStringExtra("from"); Log.i(TAG, "New push message: " + message + ", from " + from); }};
LocalBroadcastManager.getInstance(this).registerReceiver(pushBroadcastReceiver, new IntentFilter("new-push-event"));