Chat
ConnectyCube Chat API is built on top of Real-time(XMPP) protocol. In order to use it you need to setup real-time connection with ConnectyCube Chat server and use it to exchange data.
By default Real-time Chat works over secure TLS connection.
Connect to chat
Section titled “Connect to chat”let user = ConnectycubeUser()user.id = 2746user.password = "password"
ConnectyCube().chat.login(user: user, successCallback:{
}, errorCallback: { error in
}, resource: ConnectycubeSettings().chatDefaultResource)[CYBChat.instance connectWithUserID:2746 password:@"password" completion:^(NSError * _Nullable error) {
}];Chat.instance.connect(withUserID: 2746, password: "password") { (error) in
}Use CYBChatDelegate v1 or ConnectycubeConnectionListener v2 to handle different connection states:
class YourClass : NSObject {    override init() {        super.init()        ConnectyCube().chat.addConnectionListener(listener: self)    }}
extension YourClass : ConnectycubeConnectionListener {    func onConnected() {    }
    func onDisconnected() {    }}
@interface YourClass () <CYBChatDelegate>
@end
@implementation YourClass
- (instancetype)init { self = [super init]; if (self) { [CYBChat.instance addDelegate:self]; } return self;}
//MARK: CYBChatDelegate
- (void)chatDidConnect {}
- (void)chatDidReconnect {}
- (void)chatDidDisconnectWithError:(NSError *)error {}
- (void)chatDidNotConnectWithError:(NSError *)error {}
- (void)chatDidFailWithStreamError:(NSError *)error {}class YourClass : NSObject { override init() { super.init() Chat.instance.addDelegate(self) }}
//MARK: ChatDelegate
extension YourClass : ChatDelegate { func chatDidConnect() { }
func chatDidReconnect() { }
func chatDidDisconnectWithError(_ error: Error) { }
func chatDidNotConnectWithError(_ error: Error) { }}Connect to chat using custom authentication providers
Section titled “Connect to chat using custom authentication providers”In some cases we don’t have a user’s password, for example when login via:
- Firebase phone authorization
- Custom identity authentication
- etc.
In such cases ConnectyCube API provides possibility to use ConnectyCube session token as a password for chat connection:
let user = ConnectycubeUser()user.id = 2746user.password = ConnectycubeSessionManager().getToken()
ConnectyCube().chat.login(user: user, successCallback:{
}, errorCallback: { error in
}, resource: ConnectycubeSettings().chatDefaultResource)
NSString *token = CYBSession.currentSession.sessionDetails.token;
[CYBChat.instance connectWithUserID:2746 password:token completion:^(NSError * _Nullable error) {
}];String token = Session.currentSession.sessionDetails.token
Chat.instance.connect(withUserID: 2746, password: token) { (error) in
}Disconnect
Section titled “Disconnect”ConnectyCube().chat.logout(successCallback: {
}) { (error) in
}[CYBChat.instance disconnectWithCompletionBlock:^(NSError * _Nullable error) {
}];Chat.instance.disconnect { (error) in
}Reconnection
Section titled “Reconnection”SDK reconnects automatically when connection to Chat server is lost.
There is a way to disable it and then manage it manually:
//coming soonCYBSettings.autoReconnectEnabled = NO;Settings.autoReconnectEnabled = falseChat in background
Section titled “Chat in background”As iOS doesn’t provide ‘true’ background mode, we can’t have a persistent Chat connection while iOS application is in the background.
The better way to handle chat offline messages correctly is to do:
Chat disconnect when an app goes to background and do Chat connect when an app goes to the foreground.
@UIApplicationMainclass AppDelegate: UIResponder, UIApplicationDelegate {...func applicationWillTerminate(_ application: UIApplication) {    ConnectyCube().chat.logout(successCallback: {
    })}
func applicationDidEnterBackground(\_ application: UIApplication) {    ConnectyCube().chat.logout(successCallback: {
    })}
func applicationWillEnterForeground(\_ application: UIApplication) {    ConnectyCube().chat.login(user: user, successCallback:{
    }, errorCallback: { error in
    }, resource: ConnectycubeSettings().chatDefaultResource)}
@implementation AppDelegate...- (void)applicationWillTerminate:(UIApplication *)application { [CYBChat.instance disconnectWithCompletionBlock:^(NSError * _Nullable error) { }];}
- (void)applicationDidEnterBackground:(UIApplication *)application { [CYBChat.instance disconnectWithCompletionBlock:^(NSError * _Nullable error) { }];}
- (void)applicationWillEnterForeground:(UIApplication *)application { [CYBChat.instance connectWithUserID:2746 password:@"password" completion:^(NSError * _Nullable error) { }];}...@UIApplicationMainclass AppDelegate: UIResponder, UIApplicationDelegate {...func applicationWillTerminate(_ application: UIApplication) { Chat.instance.disconnect { (error) in }}
func applicationDidEnterBackground(_ application: UIApplication) { Chat.instance.disconnect { (error) in }}
func applicationWillEnterForeground(_ application: UIApplication) { Chat.instance.connect(withUserID: 2746, password: "password") { (error) in }}...Dialogs
Section titled “Dialogs”All chats between users are organized in dialogs. The are 4 types of chat dialogs:
- 1-1 chat - a conversation between 2 users.
- group chat - a conversation between specified list of users.
- public group chat - an open conversation. Any user from your app can subscribe to it.
- broadcast - chat where a message is sent to all users within application at once. All the users from the application are able to join this group. Broadcast dialogs can be created only via Admin panel.
You need to create a new dialog and then use it to chat with other users. You also can obtain a list of your existing dialogs.
Create new dialog
Section titled “Create new dialog”Create 1-1 chat
Section titled “Create 1-1 chat”let dialog = ConnectycubeDialog()dialog.type = ConnectycubeDialogType.companion.PRIVATEdialog.occupantsIds = [34] // an ID of opponent
ConnectyCube().createDialog(connectycubeDialog: dialog, successCallback: {(dialog) in
}) { (error) in
}CYBChatDialog *dialog = [[CYBChatDialog alloc] initWithDialogID:nil type:CYBChatDialogTypePrivate];dialog.occupantIDs = @[@34]; // an ID of opponent
[CYBRequest createDialog:dialog successBlock:^(CYBChatDialog * _Nonnull dialog) {
} errorBlock:^(NSError * _Nonnull error) {
}];let dialog = ChatDialog(dialogID: nil, type: .private)dialog.occupantIDs = [34] // an ID of opponent
Request.createDialog(dialog, successBlock: { (dialog) in
}) { (error) in
}Create group chat
Section titled “Create group chat”let dialog = ConnectycubeDialog()dialog.type = ConnectycubeDialogType.companion.GROUPdialog.name = "New group dialog"dialog.occupantsIds = [34, 45, 55]//dialog.photo = "..."//dialog.dialogDescription = "..."
ConnectyCube().createDialog(connectycubeDialog: dialog, successCallback: {(dialog) in
}) { (error) in
}CYBChatDialog *dialog = [[CYBChatDialog alloc] initWithDialogID:nil type:CYBChatDialogTypeGroup];dialog.name = @"Group dialog name";dialog.occupantIDs = @[@34, @45, @55];// dialog.photo = @"...";// dialog.dialogDescription = @"...";
[CYBRequest createDialog:dialog successBlock:^(CYBChatDialog * _Nonnull dialog) {
} errorBlock:^(NSError * _Nonnull error) {
}];let dialog = ChatDialog(dialogID: nil, type: .group)dialog.name = "New group dialog"dialog.occupantIDs = [34, 45, 55]// dialog.photo = "...";// dialog.dialogDescription = "...";
Request.createDialog(dialog, successBlock: { (dialog) in
}) { (error) in
}Create public chat
Section titled “Create public chat”It’s possible to create a public chat, so any user from your application can subscribe to it.
let dialog = ConnectycubeDialog()dialog.type = ConnectycubeDialogType.companion.PUBLICdialog.name = "Public dialog name"dialog.dialogDescription = "Public dialog description"//dialog.photo = "..."
ConnectyCube().createDialog(connectycubeDialog: dialog, successCallback: {(dialog) in
}) { (error) in
}
CYBChatDialog *dialog = [[CYBChatDialog alloc] initWithDialogID:nil type:CYBChatDialogTypePublic];dialog.name = @"Public dialog name";dialog.dialogDescription = @"Public dialog description";// dialog.photo = @"...";
[CYBRequest createDialog:dialog successBlock:^(CYBChatDialog * _Nonnull dialog) {
} errorBlock:^(NSError * _Nonnull error) {
}];let dialog = ChatDialog(dialogID: nil, type: .public)dialog.name = "Public dialog name"dialog.dialogDescription = "Public dialog description"// dialog.photo = "...";
Request.createDialog(dialog, successBlock: { (dialog) in
}) { (error) in
}With public dialog ID any user can subscribe to the public dialog via the following code:
ConnectyCube().subscribeToDialog(dialogId: "5b8d30d1ca8bf43f8b9df3d9", successCallback: {(dialog) in
}) { (error) in
}
[CYBRequest subscribeToPublicDialogWithID:@"5b8d30d1ca8bf43f8b9df3d9" successBlock:^{
} errorBlock:^(NSError *error) {
}];Request.subscribeToPublicDialog(withID: "5b8d30d1ca8bf43f8b9df3d9", successBlock: {
}) { (error) in
}After dialog subscription, this dialog will be listed in retrieve dialogs request and you also will be able to chat in it.
You also can unsubscribe if you do not want to be in this public dialog anymore:
ConnectyCube().unsubscribeFromDialog(dialogId: "5b8d30d1ca8bf43f8b9df3d9", successCallback: {
}) { (error) in
}
[CYBRequest ubsubscribeFromPublicDialogWithID:@"5b8d30d1ca8bf43f8b9df3d9" successBlock:^{
} errorBlock:^(NSError *error) {
}];Request.ubsubscribeFromPublicDialog(withID: "5b8d30d1ca8bf43f8b9df3d9", successBlock: {
}) { (error) in
}Chat metadata
Section titled “Chat metadata”A dialog can have up to 3 custom sub-fields to store additional information that can be linked to chat.
To start using extensions, allowed fields should be added first. Go to Admin panel > Chat > Custom Fields and provide allowed custom fields.
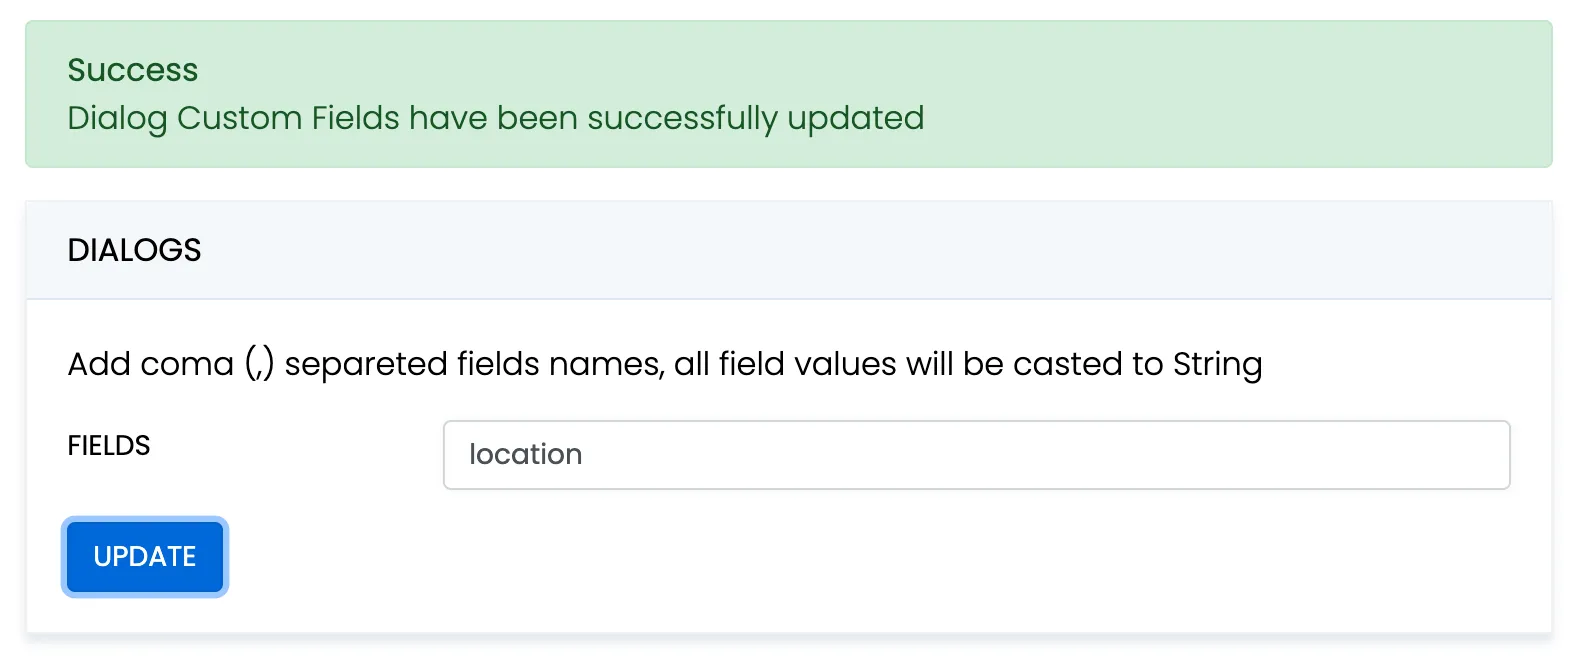
When create a dialog, the extensions field object must contain allowed fields only. Others fields will be ignored. The values will be casted to string.
let dialog = ConnectycubeDialog()dialog.type = ConnectycubeDialogType.companion.GROUPdialog.name = "Friday party"dialog.occupantsIds = [29085, 29086, 29087]dialog.dialogDescription = "lets dance the night away"dialog.extensions = ["location": "Sun bar"]
ConnectyCube().createDialog(connectycubeDialog: dialog, successCallback: {(dialog) in
}) { (error) in
}
When remove custom field in Admin panel, this field will be removed in all dialogs respectively.
These parameters also can be used as a filter for retrieving dialogs.
Chat permissions
Section titled “Chat permissions”Chat could have different permissions to managa data access. This is managed via permissions field.
At the moment, only one permission available - allow_preview - which allows to retrieve dialog’s messages for user who is not a member of dialog. This is useful when implement feature like Channels where a user can open chat and preview messages w/o joining it.
Note
To preview messages w/o joining to dialog pass
previewoperator in request to get messages.
Retrieve list of dialogs
Section titled “Retrieve list of dialogs”It’s common to request all your conversations on every app login:
let params = ["limit": 50, "skip": 100]ConnectyCube().getDialogs(params: params, successCallback: { result in    let dialogs: [ConnectycubeDialog] = result.items as! [ConnectycubeDialog]}, errorCallback: { error in
})
[CYBRequest dialogsWithPaginator:[CYBPaginator limit:50 skip:100] extendedRequest:nil successBlock:^(NSArray<CYBChatDialog *> * _Nonnull dialogs, NSSet<NSNumber *> * _Nonnull dialogsUsersIDs, CYBPaginator * _Nonnull paginator) {
} errorBlock:^(NSError * _Nonnull error) {
}];Request.dialogs(with: Paginator.limit(50, skip: 100), extendedRequest: nil, successBlock: { (dialogs, usersIDs, paginator) in
}) { (error) in
}It will return all your 1-1 dialogs, group dialog and also public dialogs your are subscribed to.
Update dialog’s name, description, photo
Section titled “Update dialog’s name, description, photo”User can update group chat name, description, photo:
let paramsToUpdate = UpdateDialogParams()paramsToUpdate.newName = "New dialog name"paramsToUpdate.newDescription = "New dialog description"paramsToUpdate.newPhoto = "https://new_photo_url" // or it can be an ID to some file in Storage module
let parameters = paramsToUpdate.getUpdateDialogParams() as! [String : Any]
ConnectyCube().updateDialog(dialogId: "5356c64ab35c12bd3b108a41", params: parameters, successCallback: { dialog in
}, errorCallback: { error in
})
CYBUpdateChatDialogParameters *parameters = [[CYBUpdateChatDialogParameters alloc] init];parameters.name = @"New dialog name";parameters.dialogDescription = @"New dialog description";parameters.photo = @"https://new_photo_url"; // or it can be an ID to some file in Storage module
[CYBRequest updateDialogWithID:@"5356c64ab35c12bd3b108a41" updateParameters:parameters successBlock:^(CYBChatDialog * _Nonnull dialog) {
} errorBlock:^(NSError * _Nonnull error) {
}];let parameters = UpdateChatDialogParameters()parameters.name = "New dialog name"parameters.dialogDescription = "New dialog description"parameters.photo = "https://new_photo_url" // or it can be an ID to some file in Storage module
Request.updateDialog(withID: "5356c64ab35c12bd3b108a41", update: parameters, successBlock: { (updatedDialog) in
}) { (error) in
}Add/Remove occupants
Section titled “Add/Remove occupants”You can add/remove occupants in group and public dialogs:
let paramsToUpdate = UpdateDialogParams()paramsToUpdate.addOccupantIds = [10056, 75432]//paramsToUpdate.deleteOccupantIds = [10023]
let parameters = paramsToUpdate.getUpdateDialogParams() as! [String : Any]
ConnectyCube().updateDialog(dialogId: "5356c64ab35c12bd3b108a41", params: parameters, successCallback: { dialog in
}, errorCallback: { error in
})
CYBUpdateChatDialogParameters *parameters = [[CYBUpdateChatDialogParameters alloc] init];parameters.occupantsIDsToAdd = @[@10056, @75432];//parameters.occupantsIDsToRemove = @[@10023];
[CYBRequest updateDialogWithID:@"5356c64ab35c12bd3b108a41" updateParameters:parameters successBlock:^(CYBChatDialog *dialog) {
} errorBlock:^(NSError * _Nonnull error) {
}];let updateParameters = UpdateChatDialogParameters()updateParameters.occupantsIDsToAdd = [10056, 75432]//updateParameters.occupantsIDsToRemove = [10023]
Request.updateDialog(withID: "5356c64ab35c12bd3b108a41", update: updateParameters, successBlock: { (updatedDialog) in
}) { (error) in
}Note
Only group chat owner and admins can remove other users from group chat.
Add / Remove admins
Section titled “Add / Remove admins”Admins it’s a special role in chats. They have the same permissions as a dialog’s creator except add/remove other admins and remove dialog.
Owner of the group chat dialog can add admins:
ConnectyCube().addRemoveAdmins(dialogId: "5356c64ab35c12bd3b108a41", toAddIds: [10056, 75432], toRemoveIds: nil, successCallback: { dialog in
}, errorCallback: { error in
})
[CYBRequest addAdminsToDialogWithID:@"5356c64ab35c12bd3b108a41" adminsUserIDs:@[@10056, @75432] successBlock:^{
} errorBlock:^(NSError * _Nonnull error) {
}];Request.addAdminsToDialog(withID: "5356c64ab35c12bd3b108a41", adminsUserIDs: [10056, 75432], successBlock: {
}) { (error) in
}and remove:
ConnectyCube().addRemoveAdmins(dialogId: "5356c64ab35c12bd3b108a41", toAddIds: nil, toRemoveIds: [75435], successCallback: { dialog in
}, errorCallback: { error in
})
[CYBRequest removeAdminsFromDialogWithID:@"5356c64ab35c12bd3b108a41" adminsUserIDs:@[@75435] successBlock:^{
} errorBlock:^(NSError * _Nonnull error) {
}];Request.removeAdminsFromDialog(withID: "5356c64ab35c12bd3b108a41", adminsUserIDs: [75435], successBlock: {
}) { (error) in
}Pin messages
Section titled “Pin messages”Pinning a message allows group owner or chat admins to easily store messages which are important, so that all users in chat have a quick access to them. The following code pins some messages to a particular group dialog:
let paramsToUpdate = UpdateDialogParams()paramsToUpdate.addPinnedMsgIds = ["5356c64ab35c12bd3b10ba32", "5356c64ab35c12bd3b10wa65"]//paramsToUpdate.deletePinnedMsgIds = ["5356c64ab35c12bd3b10ba31", "5356c64ab35c12bd3b10wa64"]
let parameters = paramsToUpdate.getUpdateDialogParams() as! [String : Any]
ConnectyCube().updateDialog(dialogId: "5356c64ab35c12bd3b108a41", params: parameters, successCallback: { dialog in
}, errorCallback: { error in
})
CYBUpdateChatDialogParameters *parameters = [[CYBUpdateChatDialogParameters alloc] init];parameters.pinnedMessagesIDsToAdd = @[@"5356c64ab35c12bd3b10ba32", @"5356c64ab35c12bd3b10wa65"];//parameters.pinnedMessagesIDsToRemove = @[@"5356c64ab35c12bd3b10ba31", @"5356c64ab35c12bd3b10wa64"];
[CYBRequest updateDialogWithID:@"5356c64ab35c12bd3b108a41" updateParameters:parameters successBlock:^(CYBChatDialog * _Nonnull dialog) {
} errorBlock:^(NSError * _Nonnull error) {
}];let updateParameters = UpdateChatDialogParameters()updateParameters.pinnedMessagesIDsToAdd = ["5356c64ab35c12bd3b10ba32", "5356c64ab35c12bd3b10wa65"]//updateParameters.pinnedMessagesIDsToRemove = ["5356c64ab35c12bd3b10ba31", "5356c64ab35c12bd3b10wa64"]Request.updateDialog(withID: "5356c64ab35c12bd3b108a41", update: updateParameters, successBlock: { (updatedDialog) in
}) { (error) in
}Remove dialog
Section titled “Remove dialog”ConnectyCube().deleteDialogs(dialogsIds: ["5356c64ab35c12bd3b108a41", "d256c64ab35c12bd3b108bc5"], force: false, successCallback: {(result) in
}) { (error) in
}
//orConnectyCube().deleteDialog(dialogId: "5356c64ab35c12bd3b108a41", force: false, successCallback: {
}) { (error) in
}[CYBRequest deleteDialogsWithIDs:[NSSet setWithArray:@[@"5356c64ab35c12bd3b108a41", @"d256c64ab35c12bd3b108bc5"]] forAllUsers:NO successBlock:^(NSArray<NSString *> * _Nonnull deletedObjectsIDs, NSArray<NSString *> * _Nonnull notFoundObjectsIDs, NSArray<NSString *> * _Nonnull wrongPermissionsObjectsIDs) {
} errorBlock:^(NSError * _Nonnull error) {
}];Request.deleteDialogs(withIDs: Set<String>(["5356c64ab35c12bd3b108a41", "d256c64ab35c12bd3b108bc5"]), forAllUsers: false, successBlock: { (deletedObjectsIDs, notFoundObjectsIDs, wrongPermissionsObjectsIDs) in
}) { (error) in
}This request will remove this conversation for current user, but other users still will be able to chat there. The forAllUsers or force parameter is used to completely remove the dialog. Only group chat owner can remove the group conversation for all users.
You can also delete multiple conversations in a single request.
Chat history
Section titled “Chat history”Every chat conversation stores its chat history which you can retrieve:
let params: GetMessagesParameters = GetMessagesParameters()params.sorter = RequestSorter(fieldType: "1455098137", fieldName: "date_sent", sortType: "gt")params.limit = 20params.skip = 0
let parameters = params.getRequestParameters() as! [String : Any]
ConnectyCube().getMessages(dialogId: "5356c64ab35c12bd3b108a41", params: parameters, successCallback: { result in    let messages = result.items as! [ConnectycubeMessage]}, errorCallback: { error in
})
[CYBRequest messagesWithDialogID:@"5356c64ab35c12bd3b108a41" extendedRequest:@{@"date_sent[gt]" : @"1455098137"} paginator:[CYBPaginator limit:20 skip:0] successBlock:^(NSArray<CYBChatMessage *> * _Nonnull messages, CYBPaginator * _Nonnull paginator) {
} errorBlock:^(NSError * _Nonnull error) {
}];Request .messages(withDialogID: "5356c64ab35c12bd3b108a41", extendedRequest: ["date_sent[gt]":"1455098137"], paginator: Paginator.limit(20, skip: 0), successBlock: { (messages, paginator) in
}) { (error) in
}Note
All retrieved chat messages will be marked as read after the request. If you decide not to mark chat messages as read, then add the following parameter to your extendedRequest -
@{@"mark_as_read" : @"0"};ormarkAsRead = false
Send/Receive chat messages
Section titled “Send/Receive chat messages”1-1 Chat
Section titled “1-1 Chat”let message = ConnectycubeMessage()message.body = "How are you today?"message.dialogId = "5356c64ab35c12bd3b108a41"message.recipientId = 10056
ConnectyCube().chat.sendMessage(msg: message, successCallback: {
}) { (error) in
}
//MARK: ConnectycubeMessageListenerConnectyCube().chat.addMessageListener(listener: self)
extension YourClass: ConnectycubeMessageListener { func onMessage(message: ConnectycubeMessage) {
}
func onError(message: ConnectycubeMessage, ex: KotlinThrowable) {
}}CYBChatMessage *message = [[CYBChatMessage alloc] init];message.text = @"How are you today?";
CYBChatDialog *privateDialog = ...;[privateDialog sendMessage:message completionBlock:^(NSError * _Nullable error) {
}];
//MARK: CYBChatDelegate
- (void)chatDidReceiveMessage:(CYBChatMessage *)message {
}let message = ChatMessage()message.text = "How are you today?"
let privateDialog = ...privateDialog.send(message) { (error) in
}
//MARK: CYBChatDelegate
func chatDidReceive(_ message: ChatMessage) {
}Group/Public chat
Section titled “Group/Public chat”Before you start chatting in a group/public conversation, you need to join it. When joined - you can send/receive messages in a real time.
//not supported, no need to joinCYBChatDialog *groupDialog = ...;[groupDialog joinWithCompletionBlock:^(NSError * _Nullable error) {
}];let groupDialog = ...groupDialog.join { (error) in
}Then you are able to send/receive messages:
let message = ConnectycubeMessage()message.body = "How are you today?"message.dialogId = "5356c64ab35c12bd3b108a41"message.type = ConnectycubeMessageType.groupchat
ConnectyCube().chat.sendMessage(msg: message, successCallback: {
}) { (error) in
}
//MARK: ConnectycubeMessageListenerConnectyCube().chat.addMessageListener(listener: self)
extension YourClass: ConnectycubeMessageListener {    func onMessage(message: ConnectycubeMessage) {
    }
    func onError(message: ConnectycubeMessage, ex: KotlinThrowable) {
    }}
CYBChatMessage *message = [[CYBChatMessage alloc] init];message.text = @"How are you today?";
CYBChatDialog *groupDialog = ...;[groupDialog sendMessage:message completionBlock:^(NSError * _Nullable error) {
}];
//MARK: CYBChatDelegate
- (void)chatRoomDidReceiveMessage:(CYBChatMessage *)message fromDialogID:(NSString *)dialogID {
}let message = ChatMessage()message.text = "How are you today?"
let groupDialog = ...groupDialog.send(message) { (error) in
}
//MARK: ChatDelegate
func chatRoomDidReceive(_ message: ChatMessage, fromDialogID dialogID: String) {
}When it’s done, you can leave the group conversation:
//not supported, no need to leaveCYBChatDialog *groupDialog = ...;[groupDialog leaveWithCompletionBlock:^(NSError * _Nullable error) {
}];let groupDialog = ...groupDialog.leave { (error) in
}Message metadata
Section titled “Message metadata”A chat message can have custom sub-fields to store additional information that can be linked to the particular chat message.
When create a message, the custom data can be attached via properties field:
let message = ConnectycubeMessage()message.properties["field_one"] = "value_one"message.properties["field_two"] = "value_two"‘Sent’ status
Section titled “‘Sent’ status”There is a ‘sent’ status to ensure that message is delivered to the server.
The completionBlock is used to track the status:
//MARK: ConnectycubeMessageSentListener
ConnectyCube().chat.addMessageSentListener(listener: self)
extension YourClass: ConnectycubeMessageSentListener {    func onMessageSent(message: ConnectycubeMessage) {    }
    func onMessageSentFailed(message: ConnectycubeMessage) {    }}
CYBChatDialog *chatDialog = ...;[chatDialog sendMessage:message completionBlock:^(NSError * _Nullable error) { if(!error) { //Status - 'sent' }}];chatDialog.send(message) { (error) in if error == nil { //Status - 'sent' }}‘Delivered’ status
Section titled “‘Delivered’ status”By default, SDK sends ‘delivered’ status automatically when the message is received by the recipient. This is controlled by message.markable parameter when you send a message.
let message = ConnectycubeMessage()message.recipientId = 10056message.markable = truemessage.body = "How are you today?"
ConnectyCube().chat.sendMessage(msg: message, successCallback: {
}) { (error) in
}
CYBChatMessage *message = [CYBChatMessage new];message.markable = YES;message.text = @"How are you today?";
[chatDialog sendMessage:message completionBlock:^(NSError * _Nullable error) {
}];let message = ChatMessage()message.markable = truemessage.text = "How are you today?"
chatDialog.send(message) { (error) in
}If markable is false or omitted, you can send ‘delivered’ status manually via Chat:
ConnectyCube().chat.sendDeliveredStatus(msg: message, successCallback: {
}) { (error) in
}
[CYBChat.instance markAsDelivered:message completion:^(NSError * _Nullable error) {
}];Chat.instance.mark(asDelivered: message) { (error) in
}and via REST
let updatedParams = UpdateMessageParameters()updatedParams.delivered = true
ConnectyCube().updateMessage(messageId: "5b23aa4f5d0b0be0900041aa", dialogId: "5b23a9f38b518248d4fd7625", params: updatedParams.getRequestParameters(), successCallback: {
}) { (error) in
}
[CYBRequest markMessagesAsDelivered:[NSSet setWithArray:@[@"5b23aa4f5d0b0be0900041aa"]] dialogID:@"5b23a9f38b518248d4fd7625" successBlock:^{
} errorBlock:^(NSError * _Nonnull error) {
}];Request.markMessages(asDelivered: Set<String>(["5b23aa4f5d0b0be0900041aa"]), dialogID: "5b23a9f38b518248d4fd7625", successBlock: {
}) { (error) in
}The following method of a delegate is used to track ‘delivered’ status:
//MARK: ConnectycubeMessageStatusListener
ConnectyCube().chat.addMessageStatusListener(listener: self)
extension YourClass: ConnectycubeMessageStatusListener {    func onMessageDelivered(messageId: String, dialogId: String, userId: Int32) {    }
func onMessageRead(messageId: String, dialogId: String, userId: Int32) { }}...[CYBChat.instance addDelegate:self];...
//MARK: CYBChatDelegate- (void)chatDidDeliverMessageWithID:(NSString *)messageID dialogID:(NSString *)dialogID toUserID:(NSUInteger)userID {
}...Chat.instance.addDelegate(self)...
//MARK: ChatDelegatefunc chatDidDeliverMessage(withID messageID: String, dialogID: String, toUserID userID: UInt) {
}‘Read’ status
Section titled “‘Read’ status”Send ‘read’ status:
ConnectyCube().chat.sendReadStatus(msg: message, successCallback: {
}) { (error) in
}
[CYBChat.instance readMessage:message completion:^(NSError * _Nullable error) {
}Chat.instance.read(message) { (error) in
}The following method of a delegate is used to track ‘read’ status:
//MARK: ConnectycubeMessageStatusListener
ConnectyCube().chat.addMessageStatusListener(listener: self)
extension YourClass: ConnectycubeMessageStatusListener {    func onMessageDelivered(messageId: String, dialogId: String, userId: Int32) {    }
    func onMessageRead(messageId: String, dialogId: String, userId: Int32) {    }}
//MARK: CYBChatDelegate- (void)chatDidReadMessageWithID:(NSString *)messageID dialogID:(NSString *)dialogID readerID:(NSUInteger)readerID {
}//MARK: ChatDelegatefunc chatDidReadMessage(withID messageID: String, dialogID: String, readerID: UInt) {
}‘Is typing’ status
Section titled “‘Is typing’ status”The following ‘typing’ notifications are supported:
- typing: The user is composing a message. The user is actively interacting with a message input interface specific to this chat session (e.g., by typing in the input area of a chat controller)
- stopped: The user had been composing but now has stopped. The user has been composing but has not interacted with the message input interface for a short period of time (e.g., 30 seconds)
Send ‘is typing’ status:
ConnectyCube().chat.sendIsTypingStatus(dialog: dialog)[chatDialog sendUserIsTyping];chatDialog.sendUserIsTyping()Send ‘stop typing’ status:
ConnectyCube().chat.sendStopTypingStatus(dialog: dialog)[chatDialog sendUserStoppedTyping];chatDialog.sendUserStopTyping()The following block (closure) is used to track ‘is typing’ status:
//MARK: ConnectycubeChatTypingListener
ConnectyCube().chat.addTypingStatusListener(listener: self)
extension YourClass: ConnectycubeChatTypingListener {    func onUserIsTyping(dialogId: String?, userId: Int32) {
    }
    func onUserStopTyping(dialogId: String?, userId: Int32) {
    }}
chatDialog.onUserIsTyping = ^(NSUInteger userID) {
};chatDialog.onUserIsTyping = { (userID: UInt) in
}The following block (closure) is used to track ‘stopped typing’ status:
//MARK: ConnectycubeChatTypingListener
ConnectyCube().chat.addTypingStatusListener(listener: self)
extension YourClass: ConnectycubeChatTypingListener {    func onUserIsTyping(dialogId: String?, userId: Int32) {
    }
    func onUserStopTyping(dialogId: String?, userId: Int32) {
    }}
chatDialog.onUserStoppedTyping = ^(NSUInteger userID) {
};chatDialog.onUserStoppedTyping = { (userID: UInt) in
}Edit Message
Section titled “Edit Message”The following snippet is used to edit chat message:
//coming soonCYBChatDialog *dialog = ...[dialog editMessageWithID:@"5356c64ab35c12bd3b10wa64" text:@"New message text" last:YES completion:^(NSError * _Nullable error) {
}];
//MARK: CYBChatDelegate
- (void)chatDidReceiveMessage:(CYBChatMessage \*)message { //Handle edited message if (message.edited) {
}}let dialog = ...dialog.editMessage(withID: "5356c64ab35c12bd3b10wa64", text: "New message text", last: true) { (error) in
}
//MARK: CYBChatDelegatefunc chatDidReceive(_ message: ChatMessage) { //Handle edited message if (message.edited) { }}Delete chat messages
Section titled “Delete chat messages”The following snippet is used to remove chat message via REST:
ConnectyCube().deleteMessages(messagesIds: ["5b23aa4f5d0b0be0900041aa", "bc23aa4f5d0b0be0900041ad"], force: false, successCallback: {(result) in
}) { (error) in
}
[CYBRequest deleteMessagesWithIDs:[NSSet setWithArray:@[@"5b23aa4f5d0b0be0900041aa", @"bc23aa4f5d0b0be0900041ad"]] forAllUsers:NO successBlock:^{
} errorBlock:^(NSError * _Nonnull error) {
}];Request.deleteMessages(withIDs: Set(["5b23aa4f5d0b0be0900041aa", "bc23aa4f5d0b0be0900041ad"]), forAllUsers: false, successBlock: {
}) { (error) in
}This request will remove the messages from current user history only, without affecting the history of other users. The forAllUsers parameter is used to completely remove messages.
The following snippet is used to remove chat message in a real time:
//coming soonCYBChatDialog *dialog = ...[dialog removeMessageWithID:@"5356c64ab35c12bd3b10wa64" completion:^(NSError * _Nullable error) {
}];
//MARK: CYBChatDelegate
- (void)chatDidReceiveMessage:(CYBChatMessage \*)message { //Handle removed message if (message.removed) { }}let dialog = ...dialog.removeMessage(withID: "5356c64ab35c12bd3b10wa64") { (error) in
}
//MARK: CYBChatDelegatefunc chatDidReceive(_ message: ChatMessage) { //Handle removed message if (message.removed) { }}Self-destroy message
Section titled “Self-destroy message”Self-destroy messages is used if you want to implement some sort of Secret Chat where messages are visible only for some limited amount of time.
It’s your responsibility to setup a timer in your app and remove messages from the client side.
Self-destroy messages are not stored in server history.
//not supportedCYBChatMessage *message = [[CYBChatMessage alloc] init];message.text = @"Self destroy message";message.destroyAfterInterval = 10 // in seconds
CYBChatDialog _privateDialog = ...;[privateDialog sendMessage:message completionBlock:^(NSError _ \_Nullable error) {
}];
//MARK: CYBChatDelegate
- (void)chatDidReceiveMessage:(CYBChatMessage \*)message { //Handle destroyAfterInterval if (message.destroyAfterInterval > 0) { // setup a timer }}let message = ChatMessage()message.text = "Self destroy message"message.destroyAfterInterval = 10 // in seconds
let privateDialog = ...privateDialog.send(message) { (error) in
}
//MARK: CYBChatDelegatefunc chatDidReceive(_ message: ChatMessage) { //Handle destroyAfterInterval if (message.destroyAfterInterval > 0) { // setup a timer }}Attachments
Section titled “Attachments”Image/Video
Section titled “Image/Video”Chat attachments are supported with the cloud storage API. In order to send a chat attachment you need to upload the file to ConnectyCube cloud storage and obtain a file UID. Then you need to include this UID into chat message and send it.
let imageFilePath = ""ConnectyCube().uploadFile(filePath: imageFilePath, public: false, successCallback: {(cubeFile) in    // create a message    let message = ConnectycubeMessage()    message.saveToHistory = true    message.recipientId = 10056    // attach a photo    let attachment = ConnectycubeAttachment()    attachment.type = "photo"    attachment.id = String(cubeFile.id)    message.attachments?.add(attachment)    // send a chat message    ConnectyCube().chat.sendMessage(msg: message)
}, errorCallback: { (error) in
}, progress: { (progress) in
})
NSURL *fileUrl = [NSURL fileURLWithPath:@"file_path"]; //Local file url[CYBRequest uploadFileWithUrl:fileUrl fileName:@"image.png" contentType:@"image/png" isPublic:NO progressBlock:^(float progress) { //Update UI with upload progress} successBlock:^(CYBBlob * _Nonnull blob) { //Create attachment CYBChatAttachment *attachment = [[CYBChatAttachment alloc] init]; attachment.ID = blob.UID; attachment.type = @"image/png"; //Create message CYBChatMessage *message = [[CYBChatMessage alloc] init]; message.text = @"Image attachment"; //Set attachment message.attachments = @[attachment]; //Send message with attachment [chatDialog sendMessage:message completionBlock:^(NSError * _Nullable error) {
}];} errorBlock:^(NSError * _Nonnull error) {
}];let url = URL(fileURLWithPath:"file_path")
Request.uploadFile(with: url, fileName: "image.png", contentType: "image/png", isPublic: true, progressBlock: { (progress) in //Update UI with upload progress}, successBlock: { (blob) in let attachment = ChatAttachment() attachment.type = "image/png" attachment.id = blob.uid //Create message let message = ChatMessage() message.text = "Image Attachment" //Set attachment message.attachments = [attachment] //Send message with attachment chatDialog.send(message, completionBlock: { (error) in
})
}) { (error) in
}The same flow is supported on the receiver’s side. When you receive a message, you need to get the file UID and then you can build a file URL:
// ConnectycubeMessageListener
func onMessage(message: ConnectycubeMessage) {    if let attachment = message.attachments {        attachment.forEach { (attachment) in            if let uid = (attachment as! ConnectycubeAttachment).id {                let privateAvatarUrl = ConnectycubeFileKt.getPrivateUrlForUID(uid: uid)            }        }    }}
- (void)chatDidReceiveMessage:(CYBChatMessage *)message { [message.attachments enumerateObjectsUsingBlock:^(CYBChatAttachment * _Nonnull attachment, NSUInteger idx, BOOL * _Nonnull stop) { NSString *fileURL = [CYBBlob privateUrlForFileUID:attachment.ID] }];}func chatDidReceive(_ message: ChatMessage) { if let attachment = message.attachments { attachment.forEach { (attachment) in if let uid = attachment.id { let fileURL = CYBBlob.privateUrlForFileUID(uid) } } }}Contact
Section titled “Contact”A contact profile can be send via chat attachments as well:
let customData = ["phone" : "180032323223", "name" : "Samuel Johnson"]if let theJSONData = try? JSONSerialization.data(withJSONObject: customData, options: .prettyPrinted) {    let data = String(data: theJSONData, encoding: .utf8)    let attachment = ConnectycubeAttachment()    attachment.data = data
    //Create message    let message = ConnectycubeMessage()    message.body = "Contact Attachment"
    message.attachments = [attachment]
    // send a chat message    // ...
}
CYBChatAttachment *attachment = [[CYBChatAttachment alloc] init];
attachment[@"phone"] = @"180032323223"attachment[@"name"] = @"Samuel Johnson"
// attach a contactCYBChatMessage *message = [[CYBChatMessage alloc] init];message.text = @"Contact attachment";message.attachments = @[attachment];
// send a chat message// ...let attachment = ChatAttachment()
attachment["phone"] = "180032323223"attachment["name"] = "Samuel Johnson"
//Create messagelet message = ChatMessage()message.text = "Contact Attachment"
message.attachments = [attachment]
// send a chat message// ...On the receiver’s side, when you receive a message, you need to get a contact data from an attachment:
// ConnectycubeMessageListener
func onMessage(message: ConnectycubeMessage) {    if let attachment = message.attachments {        attachment.forEach { (attachment) in            if let data = (attachment as! ConnectycubeAttachment).data?.data(using: .utf8) {                if let contactData = try? JSONSerialization.jsonObject(with: data, options: []) as! [String : String] {                    let phone = contactData["phone"]                    let name = contactData["name"]                }            }        }    }}
- (void)chatDidReceiveMessage:(CYBChatMessage *)message { [message.attachments enumerateObjectsUsingBlock:^(CYBChatAttachment * _Nonnull attachment, NSUInteger idx, BOOL * _Nonnull stop) { NSData *jsonData = [attachment.data dataUsingEncoding:NSUTF8StringEncoding]; NSDictionary *contactData = [NSJSONSerialization JSONObjectWithData:jsonData options:kNilOptions error:nil]; NSString *phone = contactData[@"phone"]; NSString *name = contactData[@"name"]; }];}func chatDidReceive(_ message: ChatMessage) { if let attachment = message.attachments { attachment.forEach { (attachment) in if let data = attachment.data?.data(using: .utf8) { if let contactData = try? JSONSerialization.jsonObject(with: data, options: []) as! [String : String] { let phone = contactData["phone"] let name = contactData["name"] } } } }}Message reactions
Section titled “Message reactions”Add/Remove reactions
Section titled “Add/Remove reactions”User can add/remove message reactions and listen message reaction events
Add
let messageId = "58e6a9c8a1834a3ea6001f15"let reaction = "🔥"
ConnectyCube().addMessageReaction(messageId: messageId, reaction: reaction, successCallback: {
}, errorCallback: {error in })
Remove
let messageId = "58e6a9c8a1834a3ea6001f15"let reaction = "👎"
ConnectyCube().removeMessageReaction(messageId: messageId, reaction: reaction, successCallback: {
}, errorCallback: {error in })
Add/Remove
let messageId = "58e6a9c8a1834a3ea6001f15"let reactionToAdd = "👎"let reactionToRemove = "🚀"
ConnectyCube().updateMessageReaction(messageId: messageId, reactionToAdd: reactionToAdd, reactionToRemove: reactionToRemove, successCallback: {
}, errorCallback: {error in })
Listen reactions
Section titled “Listen reactions”//MARK: ConnectycubeMessageReactionsListener
ConnectyCube().chat.addMessageReactionsListener(listener: self)
extension YourClass: ConnectycubeMessageReactionsListener { func onMessageReaction(reaction: ConnectycubeReaction) { // let dialogId = reaction.dialogId // let messageId = reaction.messageId // let addReaction = reaction.addReaction // let removeReaction = reaction.removeReaction }}List message reactions
Section titled “List message reactions”User can list message reactions
let messageId = "58e6a9c8a1834a3ea6001f15"
ConnectyCube().getMessageReactions(messageId: messageId, successCallback: { reactions in    // the result contains the dictionary where key is the reaction and value is the list of users' ids who reacted with this reaction}, errorCallback: {error in })
Response example from getMessageReactions(messageId) - see
Unread messages count
Section titled “Unread messages count”You can request total unread messages count and unread count for particular conversation:
ConnectyCube().getUnreadMessagesCount(dialogsIds: ["8b23aa4f5d0b0be0900041aa","1c23aa4f5d0b0be0900041ad"], successCallback: {(result) in    NSLog("total unread messages= " + result["8b23aa4f5d0b0be0900041aa"]!.description)    NSLog("total unread messages= " + result["1c23aa4f5d0b0be0900041ad"]!.description)}) { (error) in
}
[CYBRequest totalUnreadMessageCountForDialogsWithIDs:[NSSet setWithArray:@[@"8b23aa4f5d0b0be0900041aa", @"1c23aa4f5d0b0be0900041ad"]] successBlock:^(NSUInteger count, NSDictionary<NSString *,id> * _Nonnull dialogs) {
} errorBlock:^(NSError * _Nonnull error) {
}];Request.totalUnreadMessageCountForDialogs(withIDs: Set(["8b23aa4f5d0b0be0900041aa","1c23aa4f5d0b0be0900041ad"]), successBlock: { (count, dialogs) in
}) { (error) in
}Global search
Section titled “Global search”Global search feature was developed to simplify search of dialogs, messages and users at the same time.
Similar functionality is used in most popular messengers and you can implement it in your app using Connectycube SDK.
Just use request from snippet below. SearchRequestBuilder is optional parameter and it can be null if you don’t need
additional configs for search request (only v2).
let searchText = "dialog name"           // String or word. Should be longer than 4 symbols. Performs 'or' search.                                         // For an exact search, you need to wrap the search phrase in quotes.
let dialogIds = ["8b23aa4f5d0b0be0900041aa","1c23aa4f5d0b0be0900041ad"]
let searchParams: GlobalSearchParams = GlobalSearchParams() //class-helper to simple config search requestsearchParams.dialogIds = dialogIds // List of dialog ids. Max cam include 10 items. Optional parameter.// searchParams.startDate = startDate // Closest date to now. Uses lte comparison. Optional parameter.// searchParams.endDate = endDate // Shouldn't differ by more than 3 months from the start_date. Uses gte comparison. Optional parameter.searchParams.limit = 3 // Maximum number of items returned from the server in the search results. Max value - 100. Optional parameter.ConnectyCube().searchText(searchText: searchText, params: searchParams.getSearchParams() as? [String : Any], successCallback: {(result) in    let dialogs = result.dialogs // found dialogs    let messages = result.messages // found messages    let users = result.users // found users}) { (error) in
}
Chat alerts
Section titled “Chat alerts”When you send a chat message and the recipient/recipients is offline, then automatic push notification will be fired.
In order to receive push notifications you need to subscribe for it. Please refer to Push Notifications guide.
To configure push template which users receive - go to Dashboard Console, Chat Alerts page
Also, here is a way to avoid automatically sending push notifications to offline recipient/recipients. For it add the silent parameter with value 1 to the properties field of the instance of a ConnectycubeMessage.
let message = ConnectycubeMessage()message.properties["silent"] = "1"After sending such a message, the server won’t create the push notification for offline recipient/recipients.
Note
Currently push notifications are supported on mobile environment only.
Chat notifications settings
Section titled “Chat notifications settings”Update notifications settings
Section titled “Update notifications settings”A user can turn on/off push notifications for offline messages in a dialog. By default push notification are turned ON, so offline user receives push notifications for new messages in a chat.
let dialogId = "8b23aa4f5d0b0be0900041aa"let enabled = false  //false - to disable push notification, true - to enable
ConnectyCube().updateDialogNotificationsSettings(dialogId: dialogId, enable: enabled, successCallback: {(result) in    NSLog("notification is enabled= " + result.description)}) { (error) in
}
Get notifications settings
Section titled “Get notifications settings”Check a status of notifications setting - either it is ON or OFF for a particular chat.
ConnectyCube().getDialogNotificationsSettings(dialogId: "8b23aa4f5d0b0be0900041aa", successCallback: {(result) in    NSLog("notification is enabled= " + result.description)}) { (error) in
}
Get last activity
Section titled “Get last activity”There is a way to get an info when a user was active last time, in seconds.
This is a modern approach for messengers apps, e.g. to display this info on a Contacts screen or on a User Profile screen.
//coming soonSystem messages
Section titled “System messages”There is a way to send system messages to other users about some events. System messages work on a separate channel and are not mixed with regular chat messages:
System messages are not stored on a server. It means messages will be delivered only to online users.
//MARK: ConnectycubeSystemMessageListener
ConnectyCube().chat.addSystemMessageListener(listener: self)
extension YourClass: ConnectycubeMessageSentListener {    func onMessage(message: ConnectycubeMessage) {
    }
    func onError(message: ConnectycubeMessage, ex: KotlinThrowable) {
    }}
let message = ConnectycubeMessage()message.recipientId = 58672message.properties["param1"] = "value1"message.properties["param2"] = "value2"message.body = "some text"
ConnectyCube().chat.sendSystemMessage(msg: message)
Moderation
Section titled “Moderation”The moderation capabilities help maintain a safe and respectful chat environment. We have options that allow users to report inappropriate content and manage their personal block lists, giving them more control over their experience.
Report user
Section titled “Report user”For user reporting to work, it requires the following:
- Go to ConnectyCube Daashboard
- select your Application
- Navigate to Custom module via left sidebar
- Create new table called UserReports with the following fields:
- reportedUserId - integer
- reason - string
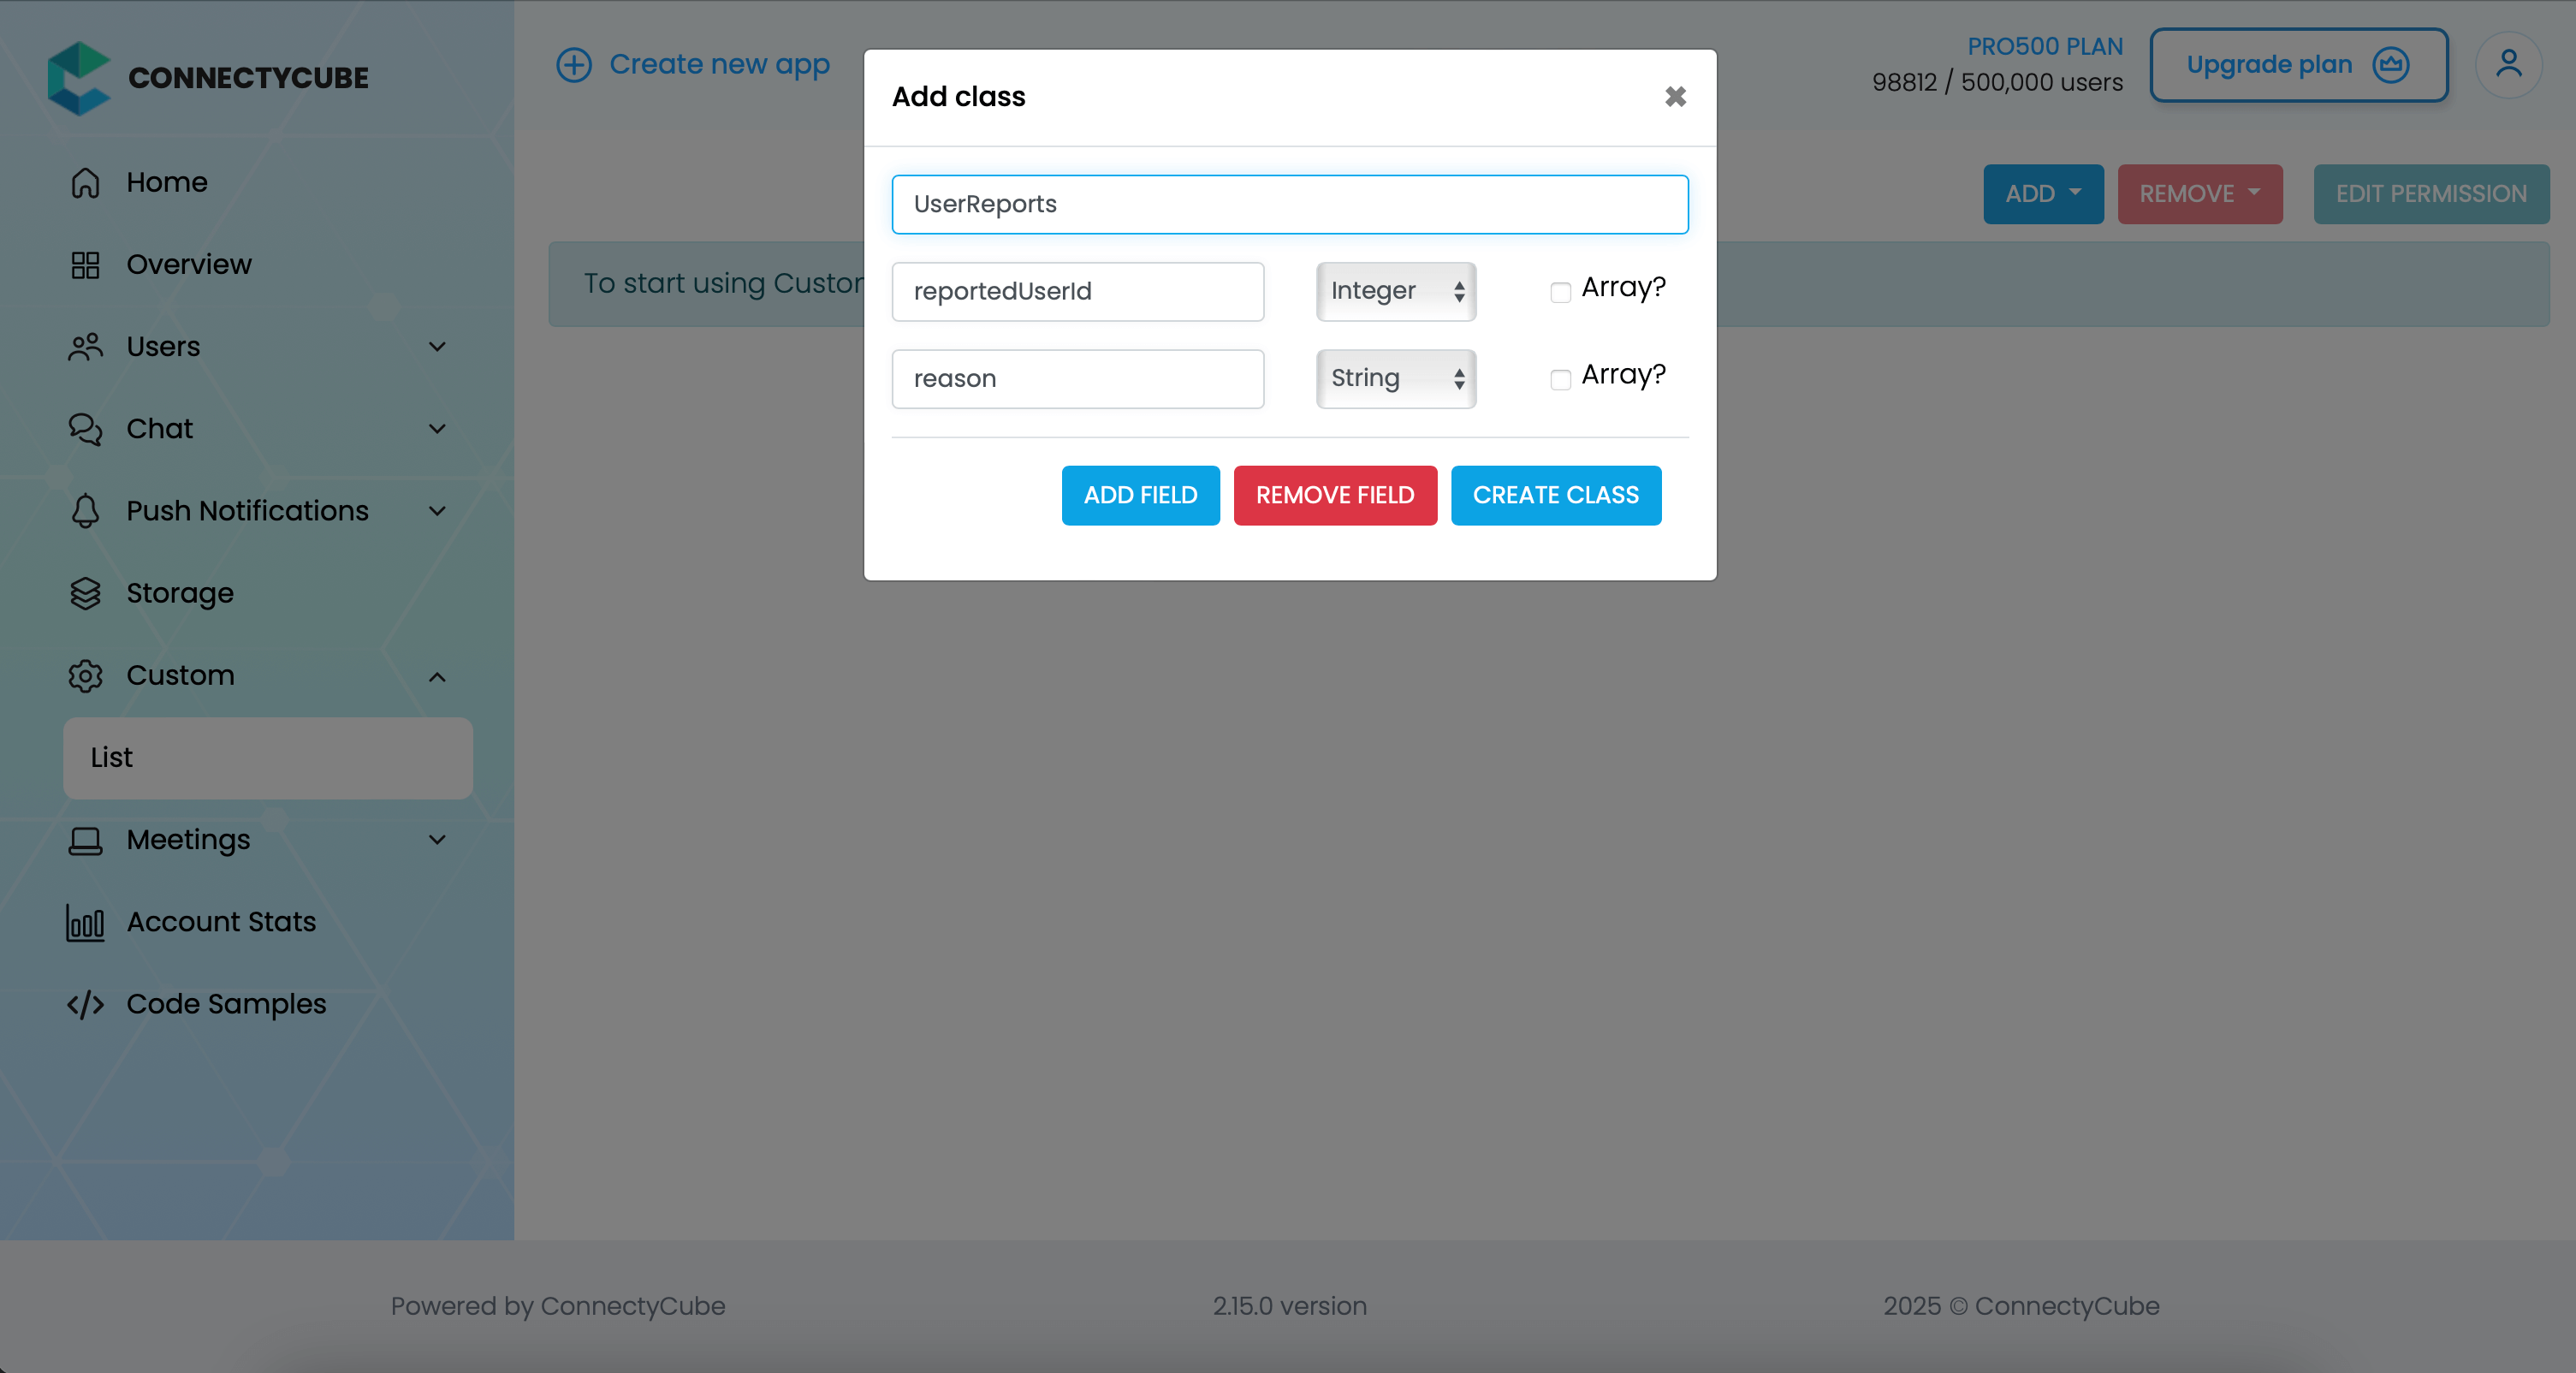
Once the table is created, you can create a report with the following code snippet and then see all the reports in Dashboard:
let customObject = ConnectycubeCustomObject(className: "UserReports")
customObject.fields = [  "reportedUserId": 45,  "reason": "User is spamming with bad words",]
ConnectyCube().createCustomObject(customObject: customObject, successCallback:{ createdObject in
}, errorCallback: { error in})
Report message
Section titled “Report message”For message reporting to work, the same approach to user reporting above could be used.
You need to create new table called MessageReports with the following fields:
- reportedMessageId - integer
- reason - string
Once the table is created, you can create a report with the following code snippet and then see all the reports in Dashboard:
let customObject = ConnectycubeCustomObject(className: "MessageReports")
customObject.fields = [  "reportedMessageId": "58e6a9c8a1834a3ea6001f15",  "reason": "The message contains phishing links",]
ConnectyCube().createCustomObject(customObject: customObject, successCallback:{ createdObject in
}, errorCallback: { error in})
Block user
Section titled “Block user”Block list (aka Privacy list) allows enabling or disabling communication with other users. You can create, modify, or delete privacy lists, define a default list.
The user can have multiple privacy lists, but only one can be active.
Create privacy list
Section titled “Create privacy list”A privacy list must have at least one element in order to be created. If no elements specified, then the list with given name will be deleted.
//coming soonNSUInteger userID = 34;
CYBPrivacyItem *privateChatPrivacyItem =[[CYBPrivacyItem alloc] initWithPrivacyType:CYBPrivacyTypeUserIDuserID:userIDallow:NO];privateChatPrivacyItem.mutualBlock = YES;CYBPrivacyItem *groupChatPrivacyItem =[[CYBPrivacyItem alloc] initWithPrivacyType:CYBPrivacyTypeGroupUserID userID:userID allow:NO];CYBPrivacyList *privacyList =[[CYBPrivacyList alloc] initWithName:@"PrivacyList" items:@[privateChatPrivacyItem,groupChatPrivacyItem]];//Setting privacy list[CYBChat.instance setPrivacyList:privacyList];let userID: UInt = 34
let privateChatPrivacyItem = PrivacyItem.init(privacyType: .userID, userID: userID, allow: false)privateChatPrivacyItem.mutualBlock = true
let groupChatPrivacyItem = PrivacyItem.init(privacyType: .groupUserID, userID: userID, allow: false)let privacyList = PrivacyList.init(name: "PrivacyList", items: [privateChatPrivacyItem, groupChatPrivacyItem])//Setting privacy listChat.instance.setPrivacyList(privacyList)If the privacy list is set successfully, the CYBChat instance will call its delegate’s chatDidSetPrivacyListWithName: method:
//coming soon//MARK: CYBChatDelegate- (void)chatDidSetPrivacyListWithName:(NSString *)name {
}//MARK: ChatDelegatefunc chatDidSetPrivacyList(withName name: String) {
}In case of error the CYBChat instance will call its delegate’s chatDidNotSetPrivacyListWithName:error: method:
//coming soon//MARK: CYBChatDelegate- (void)chatDidNotSetPrivacyListWithName:(NSString *)name error:(NSError *)error {
}//MARK: ChatDelegatefunc chatDidNotSetPrivacyList(withName name: String, error: Error) {
}In order to be used the privacy list should be not only set, but also activated(set as default).
Activate privacy list
Section titled “Activate privacy list”In order to activate rules from a privacy list you should set it as default:
//coming soon[CYBChat.instance setDefaultPrivacyListWithName:@"PrivacyList"];Chat.instance.setDefaultPrivacyListWithName("PrivacyList")If the privacy list is activated (set as default) successfully, the CYBChat instance will call its delegate’s chatDidSetDefaultPrivacyListWithName: method:
//coming soon//MARK: CYBChatDelegate- (void)chatDidSetDefaultPrivacyListWithName:(NSString *)name {
}//MARK: ChatDelegatefunc chatDidSetDefaultPrivacyList(withName name: String) {
}Otherwise the CYBChat instance will call its delegate’s chatDidNotSetDefaultPrivacyListWithName:error: method:
//coming soon//MARK: CYBChatDelegate- (void)chatDidNotSetDefaultPrivacyListWithName:(NSString *)name error:(NSError *)error {
}//MARK: ChatDelegatefunc chatDidNotSetDefaultPrivacyList(withName name: String, error: Error) {
}Update privacy list
Section titled “Update privacy list”There are some rules you should follow to update a privacy list:
- Include all of the desired items (not a “delta”).
- If you want to update or set new privacy list instead of current one, you should decline current default list first.
//coming soon//Deactivating privacy list before update[CYBChat.instance setDefaultPrivacyListWithName:nil];//Some updates here//....//Activating privacy list[CYBChat.instance setDefaultPrivacyListWithName:@"PrivacyList"];//Deactivating privacy list before updateChat.instance.setDefaultPrivacyListWithName(nil)//Some updates here//....//Activating privacy listChat.instance.setDefaultPrivacyListWithName("PrivacyList")Retrieve privacy list names
Section titled “Retrieve privacy list names”To get a list of all your privacy lists’ names use the following request:
//coming soon[CYBChat.instance retrievePrivacyListNames];Chat.instance.retrievePrivacyListNames()If the privacy list names are retrieved successfully, the CYBChat instance will call its delegate’s didReceivePrivacyListNames: method:
//coming soon- (void)chatDidReceivePrivacyListNames:(NSArray<NSString *> *)listNames {
}func chatDidReceivePrivacyListNames(_ listNames: [String]) {
}Otherwise the CYBChat instance will call its delegate’s didNotReceivePrivacyListNamesDueToError: method:
//coming soon- (void)chatDidNotReceivePrivacyListNamesDueToError:(NSError *)error {
}func chatDidNotReceivePrivacyListNamesDue(toError error: Error) {
}Retrieve privacy list with name
Section titled “Retrieve privacy list with name”To get the privacy list by name you should use the following method:
//coming soon[CYBChat.instance retrievePrivacyListWithName:@"PrivacyList"];Chat.instance.retrievePrivacyList(withName: "PrivacyList")If the privacy list is retrieved successfully, the CYBChat instance will call its delegate’s chatDidReceivePrivacyList: method:
//coming soon- (void)chatDidReceivePrivacyList:(CYBPrivacyList *)privacyList {
}func chatDidReceive(_ privacyList: PrivacyList) {
}Otherwise the CYBChat instance will call its delegate’s chatDidNotReceivePrivacyListWithName:error: method
//coming soon- (void)chatDidNotReceivePrivacyListWithName:(NSString *)name error:(NSError *)error {
}func chatDidNotReceivePrivacyList(withName name: String, error: Error) {
}Remove privacy list
Section titled “Remove privacy list”To delete a list you can call a method below or you can edit a list and set items to nil.
//coming soon[CYBChat.instance removePrivacyListWithName:@"PrivacyList"];Chat.instance.removePrivacyList(withName: "PrivacyList")If the privacy list is removed successfully, the CYBChat instance will call its delegate’s chatDidRemovedPrivacyListWithName: method
//coming soon- (void)chatDidRemovedPrivacyListWithName:(NSString *)name {
}func chatDidRemovedPrivacyList(withName name: String) {
}Blocked user attempts to communicate with user
Section titled “Blocked user attempts to communicate with user”Blocked users will be receiving an error when trying to chat with a user in a 1-1 chat and will be receiving nothing in a group chat:
//coming soonchatDialog.onBlockedMessage = ^(NSError * _Nullable error) {
};chatDialog.onBlockedMessage = { (error) in
}Ping server
Section titled “Ping server”Sometimes, it can be cases where TCP connection to Chat server can go down without the application layer knowing about it.
To check that chat connection is still alive or to keep it to be alive there is a ping method:
//coming soon