This is the abridged developer documentation for ConnectyCube
# Send first chat message
> Step-by-step guide to sending your first chat message using ConnectyCube Web Chat SDK - what exactly to do when you want to build a chat.
The **ConnectyCube Chat API** is a set of tools that enables developers to integrate real-time messaging into their web and mobile applications. With this API, users can build powerful chat functionalities that support one-on-one messaging, group chats, typing indicators, message history, delivery receipts, and push notifications. If you’re planning to build a new app, we recommend starting with one of our [code samples apps](/js/getting-started/code-samples) as a foundation for your client app.\ If you already have an app and you are looking to add a chat to it, proceed with this guide. This guide walks you through installing the ConnectyCube SDK in your app, configure it and then sending your first message to the opponent in 1-1 chat. ## Before you start [Section titled “Before you start”](#before-you-start) Before you start, make sure: 1. You have access to your ConnectyCube account. If you don’t have an account, [sign up here](https://admin.connectycube.com/register). 2. An app created in ConnectyCube dashboard. Once logged into [your ConnectyCube account](https://admin.connectycube.com), create a new application and make a note of the app credentials (app ID and auth key) that you’ll need for authentication. ## Step 1: Configure SDK [Section titled “Step 1: Configure SDK”](#step-1-configure-sdk) To use chat in a client app, you should install, import and configure ConnectyCube SDK. **Note:** If the app is already created during the onboarding process and you followed all the instructions, you can skip the ‘Configure SDK’ step and start with [Create and Authorise User](#step-2-create-and-authorise-user). ### Install SDK [Section titled “Install SDK”](#install-sdk) #### React, Angular, Vue etc. [Section titled “React, Angular, Vue etc.”](#react-angular-vue-etc) Install package from the command line: * npm ```bash npm install connectycube --save ``` * yarn ```bash yarn add connectycube ``` #### Plain HTML [Section titled “Plain HTML”](#plain-html) Сonnect SDK js file as a normal script: ```html ``` #### Vite [Section titled “Vite”](#vite) If you use [Vite](https://vite.dev/) build tool, update `vite.config.ts` and add the following: ```js export default defineConfig({ plugins: ... esbuild: ... define: { // add this line for ConnectyCube to work properly global: {}, }, }) ``` Also, it needs to add polyfils for some node libs. Install the package as a dev dependency: * npm ```bash npm install --save-dev vite-plugin-node-polyfills ``` * yarn ```bash yarn add --dev vite-plugin-node-polyfills ``` Add the plugin to your **vite.config.ts** file: ```js import { defineConfig } from 'vite' import { nodePolyfills } from 'vite-plugin-node-polyfills' // https://vitejs.dev/config/ export default defineConfig({ plugins: [ nodePolyfills(), ], }) ``` For Vite 6 to work, add the following code in **package.json**: ```json "overrides": { "vite-plugin-node-polyfills": { "vite": "^6.0.0" } } ``` ### Remix SSR (Server-Side Rendering) guide [Section titled “Remix SSR (Server-Side Rendering) guide”](#remix-ssr-server-side-rendering-guide) When using the ConnectyCube SDK in SSR environments like Remix, native Node.js modules such as “events” may cause runtime errors due to differences between Node and browser environments.\ To ensure smooth SSR integration, follow the steps below. Install ConnectyCube SDK and apply SSR patches: * npm ```bash npm install connectycube npx connectycube patch-ssr # apply SSR patches # npx connectycube revert-ssr # revert SSR patches (if needed) ``` * yarn ```bash yarn add connectycube yarn connectycube patch-ssr # apply SSR patches # yarn connectycube revert-ssr # revert SSR patches (if needed) ``` #### Remix Config Update [Section titled “Remix Config Update”](#remix-config-update) Add the following option in your **remix.config.js** or **remix.config.ts** file to polyfill the “events” module, which is required by ConnectyCube’s dependencies: ```javascript /** * @type {import('@remix-run/dev').AppConfig} */ const commonConfig = { // ... your existing config options ... browserNodeBuiltinsPolyfill: { modules: { events: true, }, }, }; export default remixConfig; ``` This enables polyfilling of the Node.js “events” module in the browser environment, preventing errors related to “@xmpp/events” and similar packages used internally by ConnectyCube SDK. ### Import SDK [Section titled “Import SDK”](#import-sdk) Add the following import statement to start using all classes and methods. ```javascript import ConnectyCube from 'connectycube'; ``` \**this is not needed for Plain HTML* ### Initialize SDK [Section titled “Initialize SDK”](#initialize-sdk) Initialize framework with your ConnectyCube application credentials. You can access your application credentials in [ConnectyCube Dashboard](https://admin.connectycube.com): * SDK v4 ```javascript const CREDENTIALS = { appId: 21, authKey: "hhf87hfushuiwef", }; ConnectyCube.init(CREDENTIALS); ``` * SDK v3 ```javascript const CREDENTIALS = { appId: 21, authKey: "hhf87hfushuiwef", authSecret: "jjsdf898hfsdfk", }; ConnectyCube.init(CREDENTIALS); ``` ## Step 2: Create and Authorise User [Section titled “Step 2: Create and Authorise User”](#step-2-create-and-authorise-user) As a starting point, the user’s session token needs to be created allowing to send and receive messages in chat. ```javascript const userCredentials = { login: "marvin18", password: "supersecurepwd" }; ConnectyCube.createSession(userCredentials) .then((session) => {}) .catch((error) => {}); ``` **Note:** With the request above, **the user is created automatically on the fly upon session creation** using the login (or email) and password from the request parameters. **Important:** such approach with the automatic user creation works well for testing purposes and while the application isn’t launched on production. For better security it is recommended to deny the session creation without an existing user.\ For this, set ‘Session creation without an existing user entity’ to **Deny** under the **Application -> Overview -> Permissions** in the [admin panel](https://admin.connectycube.com/apps). ## Step 3: Connect User to chat [Section titled “Step 3: Connect User to chat”](#step-3-connect-user-to-chat) Connecting to the chat is an essential step in enabling real-time communication. By establishing a connection, the user is authenticated on the chat server, allowing them to send and receive messages instantly. Without this connection, the app won’t be able to interact with other users in the chat. ```javascript const userCredentials = { userId: 4448514, password: "supersecurepwd", }; ConnectyCube.chat .connect(userCredentials) .then(() => { // connected }) .catch((error) => {}); ``` ## Step 4: Create 1-1 chat [Section titled “Step 4: Create 1-1 chat”](#step-4-create-1-1-chat) Creating a 1-1 chat gives a unique conversation ID to correctly route and organize your message to the intended user. You need to pass `type: 3` (1-1 chat) and an **id** of an opponent you want to create a chat with: ```javascript const params = { type: 3, occupants_ids: [56], }; ConnectyCube.chat.dialog .create(params) .then((dialog) => {}) .catch((error) => {}); ``` ## Step 5: Send / Receive chat messages [Section titled “Step 5: Send / Receive chat messages”](#step-5-send--receive-chat-messages) Once the 1-1 chat is set up, you can use it to exchange messages seamlessly. The code below demonstrates how to send and receive messages within a specific 1-1 chat. ```javascript const dialog = ...; const opponentId = 56; const message = { type: dialog.type === 3 ? 'chat' : 'groupchat', body: "How are you today?", extension: { save_to_history: 1, dialog_id: dialog._id } }; message.id = ConnectyCube.chat.send(opponentId, message); // ... ConnectyCube.chat.onMessageListener = onMessage; function onMessage(userId, message) { console.log('[ConnectyCube.chat.onMessageListener] callback:', userId, message) } ``` Congratulations! You’ve mastered the basics of sending a chat message in ConnectyCube. #### What’s next? [Section titled “What’s next?”](#whats-next) To take your chat experience to the next level, explore ConnectyCube advanced functionalities, like adding typing indicators, using emojis, sending attachments, and more. Follow the [Chat API documentation](/js/messaging/) to enrich your app and engage your users even further!
# Make first call
> A guide with the essential steps of how to make the first call via ConnectyCube Web Video SDK - from session creation to initialising and accepting the call.
**ConnectyCube Video Calling Peer-to-Peer (P2P) API** provides a solution for integrating real-time video and audio calling into your application. This API enables you to create smooth one-on-one and group video calls, supporting a wide range of use cases like virtual meetings, telemedicine consultations, social interactions, and more. The P2P approach ensures that media streams are transferred directly between users whenever possible, minimizing latency and delivering high-quality audio and video. If you’re planning to build a new app, we recommend starting with one of our [code samples apps](/js/getting-started/code-samples) as a foundation for your client app.\ If you already have an app and you are looking to add chat and voice/video calls to it, proceed with this guide. This guide walks you through installing the ConnectyCube SDK in your app, configure it and then initiating the call to the opponent. ## Before you start [Section titled “Before you start”](#before-you-start) Before you start, make sure: 1. You have access to ConnectyCube account. If you don’t have an account, [sign up here](https://admin.connectycube.com/register). 2. An app created in ConnectyCube dashboard. Once logged into [your ConnectyCube account](https://admin.connectycube.com/signin), create a new application and make a note of the app credentials (app ID and auth key) that you’ll need for authentication. ## Step 1: Configure SDK [Section titled “Step 1: Configure SDK”](#step-1-configure-sdk) To use chat in a client app, you should install, import and configure ConnectyCube SDK. **Note:** If the app is already created during the onboarding process and you followed all the instructions, you can skip the ‘Configure SDK’ step and start with [Create and Authorise User](#step-2-create-and-authorise-user). ### Install SDK [Section titled “Install SDK”](#install-sdk) #### React, Angular, Vue etc. [Section titled “React, Angular, Vue etc.”](#react-angular-vue-etc) Install package from the command line: * npm ```bash npm install connectycube --save ``` * yarn ```bash yarn add connectycube ``` #### Plain HTML [Section titled “Plain HTML”](#plain-html) Сonnect SDK js file as a normal script: ```html ``` #### Vite [Section titled “Vite”](#vite) If you use [Vite](https://vite.dev/) build tool, update `vite.config.ts` and add the following: ```js export default defineConfig({ plugins: ... esbuild: ... define: { // add this line for ConnectyCube to work properly global: {}, }, }) ``` Also, it needs to add polyfils for some node libs. Install the package as a dev dependency: * npm ```bash npm install --save-dev vite-plugin-node-polyfills ``` * yarn ```bash yarn add --dev vite-plugin-node-polyfills ``` Add the plugin to your **vite.config.ts** file: ```js import { defineConfig } from 'vite' import { nodePolyfills } from 'vite-plugin-node-polyfills' // https://vitejs.dev/config/ export default defineConfig({ plugins: [ nodePolyfills(), ], }) ``` For Vite 6 to work, add the following code in **package.json**: ```json "overrides": { "vite-plugin-node-polyfills": { "vite": "^6.0.0" } } ``` ### Remix SSR (Server-Side Rendering) guide [Section titled “Remix SSR (Server-Side Rendering) guide”](#remix-ssr-server-side-rendering-guide) When using the ConnectyCube SDK in SSR environments like Remix, native Node.js modules such as “events” may cause runtime errors due to differences between Node and browser environments.\ To ensure smooth SSR integration, follow the steps below. Install ConnectyCube SDK and apply SSR patches: * npm ```bash npm install connectycube npx connectycube patch-ssr # apply SSR patches # npx connectycube revert-ssr # revert SSR patches (if needed) ``` * yarn ```bash yarn add connectycube yarn connectycube patch-ssr # apply SSR patches # yarn connectycube revert-ssr # revert SSR patches (if needed) ``` #### Remix Config Update [Section titled “Remix Config Update”](#remix-config-update) Add the following option in your **remix.config.js** or **remix.config.ts** file to polyfill the “events” module, which is required by ConnectyCube’s dependencies: ```javascript /** * @type {import('@remix-run/dev').AppConfig} */ const commonConfig = { // ... your existing config options ... browserNodeBuiltinsPolyfill: { modules: { events: true, }, }, }; export default remixConfig; ``` This enables polyfilling of the Node.js “events” module in the browser environment, preventing errors related to “@xmpp/events” and similar packages used internally by ConnectyCube SDK. ### Import SDK [Section titled “Import SDK”](#import-sdk) Add the following import statement to start using all classes and methods. ```javascript import ConnectyCube from 'connectycube'; ``` \**this is not needed for Plain HTML* ### Initialize SDK [Section titled “Initialize SDK”](#initialize-sdk) Initialize framework with your ConnectyCube application credentials. You can access your application credentials in [ConnectyCube Dashboard](https://admin.connectycube.com): * SDK v4 ```javascript const CREDENTIALS = { appId: 21, authKey: "hhf87hfushuiwef", }; ConnectyCube.init(CREDENTIALS); ``` * SDK v3 ```javascript const CREDENTIALS = { appId: 21, authKey: "hhf87hfushuiwef", authSecret: "jjsdf898hfsdfk", }; ConnectyCube.init(CREDENTIALS); ``` ## Step 2: Create and Authorise User [Section titled “Step 2: Create and Authorise User”](#step-2-create-and-authorise-user) As a starting point, the user’s session token needs to be created allowing to participate in calls. ```javascript const userCredentials = { login: "marvin18", password: "supersecurepwd" }; ConnectyCube.createSession(userCredentials) .then((session) => {}) .catch((error) => {}); ``` **Note:** With the request above, **the user is created automatically on the fly upon session creation** using the login (or email) and password from the request parameters. **Important:** such approach with the automatic user creation works well for testing purposes and while the application isn’t launched on production. For better security it is recommended to deny the session creation without an existing user.\ For this, set ‘Session creation without an existing user entity’ to **Deny** under the **Application -> Overview -> Permissions** in the [admin panel](https://admin.connectycube.com/apps). ## Step 3: Connect User to chat [Section titled “Step 3: Connect User to chat”](#step-3-connect-user-to-chat) Connecting to the chat is an essential step in enabling real-time communication. To start using Video Calling API you need to connect user to Chat as ConnectyCube Chat API is used as a signalling transport for Video Calling API: ```javascript const userCredentials = { userId: 4448514, password: "supersecurepwd", }; ConnectyCube.chat .connect(userCredentials) .then(() => { // connected }) .catch((error) => {}); ``` ## Step 4: Create video session [Section titled “Step 4: Create video session”](#step-4-create-video-session) In order to use Video Calling API you need to create a call session object - choose your opponents with whom you will have a call and a type of session (VIDEO or AUDIO). > **Note** > > The calleesIds array must contain the opponents ids only and exclude current user id. ```javascript const calleesIds = [56, 76, 34]; // User's ids const sessionType = ConnectyCube.videochat.CallType.VIDEO; // AUDIO is also possible const additionalOptions = {}; const session = ConnectyCube.videochat.createNewSession(calleesIds, sessionType, additionalOptions); ``` ## Step 5: Access local media stream [Section titled “Step 5: Access local media stream”](#step-5-access-local-media-stream) In order to have a video chat session you need to get an access to the user’s devices (webcam / microphone): ```javascript const mediaParams = { audio: true, video: true }; session .getUserMedia(mediaParams) .then((localStream) => { // display local stream session.attachMediaStream("myVideoElementId", localStream, { muted: true, mirror: true, }); }) .catch((error) => {}); ``` This method lets the browser ask the user for permission to use devices. You should allow this dialog to access the stream. Otherwise, the browser can’t obtain access and will throw an error for `getUserMedia` callback function. ## Step 6: Initiate a call [Section titled “Step 6: Initiate a call”](#step-6-initiate-a-call) Use the code below to initiate call with the opponent(s): ```javascript const extension = {}; session.call(extension, (error) => {}); ``` The extension is used to pass any extra parameters in the request to your opponents. After this, your opponents will receive a callback call: ```javascript ConnectyCube.videochat.onCallListener = function (session, extension) {}; ``` Or if your opponents are offline or did not answer the call request: ```javascript ConnectyCube.videochat.onUserNotAnswerListener = function (session, userId) {}; ``` ## Step 7: Accept a call [Section titled “Step 7: Accept a call”](#step-7-accept-a-call) To accept a call the following code snippet is used: ```javascript ConnectyCube.videochat.onCallListener = function (session, extension) { // Here we need to show a dialog with 2 buttons - Accept & Reject. // By accepting -> run the following code: // // 1. await session.getUserMedia (...) // // 2. Accept call request: const extension = {}; session.accept(extension); }; ``` After this, you will get a confirmation in the following callback: ```javascript ConnectyCube.videochat.onAcceptCallListener = function (session, userId, extension) {}; ``` Also, both the caller and opponents will get a special callback with the remote stream: ```javascript ConnectyCube.videochat.onRemoteStreamListener = function (session, userID, remoteStream) { // attach the remote stream to DOM element session.attachMediaStream("remoteOpponentVideoElementId", remoteStream); }; ``` Great work! You’ve completed the essentials of making a call in ConnectyCube. From this point, you and your opponents should start seeing each other. #### What’s next? [Section titled “What’s next?”](#whats-next) To enhance your calling feature with advanced functionalities, such as call recording, screen sharing, or integrating emojis and attachments during calls, follow the API guides below. These additions will help create a more dynamic and engaging experience for your users! * [Voice/video calling SDK documentation](/js/videocalling) * [Conference calling SDK documentation](/js/videocalling-conference/)
# Chat
> Integrate powerful chat functionality into your Web app effortlessly with our versatile Chat APIs. Enhance user communication and engagement.
ConnectyCube Chat API is built on top of Real-time(XMPP) protocol. In order to use it you need to setup real-time connection with ConnectyCube Chat server and use it to exchange data. By default Real-time Chat works over secure TLS connection. ## Connect to chat [Section titled “Connect to chat”](#connect-to-chat) ```javascript const userCredentials = { userId: 4448514, password: "awesomepwd", }; ConnectyCube.chat .connect(userCredentials) .then(() => { // connected }) .catch((error) => {}); ``` ### Connect to chat using custom authentication providers [Section titled “Connect to chat using custom authentication providers”](#connect-to-chat-using-custom-authentication-providers) In some cases we don’t have a user’s password, for example when login via: * Facebook * Twitter * Firebase phone authorization * Custom identity authentication * etc. In such cases ConnectyCube API provides possibility to use ConnectyCube session token as a password for chat connection: ```java // get current ConnectyCube session token and set as user's password const token = ConnectyCube.service.sdkInstance.session.token; const userCredentials = { userId: 4448514, password: token }; ``` ## Connection status [Section titled “Connection status”](#connection-status) The following snippet can be used to determine whether a user is connected to chat or not: ```javascript const isConnected = ConnectyCube.chat.isConnected; ``` ## Disconnect [Section titled “Disconnect”](#disconnect) ```javascript ConnectyCube.chat.disconnect(); ConnectyCube.chat.onDisconnectedListener = onDisconnectedListener; function onDisconnectedListener() {} ``` ## Reconnection [Section titled “Reconnection”](#reconnection) The SDK reconnects automatically when connection to Chat server is lost. The following 2 callbacks are used to track the state of connection: ```javascript ConnectyCube.chat.onDisconnectedListener = onDisconnectedListener; ConnectyCube.chat.onReconnectListener = onReconnectListener; function onDisconnectedListener() {} function onReconnectListener() {} ``` ## Dialogs [Section titled “Dialogs”](#dialogs) All chats between users are organized in dialogs. The are 4 types of dialogs: * 1-1 chat - a dialog between 2 users. * group chat - a dialog between specified list of users. * public group chat - an open dialog. Any user from your app can chat there. * broadcast - chat where a message is sent to all users within application at once. All the users from the application are able to join this group. Broadcast dialogs can be created only via Admin panel. You need to create a new dialog and then use it to chat with other users. You also can obtain a list of your existing dialogs. ## Create new dialog [Section titled “Create new dialog”](#create-new-dialog) ### Create 1-1 chat [Section titled “Create 1-1 chat”](#create-1-1-chat) You need to pass `type: 3` (1-1 chat) and an id of an opponent you want to create a chat with: ```javascript const params = { type: 3, occupants_ids: [56], }; ConnectyCube.chat.dialog .create(params) .then((dialog) => {}) .catch((error) => {}); ``` ### Create group chat [Section titled “Create group chat”](#create-group-chat) You need to pass `type: 2` and ids of opponents you want to create a chat with: ```javascript const params = { type: 2, name: "Friday party", occupants_ids: [29085, 29086, 29087], description: "lets dance the night away", photo: "party.jpg", }; ConnectyCube.chat.dialog .create(params) .then((dialog) => {}) .catch((error) => {}); ``` ### Create public group chat [Section titled “Create public group chat”](#create-public-group-chat) It’s possible to create a public group chat, so any user from you application can join it. There is no a list with occupants, this chat is just open for everybody. You need to pass `type: 4` and ids of opponents you want to create a chat with: ```javascript const params = { type: 4, name: "Blockchain trends", }; ConnectyCube.chat.dialog .create(params) .then((dialog) => {}) .catch((error) => {}); ``` Response example from `ConnectyCube.chat.dialog.create(params)` - [see](/server/chat#response-1) ### Chat metadata [Section titled “Chat metadata”](#chat-metadata) A dialog can have up to 3 custom sub-fields to store additional information that can be linked to chat. To start using extensions, allowed fields should be added first. Go to [Admin panel](https://admin.connectycube.com) > Chat > Custom Fields and provide allowed custom fields. 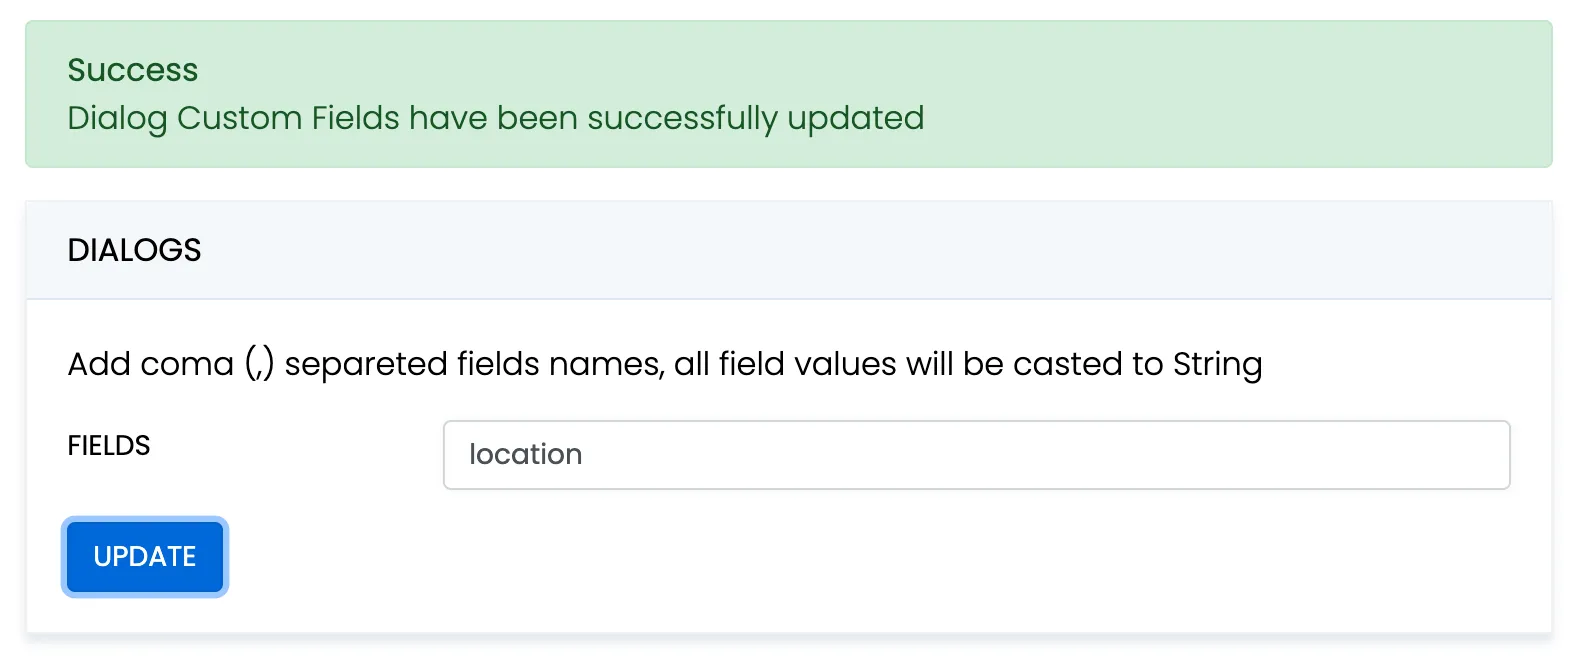 When create a dialog, the `extensions` field object must contain allowed fields only. Others fields will be ignored. The values will be casted to string. ```javascript const params = { type: 2, name: "Friday party", occupants_ids: [29085, 29086, 29087], description: "lets dance the night away", extensions: {location: "Sun bar"}, }; ConnectyCube.chat.dialog .create(params) .then((dialog) => {}) .catch((error) => {}); ``` When remove custom field in Admin panel, this field will be removed in all dialogs respectively. These parameters also can be used as a filter for retrieving dialogs. ### Chat permissions [Section titled “Chat permissions”](#chat-permissions) Chat could have different permissions to managa data access. This is managed via `permissions` field. At the moment, only one permission available - `allow_preview` - which allows to retrieve dialog’s messages for user who is not a member of dialog. This is useful when implement feature like Channels where a user can open chat and preview messages w/o joining it. ## List dialogs [Section titled “List dialogs”](#list-dialogs) It’s common to request all your dialogs on every app login: ```javascript const filters = {}; ConnectyCube.chat.dialog .list(filters) .then((result) => {}) .catch((error) => {}); ``` Response example from `ConnectyCube.chat.dialog.list(filters)` - [see](/server/chat#response) More filters available [here](/server/chat#retrieve-chat-dialogs) If you want to retrieve only dialogs updated after some specific date time, you can use `updated_at[gt]` filter. This is useful if you cache dialogs somehow and do not want to obtain the whole list of your dialogs on every app start. ## Update dialog [Section titled “Update dialog”](#update-dialog) User can update group chat name, photo or add/remove occupants: ```javascript const dialogId = "5356c64ab35c12bd3b108a41"; const toUpdateParams = { name: "Crossfit2" }; ConnectyCube.chat.dialog .update(dialogId, toUpdateParams) .then((dialog) => {}) .catch((error) => {}); ``` ## Add/Remove occupants [Section titled “Add/Remove occupants”](#addremove-occupants) To add more occupants use `push_all` operator. To remove yourself from the dialog use `pull_all` operator: ```javascript const dialogId = "5356c64ab35c12bd3b108a41"; const toUpdateParams = { push_all: { occupants_ids: [97, 789] } }; ConnectyCube.chat.dialog .update(dialogId, toUpdateParams) .then((dialog) => {}) .catch((error) => {}); ``` Response example from `ConnectyCube.chat.dialog.update(dialogId, toUpdateParams)` - [see](/server/chat#response-2) > **Note** > > Only group chat owner can remove other users from group chat. ## Remove dialog [Section titled “Remove dialog”](#remove-dialog) The following snippet is used to delete a dialog: ```javascript const dialogId = "5356c64ab35c12bd3b108a41"; // const dialogIds = ['5356c64ab35c12bd3b108a41', ..., '5356c64ab35c12bd3b108a84'] ConnectyCube.chat.dialog.delete(dialogId).catch((error) => {}); ``` This request will remove this dialog for current user, but other users still will be able to chat there. Only group chat owner can remove the group dialog for all users. You can also delete multiple dialogs in a single request. ## Clear dialog history [Section titled “Clear dialog history”](#clear-dialog-history) The following snippet is used to clear dialog history by ID: ```javascript const dialogId = "5356c64ab35c12bd3b108a41"; ConnectyCube.chat.dialog.clearHistory(dialogId).catch((error) => {}); ``` This request will clear all messages in the dialog for current user, but not for other users. ## Subscribe to dialog [Section titled “Subscribe to dialog”](#subscribe-to-dialog) In order to be able to chat in public dialog, you need to subscribe to it: ```javascript const dialogId = "5356c64ab35c12bd3b108a41"; ConnectyCube.chat.dialog .subscribe(dialogId) .then((dialog) => {}) .catch((error) => {}); ``` It’s also possible to subscribe to group chat dialog. Response example from `ConnectyCube.chat.dialog.subscribe(dialogId)` - [see](/server/chat#response-5) ## Unsubscribe from dialog [Section titled “Unsubscribe from dialog”](#unsubscribe-from-dialog) ```javascript const dialogId = "5356c64ab35c12bd3b108a41"; ConnectyCube.chat.dialog.unsubscribe(dialogId).catch((error) => {}); ``` ## Retrieve public dialog occupants [Section titled “Retrieve public dialog occupants”](#retrieve-public-dialog-occupants) A public chat dialog can have many occupants. There is a separated API to retrieve a list of public dialog occupants: ```javascript const dialogId = "5356c64ab35c12bd3b108a41"; const params = { limit: 100, skip: 0, }; ConnectyCube.chat.dialog .getPublicOccupants(dialogId, params) .then((result) => { // result.items }) .catch((error) => {}); ``` Response example from `ConnectyCube.chat.dialog.getPublicOccupants(dialogId, params)`: ```json { "items": [ { "id": 51941, "full_name": "Dacia Kail", "email": "dacia_k@domain.com", "login": "Dacia", "phone": "+6110797757", "website": null, "created_at": "2018-12-06T09:16:26Z", "updated_at": "2018-12-06T09:16:26Z", "last_request_at": null, "external_user_id": 52691165, "facebook_id": "91234409", "twitter_id": "83510562734", "blob_id": null, "custom_data": null, "avatar": null, "user_tags": null }, { "id": 51946, "full_name": "Gabrielle Corcoran", "email": "gabrielle.corcoran@domain.com", "login": "gabby", "phone": "+6192622155", "website": "http://gabby.com", "created_at": "2018-12-06T09:29:57Z", "updated_at": "2018-12-06T09:29:57Z", "last_request_at": null, "external_user_id": null, "facebook_id": "95610574", "twitter_id": null, "blob_id": null, "custom_data": "Responsible for signing documents", "avatar": null, "user_tags": "vip,accountant" } ... ] } ``` ## Add / Remove admins [Section titled “Add / Remove admins”](#add--remove-admins) Options to add or remove admins from the dialog can be done by Super admin (dialog’s creator) only. Options are supported in group chat, public or broadcast. Up to 5 admins can be added to chat. ```javascript const dialogId = "5356c64ab35c12bd3b108a41"; const adminsUsersIds = [45, 89]; ConnectyCube.chat.dialog .addAdmins(dialogId, adminsUsersIds) .then((dialog) => {}) .catch((error) => {}); ``` ```javascript const dialogId = "5356c64ab35c12bd3b108a41"; const adminsUsersIds = [45, 89]; ConnectyCube.chat.dialog .removeAdmins(dialogId, adminsUsersIds) .then((dialog) => {}) .catch((error) => {}); ``` Response example from `ConnectyCube.chat.dialog.addAdmins(dialogId, adminsUsersIds)`/`ConnectyCube.chat.dialog.removeAdmins(dialogId, adminsUsersIds)` - [see](/server/chat#response-7) ## Update notifications settings [Section titled “Update notifications settings”](#update-notifications-settings) A user can turn on/off push notifications for offline messages in a dialog. By default push notification are turned ON, so offline user receives push notifications for new messages in a chat. ```javascript const dialogId = "5356c64ab35c12bd3b108a41"; const enabled = false; ConnectyCube.chat.dialog .updateNotificationsSettings(dialogId, enabled) .then((result) => {}) .catch((error) => {}); ``` Response example from `ConnectyCube.chat.dialog.updateNotificationsSettings(dialogId, enabled)` - [see](/server/chat#response-8) ## Get notifications settings [Section titled “Get notifications settings”](#get-notifications-settings) Check a status of notifications setting - either it is ON or OFF for a particular chat. Available responses: 1 - enabled, 0 - disabled. ```javascript const dialogId = "5356c64ab35c12bd3b108a41"; ConnectyCube.chat.dialog .getNotificationsSettings(dialogId) .then((result) => {}) .catch((error) => {}); ``` Response example from `ConnectyCube.chat.dialog.getNotificationsSettings(dialogId)` - [see](/server/chat#response-9) ## Chat history [Section titled “Chat history”](#chat-history) Every chat dialog stores its chat history which you can retrieve: ```javascript const dialogId = "5356c64ab35c12bd3b108a41"; const params = { chat_dialog_id: dialogId, sort_desc: "date_sent", limit: 100, skip: 0, }; ConnectyCube.chat.message .list(params) .then((messages) => {}) .catch((error) => {}); ``` Response example from `ConnectyCube.chat.message.list(params)` - [see](/server/chat#response-10) If you want to retrieve chat messages that were sent after or before specific date time only, you can use `date_sent[gt]` or `date_sent[lt]` filter. This is useful if you implement pagination for loading messages in your app. ## Send/Receive chat messages [Section titled “Send/Receive chat messages”](#sendreceive-chat-messages) ### 1-1 chat [Section titled “1-1 chat”](#1-1-chat) ```javascript const dialog = ...; const opponentId = 78; const message = { type: dialog.type === 3 ? 'chat' : 'groupchat', body: "How are you today?", extension: { save_to_history: 1, dialog_id: dialog._id } }; message.id = ConnectyCube.chat.send(opponentId, message); // ... ConnectyCube.chat.onMessageListener = onMessage; function onMessage(userId, message) { console.log('[ConnectyCube.chat.onMessageListener] callback:', userId, message) } ``` ### Group chat [Section titled “Group chat”](#group-chat) > The group chat join is not a required step anymore. You can send/receive chat messages in a group chat w/o joining it. Before you start chatting in a group dialog, you need to join it by calling `join` function: ```javascript const dialog = ...; ConnectyCube.chat.muc.join(dialog._id).catch(error => {}); ``` Then you are able to send/receive messages: ```javascript const message = { type: dialog.type === 3 ? "chat" : "groupchat", body: "How are you today?", extension: { save_to_history: 1, dialog_id: dialog._id, } }; message.id = ConnectyCube.chat.send(dialog._id, message); // ... ConnectyCube.chat.onMessageListener = onMessage; function onMessage(userId, message) { console.log("[ConnectyCube.chat.onMessageListener] callback:", userId, message); } ``` When it’s done you can leave the group dialog by calling `leave` function: ```javascript ConnectyCube.chat.muc.leave(dialog._id).catch((error) => {}); ``` ## Message metadata [Section titled “Message metadata”](#message-metadata) A chat message can have custom sub-fields to store additional information that can be linked to the particular chat message. When create a message, the custom data can be attached via `extension` field: ```javascript const message = { ... extension: { field_one: "value_one", field_two: "value_two" } }; ``` ## ‘Sent’ status [Section titled “‘Sent’ status”](#sent-status) There is a ‘sent’ status to ensure that message is delivered to the server. In order to use the feature you need to enable it when you pass config in `ConnectyCube.init`: ```javascript chat: { streamManagement: { enable: true; } } ``` The following callback is used to track it: ```javascript ConnectyCube.chat.onSentMessageCallback = function (messageLost, messageSent) {}; ``` ## ‘Delivered’ status [Section titled “‘Delivered’ status”](#delivered-status) The following callback is used to track the ‘delivered’ status: ```javascript ConnectyCube.chat.onDeliveredStatusListener = function (messageId, dialogId, userId) { console.log("[ConnectyCube.chat.onDeliveredStatusListener] callback:", messageId, dialogId, userId); }; ``` The SDK sends the ‘delivered’ status automatically when the message is received by the recipient. This is controlled by `markable: 1` parameter when you send a message. If `markable` is `0` or omitted, then you can send the delivered status manually: ```javascript const params = { messageId: "557f1f22bcf86cd784439022", userId: 21, dialogId: "5356c64ab35c12bd3b108a41", }; ConnectyCube.chat.sendDeliveredStatus(params); ``` ## ‘Read’ status [Section titled “‘Read’ status”](#read-status) Send the ‘read’ status: ```javascript const params = { messageId: "557f1f22bcf86cd784439022", userId: 21, dialogId: "5356c64ab35c12bd3b108a41", }; ConnectyCube.chat.sendReadStatus(params); // ... ConnectyCube.chat.onReadStatusListener = function (messageId, dialogId, userId) { console.log("[ConnectyCube.chat.onReadStatusListener] callback:", messageId, dialogId, userId); }; ``` ## ‘Is typing’ status [Section titled “‘Is typing’ status”](#is-typing-status) The following ‘typing’ notifications are supported: * typing: The user is composing a message. The user is actively interacting with a message input interface specific to this chat session (e.g., by typing in the input area of a chat window) * stopped: The user had been composing but now has stopped. The user has been composing but has not interacted with the message input interface for a short period of time (e.g., 30 seconds) Send the ‘is typing’ status: ```javascript const opponentId = 78; // for 1-1 chats // const dialogJid = ..; // for group chat ConnectyCube.chat.sendIsTypingStatus(opponentId); ConnectyCube.chat.sendIsStopTypingStatus(opponentId); // ... ConnectyCube.chat.onMessageTypingListener = function (isTyping, userId, dialogId) { console.log("[ConnectyCube.chat.onMessageTypingListener] callback:", isTyping, userId, dialogId); }; ``` ## Attachments (photo / video) [Section titled “Attachments (photo / video)”](#attachments-photo--video) Chat attachments are supported with the cloud storage API. In order to send a chat attachment you need to upload the file to ConnectyCube cloud storage and obtain a link to the file (file UID). Then you need to include this UID into chat message and send it. ```javascript // for example, a file from HTML form input field const inputFile = $("input[type=file]")[0].files[0]; const fileParams = { name: inputFile.name, file: inputFile, type: inputFile.type, size: inputFile.size, public: false, }; const prepareMessageWithAttachmentAndSend = (file) => { const message = { type: dialog.type === 3 ? "chat" : "groupchat", body: "attachment", extension: { save_to_history: 1, dialog_id: dialog._id, attachments: [{ uid: file.uid, id: file.id, type: "photo" }], }, }; // send the message message.id = ConnectyCube.chat.send(dialog._id, message); }; ConnectyCube.storage .createAndUpload(fileParams) .then(prepareMessageWithAttachmentAndSend) .catch((error) => {}); ``` Response example from `ConnectyCube.storage.createAndUpload(fileParams)`: ```json { "account_id": 7, "app_id": 12, "blob_object_access": { "blob_id": 421517, "expires": "2020-10-06T15:51:38Z", "id": 421517, "object_access_type": "Write", "params": "https://s3.amazonaws.com/cb-shared-s3?Content-Type=text%2Fplain..." }, "blob_status": null, "content_type": "text/plain", "created_at": "2020-10-06T14:51:38Z", "id": 421517, "name": "awesome.txt", "public": false, "set_completed_at": null, "size": 11, "uid": "7cafb6030d3e4348ba49cab24c0cf10800", "updated_at": "2020-10-06T14:51:38Z" } ``` If you are running **Node.js** environment, the following code snippet can be used to access a file: ```javascript const fs = require("fs"); const imagePath = __dirname + "/dog.jpg"; let fileParams; fs.stat(imagePath, (error, stats) => { fs.readFile(srcIMG, (error, data) => { if (error) { throw error; } else { fileParams = { file: data, name: "image.jpg", type: "image/jpeg", size: stats.size, }; // upload // ... } }); }); ``` The same flow is supported on the receiver’s side. When you receive a message, you need to get the file UID and then download the file from the cloud storage. ```javascript ConnectyCube.chat.onMessageListener = (userId, message) => { if (message.extension.hasOwnProperty("attachments")) { if (message.extension.attachments.length > 0) { const fileUID = message.extension.attachments[0].uid; const fileUrl = ConnectyCube.storage.privateUrl(fileUID); const imageHTML = ""; // insert the imageHTML as HTML template } } }; ``` In a case you want remove a shared attachment from server: ```javascript ConnectyCube.storage .delete(file.id) .then(() => {}) .catch((error) => {}); ``` ## Attachments (location) [Section titled “Attachments (location)”](#attachments-location) Sharing location attachments is nothing but sending 2 numbers: **latitude** and **longitude**. These values can be accessed using any JS library available in npm registry. ```javascript const latitude = "64.7964274"; const longitude = "-23.7391878"; const message = { type: dialog.type === 3 ? "chat" : "groupchat", body: "attachment", extension: { save_to_history: 1, dialog_id: dialog._id, attachments: [{ latitude, longitude, type: "place" }], }, }; // send the message message.id = ConnectyCube.chat.send(dialog._id, message); ``` On the receiver’s side the location attachment can be accessed the following way: ```javascript ConnectyCube.chat.onMessageListener = (userId, message) => { if (message.extension.hasOwnProperty("attachments")) { if (message.extension.attachments.length > 0) { const attachment = message.extension.attachments[0]; const latitude = attachment.latitude; const longitude = attachment.longitude; // and now display the map // ... } } }; ``` ## Edit message [Section titled “Edit message”](#edit-message) Use the following code snippet to edit a message (correct message body). Other user(s) will receive the ‘edit’ message info via callback: ```javascript ConnectyCube.chat.editMessage({ to: 123, // either a user id if this is 1-1 chat or a chat dialog id dialogId: "52e6a9c8a18f3a3ea6001f18", body: "corrected message body", originMessageId: "58e6a9c8a1834a3ea6001f15", // origin message id to edit last: false // pass 'true' if edit last (the newest) message in history }) ... ConnectyCube.chat.onMessageUpdateListener = (messageId, isLast, updatedBody, dialogId, userId) => { } ``` Also, you can update a message via HTTP API: ```javascript // const messageIds = ""; // to update all const messageIds = ["55fd42369575c12c2e234c64", "55fd42369575c12c2e234c68"].join(","); // or one - "55fd42369575c12c2e234c64" const params = { read: 1, // mark message as read delivered: 1, // mark message as delivered message: "corrected message body", // update message body chat_dialog_id: "5356c64ab35c12bd3b108a41", }; ConnectyCube.chat.message .update(messageIds, params) .then(() => {}) .catch((error) => {}); ``` ## Message reactions [Section titled “Message reactions”](#message-reactions) ### Add/Remove reactions [Section titled “Add/Remove reactions”](#addremove-reactions) User can add/remove message reactions and listen message reaction events Add ```javascript const messageId = '58e6a9c8a1834a3ea6001f15' const reaction = '🔥' ConnectyCube.chat.message.addReaction(messageId, reaction) .then(() => {}) .catch(err => {}) ``` Remove ```javascript const messageId = '58e6a9c8a1834a3ea6001f15' const reaction = '👎' ConnectyCube.chat.message.removeReaction(messageId, reaction) .then(() => {}) .catch(err => {}) ``` Add/Remove ```javascript const messageId = '58e6a9c8a1834a3ea6001f15' const reactionToAdd = '👎' const reactionToRemove = '🚀' ConnectyCube.chat.message.updateReaction(messageId, reactionToAdd, reactionToRemove) .then(() => {}) .catch(err => {}) ``` ### Listen reactions [Section titled “Listen reactions”](#listen-reactions) ```javascript ConnectyCube.chat.onMessageReactionsListener = (messageId, userId, dialogId, addReaction, removeReaction) => { } ``` ### List message reactions [Section titled “List message reactions”](#list-message-reactions) User can list message reactions ```javascript const messageId = '58e6a9c8a1834a3ea6001f15' ConnectyCube.chat.message.listReactions(messageId) .then(reactions => reactions) .catch(err => {}) ``` Response example from `ConnectyCube.chat.message.listReactions(messageId)` - [see](/server/chat#response-19) ## Delete messages [Section titled “Delete messages”](#delete-messages) Use the following code snippet to delete a message. Other user(s) will receive the ‘delete’ message info via callback: ```javascript ConnectyCube.chat.deleteMessage({ to: 123, // either a user id if this is 1-1 chat or a chat dialog id dialogId: "52e6a9c8a18f3a3ea6001f18", messageId: "58e6a9c8a1834a3ea6001f15" // message id to delete }) ... ConnectyCube.chat.onMessageDeleteListener = (messageId, dialogId, userId) => { } ``` If you want to delete a message for yourself only, use the following API: ```javascript const messageIds = ["55fd42369575c12c2e234c64", "55fd42369575c12c2e234c68"].join(","); const params = {}; ConnectyCube.chat.message .delete(messageIds, params) .then((result) => {}) .catch((error) => {}); ``` Response example from `ConnectyCube.chat.message.delete(messageIds)` - [see](/server/chat#response-14) This request will remove the messages from current user history only, without affecting the history of other users. ## Unread messages count [Section titled “Unread messages count”](#unread-messages-count) You can request total unread messages count and unread count for particular dialog: ```javascript const params = { dialogs_ids: ["5356c64ab35c12bd3b108a41"] }; ConnectyCube.chat.message .unreadCount(params) .then((result) => {}) .catch((error) => {}); ``` Response example from `ConnectyCube.chat.message.unreadCount(params)` - [see](/server/chat#response-11) ## Mark as read all chat messages [Section titled “Mark as read all chat messages”](#mark-as-read-all-chat-messages) The following snippet is used to mark all messages as read on a backend for dialog ID: ```javascript const messageIds = ""; // use "" to update all const params = { read: 1, chat_dialog_id: "5356c64ab35c12bd3b108a41", }; ConnectyCube.chat.message .update("", params) .then(() => {}) .catch((error) => {}); ``` ## Search [Section titled “Search”](#search) The following API is used to search for messages and chat dialogs: ```javascript const params = { /* ... */ }; ConnectyCube.chat .search(params) .then((result) => {}) .catch((error) => {}); ``` Response example from `ConnectyCube.chat.search(params)` - [see](/server/chat#response-15) Please refer to [Global search parameters](/server/chat#global-search) for more info on how to form search params. ## Chat alerts [Section titled “Chat alerts”](#chat-alerts) When you send a chat message and the recipient/recipients is offline, then automatic push notification will be fired. In order to receive push notifications you need to subscribe for it. Please refer to [Push Notifications](/js/push-notifications) guide. To configure push template which users receive - go to [Dashboard Console, Chat Alerts page](https://admin.connectycube.com/) Also, here is a way to avoid automatically sending push notifications to offline recipient/recipients. For it add the `silent` parameter with value `1` to the `extension` of the message. ```javascript const message = { ... extension: { ... silent: 1, }, }; ``` After sending such a message, the server won’t create the push notification for offline recipient/recipients. > **Note** > > Currently push notifications are supported on mobile environment only. ## Mark a client as Active/Inactive [Section titled “Mark a client as Active/Inactive”](#mark-a-client-as-activeinactive) When you send a chat message and the recipient/recipients is offline, then automatic push notification will be fired. Sometimes a client app can be in a background mode, but still online. In this case it’s useful to let server know that a user wants to receive push noificattions while still is connected to chat. For this particular case we have 2 handy methods: ‘markInactive’ and ‘markActive’: ```javascript ConnectyCube.chat.markInactive(); ``` ```javascript ConnectyCube.chat.markActive(); ``` The common use case for these APIs is to call ‘markInactive’ when an app goes to background mode and to call ‘markActive’ when an app goes to foreground mode. ## Get last activity [Section titled “Get last activity”](#get-last-activity) There is a way to get an info when a user was active last time, in seconds. This is a modern approach for messengers apps, e.g. to display this info on a Contacts screen or on a User Profile screen. ```javascript const userId = 123234; ConnectyCube.chat .getLastUserActivity(userId) .then((result) => { const userId = result.userId; const seconds = result.seconds; // 'userId' was 'seconds' ago }) .catch((error) => {}); ``` ## Last activity subscription [Section titled “Last activity subscription”](#last-activity-subscription) Listen to user last activity status via subscription. ```javascript ConnectyCube.chat.subscribeToUserLastActivityStatus(userId); ConnectyCube.chat.unsubscribeFromUserLastActivityStatus(userId); ConnectyCube.chat.onLastUserActivityListener = (userId, seconds) => {}; ``` ## System messages [Section titled “System messages”](#system-messages) In a case you want to send a non text message data, e.g. some meta data about chat, some events or so - there is a system notifications API to do so: ```javascript const userId = 123234; const msg = { body: "dialog/UPDATE_DIALOG", extension: { photo_uid: "7cafb6030d3e4348ba49cab24c0cf10800", name: "Our photos", }, }; ConnectyCube.chat.sendSystemMessage(userId, msg); ConnectyCube.chat.onSystemMessageListener = function (msg) {}; ``` ## Moderation [Section titled “Moderation”](#moderation) The moderation capabilities help maintain a safe and respectful chat environment. We have options that allow users to report inappropriate content and manage their personal block lists, giving them more control over their experience. ### Report user [Section titled “Report user”](#report-user) For user reporting to work, it requires the following: 1. Go to [ConnectyCube Daashboard](https://admin.connectycube.com/) 2. select your Application 3. Navigate to **Custom** module via left sidebar 4. Create new table called **UserReports** with the following fields: * **reportedUserId** - integer * **reason** - string 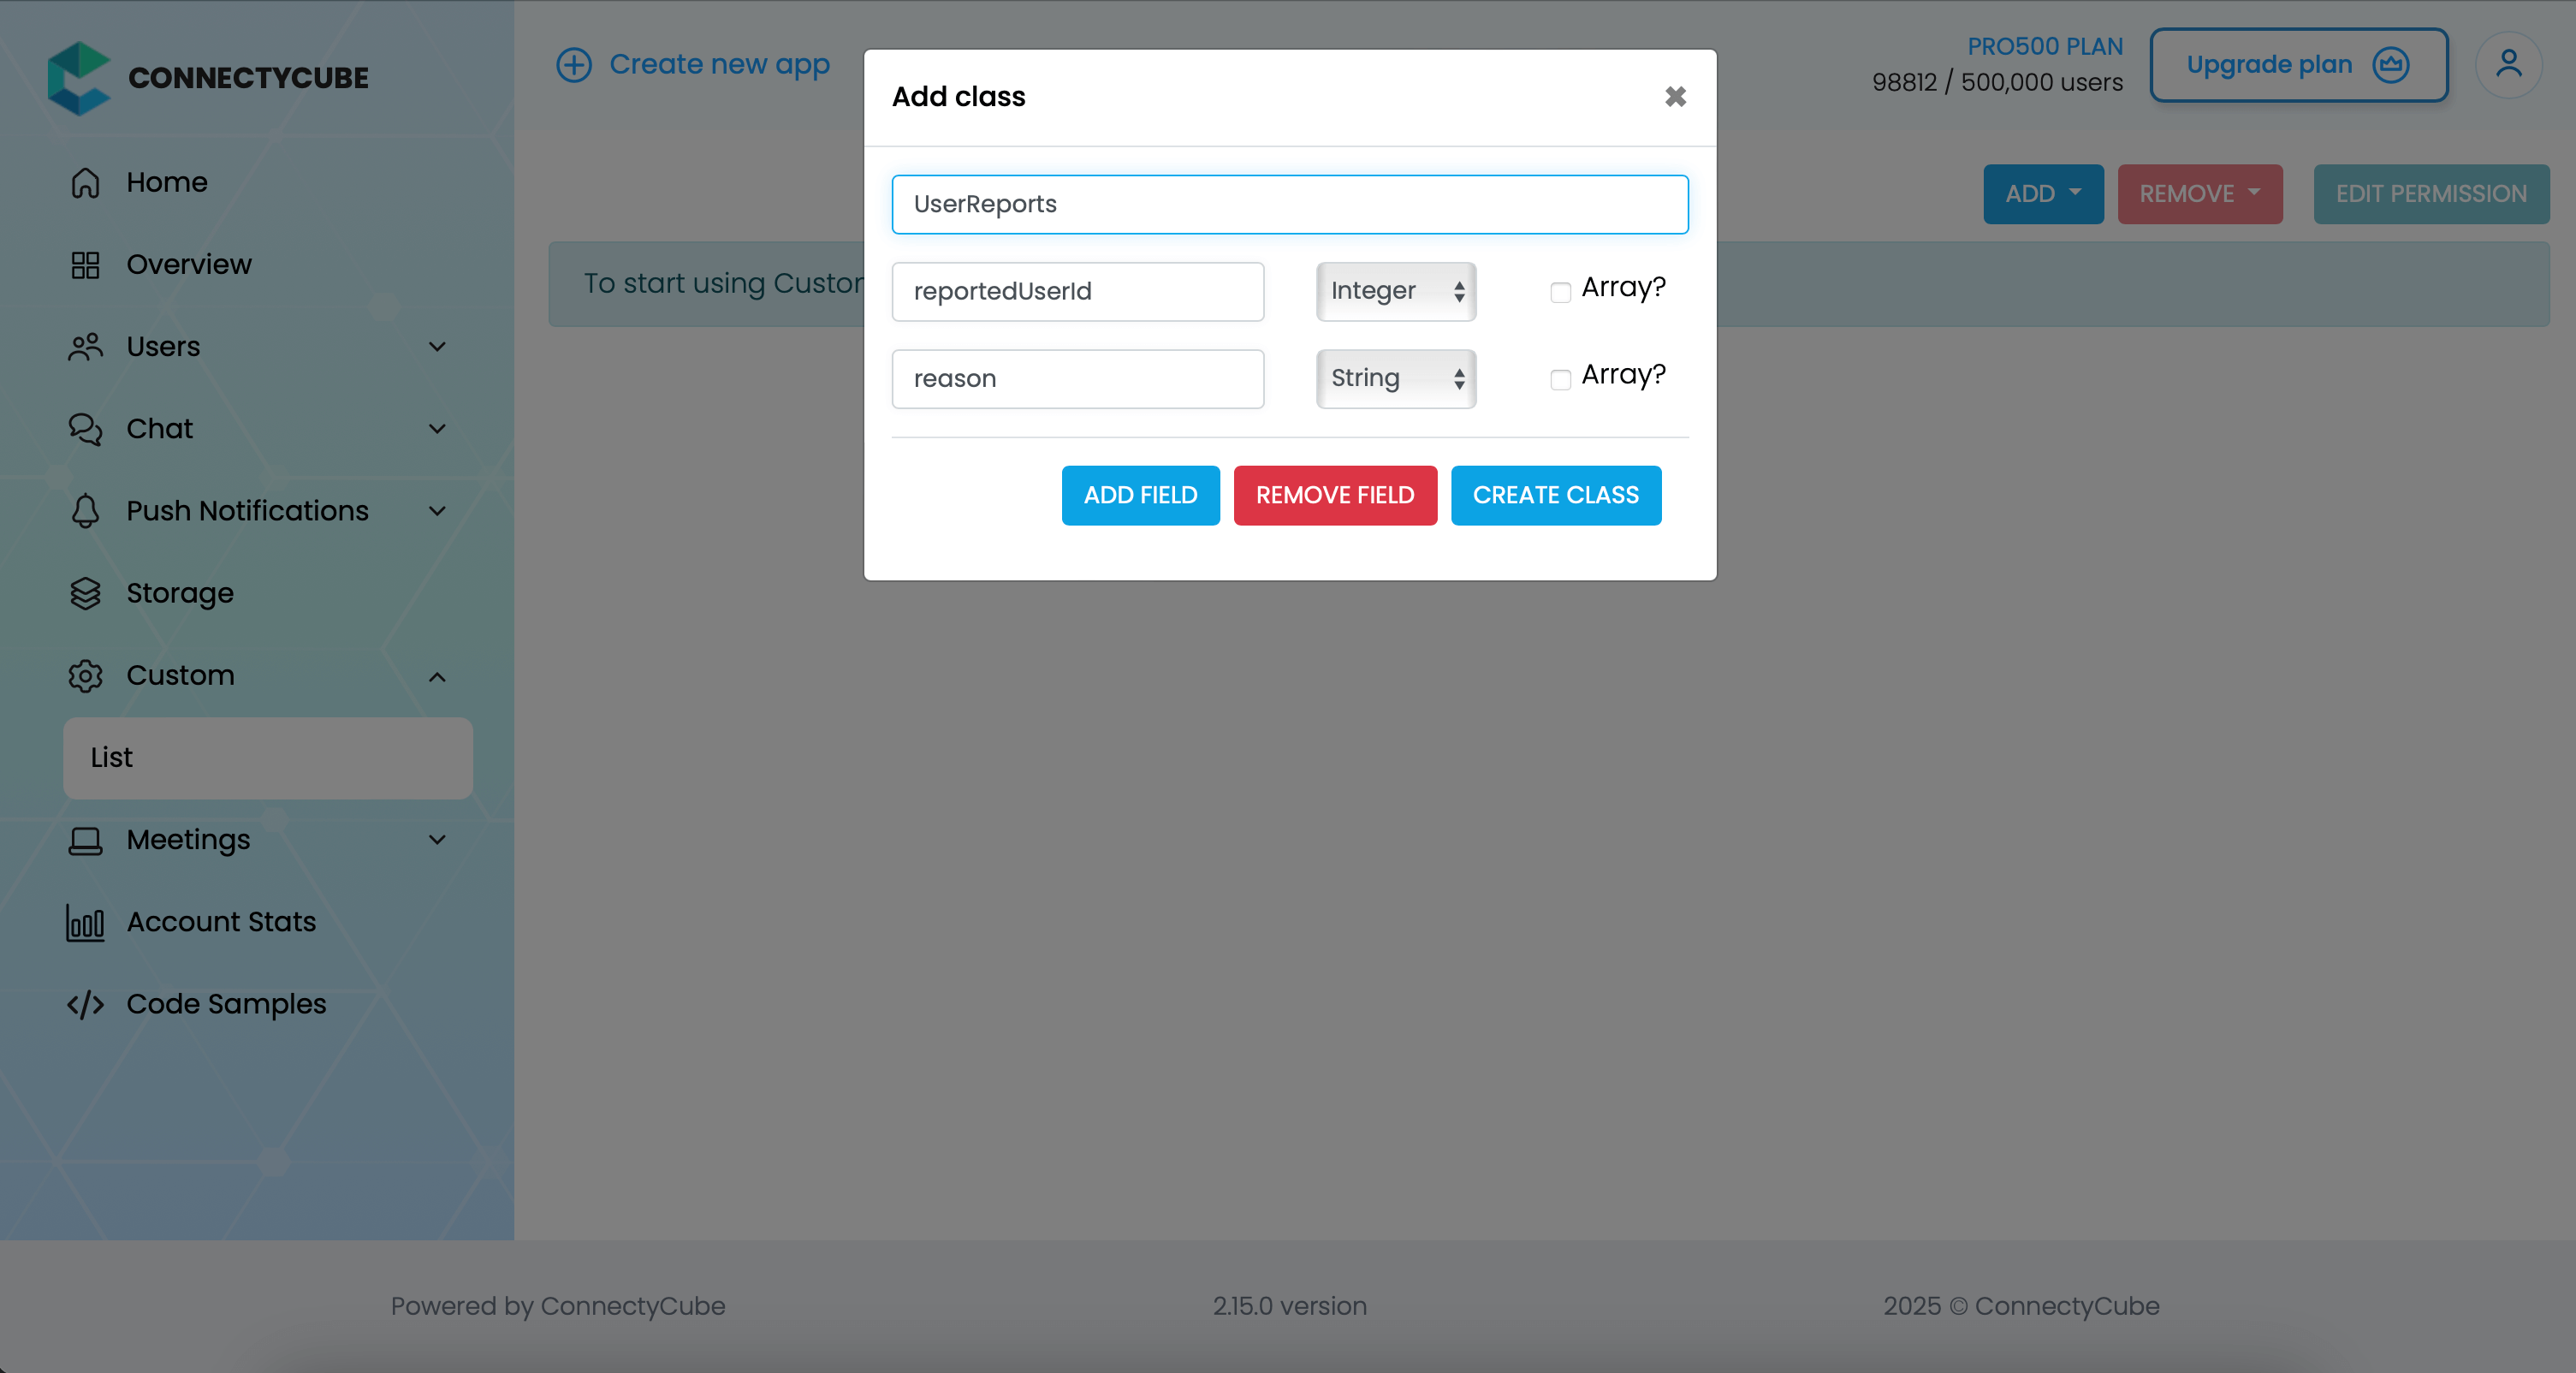 Once the table is created, you can create a report with the following code snippet and then see all the reports in Dashboard: ```javascript const reportedUserId = 45 const reason = "User is spamming with bad words" await ConnectyCube.data.create('UserReports', { reportedUserId, reason }); ``` ### Report message [Section titled “Report message”](#report-message) For message reporting to work, the same approach to user reporting above could be used. You need to create new table called **MessageReports** with the following fields: * **reportedMessageId** - integer * **reason** - string Once the table is created, you can create a report with the following code snippet and then see all the reports in Dashboard: ```javascript const reportedMessageId = "58e6a9c8a1834a3ea6001f15" const reason = "The message contains phishing links" await ConnectyCube.data.create('MessageReports', { reportedMessageId, reason }); ``` ### Block user [Section titled “Block user”](#block-user) Block list (aka Privacy list) allows enabling or disabling communication with other users. You can create, modify, or delete privacy lists, define a default list. > The user can have multiple privacy lists, but only one can be active. #### Create privacy list [Section titled “Create privacy list”](#create-privacy-list) A privacy list must have at least one element in order to be created. You can choose a type of blocked logic. There are 2 types: * Block in one way. When you blocked a user, but you can send messages to him. * Block in two ways. When you blocked a user and you also can’t send messages to him. ```javascript const users = [ { user_id: 34, action: "deny" }, { user_id: 48, action: "deny", mutualBlock: true }, // it means you can't write to user { user_id: 18, action: "allow" }, ]; const list = { name: "myList", items: users }; ConnectyCube.chat.privacylist.create(list).catch((error) => {}); ``` > In order to be used the privacy list should be not only set, but also activated(set as default). #### Activate privacy list [Section titled “Activate privacy list”](#activate-privacy-list) In order to activate rules from a privacy list you should set it as default: ```javascript const listName = "myList"; ConnectyCube.chat.privacylist.setAsDefault(listName).catch((error) => {}); ``` #### Update privacy list [Section titled “Update privacy list”](#update-privacy-list) There is a rule you should follow to update a privacy list: * If you want to update or set new privacy list instead of current one, you should decline current default list first. ```javascript const listName = "myList"; const list = { name: listName, items: [{ user_id: 34, action: "allow" }], }; ConnectyCube.chat.privacylist .setAsDefault(null) .then(() => ConnectyCube.chat.privacylist.update(list)) .then(() => ConnectyCube.chat.privacylist.setAsDefault(listName)) .catch((error) => {}); ``` #### Retrieve privacy list names [Section titled “Retrieve privacy list names”](#retrieve-privacy-list-names) To get a list of all your privacy lists’ names use the following request: ```javascript let names; ConnectyCube.chat.privacylist .getNames() .then((response) => (names = response.names)) .catch((error) => {}); ``` Response example from `ConnectyCube.chat.privacylist.getNames()`: ```json { "active": null, "default": null, "names": ["myList", "blockedusers"] } ``` #### Retrieve privacy list with name [Section titled “Retrieve privacy list with name”](#retrieve-privacy-list-with-name) To get the privacy list by name you should use the following method: ```javascript const listName = "myList"; let name, items; ConnectyCube.chat.privacylist.getList(listName).then((response) => { name = response.name; items = response.items; }); ``` Response example from `ConnectyCube.chat.privacylist.getList(listName)`: ```json { "name": "myList", "items": [ { "user_id": 34, "action": "deny" }, { "user_id": 48, "action": "deny", "mutualBlock": true }, { "user_id": 18, "action": "allow" } ] } ``` #### Remove privacy list [Section titled “Remove privacy list”](#remove-privacy-list) To delete a list you can call a method below or you can edit a list and set items to `nil`. ```javascript const listName = "myList"; ConnectyCube.chat.privacylist.delete(listName).catch((error) => {}); ``` #### Blocked user attempts to communicate with user [Section titled “Blocked user attempts to communicate with user”](#blocked-user-attempts-to-communicate-with-user) Blocked users will be receiving an error when trying to chat with a user in a 1-1 chat and will be receiving nothing in a group chat: ```javascript ConnectyCube.chat.onMessageErrorListener = function (messageId, error) {}; ``` ## Ping server [Section titled “Ping server”](#ping-server) Sometimes, it can be cases where TCP connection to Chat server can go down without the application layer knowing about it. To check that chat connection is still alive or to keep it to be alive there is a ping method: ```javascript const PING_TIMEOUT = 3000; // default is 5000 ms ConnectyCube.chat.pingWithTimeout(PING_TIMEOUT) .then(() => { // Chat connection is alive }).catch((error) => { // No connection with chat server // Let's try to re-connect }) ``` ### Pause chat connection when ping fails [Section titled “Pause chat connection when ping fails”](#pause-chat-connection-when-ping-fails) Temporarily stop the chat connection if the server does not respond to the ping request. This allows the client to attempt automatic reconnection as soon as the chat connection becomes available again: ```javascript const PING_TIMEOUT = 1000; try { await ConnectyCube.chat.pingWithTimeout(PING_TIMEOUT) } catch (error) { ConnectyCube.chat.terminate() } ``` ### Handle browser offline event with ping check [Section titled “Handle browser offline event with ping check”](#handle-browser-offline-event-with-ping-check) Listen for the browser’s `offline` event and try to ping the chat server if the event fires: ```javascript const PING_TIMEOUT = 3000; window.addEventListener("offline", () => { try { await ConnectyCube.chat.pingWithTimeout(PING_TIMEOUT); } catch (error) { ConnectyCube.chat.terminate(); } }); ``` ### Maintain chat connection with periodic pings (VPN-friendly) [Section titled “Maintain chat connection with periodic pings (VPN-friendly)”](#maintain-chat-connection-with-periodic-pings-vpn-friendly) Regularly send pings to check if the chat connection is still alive. If a ping fails, send another ping after a short delay to handle cases where the first failure was temporary; terminate the connection if the second ping also fails: ```javascript const PING_INTERVAL = 40000; const PING_TIMEOUT = 1000; const PING_DELAY = 3000; let pingInterval = null; const startPingWithInterval = () => { pingInterval = setInterval(async () => { try { await ConnectyCube.chat.pingWithTimeout(PING_TIMEOUT); } catch (error) { setTimeout(async () => { try { await ConnectyCube.chat.pingWithTimeout(PING_TIMEOUT); } catch (error) { ConnectyCube.chat.terminate(); } }, PING_DELAY); } }, PING_INTERVAL); } const stopPingWithInterval = () => { if (pingInterval) { clearInterval(pingInterval); pingInterval = null; } } ```
# Video Calling
> Empower your Web applications with our JavaScript Video Calling P2P API. Enable secure and immersive peer-to-peer video calls for enhanced user experience
ConnectyCube **Video Calling P2P API** is built on top of [WebRTC](https://webrtc.org/) protocol and based on top of [WebRTC Mesh](https://webrtcglossary.com/mesh/) architecture. Max people per P2P call is 4. > To get a difference between **P2P calling** and **Conference calling** please read our [ConnectyCube Calling API comparison](https://connectycube.com/2020/04/15/connectycube-calling-api-comparison/) blog page. ## Preparations [Section titled “Preparations”](#preparations) [ConnectyCube Chat API](/js/messaging) is used as a signaling transport for Video Calling API, so in order to start using Video Calling API you need to [connect user to Chat](/js/messaging#connect-to-chat). ## Create video session [Section titled “Create video session”](#create-video-session) In order to use Video Calling API you need to create a call session object - choose your opponents with whom you will have a call and a type of session (VIDEO or AUDIO): > **Note** > > The `calleesIds` array must contain the opponents ids only and exclude current user id. ```javascript const calleesIds = [56, 76, 34]; // User's ids const sessionType = ConnectyCube.videochat.CallType.VIDEO; // AUDIO is also possible const additionalOptions = {}; const session = ConnectyCube.videochat.createNewSession(calleesIds, sessionType, additionalOptions); ``` > **Note**: In a case of low bandwidth network, you can try to limit the call bandwidth cap to get better quality vs stability results. It can be done by passing `const additionalOptions = {bandwidth: 256};` or 128 value. ## Access local media stream [Section titled “Access local media stream”](#access-local-media-stream) In order to have a video chat session you need to get an access to the user’s devices (webcam / microphone): ```javascript const mediaParams = { audio: true, video: true }; session .getUserMedia(mediaParams) .then((localStream) => {}) .catch((error) => {}); ``` This method lets the browser ask the user for permission to use devices. You should allow this dialog to access the stream. Otherwise, the browser can’t obtain access and will throw an error for `getUserMedia` callback function. For more information about possible audio/video constraints, here is a good code sample from WebRTC team how to work with getUserMedia constraints: ## Call quality [Section titled “Call quality”](#call-quality) **Limit bandwidth** Despite WebRTC engine uses automatic quality adjustement based on available Internet bandwidth, sometimes it’s better to set the max available bandwidth cap which will result in a better and smoother user experience. For example, if you know you have a bad internet connection, you can limit the max available bandwidth to e.g. 256 Kbit/s. This can be done either when initiate a call (see below ‘Initiate a call’ API documentation): ```javascript session.call({maxBandwidth: 256}); // default is 0 - unlimited ``` which will result in limiting the max vailable bandwidth for ALL participants or/and during a call: ```javascript session.setMaxBandwidth(512); // set 0 to remove the limit ``` which will result in limiting the max available bandwidth for current user only. **HD video quality** If HD video quality is required - the following audio/video constraints are required to pass: ```javascript {video: { width: 1280, height: 720 }, audio: true} ``` More info about all possible is are available here ## Attach local media stream [Section titled “Attach local media stream”](#attach-local-media-stream) Then you should attach your local media stream to HTML video element. For **Web-like environments**, including Cordova - use the following method: ```javascript session.attachMediaStream("myVideoElementId", localStream, { muted: true, mirror: true, }); ``` ## Initiate a call [Section titled “Initiate a call”](#initiate-a-call) ```javascript const extension = {}; session.call(extension, (error) => {}); ``` The extension is used to pass any extra parameters in the request to your opponents. After this, your opponents will receive a callback call: ```javascript ConnectyCube.videochat.onCallListener = function (session, extension) {}; ``` Or if your opponents are offline or did not answer the call request: ```javascript ConnectyCube.videochat.onUserNotAnswerListener = function (session, userId) {}; ``` ## Accept a call [Section titled “Accept a call”](#accept-a-call) To accept a call the following code snippet is used: ```javascript ConnectyCube.videochat.onCallListener = function (session, extension) { // Here we need to show a dialog with 2 buttons - Accept & Reject. // By accepting -> run the following code: // // 1. await session.getUserMedia (...) // // 2. Accept call request: const extension = {}; session.accept(extension); }; ``` After this, you will get a confirmation in the following callback: ```javascript ConnectyCube.videochat.onAcceptCallListener = function (session, userId, extension) {}; ``` Also, both the caller and opponents will get a special callback with the remote stream: ```javascript ConnectyCube.videochat.onRemoteStreamListener = function (session, userID, remoteStream) { // attach the remote stream to DOM element session.attachMediaStream("remoteOpponentVideoElementId", remoteStream); }; ``` From this point, you and your opponents should start seeing each other. ## Receive a call in background [Section titled “Receive a call in background”](#receive-a-call-in-background) For mobile apps, it can be a situation when an opponent’s user app is either in closed (killed) or background (inactive) state. In this case, to be able to still receive a call request, you can use Push Notifications. The flow should be as follows: * a call initiator should send a push notification along with a call request * when an opponent’s app is killed or in background state - an opponent will receive a push notification about an incoming call, and will be able to accept/reject the call. If accepted or pressed on a push notification - an app will be opened, a user should auto login and connect to chat and then will be able to join an incoming call. Please refer to Push Notifications API guides regarding how to integrate Push Notifications in your app: * [Push Notifications API guide: JS](/js/push-notifications) For even better integration - CallKit and VoIP push notifications can be used. Please check `CallKit and VoIP push notifications` section on each platform Push Notifications API guide page. ## Reject a call [Section titled “Reject a call”](#reject-a-call) ```javascript const extension = {}; session.reject(extension); ``` After this, the caller will get a confirmation in the following callback: ```javascript ConnectyCube.videochat.onRejectCallListener = function (session, userId, extension) {}; ``` Sometimes, it could a situation when you received a call request and want to reject, but the call session object has not arrived yet. It could be in a case when you integrated CallKit to receive call requests while an app is in background/killed state. To do a reject in this case, the following snippet can be used: ```javascript const params = { sessionID: callId, recipientId: callInitiatorID, platform: 'web' }; await ConnectyCube.videochat.callRejectRequest(params); ``` ## End a call [Section titled “End a call”](#end-a-call) ```javascript const extension = {}; session.stop(extension); ``` After this, the opponents will get a confirmation in the following callback: ```javascript ConnectyCube.videochat.onStopCallListener = function (session, userId, extension) {}; ``` ## Mute audio [Section titled “Mute audio”](#mute-audio) ```javascript session.mute("audio"); session.unmute("audio"); ``` ## Mute video [Section titled “Mute video”](#mute-video) ```javascript session.mute("video"); session.unmute("video"); ``` ## Switch video cameras [Section titled “Switch video cameras”](#switch-video-cameras) First of all you need to obtain all your device’s available cameras: ```javascript let deviceInfo, deviceId, deviceLabel; ConnectyCube.videochat .getMediaDevices("videoinput") .then((devices) => { if (devices.length) { // here is a list of all available cameras for (let i = 0; i !== devices.length; ++i) { deviceInfo = devices[i]; deviceId = deviceInfo.deviceId; deviceLabel = deviceInfo.label; } } }) .catch((error) => {}); ``` Then you can choose some `deviceId` and switch the video stream to exact this device: ```javascript const constraints = { video: deviceId }; session .switchMediaTracks(constraints) .then((stream) => {}) .catch((error) => {}); ``` ## Switch audio output [Section titled “Switch audio output”](#switch-audio-output) For switching audio - use the same above flow for switching camera. Just replace a `videoinput` to `audioinput` in `getMediaDevices` and `video` to `audio` in `constraints`. ## Screen Sharing [Section titled “Screen Sharing”](#screen-sharing) Request a desktop stream by calling `getDisplayMedia`: ```javascript const constraints = { video: { width: 1280, height: 720, frameRate: { ideal: 10, max: 15 }, }, audio: true, }; session .getDisplayMedia(constraints) .then((localDesktopStream) => {}) .catch((error) => {}); ``` More info about what else options can be passed can be found here If the local stream already exists, the next call to getUserMedia or getDisplayMedia will update the tracks in the stream and preserve the track’s enabled state for the audio track. ## Group video calls [Section titled “Group video calls”](#group-video-calls) Because of [Mesh architecture](https://webrtcglossary.com/mesh/) we use for multipoint where every participant sends and receives its media to all other participants, current solution supports group calls with up to 4 people. Also ConnectyCube provides an alternative solution for up to 12 people - [Multiparty Video Conferencing API](/js/videocalling-conference). ## Monitor connection state [Section titled “Monitor connection state”](#monitor-connection-state) There is a callback function to track the session connection state: ```javascript ConnectyCube.videochat.onSessionConnectionStateChangedListener = ( session, userID, connectionState ) => { }; ``` The possible values of connectionState are those of an enum of type `ConnectyCube.videochat.SessionConnectionState`: * ConnectyCube.videochat.SessionConnectionState.UNDEFINED * ConnectyCube.videochat.SessionConnectionState.CONNECTING * ConnectyCube.videochat.SessionConnectionState.CONNECTED * ConnectyCube.videochat.SessionConnectionState.DISCONNECTED * ConnectyCube.videochat.SessionConnectionState.FAILED * ConnectyCube.videochat.SessionConnectionState.CLOSED * ConnectyCube.videochat.SessionConnectionState.COMPLETED ## Tackling Network changes [Section titled “Tackling Network changes”](#tackling-network-changes) If a user’s network environment changes (e.g., switching from Wi-Fi to mobile data), the existing call connection might no longer be valid. Normally, in a case of short network interruptions, the ConnectyCube SDK will automatically restore the call so you can see via `onSessionConnectionStateChangedListener` callback with `connectionState` changing to `DISCONNECTED` and then again to `CONNECTED`. But not all cases are the same, and in some of them the connection needs to be **manually** refreshed due to various issues like NAT or firewall behavior changes or even longer network environment changes, e.g. when a user is offline for more than 30 seconds. This is where ICE restart helps to re-establish the connection to find a new network path for communication. The correct and recommended way for an application to handle all such ‘bad’ cases is to trigger an ICE restart when the connection state goes to either `FAILED` or `DISCONNECTED` for an extended period of time (e.g. > 30 seconds). Following is the preliminary code snippet regarding how to work with ICE restart: * Firstly, we have to disable the call termination logic after the network is disconnected for > 30 seconds by increasing the `videochat.disconnectTimeInterval` value to e.g. 5 mins. ```plaintext const appConfig = { videochat: { disconnectTimeInterval: 300, } }; ConnectyCube.init(credentials, appConfig); ``` * Secondly, define a variable which can track the Internet connection state: ```plaintext let isOnline = window.navigator.onLine; window.onoffline = () => { isOnline = false; }; window.ononline = () => { isOnline = true; }; ``` * Thirdly, define a function that will perform ICE restart: ```plaintext async maybeDoIceRestart(session, userID) { try { // firstly let's check if we are still connected to chat await ConnectyCube.chat.pingWithTimeout(); // do ICE restart if (session.canInitiateIceRestart(userID)) { session.iceRestart(userID); } } catch (error) { console.error(error.message); // chat ping request has timed out, // so need to reconnect to Chat await ConnectyCube.chat.disconnect(); await ConnectyCube.chat.connect({ userId: currentUser.id, password: currentUser.password, }) // do ICE restart if (session.canInitiateIceRestart(userID)) { session.iceRestart(userID); } } } ``` * Fourthly, define a `ConnectyCube.videochat.onSessionConnectionStateChangedListener` callback and try to perform ICE restart if not automatic call restoration happened after 30 seconds: ```plaintext iceRestartTimeout = null; needIceRestartForUsersIds = []; ConnectyCube.videochat.onSessionConnectionStateChangedListener = ( session, userID, connectionState ) => { console.log( "[onSessionConnectionStateChangedListener]", userID, connectionState ); const { DISCONNECTED, FAILED, CONNECTED, CLOSED } = ConnectyCube.videochat.SessionConnectionState; if (connectionState === DISCONNECTED || connectionState === FAILED) { iceRestartTimeout = setTimeout(() => { // Connection not restored within 30 seconds, trying ICE restart... if (isOnline) { maybeDoIceRestart(session, userID); } else { // Skip ICE restart, no Internet connection this.needIceRestartForUsersIds.push(userID); } }, 30000); } else if (connectionState === CONNECTED) { clearTimeout(iceRestartTimeout); iceRestartTimeout = null; needIceRestartForUsersIds = []; } else if (connectionState === CLOSED) { needIceRestartForUsersIds = []; } }; ``` * Finally, in a case a user got working Internet connection later, do ICE restart there: ```plaintext window.ononline = () => { if (!isOnline) { if (session && needIceRestartForUsersIds.length > 0) { for (let userID of needIceRestartForUsersIds) { maybeDoIceRestart(session, userID); } } } isOnline = true; }; ``` After these changes the call connection should be restored to working state again. ## Configuration [Section titled “Configuration”](#configuration) There are various calling related configs that can be changed. ### alwaysRelayCalls [Section titled “alwaysRelayCalls”](#alwaysrelaycalls) The `alwaysRelayCalls` config sets the WebRTC `RTCConfiguration.iceTransportPolicy` [config](/js/#default-configuration). Setting it to `true` means the calling media will be routed through TURN server all the time, and not directly P2P between users even if the network path allows it: ```javascript const appConfig = { videochat: { alwaysRelayCalls: true, }, }; ``` ## Recording [Section titled “Recording”](#recording) For the recording feature implementation you can use [MediaStream Recording API](https://developer.mozilla.org/en-US/docs/Web/API/MediaStream_Recording_API) The recorder accepts a media stream and record it to file. Both local and remote streams can be recorded and saved to file. There is also a good article about client-side recording implementation ## Continue calling in background [Section titled “Continue calling in background”](#continue-calling-in-background) If you are developing dedicated apps for iOS and Android - it’s required to apply additional configure for the app to continue playing calling audio when it goes into the background. On iOS: there is no way to continue a video call in background because of some OS restrictions. What is supported there is to continue with voice calling while an app is in background. Basically, the recommended to achieve this is to switch off device camera when an app goes to background and then switch camera on back when an app goes to foreground. Furthermore, even voice background call are blocked by default on iOS. To unblock - you need to setup proper background mode capabilities in your project. Please find the [Enabling Background Audio link](https://developer.apple.com/documentation/avfoundation/media_playback_and_selection/creating_a_basic_video_player_ios_and_tvos/enabling_background_audio) with more information how to do it properly. Generally speaking, you need to enable `Voice over IP` and `Remote notifications` capabilities:  For Android, we also recommend to implement the same camera switch flow when go to background and then return to foreground.
# Video Conferencing
> Discover the simplicity of integrating conference video calling into your Web app with our easy-to-use API. Empower users to connect from anywhere.
ConnectyCube **Multiparty Video Conferencing API** is built on top of [WebRTC](https://webrtc.org/) protocol and based on top of [WebRTC SFU](https://webrtcglossary.com/sfu/) architecture. Max people per Conference call is 12. Video Conferencing is available starting from [Advanced plan](https://connectycube.com/pricing/). > To get a difference between **P2P calling** and **Conference calling** please read our [ConnectyCube Calling API comparison](https://connectycube.com/2020/04/15/connectycube-calling-api-comparison/) blog page. ## Features supported [Section titled “Features supported”](#features-supported) * Video/Audio Conference with up to 12 people * Join-Rejoin video room functionality (like Skype) * Guest rooms * Mute/Unmute audio/video streams * Display bitrate * Switch video input device (camera) * Switch audio input device (microphone) ## Preparations [Section titled “Preparations”](#preparations) ### Connect adapter.js [Section titled “Connect adapter.js”](#connect-adapterjs) Make sure you connected the latest version of [adapter.js](https://github.com/webrtc/adapter/tree/master/release) Note If you use Chrome browser and emulate iOS device - you may get “The adapter.js addTrack polyfill only supports a single stream which is associated with the specified track” error. That’s a known issue with adapter.js where it wrongly parses the user agent. Either use real iOS device or Safari browser to test iOS behaviour. ### Set up config [Section titled “Set up config”](#set-up-config) In order to start working with Multiparty Video Conferencing API you need to initialize a client: ```javascript const credentials = { appId: ..., authKey: "...", } const MULTIPARTY_SERVER_ENDPOINT = 'wss://...:8989'; const appConfig = { debug: { mode: 1 }, conference: { server: MULTIPARTY_SERVER_ENDPOINT }, } ConnectyCube.init(credentials, appConfig) ``` > Default multiparty server endpoint is wss\://janus.connectycube.com:8989 ([see](/js/#default-configuration)). ## Create meeting [Section titled “Create meeting”](#create-meeting) In order to have a conference call, a meeting object has to be created. ```javascript const params = { name: "My meeting", start_date: timestamp, end_date: timestamp attendees: [ {id: 123, email: "..."}, {id: 124, email: "..."} ], record: false, chat: false }; ConnectyCube.meeting.create(params) .then(meeting => { const confRoomId = meeting._id; }) .catch(error => { }); ``` * As for `attendees` - either ConnectyCube users ids or external emails can be provided. * If you want to schedule a meeting - pass `start_date` and `end_date`. * Pass `chat: true` if you want to have a chat connected to meeting. * Pass `record: true` if you want to have a meeting call recorded. Read more about Recording feature Once meeting is created, you can use `meeting._id` as a conf room identifier in the below requests when join a call. ## Create call session [Section titled “Create call session”](#create-call-session) Once a meeting is created/retrieved, you can create a conf call session. Normally, each browser tab will need a single session with the server: ```javascript const session = ConnectyCube.videochatconference.createNewSession(); ``` Once a session is created, you can interact with a Video Conferencing API. ## Access local media stream [Section titled “Access local media stream”](#access-local-media-stream) In order to have a video chat session you need to get an access to the user’s devices (webcam / microphone): ```javascript const mediaParams = { audio: true, video: true, }; session .getUserMedia(mediaParams) .then((localStream) => {}) .catch((error) => {}); ``` This method lets the browser ask the user for permission to use devices. You should allow this dialog to access the stream. Otherwise, the browser can’t obtain access and will throw an error for `getUserMedia` callback function. For more information about possible audio/video constraints, here is a good code sample from WebRTC team how to work with getUserMedia constraints: ### HD video quality [Section titled “HD video quality”](#hd-video-quality) If HD video quality is required - the following audio/video constraints are required to pass: ```javascript {video: { width: 1280, height: 720 }, audio: true} ``` More info about all possible is are available here ## Attach local media stream [Section titled “Attach local media stream”](#attach-local-media-stream) Then you should attach your local media stream to HTML video element. For **Web-like environments**, including Cordova - use the following method: ```javascript session.attachMediaStream("myVideoElementId", localStream, { muted: true, mirror: true, }); ``` For **ReactNative environment** - use the following method: ```javascript import {RTCView} from 'react-native-connectycube'; // pass a local or remote stream to the RTCView component ... ... ``` ## Join room [Section titled “Join room”](#join-room) To jump into video chat with users you should join it: ```javascript session .join(confRoomId, userId, userDisplayName) .then(() => {}) .catch((error) => {}); ``` To check current joined video room use the following property: ```javascript const confRoomId = session.currentRoomId; ``` ## Join as listener [Section titled “Join as listener”](#join-as-listener) It can be a requirement where it needs to join a room as listener only, w/o publishing own media stream. It can be useful for a case with a teacher and many students where normally students join a call as listeners and only a teacher publishes own media stream: ```javascript session .joinAsListener(confRoomId, userId, userDisplayName) .then(() => {}) .catch((error) => {}); ``` ## List online participants [Section titled “List online participants”](#list-online-participants) To list online users in a room: ```javascript session .listOfOnlineParticipants() .then((participants) => {}) .catch((error) => {}); ``` ## Events [Section titled “Events”](#events) There are 6 events you can listen for: ```javascript ConnectyCube.videochatconference.onParticipantJoinedListener = ( session, userId, userDisplayName, isExistingParticipant ) => {}; ConnectyCube.videochatconference.onParticipantLeftListener = (session, userId) => {}; ConnectyCube.videochatconference.onRemoteStreamListener = (session, userId, stream) => {}; ConnectyCube.videochatconference.onSlowLinkListener = (session, userId, uplink, nacks) => {}; ConnectyCube.videochatconference.onRemoteConnectionStateChangedListener = (session, userId, iceState) => {}; ConnectyCube.videochatconference.onSessionConnectionStateChangedListener = (session, iceState) => {}; ConnectyCube.videochatconference.onErrorListener = (session, error) => {}; ``` ## Mute/Unmute audio [Section titled “Mute/Unmute audio”](#muteunmute-audio) You can mute/unmute your own audio: ```javascript // mute session.muteAudio(); // unmute session.unmuteAudio(); //check mute state session.isAudioMuted(); // true/false ``` ## Mute/Unmute video [Section titled “Mute/Unmute video”](#muteunmute-video) You can mute/unmute your own video: ```javascript // mute session.muteVideo(); // unmute session.unmuteVideo(); //check mute state session.isVideoMuted(); // true/false ``` ## List of devices [Section titled “List of devices”](#list-of-devices) ```javascript // get all devices ConnectyCube.videochatconference .getMediaDevices() .then((allDevices) => {}) .catch((error) => {}); // only video devices ConnectyCube.videochatconference .getMediaDevices(ConnectyCube.videochatconference.DEVICE_INPUT_TYPES.VIDEO) .then((videoDevices) => {}) .catch((error) => {}); // only audio devices ConnectyCube.videochatconference .getMediaDevices(ConnectyCube.videochatconference.DEVICE_INPUT_TYPES.AUDIO) .then((audioDevices) => {}) .catch((error) => {}); ``` ## Switch video(camera)/audio(microphone) input device [Section titled “Switch video(camera)/audio(microphone) input device”](#switch-videocameraaudiomicrophone-input-device) ```javascript const deviceId = "..."; // switch video session .switchMediaTracks({ video: deviceId }) .then((updatedLocaStream) => {}) // you can reattach local stream .catch((error) => {}); // switch audio session .switchMediaTracks({ audio: deviceId }) .then((updatedLocaStream) => {}) // you can reattach local stream .catch((error) => {}); ``` ## Screen Sharing [Section titled “Screen Sharing”](#screen-sharing) Request a desktop stream by calling `getDisplayMedia`: ```javascript const constraints = { video: { width: 1280, height: 720, frameRate: { ideal: 10, max: 15 }, }, audio: true, }; session .getDisplayMedia(constraints) .then((localDesktopStream) => {}) .catch((error) => {}); ``` More info about what else options can be passed can be found here If the local stream already exists, the next call to getUserMedia or getDisplayMedia will update the tracks in the stream and preserve the track’s enabled state for the audio track. ## Get remote user bitrate [Section titled “Get remote user bitrate”](#get-remote-user-bitrate) ```javascript const bitrate = session.getRemoteUserBitrate(userId); ``` ## Get remote user mic level [Section titled “Get remote user mic level”](#get-remote-user-mic-level) ```javascript const micLevel = session.getRemoteUserVolume(userId); ``` ## Leave room and destroy conf session [Section titled “Leave room and destroy conf session”](#leave-room-and-destroy-conf-session) To leave current joined video room: ```javascript session .leave() .then(() => {}) .catch((error) => {}); ``` ## Retrieve meetings [Section titled “Retrieve meetings”](#retrieve-meetings) Retrieve a meeting by id: ```javascript const params = { _id: meetingId, }; ConnectyCube.meeting .get(params) .then((meeting) => {}) .catch((error) => {}); ``` Retrieve a list of meetings: ```javascript const params = { limit: 5, offset: 0 }; ConnectyCube.meeting .get(params) .then((meetings) => {}) .catch((error) => {}); ``` ## Edit meeting [Section titled “Edit meeting”](#edit-meeting) A meeting creator can edit a meeting: ```javascript const params = { name, start_date, end_date }; ConnectyCube.meeting .update(meetingId, params) .then((meeting) => {}) .catch((error) => {}); ``` ## Delete meeting [Section titled “Delete meeting”](#delete-meeting) A meeting creator can delete a meeting: ```javascript ConnectyCube.meeting .delete(meetingId) .then(() => {}) .catch((error) => {}); ``` ## Recording [Section titled “Recording”](#recording) Server-side recording is available. Read more about Recording feature ### Retrieve recordings with download url [Section titled “Retrieve recordings with download url”](#retrieve-recordings-with-download-url) ```javascript ConnectyCube.meeting .getRecordings(meetingId) .then(() => {}) .catch((error) => {}); ``` ## Continue calling in background [Section titled “Continue calling in background”](#continue-calling-in-background) If you are developing dedicated apps for iOS and Android - it’s required to apply additional configure for the app to continue playing calling audio when it goes into the background. On iOS: there is no way to continue a video call in background because of some OS restrictions. What is supported there is to continue with voice calling while an app is in background. Basically, the recommended to achieve this is to switch off device camera when an app goes to background and then switch camera on back when an app goes to foreground. Furthermore, even voice background call are blocked by default on iOS. To unblock - you need to setup proper background mode capabilities in your project. Please find the [Enabling Background Audio link](https://developer.apple.com/documentation/avfoundation/media_playback_and_selection/creating_a_basic_video_player_ios_and_tvos/enabling_background_audio) with more information how to do it properly. Generally speaking, you need to enable `Voice over IP` and `Remote notifications` capabilities:  For Android, we also recommend to implement the same camera switch flow when go to background and then return to foreground.
# Address Book
> Effortlessly upload, sync, and access ConnectyCube users from your phone contacts in your Web app with Address Book API.
Address Book API provides an interface to work with phone address book, upload it to server and retrieve already registered ConnectyCube users from your address book. With conjunction of [User authentication via phone number](/js/authentication-and-users#authentication-via-phone-number) you can easily organise a state of the art logic in your App where you can easily start chatting with your phone contacts, without adding them manually as friends - the same what you can see in WhatsApp, Telegram, Facebook Messenger and Viber. ## Upload Address Book [Section titled “Upload Address Book”](#upload-address-book) First of all you need to upload your Address Book to the backend. It’s a normal practice to do a full upload for the 1st time and then upload diffs on future app logins. ```javascript const CONTACTS = [ { name: "Gordie Kann", phone: "1879108395", }, { name: "Wildon Gilleon", phone: "2759108396", }, { name: "Gaston Center", phone: "3759108396", }, ]; const options = {}; // const options = {'force': 1, 'udid': 'XXX'}; ConnectyCube.addressbook .uploadAddressBook(CONTACTS, options) .then(() => {}) .catch((error) => {}); ``` Response example from `ConnectyCube.addressbook.uploadAddressBook(params)` - [see](/server/address_book#response) * You also can edit an existing contact by providing a new name for it. * You also can upload more contacts, not just all in one request - they will be added to your address book on the backend. If you want to override the whole address book on the backend - just provide `force: 1` option. * You also can remove a contact by setting `contact.destroy = 1;` * A device UDID is used in cases where user has 2 or more devices and contacts sync is off. Otherwise - user has a single global address book. ## Retrieve Address Book [Section titled “Retrieve Address Book”](#retrieve-address-book) If you want you can retrieve your uploaded address book: ```javascript ConnectyCube.addressbook .get() .then((result) => {}) .catch((error) => {}); ``` or with UDID: ```javascript const UDID = "XXX"; ConnectyCube.addressbook .get(UDID) .then((result) => {}) .catch((error) => {}); ``` Response example from `ConnectyCube.addressbook.get()` - [see](/server/address_book#response-1) ## Retrieve Registered Users [Section titled “Retrieve Registered Users”](#retrieve-registered-users) Using this request you can easily retrieve the ConnectyCube users - you phone Address Book contacts that already registered in your app, so you can start communicate with these users right away: ```javascript ConnectyCube.addressbook .getRegisteredUsers() .then((result) => {}) .catch((error) => {}); ``` Response example from `ConnectyCube.addressbook.getRegisteredUsers()` - [see](/server/address_book#response-2) If isCompact = true - server will return only id and phone fields of User. Otherwise - all User’s fields will be returned. ## Push notification on new contact joined [Section titled “Push notification on new contact joined”](#push-notification-on-new-contact-joined) There is a way to get a push notification when some contact from your Address Book registered in an app. You can enable this feature at [ConnectyCube Dashboard](https://admin.connectycube.com), Users module, Settings tab: 
# Authentication and Users
> Simplify user authentication in your Web app with our definitive API guide. Fortify your app's defenses and protect user data effectively.
Every user has to authenticate with ConnectyCube before using any ConnectyCube functionality. When someone connects with an application using ConnectyCube, the application will need to obtain a session token which provides temporary, secure access to ConnectyCube APIs. A session token is an opaque string that identifies a user and an application. ## Create session token [Section titled “Create session token”](#create-session-token) As a starting point, the user’s session token needs to be created allowing user any further actions within the app. Pass login/email and password to identify a user: ```javascript const userCredentials = { login: "cubeuser", password: "awesomepwd" }; ConnectyCube.createSession(userCredentials) .then((session) => {}) .catch((error) => {}); ``` **Note:** With the request above, **the user is created automatically on the fly upon session creation** using the login (or email) and password from the request parameters. **Important:** For better security it is recommended to deny the session creation without an existing user.\ For this, set ‘Session creation without an existing user entity’ to **Deny** under the **Application -> Overview -> Permissions** in the [admin panel](https://admin.connectycube.com/apps). ### Authentication via phone number [Section titled “Authentication via phone number”](#authentication-via-phone-number) Sign In with phone number is supported with ([Firebase integration](https://firebase.google.com/docs/auth/web/phone-auth)). You need to create Firebase `project_id` and obtain Firebase `access_token` after SMS code verification, then pass these parameters to `login` method: ```javascript const userCredentials = { provider: "firebase_phone", "firebase_phone[project_id]": "...", "firebase_phone[access_token]": "...", }; ConnectyCube.createSession(userCredentials) .then((user) => {}) .catch((error) => {}); ``` > **Note** > > In order to login via phone number you need to create a session token first. ### Authentication via Firebase email [Section titled “Authentication via Firebase email”](#authentication-via-firebase-email) Sign In with email is supported with ([Firebase integration](https://firebase.google.com/docs/auth/web/password-auth)). You need to create Firebase `project_id` and obtain Firebase `access_token` after email/password verification, then pass these parameters to `login` method: ```javascript const userCredentials = { provider: "firebase_email", firebase_email: { project_id: "XXXXXXXXXXX", access_token: "XXXXXXXXXXXYYYYYY", }, }; ConnectyCube.createSession(userCredentials) .then((user) => {}) .catch((error) => {}); ``` > **Note** > > In order to login via email you need to create a session token first. ### Authentication via external identity provider [Section titled “Authentication via external identity provider”](#authentication-via-external-identity-provider) **Custom Identity Provider (CIdP)** feature is necessary if you have your own user database and want to authenticate users in ConnectyCube against it. It works the same way as Facebook/Twitter SSO. With Custom Identity Provider feature you can continue use your user database instead of storing/copying user data to ConnectyCube database. #### CIdP high level integration flow [Section titled “CIdP high level integration flow”](#cidp-high-level-integration-flow) To get started with **CIdP** integration, check the [Custom Identity Provider guide](/guides/custom-identity-provider) which describes high level integration flow. #### How to login via CIdP [Section titled “How to login via CIdP”](#how-to-login-via-cidp) Once you done with the setup mapping in ConnectyCube Dashboard, it’s time to verify the integration. To perform CIdP login, the same ConnectyCube [User Login API](/js/authentication-and-users/#upgrade-session-token-user-login) is used. You just use existing login request params to pass your external user token: ```javascript const userCredentials = { login: "eyJhbGciOiJIUzI1NiIsInR5cCI6IkpXVCJ9.eyJpZCI6MTIzNDU2Nzg5LCJuYW1lIjoiSm9zZXBoIn0.OpOSSw7e485LOP5PrzScxHb7SR6sAOMRckfFwi4rp7o" }; ConnectyCube.createSession(userCredentials) .then((user) => {}) .catch((error) => {}); ``` Once the login is successful, ConnectyCube will create an underalying User entity, so then you can use ConnectyCube APIs in a same way as you do with a normal login. With CIdP we do not have/store any user password in ConnectyCube User entity. Following further integration, you may need to connect to Chat. In a case of CIdP login, you do not have a user password. In such cases you should use ConnectyCube session token as a password for chat connection. [Follow the Connect to Chat with CIdP guide](/js/messaging/#connect-to-chat-using-custom-authentication-providers). ### Create guest session [Section titled “Create guest session”](#create-guest-session) To create a session with guest user use the following code: ```javascript const guestUserCredentials = { guest: "1", full_name: "Awesome Smith" }; ConnectyCube.createSession(guestUserCredentials) .then((session) => {}) .catch((error) => {}); ``` ## Session expiration [Section titled “Session expiration”](#session-expiration) Expiration time for session token is 2 hours after last request to API. If you perform query with expired token, you will receive the error **Required session does not exist**. In this case you need to recreate a session token. There is a special callback function to handle this case: ```javascript const CONFIG = { on: { sessionExpired: (handleResponse, retry) => { // call handleResponse() if you do not want to process a session expiration, // so an error will be returned to origin request // handleResponse(); ConnectyCube.createSession() .then(retry) .catch((error) => {}); }, }, }; ConnectyCube.init(CREDENTIALS, CONFIG); ``` ## Destroy session token [Section titled “Destroy session token”](#destroy-session-token) To destroy a session use the following code: ```javascript ConnectyCube.destroySession().catch((error) => {}); ``` ## User signup [Section titled “User signup”](#user-signup) Only login (or email) + password are required for user to be created. All other parameters are optional: ```javascript const userProfile = { login: "marvin18", password: "supersecurepwd", email: "awesomeman@gmail.com", full_name: "Marvin Simon", phone: "47802323143", website: "https://dozensofdreams.com", tag_list: ["iphone", "apple"], custom_data: JSON.stringify({ middle_name: "Bartoleo" }), }; ConnectyCube.users .signup(userProfile) .then((user) => {}) .catch((error) => {}); ``` ## User profile update [Section titled “User profile update”](#user-profile-update) ```javascript const updatedUserProfile = { login: "marvin18sim", full_name: "Mar Sim", }; ConnectyCube.users .update(updatedUserProfile) .then((user) => {}) .catch((error) => {}); ``` If you want to change your password, you need to provide 2 parameters: `password` and `old_password`. Updated `user` entity will be returned. ## User avatar [Section titled “User avatar”](#user-avatar) You can set a user’s avatar. You just need to upload it to the ConnectyCube cloud storage and then connect to user. ```javascript // for example, a file from HTML form input field const inputFile = $("input[type=file]")[0].files[0]; const fileParams = { name: inputFile.name, file: inputFile, type: inputFile.type, size: inputFile.size, public: false, }; const updateUser = (uploadedFile) => { const updatedUserProfile = { avatar: uploadedFile.uid }; return ConnectyCube.users.update(updatedUserProfile); }; ConnectyCube.storage .createAndUpload(fileParams) .then(updateUser) .then((updatedUser) => {}) .catch((error) => {}); ``` Now, other users can get you avatar: ```javascript const avatarUID = updatedUser.avatar; const avatarURL = ConnectyCube.storage.privateUrl(avatarUID); const avatarHTML = ""; ``` ## Password reset [Section titled “Password reset”](#password-reset) It’s possible to reset a password via email: ```javascript ConnectyCube.users .resetPassword("awesomeman@gmail.com") .then((result) => {}) .catch((error) => {}); ``` If provided email is valid - an email with password reset instruction will be sent to it. ## Retrieve users V2 [Section titled “Retrieve users V2”](#retrieve-users-v2) ### Examples [Section titled “Examples”](#examples) Retrieve users by ID ```javascript const searchParams = { limit: 10, offset: 50, id: { in: [51941, 51946] }, }; ConnectyCube.users .getV2(searchParams) .then((result) => {}) .catch((error) => {}); ``` Retrieve users by login ```javascript const searchParams = { login: "adminFirstUser" }; ConnectyCube.users .getV2(searchParams) .then((result) => {}) .catch((error) => {}); ``` Retrieve users by last\_request\_at ```javascript const date = new Date(2017, 10, 10); const searchParams = { last_request_at: { gt: date } }; ConnectyCube.users .getV2(searchParams) .then((result) => {}) .catch((error) => {}); ``` More information (fields, operators, request rules) available [here](/server/users#retrieve-users-v2) ## Retrieve users V1 (**Deprecated**) [Section titled “Retrieve users V1 (Deprecated)”](#retrieve-users-v1-deprecated) ### Retrieve users by ID (**Deprecated**) [Section titled “Retrieve users by ID (Deprecated)”](#retrieve-users-by-id-deprecated) ```javascript const params = { page: 1, per_page: 5, filter: { field: "id", param: "in", value: [51941, 51946], }, }; ConnectyCube.users .get(params) .then((result) => {}) .catch((error) => {}); ``` ### Retrieve user by login (**Deprecated**) [Section titled “Retrieve user by login (Deprecated)”](#retrieve-user-by-login-deprecated) ```javascript const searchParams = { login: "marvin18" }; ConnectyCube.users .get(searchParams) .then((result) => {}) .catch((error) => {}); ``` ### Retrieve user by email (**Deprecated**) [Section titled “Retrieve user by email (Deprecated)”](#retrieve-user-by-email-deprecated) ```javascript const searchParams = { email: "marvin18@example.com" }; ConnectyCube.users .get(searchParams) .then((result) => {}) .catch((error) => {}); ``` ### Retrieve users by full name (**Deprecated**) [Section titled “Retrieve users by full name (Deprecated)”](#retrieve-users-by-full-name-deprecated) ```javascript const searchParams = { full_name: "Marvin Samuel" }; ConnectyCube.users .get(searchParams) .then((result) => {}) .catch((error) => {}); ``` ### Retrieve user by phone number (**Deprecated**) [Section titled “Retrieve user by phone number (Deprecated)”](#retrieve-user-by-phone-number-deprecated) ```javascript const searchParams = { phone: "44678162873" }; ConnectyCube.users .get(searchParams) .then((result) => {}) .catch((error) => {}); ``` ### Retrieve user by external ID (**Deprecated**) [Section titled “Retrieve user by external ID (Deprecated)”](#retrieve-user-by-external-id-deprecated) ```javascript const searchParams = { external_user_id: "675373912" }; ConnectyCube.users .get(searchParams) .then((result) => {}) .catch((error) => {}); ``` ### Retrieve users by tags [Section titled “Retrieve users by tags”](#retrieve-users-by-tags) ```javascript const searchParams = { tags: ["apple"] }; ConnectyCube.users .get(searchParams) .then((result) => {}) .catch((error) => {}); ``` ## Delete user [Section titled “Delete user”](#delete-user) A user can delete himself from the platform: ```javascript ConnectyCube.users .delete() .then((result) => {}) .catch((error) => {}); ```
# Custom Data
> Maximize your Web app's potential with customizable data cloud storage solutions. Tailor data structures to match your application's unique requirements.
Custom Data, also known as cloud tables or custom objects, provide users with the flexibility to define and manage data in a way that is specific to their application’s requirements. Here are some common reasons why you might need use custom data in your app: * Custom Data allows you to define data structures that align precisely with your application’s needs. This is particularly useful when dealing with complex or unique data types that don’t fit well into standard ConnectyCube models. * In certain applications, there may be entities or objects that are unique to that particular use case. Custom Data enable the representation of these entities in the database, ensuring that the data storage is optimized for the application’s logic. * Custom Data allows you to extend the functionality of the app by introducing new types of data that go beyond what the ConnectyCube platform’s standard models support. Custom Data empower you to introduce these extensions and additional features. * In situations where data needs to be migrated from an existing system or transformed in a specific way, Custom Data offer the flexibility to accommodate these requirements. * Your application needs to integrate with external systems or APIs, Custom Data can be designed to align seamlessly with the data structures of your external systems. ## Get started with SDK [Section titled “Get started with SDK”](#get-started-with-sdk) Follow the [Getting Started guide](/js/) on how to connect ConnectyCube SDK and start building your first app. ## Preparations [Section titled “Preparations”](#preparations) In order to start using Custom Data you need first create the data scheme in the ConnectyCube Admin panel. For it navigate to **`Home -> Your App -> Custom -> List`** then click on **`ADD`** and from the dropdown menu select **`ADD NEW CLASS`**. In the opened dialog, enter your model name and add the necessary fields. The ConnectyCube Custom Data models’ fields support various data types or arrays (except `Location`). These include: * Integer (e.g. `8222456`); * Float (e.g. `1.25`); * Boolean (`true` or `false`); * String (e.g. `"some text"`); * Location (the array what consist of **two** `numbers`s); After adding all the required fields, click the **`CREATE CLASS`** button to save your scheme.  Newly created class is now available and contains the following data: * **\_id** - record identifier generated by system automatically * **user\_id** - identifier of user who created a record * **\_parent\_id** - by default is null * **field\_1** - field defined in a scheme * **field\_2** - field defined in a scheme * … * **field\_N** - field defined in a scheme * **created\_at** - date and time when a record is created  After that you can perform all **CRUD** operations with your Custom Data. > **Note**: The **Class name** field will be represented as the DB table name and will be used for identification of your requests during the work with Custom Data. ## Permissions [Section titled “Permissions”](#permissions) Access control list (ACL) is a list of permissions attached to some object. An ACL specifies which users have an access to objects, as well as what operations are allowed with such objects. Each entry in a typical ACL specifies a subject and an operation. ACL models may be applied to collections of objects as well as to individual entities within the system’s hierarchy. Adding the Access Control list is only available within the Custom Data module. ### Permissions scheme [Section titled “Permissions scheme”](#permissions-scheme) ConnectyCube permission scheme contains five permissions levels: * **Open** (open) - any user within the application can access the record(s) in the class and perform actions with the record * **Owner** (owner) - only the Owner (the user who created a record) is authorized to perform actions with the record * **Not allowed** (not\_allowed) - no one (except the Account Administrator) can proceed with a chosen action * **Open for groups** (open\_for\_groups) - users with the specified tag(s) will be included in the group that is authorized to perform actions with a record. Multiple groups can be specified (number of groups is not limited). * **Open for users ids** (open\_for\_users\_ids) - only users with listed IDs can perform actions with a record. Actions for work with an entity: * **Create** - create a new record * **Read** - retrieve information about a record and view it in the read-only mode * **Update** - update any parameter of the chosen record that can be updated by user * **Delete** - delete a record To set a permission schema for the Class, go to ConnectyCube dashboard and find a required class within Custom Data module Click on **`EDIT PERMISSION`** button to open permissions schema to edit. Each listed action has a separate permission level to select. The exception is a ‘Create’ action that isn’t available for ‘Owner’ permission level.  ### Permission levels [Section titled “Permission levels”](#permission-levels) Two access levels are available in the ConnectyCube: access to Class and access to Record. Only one permission schema can be applied for the record. Using the Class permission schema means that the Record permission schema won’t be affected on a reсord. **Class entity** **Class** is an entity that contains records. Class can be created via ConnectyCube dashboard only within Custom data module. Operations with Class entity are not allowed in API. All actions (Create, Read, Update and Delete) that are available for the ‘Class’ entity are also applicable for all records within a class. Default Class permission schema is using during the creation of a class: * **Create:** Open * **Read:** Open * **Update:** Owner * **Delete:** Owner To enable applying Class permissions for any of the action types, ‘Use Class permissions’ check box should be ticked. It means that the record permission schema (if existing) won’t be affected on a record. **Record entity** **Record** is an entity within the Class in the Custom Data module that can be created in ConnectyCube dashboard and via API. Each record within a Class has its own permission level. Unlike Class entity, ‘Not allowed’ permission level isn’t available for a record as well as only three actions are available to work with a record - read, update and delete. Default values for Record permission scheme: * Read: Open * Update: Owner * Delete: Owner To set a separate permission scheme for a record, open a record to edit and click on **`SET PERMISSION ON RECORD`** button:  Define the permission level for each of available actions. ## Create a new record [Section titled “Create a new record”](#create-a-new-record) Create a new record with the defined parameters in the class. Fields that weren’t defined in the request but are available in the scheme (class) will have null values. ```javascript const className = 'call_history_item'; const record = { 'call_name': 'Group call', 'call_participants': [2325293, 563541, 563543], 'call_start_time': 1701789791673, 'call_end_time': 0, 'call_duration': 0, 'call_state': 'accepted', 'is_group_call': true, 'call_id': 'f8c3de3d-1fea-4d7c-a8b0-29f63c4c3454', 'user_id': 2325293, 'caller_location': [50.004444, 36.234380] } try { const result = await ConnectyCube.data.create(className, record); console.log(result) } catch (error) { console.error(error) } ``` ### Create a record with permissions [Section titled “Create a record with permissions”](#create-a-record-with-permissions) To create a new record with permissions, add the `permissions` parameter to a record. In this case, the request will look like this: ```javascript const className = 'call_history_item'; const record = { call_name: 'Group call', call_participants: [2325293, 563541, 563543], call_start_time: 1701789791673, call_end_time: 0, call_duration: 0, call_state: 'accepted', is_group_call: true, call_id: 'f8c3de3d-1fea-4d7c-a8b0-29f63c4c3454', user_id: 2325293, caller_location: [50.004444, 36.234380], permissions: { read: { access: 'owner' }, update: { access: 'open_for_users_ids', ids: [563541, 563543] }, delete: { access: 'open_for_groups', groups: ['group87', 'group108'] } } } try { const result = await ConnectyCube.data.create(className, record); console.log(result) } catch (error) { console.error(error) } ``` ## Create multi records [Section titled “Create multi records”](#create-multi-records) Create several new records in the class. Fields that weren’t defined in the request but available in the scheme would have null values. ```javascript const className = 'call_history_item'; const record_1 = { 'call_name': 'Group call 1', 'call_participants': [2325293, 563541, 563543], 'call_start_time': 1701789791673, 'call_end_time': 0, 'call_duration': 0, 'call_state': 'accepted', 'is_group_call': true, 'call_id': 'f8c3de3d-1fea-4d7c-a8b0-29f63c4c3454', 'user_id': 2325293, 'caller_location': [50.004444, 36.234380] } const record_2 = { 'call_name': 'Group call 2', 'call_participants': [2325293, 563541, 563543], 'call_start_time': 1701789832955, 'call_end_time': 0, 'call_duration': 0, 'call_state': 'accepted', 'is_group_call': true, 'call_id': 'a2a7bc3f-2eeb-3d72-11b0-566d3c4c2748', 'user_id': 2325293, 'caller_location': [50.004444, 36.234380] } const records = [record_1, record_2] try { const result = await ConnectyCube.data.create(className, records); console.log(result.items) } catch (error) { console.error(error) } ``` ## Retrieve record by ID [Section titled “Retrieve record by ID”](#retrieve-record-by-id) Retrieve the record by specifying its identifier. ```javascript const className = 'call_history_item'; const id = '656f407e29d6c5002fce89dc'; try { const result = await ConnectyCube.data.list(className, id); console.log(result.items) } catch (error) { console.error(error) } ``` ## Retrieve records by IDs [Section titled “Retrieve records by IDs”](#retrieve-records-by-ids) Retrieve records by specifying their identifiers. ```javascript const className = 'call_history_item'; const ids = ['656f407e29d6c5002fce89dc', '5f985984ca8bf43530e81233']; // or `const ids = '656f407e29d6c5002fce89dc,5f985984ca8bf43530e81233'`; try { const result = await ConnectyCube.data.list(className, ids); console.log(result.items) } catch (error) { console.error(error) } ``` ## Retrieve records within a class [Section titled “Retrieve records within a class”](#retrieve-records-within-a-class) Search records within the particular class. > **Note:** If you are sorting records by time, use the `_id` field. It is indexed and it will be much faster than sorting by `created_at` field. The list of additional parameter for sorting, filtering, aggregation of the search response is provided by link ```javascript const className = 'call_history_item'; const filters = { call_start_time: { gt: 1701789791673 } }; try { const result = await ConnectyCube.data.list(className, filter); console.log(result.items) } catch (error) { console.error(error) } ``` ## Retrieve the record’s permissions [Section titled “Retrieve the record’s permissions”](#retrieve-the-records-permissions) > **Note:** record permissions are checked during request processing. Only the owner has an ability to view a record’s permissions. ```javascript const className = 'call_history_item'; const id = '656f407e29d6c5002fce89dc'; try { const result = await ConnectyCube.data.readPermissions(className, id); console.log(result.permissions) console.log(result.record_is) } catch (error) { console.error(error) } ``` ## Update record by ID [Section titled “Update record by ID”](#update-record-by-id) Update record data by specifying its ID. ```javascript const className = 'call_history_item'; const params = { id: '656f407e29d6c5002fce89dc', call_end_time: 1701945033120, }; try { const result = await ConnectyCube.data.update(className, params); console.log(result) } catch (error) { console.error(error) } ``` ## Update records by criteria [Section titled “Update records by criteria”](#update-records-by-criteria) Update records found by the specified search criteria with a new parameter(s). The structure of the parameter `search_criteria` and the list of available operators provided by link ```javascript const className = 'call_history_item'; const params = { search_criteria: { user_id: 1234567 }, call_name: 'Deleted user' }; try { const result = await ConnectyCube.data.update(className, params); console.log(result.items) } catch (error) { console.error(error) } ``` ## Update multi records [Section titled “Update multi records”](#update-multi-records) Update several records within a class by specifying new values. ```javascript const className = 'call_history_item'; const params = [{ id: '656f407e29d6c5002fce89dc', call_end_time: 1701945033120, }, { id: '5f998d3bca8bf4140543f79a', call_end_time: 1701945033120, }]; try { const result = await ConnectyCube.data.update(className, params); console.log(result.items) } catch (error) { console.error(error) } ``` ## Delete record by ID [Section titled “Delete record by ID”](#delete-record-by-id) Delete a record from a class by record identifier. ```javascript const className = 'call_history_item'; const id = '5f998d3bca8bf4140543f79a'; try { await ConnectyCube.data.delete(className, id); } catch (error) { console.error(error) } ``` ## Delete several records by their IDs [Section titled “Delete several records by their IDs”](#delete-several-records-by-their-ids) Delete several records from a class by specifying their identifiers. If one or more records can not be deleted, an appropriate error is returned for that record(s). ```javascript const className = 'call_history_item'; const ids = ['656f407e29d6c5002fce89dc', '5f998d3bca8bf4140543f79a']; try { const result = await ConnectyCube.data.delete(className, id); console.log(result) } catch (error) { console.error(error) } ``` ## Delete records by criteria [Section titled “Delete records by criteria”](#delete-records-by-criteria) Delete records from the class by specifying a criteria to find records to delete. The search query format is provided by link ```javascript const className = 'call_history_item'; const params = { call_id: { in: ['f8c3de3d-1fea-4d7c-a8b0-29f63c4c3454'] } }; try { const result = await ConnectyCube.data.delete(className, params); console.log(result) } catch (error) { console.error(error) } ``` ## Relations [Section titled “Relations”](#relations) Objects (records) in different classes can be linked with a `parentId` field. If the record from the **Class 1** is pointed with a record from **Class 2** via its `parentId`, the `parentId` field will contain an ID of a record from the **Class 2**. If a record from the **Class 2** is deleted, all its children (records of the **Class 1** with `parentId` field set to the **Class 2** record ID) will be automatically deleted as well. The linked children can be retrieved with `_parent_id={id_of_parent_class_record}` parameter.
# How to Setup Firebase
> A complete, step-by-step installation guide to integrate Firebase to your Web application, empowering to easily create feature-rich, scalable applications.
## Firebase account and project registration [Section titled “Firebase account and project registration”](#firebase-account-and-project-registration) Follow these steps to register your Firebase account and create a Firebase project: 1. **Register a Firebase account** at [Firebase console](https://console.firebase.google.com/) . You can use your Google account to authenticate at Firebase. 2. Click **Create project**  > **Note**: If you have a Google project registered for your mobile app, select it from the **Project name** dropdown menu. You can also edit your **Project ID** if you need. A unique ID is assigned automatically to each project. This ID is used in publicly visible Firebase features. For example, it will be used in database URLs and in your Firebase Hosting subdomain. If you need to use a specific subdomain, you can change it. 3. Fill in the fields required (Project name, Project ID, etc.) and click **Continue**.   4. Configure Google Analytics for your project and click **Create project**.  Then click Continue.  5. Select platform for which you need Firebase  If you already have an app in your project, go to project Overview page and click Add another app link:  ## Connect Firebase SDK [Section titled “Connect Firebase SDK”](#connect-firebase-sdk) Here is a step by step guide how to connect Firebase SDK to your **Web** Project: 1. Copy the code from **Add Firebase to your web app** screen and paste it in the ****tag of your HTML page before other script tags: 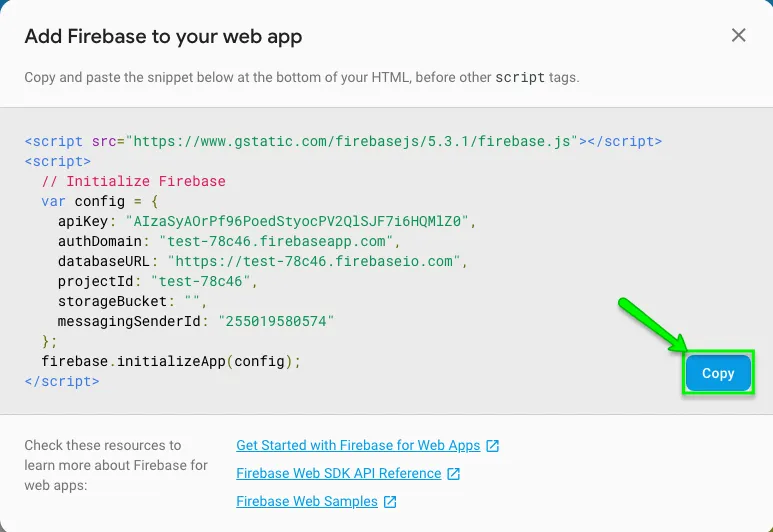 > **Note**: The above code snippet should be used to initialize Firebase Javascript SDK for *Authentication, Cloud Storage, Realtime Database*, and *Cloud Firestore*. You can include only the features that you need. In our case **Authentication (firebase-auth)** component is necessary. If you use **FCM push notifications on Web**, then you need to include **Firebase Cloud Messaging (firebase-messaging)** component as well. 2. From the CDN you need to **include the following components**: ```html ``` In case you are using a bundler like Browserify or webpack, you can just require() the components that you use: ```javascript // Firebase App is always required and must be first const firebase = require("firebase/app"); // Add additional services that you want to use require("firebase/auth"); require("firebase/messaging"); const config = { // ... }; firebase.initializeApp(config); ``` ## Firebase authentication [Section titled “Firebase authentication”](#firebase-authentication) This option allows users in your app authenticate themselves via phone number. If you use this method for user authentication, the user receives an SMS with verification code and authenticates via that code in your app. You need to follow these steps to add Firebase authentication to your Web project: 1. Go to **Firebase console >> Authentication >> Sign-in method** section: 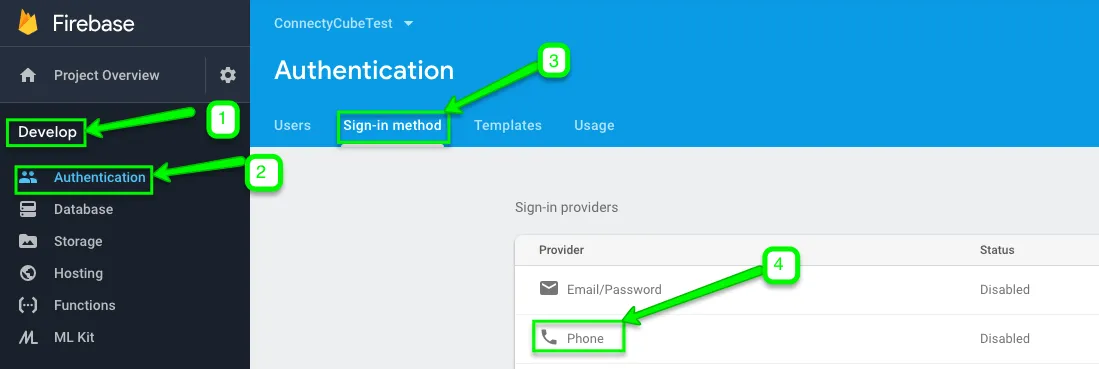 2. Enable **Phone** number sign-in method: 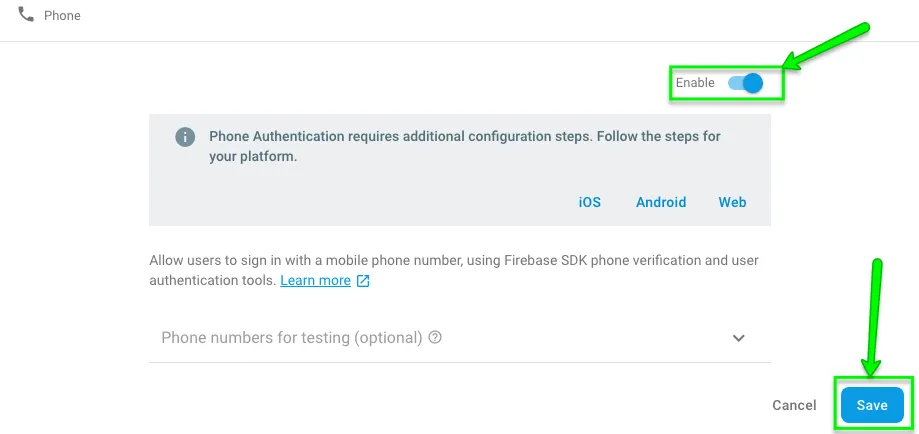 3. In **Firebase console >> Authentication >> Sign-in method** section check **Authorized domains** block and if your domain that will host your app is not added there, add it: 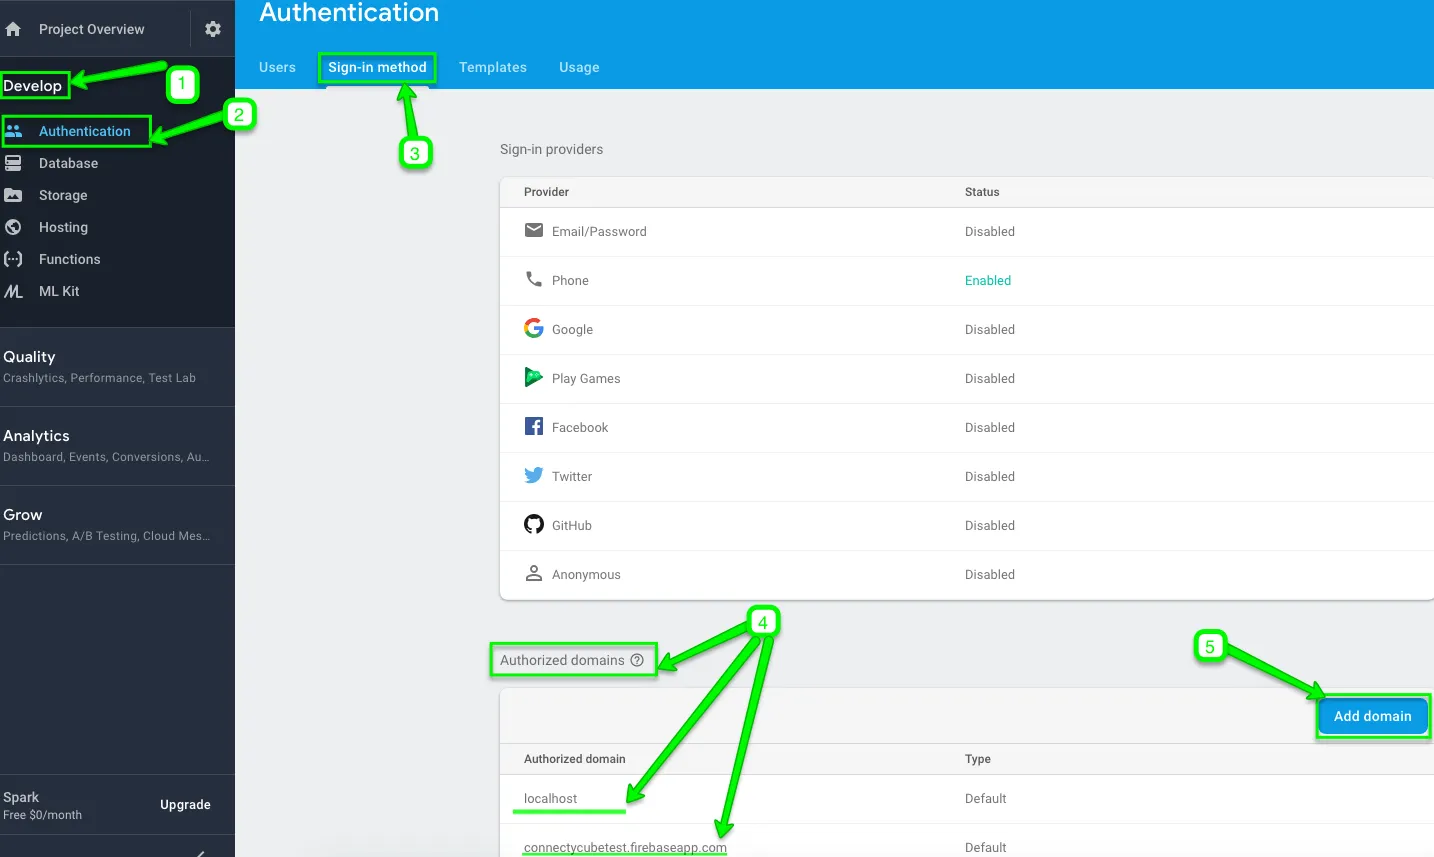 Then enter your domain name on the pop-up window that appears and click **Add**:  4. Set up **reCAPTCHA verification**: > **Note**: If you use Firebase SDK’s `RecaptchaVerifier` object, Firebase creates and handles any necessary client keys and secrets automatically, so you do not need to set up a reCAPTCHA client manually. **reCAPTCHA** options: 1. **Invisible reCAPTCHA** `RecaptchaVerifier` object supports [invisible reCAPTCHA](https://www.google.com/recaptcha/intro/invisible.html), which can verify the user without requiring any user action. In order to set it you need to create a `RecaptchaVerifier` object with the `size` parameter set to `invisible`, specifying the ID of the button that submits your sign-in form: ```javascript window.recaptchaVerifier = new firebase.auth.RecaptchaVerifier("sign-in-button", { size: "invisible", callback: (response) => { // reCAPTCHA solved, allow signInWithPhoneNumber. onSignInSubmit(); }, }); ``` ````plaintext 2) **reCAPTCHA widget** `RecaptchaVerifier` object supports reCAPTCHA widget, which always requires user interaction to complete successfully. In order to set it you need create an element on your page to contain the widget, and then create a `RecaptchaVerifier` object, specifying the ID of the container when you do so. ```javascript window.recaptchaVerifier = new firebase.auth.RecaptchaVerifier('recaptcha-container'); ```` **Optional features**: 1. **Localization** reCAPTCHA can be localized by updating the language code on the Auth instance before rendering the reCAPTCHA. This localization will apply to the SMS message with verification code sent to the user as well. ```javascript firebase.auth().languageCode = "it"; // To apply the default browser preference instead of explicitly setting it. // firebase.auth().useDeviceLanguage(); ``` 2. **reCAPTCHA parameters** It is possible to set callback functions on the `RecaptchaVerifier` object that are called when the user solves the reCAPTCHA or the reCAPTCHA expires before the user submits the form: ```javascript window.recaptchaVerifier = new firebase.auth.RecaptchaVerifier("recaptcha-container", { size: "normal", callback: (response) => { // reCAPTCHA solved, allow signInWithPhoneNumber. // ... }, "expired-callback": () => { // Response expired. Ask user to solve reCAPTCHA again. // ... }, }); ``` 3. **Pre-render the reCAPTCHA** It is possible to pre-render the reCAPTCHA before you submit a sign-in request, if you call `render`: ```javascript recaptchaVerifier.render().then((widgetId) => { window.recaptchaWidgetId = widgetId; }); ``` After `render` resolves, you get the **reCAPTCHA’s widget ID**. You can use it to make calls to the [reCAPTCHA](https://developers.google.com/recaptcha/intro) API: ```javascript const recaptchaResponse = grecaptcha.getResponse(window.recaptchaWidgetId); ``` 5. Send a verification code to user’s phone: In order to request that Firebase send an authentication code to the user’s phone by SMS, set an interface that prompts users to provide their phone number, and then call `signInWithPhoneNumber` as follows: 1. Get the user’s phone number > **Note** > > As a best practice please do not forget to inform your users that if they use phone sign-in, they might receive an SMS message for verification and standard rates apply. 2. Call `signInWithPhoneNumber`, passing to it the user’s phone number and `RecaptchaVerifier` you created earlier: ```javascript const phoneNumber = getPhoneNumberFromUserInput(); const appVerifier = window.recaptchaVerifier; firebase .auth() .signInWithPhoneNumber(phoneNumber, appVerifier) .then((confirmationResult) => { // SMS sent. Prompt user to type the code from the message, then sign the // user in with confirmationResult.confirm(code). window.confirmationResult = confirmationResult; }) .catch((error) => { // Error; SMS not sent // ... }); ``` If `signInWithPhoneNumber` results in an error, reset reCAPTCHA so that the user can try verifying again: ```javascript grecaptcha.reset(window.recaptchaWidgetId); // Or, if you haven't stored the widget ID: window.recaptchaVerifier.render().then(widgetId => { grecaptcha.reset(widgetId); } ``` > **Note**: `signInWithPhoneNumber` method issues reCAPTCHA challenge to the user, and if the user passes the challenge, requests that Firebase Authentication send an SMS message containing a verification code to the user’s phone. 6. Sign in the user with the verification code: 1. Once the call to `signInWithPhoneNumber` succeeds, you need to prompt the user to type the verification code they received by SMS. 2. Then, sign in the user by passing the code to `confirm` method of `ConfirmationResult` object that was passed to `signInWithPhoneNumber`’s fulfillment handler (that is, its `then` block): ```javascript const code = getCodeFromUserInput(); let user; confirmationResult .confirm(code) .then((result) => { // User signed in successfully. user = result.user; // ... }) .catch((error) => { // User couldn't sign in (bad verification code?) // ... }); ``` If the call to `confirm` succeeded, the user is successfully signed in. 3. Get the intermediate `AuthCredential` object: If you need to get an `AuthCredential` object for the user’s account, pass the verification code from the confirmation result and the verification code to `PhoneAuthProvider.credential` instead of calling `confirm`: ```javascript const credential = firebase.auth.PhoneAuthProvider.credential(confirmationResult.verificationId, code); ``` Then, you can sign in the user with the credential: ```javascript let user; firebase .auth() .signInAndRetrieveDataWithCredential(credential) .then((result) => { // User signed in successfully. user = result.user; }) .catch((error) => {}); ``` 7. Get **Firebase accessToken** after SMS code verification as follows: ```javascript let accessToken; user.getIdToken().then((idToken) => { accessToken = idToken; }); ``` 8. Get your **Project ID** from your **Firebase console**:  9. Pass your Firebase `project_id` and Firebase `access_token` parameters to `login` method: ```javascript const userCredentials = { provider: 'firebase_phone', firebase_phone[project_id]: '...', firebase_phone[access_token]: accessToken }; ConnectyCube.login(userCredentials) .then(user => {}); .catch(error => {}); ``` 10. Try running a test. Once your user is logged in successfully, you will find him/her in your **Dashboard >> Your App >> Users** section.  So now you know how to use Firebase features in your ConnectyCube apps. If you have any difficulties - please let us know via [support channel](mailto:support@connectycube.com) ```plaintext ```
# Push Notifications
> Elevate your Web app's performance with push notifications API guide. Keep users engaged with real-time updates, ensuring seamless interaction on the go.
Push Notifications provide a way to deliver some information to users while they are not using your app actively. The following use cases can be covered additionally with push notifications: * send a chat message when a recipient is offline (a push notification will be initiated automatically in this case) * make a video call with offline opponents (need to send a push notification manually) ## Configuration [Section titled “Configuration”](#configuration) In order to start work with push notifications you need to configure it. 1. Generate VAPID keys via npm package: run `npx web-push generate-vapid-keys` to get **Public Key** and **Private Key** values. 2. Set keys in ConnectyCube dashboard: * Open your ConnectyCube Dashboard at [admin.connectycube.com](https://admin.connectycube.com) * Go to **Push notifications** module, **Credentials** page * Set **Public Key** and **Private Key** values in the fields for “WebPush Notifications”. Set `mailto:example@yourdomain.org` for Subject field.  ## Subscribe to push notifications [Section titled “Subscribe to push notifications”](#subscribe-to-push-notifications) 1. Create a service worker file (`*.js`) and place it on your site. 2. Use the following example to register the Service Worker at the correct path and subscribe to [PushManager](https://developer.mozilla.org/en-US/docs/Web/API/PushManager) using the **Public Key** as the `applicationServerKey`: ```javascript const registration = await navigator.serviceWorker .register("path_to/serviceWorker.js"); const subscription = await registration.pushManager .subscribe({ applicationServerKey: "", userVisibleOnly: true }); const subscriptionData = subscription.toJSON(); ``` 3. Retrieve `subscriptionData` to create ConnectyCube subscription: ```javascript const uniqDeviceIdentifier = "" // Any unique fingerprint to identify the subscription with the browser tab, e.g. https://github.com/fingerprintjs/fingerprintjs const params = { notification_channels: "web", device: { platform: "web", udid: uniqDeviceIdentifier, }, push_token: { environment: "development", web_endpoint: subscriptionData.endpoint, web_auth: subscriptionData.auth, web_p256dh: subscriptionData.p256dh, }, }; const result = await ConnectyCube.pushnotifications.subscriptions.create(params); ``` ## Send push notifications [Section titled “Send push notifications”](#send-push-notifications) You can manually initiate a push notification to user/users on any event in your application. To do so you need to form a push notification parameters (payload) and set the push recipients: ```javascript const payload = JSON.stringify({ message: "This is a new chat message" }); const params = { notification_type: "push", user: { ids: [21, 12] }, // recipients. environment: "development", // environment, can be 'production'. message: ConnectyCube.pushnotifications.base64Encode(payload), }; const result = await ConnectyCube.pushnotifications.events.create(params); ``` ## Receive push notifications [Section titled “Receive push notifications”](#receive-push-notifications) You will receive notifications in the service worker and display them using the [Notification API](https://developer.mozilla.org/en-US/docs/Web/API/Notifications_API). To successfully use the [`ServiceWorkerRegistration: showNotification()`](https://developer.mozilla.org/en-US/docs/Web/API/ServiceWorkerRegistration/showNotification) method, you first need to request permission via the [`Notification: requestPermission()`](https://developer.mozilla.org/en-US/docs/Web/API/Notification/requestPermission_static) method. The following code demonstrates how to handle push notifications in a service worker: ```javascript self.addEventListener('install', (event) => { self.skipWaiting(); }); self.addEventListener('push', (event) => { const data = event.data.json().data; const title = data.title; const options = { body: data.message, icon: data.photo }; event.waitUntil(self.registration.showNotification(title, options)); }); self.addEventListener('notificationclick', (event) => { event.notification.close(); event.waitUntil(clients.openWindow('/')); }); ``` ## Unsubscribe [Section titled “Unsubscribe”](#unsubscribe) In order to unsubscribe and stop receiving push notifications you need to list your current subscriptions and then choose those to be deleted: ```javascript const subscriptions = await ConnectyCube.pushnotifications.subscriptions .list(); const subscriptionId = subscriptions[0].subscription.id; const result = await ConnectyCube.pushnotifications.subscriptions .delete(subscriptionId); ```
# Streaming
> Leverage ConnectyCube’s streaming feature for dynamic real-time interactions in Web app. Ideal for interactive sessions, such as teachers broadcasting to multiple students.
ConnectyCube streaming is built on top of [WebRTC](https://webrtc.org/) protocol. The main use case for streaming is with a teacher and many students where normally students join a call as listeners and only a teacher publishes own media stream: **Streaming API** is built on top of [Video Conferencing API](/js/videocalling-conference), hence same API documentation should be followed. The only difference is when join a room - a `session.joinAsListener(...)` API should be used at students side instead of `session.join(...)` API at teacher’s side. This method allows to join a conference room w/o publishing own media stream.
# use-chat React hook
> Simplify chat app state management with use-chat lightweight React hook for real-time chat.
**use-chat** is a React hook for state management in ConnectyCube-powered chat solutions. This library provides a headless solution for managing chat functionality in ConnectyCube. Similar to how Formik simplifies form handling, this library streamlines the development of chat applications. The core purpose is to handle essential chat features like state management, handling subsequent events and APIs properly etc, so the end user takes care about UI building only. ## Features [Section titled “Features”](#features) * Handle chats and messages states, including the currently active conversation * Manage chat participants states * Maintain typing indicators and users last activity. * Support attachments download * Message drafts * Moderation via user reporting and block ## Installation [Section titled “Installation”](#installation) ```plaintext npm install @connectycube/use-chat ``` or ```plaintext yarn add @connectycube/use-chat ``` ## Usage [Section titled “Usage”](#usage) ```ts import { useChat } from "@connectycube/use-chat"; const MyComponent = () => { const { connect, createChat, sendMessage, selectedDialog } = useChat(); const handleConnect = async () => { const chatCredentials = { userId: 22, password: "password", }; await connect(chatCredentials); }; const handleCreateChat = async () => { const userId = 456; const dialog = await createChat(userId); await selectDialog(dialog); }; const handleSendMessage = async () => { // send message to selected dialog sendMessage("Hi there"); }; return (
); }; export default MyComponent; ``` For more complex example please check [React chat code sample](https://github.com/ConnectyCube/connectycube-web-samples/tree/master/chat-react) ## API [Section titled “API”](#api) Check types for more API examples ## Have an issue? [Section titled “Have an issue?”](#have-an-issue) Join our [Discord](https://discord.com/invite/zqbBWNCCFJ) for quick answers to your questions ## Changelog [Section titled “Changelog”](#changelog)
# Whiteboard
> Enable dynamic collaboration in chat with ConnectyCube Whiteboard API. Ideal for remote meetings, teaching environments, sales demos, real-time workflows.
ConnectyCube **Whiteboard API** allows to create whiteboard functionality and associate it with a chat dialog. Chat dialog’s users can collaborate and draw simultaneously on a whiteboard. You can do freehand drawing with a number of tools, add shapes, lines, text and erase. To share boards, you just get an easy link which you can email. Your whiteboard stays safe in the cloud until you’re ready to return to it.  The most popular use cases for using the whiteboard: * Remote meetings * Remote teaching * Sales presentations * Workflows * Real-time collaboration ## Get started with SDK [Section titled “Get started with SDK”](#get-started-with-sdk) Follow the [Getting Started guide](/js/) on how to connect ConnectyCube SDK and start building your first app. ## Preparations [Section titled “Preparations”](#preparations) In order to start using whiteboard, an additional config has to be provided: ```javascript const CONFIG = { ... whiteboard: { server: 'https://whiteboard.connectycube.com' } } ConnectyCube.init(CREDS, CONFIG); ``` Then, ConnectyCube whiteboard is associated with a chat dialog. In order to create a whiteboard, you need to have a chat dialog. Refer to [chat dialog creation API](/js/messaging#create-new-dialog). ## Create whiteboard [Section titled “Create whiteboard”](#create-whiteboard) When create a whiteboard you need to pass a name (any) and a chat dialog id to which whiteboard will be connected. ```javascript const params = { name: 'New Whiteboard', chat_dialog_id: "5356c64ab35c12bd3b108a41" }; ConnectyCube.whiteboard.create(params) .then(whiteboard => { const wid = whiteboard._id; }) .catch(error => { }); ``` Once whiteboard is created - a user can display it in app in a WebView using the following url: `https://whiteboard.connectycube.com?whiteboardid=<_id>&username=&title=` For `username` - any value can be provided. This is to display a text hint near the drawing arrow. ## Retrieve whiteboards [Section titled “Retrieve whiteboards”](#retrieve-whiteboards) Use the following code snippet to retrieve a list of whiteboards associated with a chat dialog: ```javascript const params = {chat_dialog_id: "5456c64ab35c17bd3b108a76"}; ConnectyCube.whiteboard.get(params) .then(whiteboard => { }) .catch(error => { }); ``` ## Update whiteboard [Section titled “Update whiteboard”](#update-whiteboard) A whiteboard can be updated, e.g. its name: ```javascript const whiteboardId = "5456c64ab35c17bd3b108a76"; const params = { name: 'New Whiteboard', }; ConnectyCube.whiteboard.update(whiteboardId, params) .then(whiteboard => { }) .catch(error => { }); ``` ## Delete whiteboard [Section titled “Delete whiteboard”](#delete-whiteboard) ```javascript const whiteboardId = "5456c64ab35c17bd3b108a76"; ConnectyCube.whiteboard.delete(whiteboardId) .then(whiteboard => { }) .catch(error => { }); ```
# Send first chat message
> Step-by-step guide to sending your first chat message using ConnectyCube ReactNative Chat SDK - what exactly to do when you want to build a chat
The **ConnectyCube Chat API** is a set of tools that enables developers to integrate real-time messaging into their web and mobile applications. With this API, users can build powerful chat functionalities that support one-on-one messaging, group chats, typing indicators, message history, delivery receipts, and push notifications. If you’re planning to build a new app, we recommend starting with one of our [code samples apps](/reactnative/getting-started/code-samples) as a foundation for your client app.\ If you already have an app and you are looking to add a chat to it, proceed with this guide. This guide walks you through installing the ConnectyCube SDK in your app, configure it and then sending your first message to the opponent in 1-1 chat. ## Before you start [Section titled “Before you start”](#before-you-start) Before you start, make sure: 1. You have access to your ConnectyCube account. If you don’t have an account, [sign up here](https://admin.connectycube.com/register). 2. An app created in ConnectyCube dashboard. Once logged into [your ConnectyCube account](https://admin.connectycube.com), create a new application and make a note of the app credentials (app ID and auth key) that you’ll need for authentication. ## Step 1: Configure SDK [Section titled “Step 1: Configure SDK”](#step-1-configure-sdk) To use chat in a client app, you should install, import and configure ConnectyCube SDK. **Note:** If the app is already created during the onboarding process and you followed all the instructions, you can skip the ‘Configure SDK’ step and start with [Create and Authorise User](#step-2-create-and-authorise-user). ### Install SDK [Section titled “Install SDK”](#install-sdk) Install package from the command line: * npm ```bash npm install react-native-connectycube --save ``` * yarn ```bash yarn add react-native-connectycube ``` ### Import SDK [Section titled “Import SDK”](#import-sdk) Add the following import statement to start using all classes and methods. ```javascript import ConnectyCube from 'react-native-connectycube'; ``` ### Initialize SDK [Section titled “Initialize SDK”](#initialize-sdk) Initialize the SDK with your ConnectyCube application credentials. You can access your application credentials in [ConnectyCube Dashboard](https://admin.connectycube.com): * SDK v4 ```javascript const CREDENTIALS = { appId: 21, authKey: 'hhf87hfushuiwef', }; ConnectyCube.init(CREDENTIALS); ``` * SDK v3 ```javascript const CREDENTIALS = { appId: 21, authKey: 'hhf87hfushuiwef', authSecret: 'jjsdf898hfsdfk', }; ConnectyCube.init(CREDENTIALS); ``` ## Step 2: Create and Authorise User [Section titled “Step 2: Create and Authorise User”](#step-2-create-and-authorise-user) As a starting point, the user’s session token needs to be created allowing to send and receive messages in chat. ```javascript const userCredentials = { login: "cubeuser", password: "awesomepwd" }; // const userCredentials = { email: 'cubeuser@gmail.com', password: 'awesomepwd' }; // const userCredentials = { provider: 'facebook', keys: {token: 'a876as7db...asg34dasd8wqe'} }; ConnectyCube.createSession(userCredentials) .then((session) => {}) .catch((error) => {}); ``` **Note:** With the request above, **the user is created automatically on the fly upon session creation** using the login (or email) and password from the request parameters. **Important:** such approach with the automatic user creation works well for testing purposes and while the application isn’t launched on production. For better security it is recommended to deny the session creation without an existing user.\ For this, set ‘Session creation without an existing user entity’ to **Deny** under the **Application -> Overview -> Permissions** in the [admin panel](https://admin.connectycube.com/apps). ## Step 3: Connect User to chat [Section titled “Step 3: Connect User to chat”](#step-3-connect-user-to-chat) Connecting to the chat is an essential step in enabling real-time communication. By establishing a connection, the user is authenticated on the chat server, allowing them to send and receive messages instantly. Without this connection, the app won’t be able to interact with other users in the chat. ```javascript const userCredentials = { userId: 4448514, password: "supersecurepwd", }; ConnectyCube.chat .connect(userCredentials) .then(() => { // connected }) .catch((error) => {}); ``` ## Step 4: Create 1-1 chat [Section titled “Step 4: Create 1-1 chat”](#step-4-create-1-1-chat) Creating a 1-1 chat gives a unique conversation ID to correctly route and organize your message to the intended user. You need to pass `type: 3` (1-1 chat) and an **ID** of an opponent you want to create a chat with: ```javascript const params = { type: 3, occupants_ids: [56], }; ConnectyCube.chat.dialog .create(params) .then((dialog) => {}) .catch((error) => {}); ``` ## Step 5: Send / Receive chat messages [Section titled “Step 5: Send / Receive chat messages”](#step-5-send--receive-chat-messages) Once the 1-1 chat is set up, you can use it to exchange messages seamlessly. This code example demonstrates how to send and receive messages in the created 1-1 chat: ```javascript const dialog = ...; const opponentId = 56; const message = { type: dialog.type === 3 ? 'chat' : 'groupchat', body: "How are you today?", extension: { save_to_history: 1, dialog_id: dialog._id } }; message.id = ConnectyCube.chat.send(opponentId, message); // ... ConnectyCube.chat.onMessageListener = onMessage; function onMessage(userId, message) { console.log('[ConnectyCube.chat.onMessageListener] callback:', userId, message) } ``` That’s it! You’ve mastered the basics of sending a chat message in ConnectyCube. #### What’s next? [Section titled “What’s next?”](#whats-next) To take your chat experience to the next level, explore ConnectyCube advanced functionalities, like adding typing indicators, using emojis, sending attachments, and more. Follow the [Chat API documentation](/reactnative/messaging/) to enrich your app and engage your users even further!
# Make first call
> A guide with the essential steps of how to make the first call via ConnectyCube ReactNative Video SDK - from session creation to initialising and accepting the call
**ConnectyCube’s Video Calling Peer-to-Peer (P2P) API** provides a solution for integrating real-time video and audio calling into your application. This API enables you to create smooth one-on-one and group video calls, supporting a wide range of use cases like virtual meetings, telemedicine consultations, social interactions, and more. The P2P approach ensures that media streams are transferred directly between users whenever possible, minimizing latency and delivering high-quality audio and video. If you’re planning to build a new app, we recommend starting with one of our [code samples apps](/reactnative/getting-started/code-samples) as a foundation for your client app.\ If you already have an app and you are looking to add chat and voice/video calls to it, proceed with this guide. This guide walks you through installing the ConnectyCube SDK in your app, configure it and then initiating the call to the opponent. ## Before you start [Section titled “Before you start”](#before-you-start) Before you start, make sure: 1. You have access to ConnectyCube account. If you don’t have an account, [sign up here](https://admin.connectycube.com/register). 2. An app created in ConnectyCube dashboard. Once logged into [your ConnectyCube account](https://admin.connectycube.com/signin), create a new application and make a note of the app credentials (app ID and auth key) that you’ll need for authentication. ## Step 1: Configure SDK [Section titled “Step 1: Configure SDK”](#step-1-configure-sdk) To use voice and video calls in a client app, you should install, import and configure ConnectyCube SDK. **Note:** If the app is already created during the onboarding process and you followed all the instructions, you can skip the ‘Configure SDK’ step and start with [Connect React Native WerRTC lib](#step-2-сonnect-react-native-webrtc-lib). ### Install SDK [Section titled “Install SDK”](#install-sdk) Install package from the command line: * npm ```bash npm install react-native-connectycube --save ``` * yarn ```bash yarn add react-native-connectycube ``` ### Import SDK [Section titled “Import SDK”](#import-sdk) Add the following import statement to start using all classes and methods. ```javascript import ConnectyCube from 'react-native-connectycube'; ``` ### Initialize SDK [Section titled “Initialize SDK”](#initialize-sdk) Initialize the SDK with your ConnectyCube application credentials. You can access your application credentials in [ConnectyCube Dashboard](https://admin.connectycube.com): * SDK v4 ```javascript const CREDENTIALS = { appId: 21, authKey: 'hhf87hfushuiwef', }; ConnectyCube.init(CREDENTIALS); ``` * SDK v3 ```javascript const CREDENTIALS = { appId: 21, authKey: 'hhf87hfushuiwef', authSecret: 'jjsdf898hfsdfk', }; ConnectyCube.init(CREDENTIALS); ``` ## Step 2: Сonnect React Native WebRTC lib [Section titled “Step 2: Сonnect React Native WebRTC lib”](#step-2-сonnect-react-native-webrtc-lib) Since **react-native-connectycube** version 3.34.0, the **react-native-webrtc** has been replaced from dependencies to peerDependencies to support autolinking. Install the **react-native-webrtc** and follow the [Getting started](https://github.com/react-native-webrtc/react-native-webrtc?tab=readme-ov-file#getting-started). Configure your [iOS](https://github.com/react-native-webrtc/react-native-webrtc/blob/master/Documentation/iOSInstallation.md) and [Android](https://github.com/react-native-webrtc/react-native-webrtc/blob/master/Documentation/AndroidInstallation.md) projects. ## Step 3: Create and Authorise User [Section titled “Step 3: Create and Authorise User”](#step-3-create-and-authorise-user) As a starting point, the user’s session token needs to be created allowing to participate in calls. ```javascript const userCredentials = { login: "cubeuser", password: "awesomepwd" }; // const userCredentials = { email: 'cubeuser@gmail.com', password: 'awesomepwd' }; // const userCredentials = { provider: 'facebook', keys: {token: 'a876as7db...asg34dasd8wqe'} }; ConnectyCube.createSession(userCredentials) .then((session) => {}) .catch((error) => {}); ``` **Note:** With the request above, **the user is created automatically on the fly upon session creation** using the login (or email) and password from the request parameters. **Important:** such approach with the automatic user creation works well for testing purposes and while the application isn’t launched on production. For better security it is recommended to deny the session creation without an existing user.\ For this, set ‘Session creation without an existing user entity’ to **Deny** under the **Application -> Overview -> Permissions** in the [admin panel](https://admin.connectycube.com/apps). ## Step 4: Connect User to chat [Section titled “Step 4: Connect User to chat”](#step-4-connect-user-to-chat) Connecting to the chat is an essential step in enabling real-time communication. **ConnectyCube Chat API** is used as a signaling transport for Video Calling API, so to start using Video Calling API you need to connect user to Chat: ```javascript const userCredentials = { userId: 4448514, password: "supersecurepwd", }; ConnectyCube.chat .connect(userCredentials) .then(() => { // connected }) .catch((error) => {}); ``` ## Step 5: Create video session [Section titled “Step 5: Create video session”](#step-5-create-video-session) Also, to use Video Calling API you need to create a call session object - choose your opponent(s) you will have a call with and a type of session (VIDEO or AUDIO): ```javascript const calleesIds = [56, 76, 34]; // User's ids const sessionType = ConnectyCube.videochat.CallType.VIDEO; // AUDIO is also possible const additionalOptions = {}; const session = ConnectyCube.videochat.createNewSession(calleesIds, sessionType, additionalOptions); ``` ## Step 6: Access local media stream [Section titled “Step 6: Access local media stream”](#step-6-access-local-media-stream) In order to have a video chat session you need to get an access to the user’s devices (webcam / microphone): ```javascript const mediaParams = { audio: true, video: true }; session .getUserMedia(mediaParams) .then((localStream) => { // pass a local or remote stream to the RTCView component // // }) .catch((error) => {}); ``` ## Step 7: Initiate a call [Section titled “Step 7: Initiate a call”](#step-7-initiate-a-call) The *initiate call* function is essential for starting a video call session between users, enabling real-time communication by establishing the initial connection: ```javascript const extension = {}; session.call(extension); ``` The extension is used to pass any extra parameters in the request to your opponents. After this, your opponents will receive a callback call: ```javascript ConnectyCube.videochat.onCallListener = function (session, extension) {}; ``` Or if your opponents are offline or did not answer the call request: ```javascript ConnectyCube.videochat.onUserNotAnswerListener = function (session, userId) {}; ``` ## Step 8: Accept call [Section titled “Step 8: Accept call”](#step-8-accept-call) To accept a call the following code snippet is used: ```javascript ConnectyCube.videochat.onCallListener = function (session, extension) { // Here we need to show a dialog with 2 buttons - Accept & Reject. // By accepting -> run the following code: // // 1. await session.getUserMedia (...) // // 2. Accept call request: const extension = {}; session.accept(extension); }; ``` After this, you will get a confirmation in the following callback: ```javascript ConnectyCube.videochat.onAcceptCallListener = function (session, userId, extension) {}; ``` Also, both the caller and opponents will get a special callback with the remote stream: ```javascript ConnectyCube.videochat.onRemoteStreamListener = function (session, userID, remoteStream) { // attach the remote stream to a video element // import {RTCView} from 'react-native-connectycube'; // // }; ``` Great work! You’ve completed the essentials of making a call in ConnectyCube. From this point, you and your opponents should start seeing each other. #### What’s next? [Section titled “What’s next?”](#whats-next) To enhance your calling feature with advanced functionalities, such as call recording, screen sharing, or integrating emojis and attachments during calls, follow the API guides below. These additions will help create a more dynamic and engaging experience for your users! * [Voice/video calling SDK documentation](/reactnative/videocalling) * [Conference calling SDK documentation](/reactnative/videocalling-conference/)
# Chat
> Integrate powerful chat functionality into your ReactNative app effortlessly with our versatile Chat APIs. Enhance user communication and engagement.
ConnectyCube Chat API is built on top of Real-time(XMPP) protocol. In order to use it you need to setup real-time connection with ConnectyCube Chat server and use it to exchange data. By default Real-time Chat works over secure TLS connection. ## Connect to chat [Section titled “Connect to chat”](#connect-to-chat) ```javascript const userCredentials = { userId: 4448514, password: "awesomepwd", }; ConnectyCube.chat .connect(userCredentials) .then(() => { // connected }) .catch((error) => {}); ``` ### Connect to chat using custom authentication providers [Section titled “Connect to chat using custom authentication providers”](#connect-to-chat-using-custom-authentication-providers) In some cases we don’t have a user’s password, for example when login via: * Facebook * Twitter * Firebase phone authorization * Custom identity authentication * etc. In such cases ConnectyCube API provides possibility to use ConnectyCube session token as a password for chat connection: ```java // get current ConnectyCube session token and set as user's password const token = ConnectyCube.service.sdkInstance.session.token; const userCredentials = { userId: 4448514, password: token }; ``` ## Connection status [Section titled “Connection status”](#connection-status) The following snippet can be used to determine whether a user is connected to chat or not: ```javascript const isConnected = ConnectyCube.chat.isConnected; ``` ## Disconnect [Section titled “Disconnect”](#disconnect) ```javascript ConnectyCube.chat.disconnect(); ConnectyCube.chat.onDisconnectedListener = onDisconnectedListener; function onDisconnectedListener() {} ``` ## Reconnection [Section titled “Reconnection”](#reconnection) The SDK reconnects automatically when connection to Chat server is lost. The following 2 callbacks are used to track the state of connection: ```javascript ConnectyCube.chat.onDisconnectedListener = onDisconnectedListener; ConnectyCube.chat.onReconnectListener = onReconnectListener; function onDisconnectedListener() {} function onReconnectListener() {} ``` ## Dialogs [Section titled “Dialogs”](#dialogs) All chats between users are organized in dialogs. The are 4 types of dialogs: * 1-1 chat - a dialog between 2 users. * group chat - a dialog between specified list of users. * public group chat - an open dialog. Any user from your app can chat there. * broadcast - chat where a message is sent to all users within application at once. All the users from the application are able to join this group. Broadcast dialogs can be created only via Admin panel. You need to create a new dialog and then use it to chat with other users. You also can obtain a list of your existing dialogs. ## Create new dialog [Section titled “Create new dialog”](#create-new-dialog) ### Create 1-1 chat [Section titled “Create 1-1 chat”](#create-1-1-chat) You need to pass `type: 3` (1-1 chat) and an id of an opponent you want to create a chat with: ```javascript const params = { type: 3, occupants_ids: [56], }; ConnectyCube.chat.dialog .create(params) .then((dialog) => {}) .catch((error) => {}); ``` ### Create group chat [Section titled “Create group chat”](#create-group-chat) You need to pass `type: 2` and ids of opponents you want to create a chat with: ```javascript const params = { type: 2, name: "Friday party", occupants_ids: [29085, 29086, 29087], description: "lets dance the night away", photo: "party.jpg", }; ConnectyCube.chat.dialog .create(params) .then((dialog) => {}) .catch((error) => {}); ``` ### Create public group chat [Section titled “Create public group chat”](#create-public-group-chat) It’s possible to create a public group chat, so any user from you application can join it. There is no a list with occupants, this chat is just open for everybody. You need to pass `type: 4` and ids of opponents you want to create a chat with: ```javascript const params = { type: 4, name: "Blockchain trends", }; ConnectyCube.chat.dialog .create(params) .then((dialog) => {}) .catch((error) => {}); ``` Response example from `ConnectyCube.chat.dialog.create(params)` - [see](/server/chat#response-1) ### Chat metadata [Section titled “Chat metadata”](#chat-metadata) A dialog can have up to 3 custom sub-fields to store additional information that can be linked to chat. To start using extensions, allowed fields should be added first. Go to [Admin panel](https://admin.connectycube.com) > Chat > Custom Fields and provide allowed custom fields.  When create a dialog, the `extensions` field object must contain allowed fields only. Others fields will be ignored. The values will be casted to string. ```javascript const params = { type: 2, name: "Friday party", occupants_ids: [29085, 29086, 29087], description: "lets dance the night away", extensions: {location: "Sun bar"}, }; ConnectyCube.chat.dialog .create(params) .then((dialog) => {}) .catch((error) => {}); ``` When remove custom field in Admin panel, this field will be removed in all dialogs respectively. These parameters also can be used as a filter for retrieving dialogs. ### Chat permissions [Section titled “Chat permissions”](#chat-permissions) Chat could have different permissions to managa data access. This is managed via `permissions` field. At the moment, only one permission available - `allow_preview` - which allows to retrieve dialog’s messages for user who is not a member of dialog. This is useful when implement feature like Channels where a user can open chat and preview messages w/o joining it. ## List dialogs [Section titled “List dialogs”](#list-dialogs) It’s common to request all your dialogs on every app login: ```javascript const filters = {}; ConnectyCube.chat.dialog .list(filters) .then((result) => {}) .catch((error) => {}); ``` Response example from `ConnectyCube.chat.dialog.list(filters)` - [see](/server/chat#response) More filters available [here](/server/chat#retrieve-chat-dialogs) If you want to retrieve only dialogs updated after some specific date time, you can use `updated_at[gt]` filter. This is useful if you cache dialogs somehow and do not want to obtain the whole list of your dialogs on every app start. ## Update dialog [Section titled “Update dialog”](#update-dialog) User can update group chat name, photo or add/remove occupants: ```javascript const dialogId = "5356c64ab35c12bd3b108a41"; const toUpdateParams = { name: "Crossfit2" }; ConnectyCube.chat.dialog .update(dialogId, toUpdateParams) .then((dialog) => {}) .catch((error) => {}); ``` ## Add/Remove occupants [Section titled “Add/Remove occupants”](#addremove-occupants) To add more occupants use `push_all` operator. To remove yourself from the dialog use `pull_all` operator: ```javascript const dialogId = "5356c64ab35c12bd3b108a41"; const toUpdateParams = { push_all: { occupants_ids: [97, 789] } }; ConnectyCube.chat.dialog .update(dialogId, toUpdateParams) .then((dialog) => {}) .catch((error) => {}); ``` Response example from `ConnectyCube.chat.dialog.update(dialogId, toUpdateParams)` - [see](/server/chat#response-2) > **Note** > > Only group chat owner can remove other users from group chat. ## Remove dialog [Section titled “Remove dialog”](#remove-dialog) The following snippet is used to delete a dialog: ```javascript const dialogId = "5356c64ab35c12bd3b108a41"; // const dialogIds = ['5356c64ab35c12bd3b108a41', ..., '5356c64ab35c12bd3b108a84'] ConnectyCube.chat.dialog.delete(dialogId).catch((error) => {}); ``` This request will remove this dialog for current user, but other users still will be able to chat there. Only group chat owner can remove the group dialog for all users. You can also delete multiple dialogs in a single request. ## Clear dialog history [Section titled “Clear dialog history”](#clear-dialog-history) The following snippet is used to clear dialog history by ID: ```javascript const dialogId = "5356c64ab35c12bd3b108a41"; ConnectyCube.chat.dialog.clearHistory(dialogId).catch((error) => {}); ``` This request will clear all messages in the dialog for current user, but not for other users. ## Subscribe to dialog [Section titled “Subscribe to dialog”](#subscribe-to-dialog) In order to be able to chat in public dialog, you need to subscribe to it: ```javascript const dialogId = "5356c64ab35c12bd3b108a41"; ConnectyCube.chat.dialog .subscribe(dialogId) .then((dialog) => {}) .catch((error) => {}); ``` It’s also possible to subscribe to group chat dialog. Response example from `ConnectyCube.chat.dialog.subscribe(dialogId)` - [see](/server/chat#response-5) ## Unsubscribe from dialog [Section titled “Unsubscribe from dialog”](#unsubscribe-from-dialog) ```javascript const dialogId = "5356c64ab35c12bd3b108a41"; ConnectyCube.chat.dialog.unsubscribe(dialogId).catch((error) => {}); ``` ## Retrieve public dialog occupants [Section titled “Retrieve public dialog occupants”](#retrieve-public-dialog-occupants) A public chat dialog can have many occupants. There is a separated API to retrieve a list of public dialog occupants: ```javascript const dialogId = "5356c64ab35c12bd3b108a41"; ConnectyCube.chat.dialog .getPublicOccupants(dialogId) .then((result) => { // result.items }) .catch((error) => {}); ``` Response example from `ConnectyCube.chat.dialog.getPublicOccupants(dialogId)`: ```json { "items": [ { "id": 51941, "full_name": "Dacia Kail", "email": "dacia_k@domain.com", "login": "Dacia", "phone": "+6110797757", "website": null, "created_at": "2018-12-06T09:16:26Z", "updated_at": "2018-12-06T09:16:26Z", "last_request_at": null, "external_user_id": 52691165, "facebook_id": "91234409", "twitter_id": "83510562734", "blob_id": null, "custom_data": null, "avatar": null, "user_tags": null }, { "id": 51946, "full_name": "Gabrielle Corcoran", "email": "gabrielle.corcoran@domain.com", "login": "gabby", "phone": "+6192622155", "website": "http://gabby.com", "created_at": "2018-12-06T09:29:57Z", "updated_at": "2018-12-06T09:29:57Z", "last_request_at": null, "external_user_id": null, "facebook_id": "95610574", "twitter_id": null, "blob_id": null, "custom_data": "Responsible for signing documents", "avatar": null, "user_tags": "vip,accountant" } ... ] } ``` ## Add / Remove admins [Section titled “Add / Remove admins”](#add--remove-admins) Options to add or remove admins from the dialog can be done by Super admin (dialog’s creator) only. Options are supported in group chat, public or broadcast. Up to 5 admins can be added to chat. ```javascript const dialogId = "5356c64ab35c12bd3b108a41"; const adminsUsersIds = [45, 89]; ConnectyCube.chat.dialog .addAdmins(dialogId, adminsUsersIds) .then((dialog) => {}) .catch((error) => {}); ``` ```javascript const dialogId = "5356c64ab35c12bd3b108a41"; const adminsUsersIds = [45, 89]; ConnectyCube.chat.dialog .removeAdmins(dialogId, adminsUsersIds) .then((dialog) => {}) .catch((error) => {}); ``` Response example from `ConnectyCube.chat.dialog.addAdmins(dialogId, adminsUsersIds)`/`ConnectyCube.chat.dialog.removeAdmins(dialogId, adminsUsersIds)` - [see](/server/chat#response-7) ## Update notifications settings [Section titled “Update notifications settings”](#update-notifications-settings) A user can turn on/off push notifications for offline messages in a dialog. By default push notification are turned ON, so offline user receives push notifications for new messages in a chat. ```javascript const dialogId = "5356c64ab35c12bd3b108a41"; const enabled = false; ConnectyCube.chat.dialog .updateNotificationsSettings(dialogId, enabled) .then((result) => {}) .catch((error) => {}); ``` Response example from `ConnectyCube.chat.dialog.updateNotificationsSettings(dialogId, enabled)` - [see](/server/chat#response-8) ## Get notifications settings [Section titled “Get notifications settings”](#get-notifications-settings) Check a status of notifications setting - either it is ON or OFF for a particular chat. Available responses: 1 - enabled, 0 - disabled. ```javascript const dialogId = "5356c64ab35c12bd3b108a41"; ConnectyCube.chat.dialog .getNotificationsSettings(dialogId) .then((result) => {}) .catch((error) => {}); ``` Response example from `ConnectyCube.chat.dialog.getNotificationsSettings(dialogId)` - [see](/server/chat#response-9) ## Chat history [Section titled “Chat history”](#chat-history) Every chat dialog stores its chat history which you can retrieve: ```javascript const dialogId = "5356c64ab35c12bd3b108a41"; const params = { chat_dialog_id: dialogId, sort_desc: "date_sent", limit: 100, skip: 0, }; ConnectyCube.chat.message .list(params) .then((messages) => {}) .catch((error) => {}); ``` Response example from `ConnectyCube.chat.message.list(params)` - [see](/server/chat#response-10) If you want to retrieve chat messages that were sent after or before specific date time only, you can use `date_sent[gt]` or `date_sent[lt]` filter. This is useful if you implement pagination for loading messages in your app. ## Send/Receive chat messages [Section titled “Send/Receive chat messages”](#sendreceive-chat-messages) ### 1-1 chat [Section titled “1-1 chat”](#1-1-chat) ```javascript const dialog = ...; const opponentId = 78; const message = { type: dialog.type === 3 ? 'chat' : 'groupchat', body: "How are you today?", extension: { save_to_history: 1, dialog_id: dialog._id } }; message.id = ConnectyCube.chat.send(opponentId, message); // ... ConnectyCube.chat.onMessageListener = onMessage; function onMessage(userId, message) { console.log('[ConnectyCube.chat.onMessageListener] callback:', userId, message) } ``` ### Group chat [Section titled “Group chat”](#group-chat) > The group chat join is not a required step anymore. You can send/receive chat messages in a group chat w/o joining it. Before you start chatting in a group dialog, you need to join it by calling `join` function: ```javascript const dialog = ...; ConnectyCube.chat.muc.join(dialog._id).catch(error => {}); ``` Then you are able to send/receive messages: ```javascript const message = { type: dialog.type === 3 ? "chat" : "groupchat", body: "How are you today?", extension: { save_to_history: 1, dialog_id: dialog._id, } }; message.id = ConnectyCube.chat.send(dialog._id, message); // ... ConnectyCube.chat.onMessageListener = onMessage; function onMessage(userId, message) { console.log("[ConnectyCube.chat.onMessageListener] callback:", userId, message); } ``` When it’s done you can leave the group dialog by calling `leave` function: ```javascript ConnectyCube.chat.muc.leave(dialog._id).catch((error) => {}); ``` ## Message metadata [Section titled “Message metadata”](#message-metadata) A chat message can have custom sub-fields to store additional information that can be linked to the particular chat message. When create a message, the custom data can be attached via `extension` field: ```javascript const message = { ... extension: { field_one: "value_one", field_two: "value_two" } }; ``` ## ‘Sent’ status [Section titled “‘Sent’ status”](#sent-status) There is a ‘sent’ status to ensure that message is delivered to the server. In order to use the feature you need to enable it when you pass config in `ConnectyCube.init`: ```javascript chat: { streamManagement: { enable: true; } } ``` The following callback is used to track it: ```javascript ConnectyCube.chat.onSentMessageCallback = function (messageLost, messageSent) {}; ``` ## ‘Delivered’ status [Section titled “‘Delivered’ status”](#delivered-status) The following callback is used to track the ‘delivered’ status: ```javascript ConnectyCube.chat.onDeliveredStatusListener = function (messageId, dialogId, userId) { console.log("[ConnectyCube.chat.onDeliveredStatusListener] callback:", messageId, dialogId, userId); }; ``` The SDK sends the ‘delivered’ status automatically when the message is received by the recipient. This is controlled by `markable: 1` parameter when you send a message. If `markable` is `0` or omitted, then you can send the delivered status manually: ```javascript const params = { messageId: "557f1f22bcf86cd784439022", userId: 21, dialogId: "5356c64ab35c12bd3b108a41", }; ConnectyCube.chat.sendDeliveredStatus(params); ``` ## ‘Read’ status [Section titled “‘Read’ status”](#read-status) Send the ‘read’ status: ```javascript const params = { messageId: "557f1f22bcf86cd784439022", userId: 21, dialogId: "5356c64ab35c12bd3b108a41", }; ConnectyCube.chat.sendReadStatus(params); // ... ConnectyCube.chat.onReadStatusListener = function (messageId, dialogId, userId) { console.log("[ConnectyCube.chat.onReadStatusListener] callback:", messageId, dialogId, userId); }; ``` ## ‘Is typing’ status [Section titled “‘Is typing’ status”](#is-typing-status) The following ‘typing’ notifications are supported: * typing: The user is composing a message. The user is actively interacting with a message input interface specific to this chat session (e.g., by typing in the input area of a chat window) * stopped: The user had been composing but now has stopped. The user has been composing but has not interacted with the message input interface for a short period of time (e.g., 30 seconds) Send the ‘is typing’ status: ```javascript const opponentId = 78; // for 1-1 chats // const dialogJid = ..; // for group chat ConnectyCube.chat.sendIsTypingStatus(opponentId); ConnectyCube.chat.sendIsStopTypingStatus(opponentId); // ... ConnectyCube.chat.onMessageTypingListener = function (isTyping, userId, dialogId) { console.log("[ConnectyCube.chat.onMessageTypingListener] callback:", isTyping, userId, dialogId); }; ``` ## Attachments (photo / video) [Section titled “Attachments (photo / video)”](#attachments-photo--video) Chat attachments are supported with the cloud storage API. In order to send a chat attachment you need to upload the file to ConnectyCube cloud storage and obtain a link to the file (file UID). Then you need to include this UID into chat message and send it. ```javascript // for example, a file from HTML form input field const inputFile = $("input[type=file]")[0].files[0]; const fileParams = { name: inputFile.name, file: inputFile, type: inputFile.type, size: inputFile.size, public: false, }; const prepareMessageWithAttachmentAndSend = (file) => { const message = { type: dialog.type === 3 ? "chat" : "groupchat", body: "attachment", extension: { save_to_history: 1, dialog_id: dialog._id, attachments: [{ uid: file.uid, id: file.id, type: "photo" }], }, }; // send the message message.id = ConnectyCube.chat.send(dialog._id, message); }; ConnectyCube.storage .createAndUpload(fileParams) .then(prepareMessageWithAttachmentAndSend) .catch((error) => {}); ``` Response example from `ConnectyCube.storage.createAndUpload(fileParams)`: ```json { "account_id": 7, "app_id": 12, "blob_object_access": { "blob_id": 421517, "expires": "2020-10-06T15:51:38Z", "id": 421517, "object_access_type": "Write", "params": "https://s3.amazonaws.com/cb-shared-s3?Content-Type=text%2Fplain..." }, "blob_status": null, "content_type": "text/plain", "created_at": "2020-10-06T14:51:38Z", "id": 421517, "name": "awesome.txt", "public": false, "set_completed_at": null, "size": 11, "uid": "7cafb6030d3e4348ba49cab24c0cf10800", "updated_at": "2020-10-06T14:51:38Z" } ``` If you are running **Node.js** environment, the following code snippet can be used to access a file: ```javascript const fs = require("fs"); const imagePath = __dirname + "/dog.jpg"; let fileParams; fs.stat(imagePath, (error, stats) => { fs.readFile(srcIMG, (error, data) => { if (error) { throw error; } else { fileParams = { file: data, name: "image.jpg", type: "image/jpeg", size: stats.size, }; // upload // ... } }); }); ``` The same flow is supported on the receiver’s side. When you receive a message, you need to get the file UID and then download the file from the cloud storage. ```javascript ConnectyCube.chat.onMessageListener = (userId, message) => { if (message.extension.hasOwnProperty("attachments")) { if (message.extension.attachments.length > 0) { const fileUID = message.extension.attachments[0].uid; const fileUrl = ConnectyCube.storage.privateUrl(fileUID); const imageHTML = ""; // insert the imageHTML as HTML template } } }; ``` In a case you want remove a shared attachment from server: ```javascript ConnectyCube.storage .delete(file.id) .then(() => {}) .catch((error) => {}); ``` ## Attachments (location) [Section titled “Attachments (location)”](#attachments-location) Sharing location attachments is nothing but sending 2 numbers: **latitude** and **longitude**. These values can be accessed using any JS library available in npm registry. ```javascript const latitude = "64.7964274"; const longitude = "-23.7391878"; const message = { type: dialog.type === 3 ? "chat" : "groupchat", body: "attachment", extension: { save_to_history: 1, dialog_id: dialog._id, attachments: [{ latitude, longitude, type: "place" }], }, }; // send the message message.id = ConnectyCube.chat.send(dialog._id, message); ``` On the receiver’s side the location attachment can be accessed the following way: ```javascript ConnectyCube.chat.onMessageListener = (userId, message) => { if (message.extension.hasOwnProperty("attachments")) { if (message.extension.attachments.length > 0) { const attachment = message.extension.attachments[0]; const latitude = attachment.latitude; const longitude = attachment.longitude; // and now display the map // ... } } }; ``` ## Edit message [Section titled “Edit message”](#edit-message) Use the following code snippet to edit a message (correct message body). Other user(s) will receive the ‘edit’ message info via callback: ```javascript ConnectyCube.chat.editMessage({ to: 123, // either a user id if this is 1-1 chat or a chat dialog id dialogId: "52e6a9c8a18f3a3ea6001f18", body: "corrected message body", originMessageId: "58e6a9c8a1834a3ea6001f15", // origin message id to edit last: false // pass 'true' if edit last (the newest) message in history }) ... ConnectyCube.chat.onMessageUpdateListener = (messageId, isLast, updatedBody, dialogId, userId) => { } ``` Also, you can update a message via HTTP API: ```javascript // const messageIds = ""; // to update all const messageIds = ["55fd42369575c12c2e234c64", "55fd42369575c12c2e234c68"].join(","); // or one - "55fd42369575c12c2e234c64" const params = { read: 1, // mark message as read delivered: 1, // mark message as delivered message: "corrected message body", // update message body chat_dialog_id: "5356c64ab35c12bd3b108a41", }; ConnectyCube.chat.message .update(messageIds, params) .then(() => {}) .catch((error) => {}); ``` ## Message reactions [Section titled “Message reactions”](#message-reactions) ### Add/Remove reactions [Section titled “Add/Remove reactions”](#addremove-reactions) User can add/remove message reactions and listen message reaction events Add ```javascript const messageId = '58e6a9c8a1834a3ea6001f15' const reaction = '🔥' ConnectyCube.chat.message.addReaction(messageId, reaction) .then(() => {}) .catch(err => {}) ``` Remove ```javascript const messageId = '58e6a9c8a1834a3ea6001f15' const reaction = '👎' ConnectyCube.chat.message.removeReaction(messageId, reaction) .then(() => {}) .catch(err => {}) ``` Add/Remove ```javascript const messageId = '58e6a9c8a1834a3ea6001f15' const reactionToAdd = '👎' const reactionToRemove = '🚀' ConnectyCube.chat.message.updateReaction(messageId, reactionToAdd, reactionToRemove) .then(() => {}) .catch(err => {}) ``` ### Listen reactions [Section titled “Listen reactions”](#listen-reactions) ```javascript ConnectyCube.chat.onMessageReactionsListener = (messageId, userId, dialogId, addReaction, removeReaction) => { } ``` ### List message reactions [Section titled “List message reactions”](#list-message-reactions) User can list message reactions ```javascript const messageId = '58e6a9c8a1834a3ea6001f15' ConnectyCube.chat.message.listReactions(messageId) .then(reactions => reactions) .catch(err => {}) ``` Response example from `ConnectyCube.chat.message.listReactions(messageId)` - [see](/server/chat#response-19) ## Delete messages [Section titled “Delete messages”](#delete-messages) Use the following code snippet to delete a message. Other user(s) will receive the ‘delete’ message info via callback: ```javascript ConnectyCube.chat.deleteMessage({ to: 123, // either a user id if this is 1-1 chat or a chat dialog id dialogId: "52e6a9c8a18f3a3ea6001f18", messageId: "58e6a9c8a1834a3ea6001f15" // message id to delete }) ... ConnectyCube.chat.onMessageDeleteListener = (messageId, dialogId, userId) => { } ``` If you want to delete a message for yourself only, use the following API: ```javascript const messageIds = ["55fd42369575c12c2e234c64", "55fd42369575c12c2e234c68"].join(","); const params = {}; ConnectyCube.chat.message .delete(messageIds, params) .then((result) => {}) .catch((error) => {}); ``` Response example from `ConnectyCube.chat.message.delete(messageIds)` - [see](/server/chat#response-14) This request will remove the messages from current user history only, without affecting the history of other users. ## Unread messages count [Section titled “Unread messages count”](#unread-messages-count) You can request total unread messages count and unread count for particular dialog: ```javascript const params = { dialogs_ids: ["5356c64ab35c12bd3b108a41"] }; ConnectyCube.chat.message .unreadCount(params) .then((result) => {}) .catch((error) => {}); ``` Response example from `ConnectyCube.chat.message.unreadCount(params)` - [see](/server/chat#response-11) ## Mark as read all chat messages [Section titled “Mark as read all chat messages”](#mark-as-read-all-chat-messages) The following snippet is used to mark all messages as read on a backend for dialog ID: ```javascript const messageIds = ""; // use "" to update all const params = { read: 1, chat_dialog_id: "5356c64ab35c12bd3b108a41", }; ConnectyCube.chat.message .update("", params) .then(() => {}) .catch((error) => {}); ``` ## Search [Section titled “Search”](#search) The following API is used to search for messages and chat dialogs: ```javascript const params = { /* ... */ }; ConnectyCube.chat .search(params) .then((result) => {}) .catch((error) => {}); ``` Response example from `ConnectyCube.chat.search(params)` - [see](/server/chat#response-15) Please refer to [Global search parameters](/server/chat#global-search) for more info on how to form search params. ## Chat alerts [Section titled “Chat alerts”](#chat-alerts) When you send a chat message and the recipient/recipients is offline, then automatic push notification will be fired. In order to receive push notifications you need to subscribe for it. Please refer to [Push Notifications](/reactnative/push-notifications) guide. To configure push template which users receive - go to [Dashboard Console, Chat Alerts page](https://admin.connectycube.com/) Also, here is a way to avoid automatically sending push notifications to offline recipient/recipients. For it add the `silent` parameter with value `1` to the `extension` of the message. ```javascript const message = { ... extension: { ... silent: 1, }, }; ``` After sending such a message, the server won’t create the push notification for offline recipient/recipients. > **Note** > > Currently push notifications are supported on mobile environment only. ## Mark a client as Active/Inactive [Section titled “Mark a client as Active/Inactive”](#mark-a-client-as-activeinactive) When you send a chat message and the recipient/recipients is offline, then automatic push notification will be fired. Sometimes a client app can be in a background mode, but still online. In this case it’s useful to let server know that a user wants to receive push noificattions while still is connected to chat. For this particular case we have 2 handy methods: ‘markInactive’ and ‘markActive’: ```javascript ConnectyCube.chat.markInactive(); ``` ```javascript ConnectyCube.chat.markActive(); ``` The common use case for these APIs is to call ‘markInactive’ when an app goes to background mode and to call ‘markActive’ when an app goes to foreground mode. ## Get last activity [Section titled “Get last activity”](#get-last-activity) There is a way to get an info when a user was active last time, in seconds. This is a modern approach for messengers apps, e.g. to display this info on a Contacts screen or on a User Profile screen. ```javascript const userId = 123234; ConnectyCube.chat .getLastUserActivity(userId) .then((result) => { const userId = result.userId; const seconds = result.seconds; // 'userId' was 'seconds' ago }) .catch((error) => {}); ``` ## Last activity subscription [Section titled “Last activity subscription”](#last-activity-subscription) Listen to user last activity status via subscription. ```javascript ConnectyCube.chat.subscribeToUserLastActivityStatus(userId); ConnectyCube.chat.unsubscribeFromUserLastActivityStatus(userId); ConnectyCube.chat.onLastUserActivityListener = (userId, seconds) => {}; ``` ## System messages [Section titled “System messages”](#system-messages) In a case you want to send a non text message data, e.g. some meta data about chat, some events or so - there is a system notifications API to do so: ```javascript const userId = 123234; const msg = { body: "dialog/UPDATE_DIALOG", extension: { photo_uid: "7cafb6030d3e4348ba49cab24c0cf10800", name: "Our photos", }, }; ConnectyCube.chat.sendSystemMessage(userId, msg); ConnectyCube.chat.onSystemMessageListener = function (msg) {}; ``` ## Moderation [Section titled “Moderation”](#moderation) The moderation capabilities help maintain a safe and respectful chat environment. We have options that allow users to report inappropriate content and manage their personal block lists, giving them more control over their experience. ### Report user [Section titled “Report user”](#report-user) For user reporting to work, it requires the following: 1. Go to [ConnectyCube Daashboard](https://admin.connectycube.com/) 2. select your Application 3. Navigate to **Custom** module via left sidebar 4. Create new table called **UserReports** with the following fields: * **reportedUserId** - integer * **reason** - string  Once the table is created, you can create a report with the following code snippet and then see all the reports in Dashboard: ```javascript const reportedUserId = 45 const reason = "User is spamming with bad words" await ConnectyCube.data.create('UserReports', { reportedUserId, reason }); ``` ### Report message [Section titled “Report message”](#report-message) For message reporting to work, the same approach to user reporting above could be used. You need to create new table called **MessageReports** with the following fields: * **reportedMessageId** - integer * **reason** - string Once the table is created, you can create a report with the following code snippet and then see all the reports in Dashboard: ```javascript const reportedMessageId = "58e6a9c8a1834a3ea6001f15" const reason = "The message contains phishing links" await ConnectyCube.data.create('MessageReports', { reportedMessageId, reason }); ``` ### Block user [Section titled “Block user”](#block-user) Block list (aka Privacy list) allows enabling or disabling communication with other users. You can create, modify, or delete privacy lists, define a default list. > The user can have multiple privacy lists, but only one can be active. #### Create privacy list [Section titled “Create privacy list”](#create-privacy-list) A privacy list must have at least one element in order to be created. You can choose a type of blocked logic. There are 2 types: * Block in one way. When you blocked a user, but you can send messages to him. * Block in two ways. When you blocked a user and you also can’t send messages to him. ```javascript const users = [ { user_id: 34, action: "deny" }, { user_id: 48, action: "deny", mutualBlock: true }, // it means you can't write to user { user_id: 18, action: "allow" }, ]; const list = { name: "myList", items: users }; ConnectyCube.chat.privacylist.create(list).catch((error) => {}); ``` > In order to be used the privacy list should be not only set, but also activated(set as default). #### Activate privacy list [Section titled “Activate privacy list”](#activate-privacy-list) In order to activate rules from a privacy list you should set it as default: ```javascript const listName = "myList"; ConnectyCube.chat.privacylist.setAsDefault(listName).catch((error) => {}); ``` #### Update privacy list [Section titled “Update privacy list”](#update-privacy-list) There is a rule you should follow to update a privacy list: * If you want to update or set new privacy list instead of current one, you should decline current default list first. ```javascript const listName = "myList"; const list = { name: listName, items: [{ user_id: 34, action: "allow" }], }; ConnectyCube.chat.privacylist .setAsDefault(null) .then(() => ConnectyCube.chat.privacylist.update(list)) .then(() => ConnectyCube.chat.privacylist.setAsDefault(listName)) .catch((error) => {}); ``` #### Retrieve privacy list names [Section titled “Retrieve privacy list names”](#retrieve-privacy-list-names) To get a list of all your privacy lists’ names use the following request: ```javascript let names; ConnectyCube.chat.privacylist .getNames() .then((response) => (names = response.names)) .catch((error) => {}); ``` Response example from `ConnectyCube.chat.privacylist.getNames()`: ```json { "active": null, "default": null, "names": ["myList", "blockedusers"] } ``` #### Retrieve privacy list with name [Section titled “Retrieve privacy list with name”](#retrieve-privacy-list-with-name) To get the privacy list by name you should use the following method: ```javascript const listName = "myList"; let name, items; ConnectyCube.chat.privacylist.getList(listName).then((response) => { name = response.name; items = response.items; }); ``` Response example from `ConnectyCube.chat.privacylist.getList(listName)`: ```json { "name": "myList", "items": [ { "user_id": 34, "action": "deny" }, { "user_id": 48, "action": "deny", "mutualBlock": true }, { "user_id": 18, "action": "allow" } ] } ``` #### Remove privacy list [Section titled “Remove privacy list”](#remove-privacy-list) To delete a list you can call a method below or you can edit a list and set items to `nil`. ```javascript const listName = "myList"; ConnectyCube.chat.privacylist.delete(listName).catch((error) => {}); ``` #### Blocked user attempts to communicate with user [Section titled “Blocked user attempts to communicate with user”](#blocked-user-attempts-to-communicate-with-user) Blocked users will be receiving an error when trying to chat with a user in a 1-1 chat and will be receiving nothing in a group chat: ```javascript ConnectyCube.chat.onMessageErrorListener = function (messageId, error) {}; ``` ## Ping server [Section titled “Ping server”](#ping-server) Sometimes, it can be cases where TCP connection to Chat server can go down without the application layer knowing about it. To check that chat connection is still alive or to keep it to be alive there is a ping method: ```javascript const PING_TIMEOUT = 3000; // default is 5000 ms ConnectyCube.chat.pingWithTimeout(PING_TIMEOUT) .then(() => { // Chat connection is alive }).catch((error) => { // No connection with chat server // Let's try to re-connect }) ``` ### Pause chat connection when ping fails [Section titled “Pause chat connection when ping fails”](#pause-chat-connection-when-ping-fails) Temporarily stop the chat connection if the server does not respond to the ping request. This allows the client to attempt automatic reconnection as soon as the chat connection becomes available again: ```javascript const PING_TIMEOUT = 1000; try { await ConnectyCube.chat.pingWithTimeout(PING_TIMEOUT) } catch (error) { ConnectyCube.chat.terminate() } ``` ### Handle network offline event with ping check [Section titled “Handle network offline event with ping check”](#handle-network-offline-event-with-ping-check) In React Native, use the [@react-native-community/netinfo](https://github.com/react-native-netinfo/react-native-netinfo) library to listen for network status changes. When the device goes offline, attempt to ping the chat server and terminate the chat connection if the ping fails: ```javascript import { addEventListener } from "@react-native-community/netinfo"; const PING_TIMEOUT = 3000; const unsubscribe = addEventListener(state => { if (!state.isConnected) { try { await ConnectyCube.chat.pingWithTimeout(PING_TIMEOUT); } catch (error) { ConnectyCube.chat.terminate(); } } }); ``` ### Maintain chat connection with periodic pings (VPN-friendly) [Section titled “Maintain chat connection with periodic pings (VPN-friendly)”](#maintain-chat-connection-with-periodic-pings-vpn-friendly) Regularly send pings to check if the chat connection is still alive. If a ping fails, send another ping after a short delay to handle cases where the first failure was temporary; terminate the connection if the second ping also fails: ```javascript const PING_INTERVAL = 40000; const PING_TIMEOUT = 1000; const PING_DELAY = 3000; let pingInterval = null; const startPingWithInterval = () => { pingInterval = setInterval(async () => { try { await ConnectyCube.chat.pingWithTimeout(PING_TIMEOUT); } catch (error) { setTimeout(async () => { try { await ConnectyCube.chat.pingWithTimeout(PING_TIMEOUT); } catch (error) { ConnectyCube.chat.terminate(); } }, PING_DELAY); } }, PING_INTERVAL); } const stopPingWithInterval = () => { if (pingInterval) { clearInterval(pingInterval); pingInterval = null; } } ```
# Video Calling
> Empower your ReactNative applications with our Video Calling P2P API. Enable secure and immersive peer-to-peer video calls for enhanced user experience
ConnectyCube **Video Calling P2P API** is built on top of [WebRTC](https://webrtc.org/) protocol and based on top of [WebRTC Mesh](https://webrtcglossary.com/mesh/) architecture. Max people per P2P call is 4. > To get a difference between **P2P calling** and **Conference calling** please read our [ConnectyCube Calling API comparison](https://connectycube.com/2020/04/15/connectycube-calling-api-comparison/) blog page. ## Preparations [Section titled “Preparations”](#preparations) [ConnectyCube Chat API](/reactnative/messaging) is used as a signaling transport for Video Calling API, so in order to start using Video Calling API you need to [connect user to Chat](/reactnative/messaging#connect-to-chat). ### Connect WebRTC lib [Section titled “Connect WebRTC lib”](#connect-webrtc-lib) Since “react-native-connectycube” version 3.34.0, the “react-native-webrtc” has been replaced from dependencies to peerDependencies to support autolinking. Install the “react-native-webrtc” and follow the [Getting started](https://github.com/react-native-webrtc/react-native-webrtc?tab=readme-ov-file#getting-started). Configure your [iOS](https://github.com/react-native-webrtc/react-native-webrtc/blob/master/Documentation/iOSInstallation.md) and [Android](https://github.com/react-native-webrtc/react-native-webrtc/blob/master/Documentation/AndroidInstallation.md) projects. Until “react-native-connectycube” version 3.34.0, the “react-native-webrtc” is included to “react-native-connectycube”. Follow the [Android Manual Linking](https://github.com/react-native-webrtc/react-native-webrtc/blob/1.98.0/Documentation/AndroidInstallation.md) and [iOS Manual Linking](https://github.com/react-native-webrtc/react-native-webrtc/blob/1.98.0/Documentation/iOSInstallation.md) guides. ## Create video session [Section titled “Create video session”](#create-video-session) In order to use Video Calling API you need to create a call session object - choose your opponents with whom you will have a call and a type of session (VIDEO or AUDIO): ```javascript const calleesIds = [56, 76, 34]; // User's ids const sessionType = ConnectyCube.videochat.CallType.VIDEO; // AUDIO is also possible const additionalOptions = {}; const session = ConnectyCube.videochat.createNewSession(calleesIds, sessionType, additionalOptions); ``` > **Note**: in a case of low bandwidth network, you can try to limit the call bandwidth cap to get better quality vs stability results. It can be done by passing `const additionalOptions = {bandwidth: 256};` or 128 value. ## Access local media stream [Section titled “Access local media stream”](#access-local-media-stream) In order to have a video chat session you need to get an access to the user’s devices (webcam / microphone): ```javascript const mediaParams = { audio: true, video: true }; session .getUserMedia(mediaParams) .then((localStream) => {}) .catch((error) => {}); ``` This method lets the browser ask the user for permission to use devices. You should allow this dialog to access the stream. Otherwise, the browser can’t obtain access and will throw an error for `getUserMedia` callback function. For more information about possible audio/video constraints, here is a good code sample from WebRTC team how to work with getUserMedia constraints: ## Call quality [Section titled “Call quality”](#call-quality) **Limit bandwidth** Despite WebRTC engine uses automatic quality adjustement based on available Internet bandwidth, sometimes it’s better to set the max available bandwidth cap which will result in a better and smoother user experience. For example, if you know you have a bad internet connection, you can limit the max available bandwidth to e.g. 256 Kbit/s. This can be done when initiate a call (see below ‘Initiate a call’ API documentation): ```javascript session.call({maxBandwidth: 256}); // default is 0 - unlimited ``` which will result in limiting the max vailable bandwidth for ALL participants. ## Attach local media stream [Section titled “Attach local media stream”](#attach-local-media-stream) Then you should attach your local media stream to a video element: ```javascript import {RTCView} from 'react-native-connectycube'; // pass a local or remote stream to the RTCView component ... ... ``` ## Initiate a call [Section titled “Initiate a call”](#initiate-a-call) ```javascript const extension = {}; session.call(extension); ``` The extension is used to pass any extra parameters in the request to your opponents. After this, your opponents will receive a callback call: ```javascript ConnectyCube.videochat.onCallListener = function (session, extension) {}; ``` Or if your opponents are offline or did not answer the call request: ```javascript ConnectyCube.videochat.onUserNotAnswerListener = function (session, userId) {}; ``` ## Accept a call [Section titled “Accept a call”](#accept-a-call) To accept a call the following code snippet is used: ```javascript ConnectyCube.videochat.onCallListener = function (session, extension) { // Here we need to show a dialog with 2 buttons - Accept & Reject. // By accepting -> run the following code: // // 1. await session.getUserMedia (...) // // 2. Accept call request: const extension = {}; session.accept(extension); }; ``` After this, you will get a confirmation in the following callback: ```javascript ConnectyCube.videochat.onAcceptCallListener = function (session, userId, extension) {}; ``` Also, both the caller and opponents will get a special callback with the remote stream: ```javascript ConnectyCube.videochat.onRemoteStreamListener = function (session, userID, remoteStream) { // attach the remote stream to a video element // import {RTCView} from 'react-native-connectycube'; // // }; ``` From this point, you and your opponents should start seeing each other. ## Receive a call in background [Section titled “Receive a call in background”](#receive-a-call-in-background) See [CallKit section](#callkit) below. ## Reject a call [Section titled “Reject a call”](#reject-a-call) ```javascript const extension = {}; session.reject(extension); ``` After this, the caller will get a confirmation in the following callback: ```javascript ConnectyCube.videochat.onRejectCallListener = function (session, userId, extension) {}; ``` Sometimes, it could a situation when you received a call request and want to reject, but the call sesison object has not arrived yet. It could be in a case when you integrated CallKit to receive call requests while an app is in background/killed state. To do a reject in this case, the following snippet can be used: ```javascript const params = { sessionID: callId, recipientId: callInitiatorID, platform: Platform.OS }; await ConnectyCube.videochat.callRejectRequest(params); ``` ## End a call [Section titled “End a call”](#end-a-call) ```javascript const extension = {}; session.stop(extension); ``` After this, the opponents will get a confirmation in the following callback: ```javascript ConnectyCube.videochat.onStopCallListener = function (session, userId, extension) {}; ``` ## Mute audio [Section titled “Mute audio”](#mute-audio) ```javascript session.mute("audio"); session.unmute("audio"); ``` ## Mute video [Section titled “Mute video”](#mute-video) ```javascript session.mute("video"); session.unmute("video"); ``` ## Switch video cameras [Section titled “Switch video cameras”](#switch-video-cameras) ```javascript localStream.getVideoTracks().forEach(track => track._switchCamera()); ``` ## Switch audio output [Section titled “Switch audio output”](#switch-audio-output) 1. connect and install lib 2. Use `InCallManager` class to switch audio output: ```javascript import InCallManager from 'react-native-incall-manager'; ... let isSpeakerOn = true; // false InCallManager.setSpeakerphoneOn(isSpeakerOn); ``` Also, pay attention to [InCall Manager lib](https://github.com/react-native-webrtc/react-native-incall-manager) if you need to use one of the options below: * Manage devices events like wired-headset plugged-in state, proximity sensors and expose functionalities to javascript. * Automatically route audio to proper devices based on events and platform API. * Toggle speaker or microphone on/off, toggle flashlight on/off * Play ringtone/ringback/dtmftone ## Screen Sharing [Section titled “Screen Sharing”](#screen-sharing) Request a desktop stream by calling `getDisplayMedia`: ```javascript session .getDisplayMedia() .then((localDesktopStream) => {}) .catch((error) => {}); ``` In React Native, the [getDisplayMedia](https://github.com/react-native-webrtc/react-native-webrtc/blob/fe5ce9798cae5eb53fa028309b0217d7c22f255d/src/getDisplayMedia.ts#L9) method does not accept constrains as a parameter due to [react-native-webrtc](https://github.com/react-native-webrtc/react-native-webrtc) limitations. If the local stream already exists, the next call to getUserMedia or getDisplayMedia will update the tracks in the stream and preserve the track’s enabled state for the audio track. ### Screen Sharing on Android [Section titled “Screen Sharing on Android”](#screen-sharing-on-android) Follow this guide to configure [Screen Sharing on Android](https://github.com/react-native-webrtc/react-native-webrtc/blob/master/Documentation/AndroidInstallation.md#screen-sharing) and this to support [Screen Capture on Android 10+](https://github.com/react-native-webrtc/react-native-webrtc/blob/master/Documentation/AndroidInstallation.md#screen-capture-support---android-10). Call the `getDisplayMedia` after starting a ForegroundService: ```javascript import { Platform } from 'react-native'; import notifee, { AndroidImportance } from '@notifee/react-native'; /* ... */ const ScreenSharingComponent() { const mediaParams = { audio: true, video: true, }; const startShareScreen = async () => { if (Platform.OS === 'android') { const channelId = await notifee.createChannel({ id: 'screen_capture', name: 'Screen Capture', lights: false, vibration: false, importance: AndroidImportance.DEFAULT, }); await notifee.displayNotification({ title: 'Screen Capture', body: 'Capturing...', android: { channelId, asForegroundService: true, }, }); } // Capturing a screen const stream = await session.getDisplayMedia(); }; const stopShareScreen = async () => { if (Platform.OS === 'android') { await notifee.stopForegroundService(); } //Get back media stream from camera or call `session.stop(extension)` const stream = await session.getUserMedia(mediaParams); }; return <>{/* ... */} } export default ScreenSharingComponent; ``` ### Screen Sharing on iOS [Section titled “Screen Sharing on iOS”](#screen-sharing-on-ios) Preform the [Screen Sharing integration for iOS](https://jitsi.github.io/handbook/docs/dev-guide/dev-guide-ios-sdk/#screen-sharing-integration) guide from Jitsi. Use `` component from ‘react-native-webrtc’ to prepare: ```javascript import React from 'react'; import { findNodeHandle, Platform, NativeModules } from 'react-native'; import { ScreenCapturePickerView } from 'react-native-webrtc'; /* ... */ const ScreenSharingComponent() { const screenCaptureView = React.useRef(null); const mediaParams = { audio: true, video: true, }; const startShareScreen = async () => { if (Platform.OS === 'ios') { const reactTag = findNodeHandle(screenCaptureView.current); await NativeModules.ScreenCapturePickerViewManager.show(reactTag); } // Capturing a screen const stream = await session.getDisplayMedia(); }; const stopShareScreen = async () => { // Get back media stream from camera or call `session.stop(extension)` const stream = await session.getUserMedia(mediaParams); }; return <> {/* ... */} {Platform.OS === 'ios' && ( )} } export default ScreenSharingComponent; ``` ## Group video calls [Section titled “Group video calls”](#group-video-calls) Because of [Mesh architecture](https://webrtcglossary.com/mesh/) we use for multipoint where every participant sends and receives its media to all other participants, current solution supports group calls with up to 4 people. Also ConnectyCube provides an alternative solution for up to 12 people - [Multiparty Video Conferencing API](/reactnative/videocalling-conference). ## Monitor connection state [Section titled “Monitor connection state”](#monitor-connection-state) There is a callback function to track the session connection state: ```javascript ConnectyCube.videochat.onSessionConnectionStateChangedListener = ( session, userID, connectionState ) => { }; ``` The possible values of connectionState are those of an enum of type `ConnectyCube.videochat.SessionConnectionState`: * ConnectyCube.videochat.SessionConnectionState.UNDEFINED * ConnectyCube.videochat.SessionConnectionState.CONNECTING * ConnectyCube.videochat.SessionConnectionState.CONNECTED * ConnectyCube.videochat.SessionConnectionState.DISCONNECTED * ConnectyCube.videochat.SessionConnectionState.FAILED * ConnectyCube.videochat.SessionConnectionState.CLOSED * ConnectyCube.videochat.SessionConnectionState.COMPLETED ## Tackling Network changes [Section titled “Tackling Network changes”](#tackling-network-changes) If a user’s network environment changes (e.g., switching from Wi-Fi to mobile data), the existing call connection might no longer be valid. Normally, in a case of short network interruptions, the ConnectyCube SDK will automatically restore the call so you can see via `onSessionConnectionStateChangedListener` callback with `connectionState` changing to `DISCONNECTED` and then again to `CONNECTED`. But not all cases are the same, and in some of them the connection needs to be **manually** refreshed due to various issues like NAT or firewall behavior changes or even longer network environment changes, e.g. when a user is offline for more than 30 seconds. This is where ICE restart helps to re-establish the connection to find a new network path for communication. The correct and recommended way for an application to handle all such ‘bad’ cases is to trigger an ICE restart when the connection state goes to either `FAILED` or `DISCONNECTED` for an extended period of time (e.g. > 30 seconds). Following is the preliminary code snippet regarding how to work with ICE restart: * Firstly, we have to disable the call termination logic after the network is disconnected for > 30 seconds by increasing the `videochat.disconnectTimeInterval` value to e.g. 5 mins. ```plaintext const appConfig = { videochat: { disconnectTimeInterval: 300, } }; ConnectyCube.init(credentials, appConfig); ``` * Secondly, define a variable which can track the Internet connection state: ```plaintext import { fetch, addEventListener } from "@react-native-community/netinfo"; let isOnline; fetch().then(state => { isOnline = state.isConnected; }); const unsubscribe = addEventListener(state => { isOnline = state.isConnected; }); ``` * Thirdly, define a function that will perform ICE restart: ```plaintext async maybeDoIceRestart(session, userID) { try { // firstly let's check if we are still connected to chat await ConnectyCube.chat.pingWithTimeout(); // do ICE restart if (session.canInitiateIceRestart(userID)) { session.iceRestart(userID); } } catch (error) { console.error(error.message); // chat ping request has timed out, // so need to reconnect to Chat await ConnectyCube.chat.disconnect(); await ConnectyCube.chat.connect({ userId: currentUser.id, password: currentUser.password, }) // do ICE restart if (session.canInitiateIceRestart(userID)) { session.iceRestart(userID); } } } ``` * Fourthly, define a `ConnectyCube.videochat.onSessionConnectionStateChangedListener` callback and try to perform ICE restart if not automatic call restoration happened after 30 seconds: ```plaintext iceRestartTimeout = null; needIceRestartForUsersIds = []; ConnectyCube.videochat.onSessionConnectionStateChangedListener = ( session, userID, connectionState ) => { console.log( "[onSessionConnectionStateChangedListener]", userID, connectionState ); const { DISCONNECTED, FAILED, CONNECTED, CLOSED } = ConnectyCube.videochat.SessionConnectionState; if (connectionState === DISCONNECTED || connectionState === FAILED) { iceRestartTimeout = setTimeout(() => { // Connection not restored within 30 seconds, trying ICE restart... if (isOnline) { maybeDoIceRestart(session, userID); } else { // Skip ICE restart, no Internet connection this.needIceRestartForUsersIds.push(userID); } }, 30000); } else if (connectionState === CONNECTED) { clearTimeout(iceRestartTimeout); iceRestartTimeout = null; needIceRestartForUsersIds = []; } else if (connectionState === CLOSED) { needIceRestartForUsersIds = []; } }; ``` * Finally, in a case a user got working Internet connection later, do ICE restart there: ```plaintext import { addEventListener } from "@react-native-community/netinfo"; const unsubscribe = addEventListener(state => { if (!isOnline && state.isConnected) { if (session && needIceRestartForUsersIds.length > 0) { for (let userID of needIceRestartForUsersIds) { maybeDoIceRestart(session, userID); } } } isOnline = state.isConnected; }); ``` After these changes the call connection should be restored to working state again. ## Configuration [Section titled “Configuration”](#configuration) There are various calling related configs that can be changed. ### alwaysRelayCalls [Section titled “alwaysRelayCalls”](#alwaysrelaycalls) The `alwaysRelayCalls` config sets the WebRTC `RTCConfiguration.iceTransportPolicy` [config](/js/#default-configuration). Setting it to `true` means the calling media will be routed through TURN server all the time, and not directly P2P between users even if the network path allows it: ```javascript const appConfig = { videochat: { alwaysRelayCalls: true, }, }; ``` ### Echo cancelation issue on some Android devices [Section titled “Echo cancelation issue on some Android devices”](#echo-cancelation-issue-on-some-android-devices) A possible solution can be found here ## Recording [Section titled “Recording”](#recording) Not available as for now ## Continue call in background [Section titled “Continue call in background”](#continue-call-in-background) If you are developing dedicated apps for iOS and Android - it’s required to apply additional configuration for the app to keeping the call alive when it goes into the background. \*\*iOS: \*\* There is no way to continue a video call in background because of some OS restrictions. What is supported there is to continue with voice calling while an app is in background. Basically, the recommended to achieve this is to switch off device camera when an app goes to background and then switch camera on back when an app goes to foreground. Furthermore, even voice background call are blocked by default on iOS. To unblock - you need to setup proper background mode capabilities in your project. Please find the [Enabling Background Audio link](https://developer.apple.com/documentation/avfoundation/media_playback_and_selection/creating_a_basic_video_player_ios_and_tvos/enabling_background_audio) with more information how to do it properly. Generally speaking, you need to enable `Voice over IP` and `Remote notifications` capabilities:  \*\*Android: \*\* For Android, we also recommend to implement the same camera switch flow when go to background and then return to foreground. To keep the call while in background, we recomment to use the **react-native-background-actions** library. The flow is the following: * when start a call or go background -> display notification * when stop call or return to foreground -> hide notification ```javascript // Background Activity import BackgroundService from 'react-native-background-actions'; startBackgroundMode = () => { this.stopBackgroundMode(); const options = { taskName: 'AppName', taskTitle: 'You have an active call', taskDesc: 'Press to return', taskIcon: { name: 'ic_notification', type: 'mipmap', }, linkingURI: 'appName://foreground', }; BackgroundService.start(async (params) => { await new Promise(async () => {}); }, options); }; stopBackgroundMode = (force = false) => { if (BackgroundService.isRunning() || force) { return BackgroundService.stop(); } }; ``` ## CallKit [Section titled “CallKit”](#callkit) > A ready [RNVideoChat code sample](https://github.com/ConnectyCube/connectycube-reactnative-samples/tree/master/RNVideoChat) with CallKit integrated is available at GitHub. All the below code snippets will taken from it. For mobile apps, it can be a situation when an opponent’s user app is either in closed (killed) or background (inactive) state. In this case, to be able to still receive a call request, a flow called CallKit is used. It’s a mix of CallKit API + Push Notifications API + VOIP Push Notifications API. The complete flow is similar to the following: * a call initiator should send a push notification (for iOS it’s VOIP push notification) along with a call request * when an opponent’s app is killed or in background state - an opponent will receive a push notification about an incoming call, so the CallKit incoming call screen will be displayed, where a user can accept/reject the call. The following libs should be used to integrate CallKit functionality: * [CallKeep](https://github.com/react-native-webrtc/react-native-callkeep) lib for accessing CallKit API * [react-native-notifications](https://github.com/wix/react-native-notifications) lib along with [ConnectyCube Push Notifications API guide](/reactnative/push-notifications) for both push notifications and VOIP push notifications integration. Below we provide a detailed guide on additional steps that needs to be performed in order to integrate CallKit into a RN app. **Initiate a call** When initiate a call via `session.call()`, additionally we need to send a push notification (standard for Android user and VOIP for iOS). This is required for an opponent(s) to be able to receive an incoming call request when an app is in background or killed state. The following request will initiate a standard push notification for Android and a VOIP push notification for iOS: ```javascript const callType = "video" // "voice" const callInitiatorName = "..." const callOpponentsIds = [...] const pushParams = { message: `Incoming call from ${callInitiatorName}`, ios_voip: 1, handle: callInitiatorName, initiatorId: callSession.initiatorID, opponentsIds: callOpponentsIds.join(","), uuid: callSession.ID, callType }; PushNotificationsService.sendPushNotification(callOpponentsIds, pushParams); ... // PushNotificationsService: sendPushNotification(recipientsUsersIds, params) { const payload = JSON.stringify(params); const pushParameters = { notification_type: "push", user: { ids: recipientsUsersIds }, environment: __DEV__ ? "development" : "production", message: ConnectyCube.pushnotifications.base64Encode(payload), }; ConnectyCube.pushnotifications.events.create(pushParameters) .then(result => { console.log("[PushNotificationsService][sendPushNotification] Ok"); }).catch(error => { console.warn("[PushNotificationsService][sendPushNotification] Error", error); }); } ``` We recommend to simply copy-past the entire [src/services/pushnotifications-service.js](https://github.com/ConnectyCube/connectycube-reactnative-samples/blob/master/RNVideoChat/src/services/pushnotifications-service.js) file from RNVideoChat code sample into your app. ### Receive call request in background/killed state [Section titled “Receive call request in background/killed state”](#receive-call-request-in-backgroundkilled-state) The goal of CallKit is to receive call request when an app is in background or killed state. For iOS we will use CallKit and for Android we will use standard capabilities. **Android** First of all, we need to setup callbacks to receive push notification - in background and in killed state (there is a dedicated doc regarding how to setup a callback to receive pushes in killed state ): ```javascript import invokeApp from 'react-native-invoke-app'; class PushNotificationsService { constructor() { console.log("[PushNotificationsService][constructor]"); this._registerBackgroundTasks(); } init() { Notifications.events().registerNotificationReceivedBackground(async (notification, completion) => { console.log("[PushNotificationService] Notification Received - Background", notification.payload, notification?.payload?.message); if (Platform.OS === 'android') { if (await PermissionsService.isDrawOverlaysPermisisonGranted()) { invokeApp(); const dummyCallSession = { initiatorID: notificationBundle.initiatorId, opponentsIDs: notificationBundle.opponentsIds.split(","), ID: notificationBundle.uuid } store.dispatch(setCallSession(dummyCallSession, true, true)); } else { PushNotificationsService.displayNotification(notification.payload); } } // Calling completion on iOS with `alert: true` will present the native iOS inApp notification. completion({alert: true, sound: true, badge: false}); }); } _registerBackgroundTasks() { if (Platform.OS === 'ios') { return; } const { AppRegistry } = require("react-native"); // https://reactnative.dev/docs/headless-js-android // AppRegistry.registerHeadlessTask( "JSNotifyWhenKilledTask", () => { return async (notificationBundle) => { console.log('[JSNotifyWhenKilledTask] notificationBundle', notificationBundle); if (await PermissionsService.isDrawOverlaysPermisisonGranted()) { invokeApp(); const dummyCallSession = { initiatorID: notificationBundle.initiatorId, opponentsIDs: notificationBundle.opponentsIds.split(","), ID: notificationBundle.uuid } store.dispatch(setCallSession(dummyCallSession, true, true)); } else { PushNotificationsService.displayNotification(notificationBundle); } } }, ); } } ``` What we do is we simply open app (bringing the app to foreground) once a push re incoming call is received and display an incoming call screen. This is done via [react-native-invoke-app](https://github.com/ConnectyCube/react-native-invoke-app) lib. Also, we have `PermisisonsService` to check if a user granted a `DrawOverlays` permission to make the switch to foreground possible: ```javascript import { isOverlayPermissionGranted, requestOverlayPermission } from 'react-native-can-draw-overlays'; import { Alert } from "react-native"; class PermisisonsService { async checkAndRequestDrawOverlaysPermission() { if (Platform.OS !== 'android') { return true; } const isGranted = await this.isDrawOverlaysPermisisonGranted(); if (!isGranted) { Alert.alert( "Permission required", "For accepting calls in background you should provide access to show System Alerts from in background. Would you like to do it now?", [ { text: "Later", onPress: () => {}, style: "cancel" }, { text: "Request", onPress: () => { this.requestOverlayPermission(); }} ] ); } } async isDrawOverlaysPermisisonGranted() { const isGranted = await isOverlayPermissionGranted(); console.log("[PermisisonsService][isDrawOverlaysPermisisonGranted]", isGranted); return isGranted; } async requestOverlayPermission() { const granted = await requestOverlayPermission(); console.log("[PermisisonsService][requestOverlayPermission]", granted); return granted; } } const permisisonsService = new PermisisonsService(); export default permisisonsService; ``` We recommend to simply copy-past the entire [src/services/permissions-service.js](https://github.com/ConnectyCube/connectycube-reactnative-samples/blob/master/RNVideoChat/src/services/permissions-service.js) file from RNVideoChat code sample into your app. **iOS** For iOS we need to setup CallKit. For this a [react-native-callkeep](https://github.com/react-native-webrtc/react-native-callkeep) library will be used. We recommend to connect a version from github rather than froim npm: `"react-native-callkeep": "github:react-native-webrtc/react-native-callkeep#master"` All the logic is presented in `call-service.js` file: ```javascript // CallService import RNCallKeep, { CONSTANTS as CK_CONSTANTS } from 'react-native-callkeep'; import { getApplicationName } from 'react-native-device-info'; import RNUserdefaults from '@tranzerdev/react-native-user-defaults'; initCallKit() { if (Platform.OS !== 'ios') { return; } const options = { ios: { appName: getApplicationName(), includesCallsInRecents: false, } }; RNCallKeep.setup(options).then(accepted => { console.log('[CallKitService][setup] Ok'); }).catch(err => { console.error('[CallKitService][setup] Error:', err.message); }); // Add RNCallKeep Events // RNCallKeep.addEventListener('didReceiveStartCallAction', this.didReceiveStartCallAction); RNCallKeep.addEventListener('answerCall', this.onAnswerCallAction); RNCallKeep.addEventListener('endCall', this.onEndCallAction); RNCallKeep.addEventListener('didPerformSetMutedCallAction', this.onToggleMute); RNCallKeep.addEventListener('didChangeAudioRoute', this.onChangeAudioRoute); RNCallKeep.addEventListener('didLoadWithEvents', this.onLoadWithEvents); } onAnswerCallAction = (data) => { console.log('[CallKitService][onAnswerCallAction]', data); // let { callUUID } = data; // Called when the user answers an incoming call via Call Kit if (!this.isAccepted) { // by some reason, this event could fire > 1 times this.acceptCall({}, true); } }; onEndCallAction = async (data) => { console.log('[CallKitService][onEndCallAction]', data); let { callUUID } = data; if (this.callSession) { if (this.isAccepted) { this.rejectCall({}, true); } else { this.stopCall({}, true); } } else { const voipIncomingCallSessions = await RNUserdefaults.get("voipIncomingCallSessions"); if (voipIncomingCallSessions) { const sessionInfo = voipIncomingCallSessions[callUUID]; if (sessionInfo) { const initiatorId = sessionInfo["initiatorId"]; // most probably this is a call reject, so let's reject it via HTTP API ConnectyCube.videochat.callRejectRequest({ sessionID: callUUID, platform: Platform.OS, recipientId: initiatorId }).then(res => { console.log("[CallKitService][onEndCallAction] [callRejectRequest] done") }); } } } }; onToggleMute = (data) => { console.log('[CallKitService][onToggleMute]', data); let { muted, callUUID } = data; // Called when the system or user mutes a call this.muteMicrophone(muted, true) }; onChangeAudioRoute = (data) => { console.log('[CallKitService][onChangeAudioRoute]', data); const output = data.output; // could be Speaker or Receiver }; onLoadWithEvents = (events) => { console.log('[CallKitService][onLoadWithEvents]', events); // `events` is passed as an Array chronologically, handle or ignore events based on the app's logic // see example usage in https://github.com/react-native-webrtc/react-native-callkeep/pull/169 or https://github.com/react-native-webrtc/react-native-callkeep/pull/20 }; ``` Also, when perform any operations e.g. start call, accept, reject, stop etc, we need to report back to CallKit lib - to have both app UI and CallKit UI in sync: ```javascript RNCallKeep.startCall(callUUID, handle, contactIdentifier, handleType, hasVideo); ... RNCallKeep.answerIncomingCall(callUUID); ... RNCallKeep.rejectCall(callUUID); ... RNCallKeep.endCall(callUUID); ... RNCallKeep.setMutedCall(callUUID, isMuted); ... RNCallKeep.reportEndCallWithUUID(callUUID, reason); ``` For the `callUUID` we will be using call’s `session.ID`. The last point is to do the needed changes at iOS native code. When receive a VOIP push notification in background/killed state, we must immediately display an incoming CallKit screen. Otherwise, the app will be banned with an error. To do so, the following changes in `AppDelegate.mm` should be done: ```javascript #import "RNNotifications.h" #import "RNEventEmitter.h" #import "RNCallKeep.h" ... - (BOOL)application:(UIApplication *)application didFinishLaunchingWithOptions:(NSDictionary *)launchOptions { ... [RNNotifications startMonitorNotifications]; [RNNotifications startMonitorPushKitNotifications]; [[NSNotificationCenter defaultCenter] addObserver:self selector:@selector(handlePushKitNotificationReceived:) name:RNPushKitNotificationReceived object:nil]; // cleanup [[NSUserDefaults standardUserDefaults] removeObjectForKey:@"voipIncomingCallSessions"]; return YES; } ... - (void)handlePushKitNotificationReceived:(NSNotification *)notification { UIApplicationState state = [[UIApplication sharedApplication] applicationState]; if (state == UIApplicationStateBackground || state == UIApplicationStateInactive) { // save call info to user defaults NSMutableDictionary *callsInfo = [[[NSUserDefaults standardUserDefaults] objectForKey:@"voipIncomingCallSessions"] mutableCopy]; if (callsInfo == nil) { callsInfo = [NSMutableDictionary dictionary]; } [callsInfo setObject:@{ @"initiatorId": notification.userInfo[@"initiatorId"], @"opponentsIds": notification.userInfo[@"opponentsIds"], @"handle": notification.userInfo[@"handle"], @"callType": notification.userInfo[@"callType"] } forKey:notification.userInfo[@"uuid"]]; [[NSUserDefaults standardUserDefaults] setObject:callsInfo forKey:@"voipIncomingCallSessions"]; // show CallKit incoming call screen [RNCallKeep reportNewIncomingCall: notification.userInfo[@"uuid"] handle: notification.userInfo[@"handle"] handleType: @"generic" hasVideo: [notification.userInfo[@"callType"] isEqual: @"video"] localizedCallerName: notification.userInfo[@"handle"] supportsHolding: YES supportsDTMF: YES supportsGrouping: YES supportsUngrouping: YES fromPushKit: YES payload: notification.userInfo withCompletionHandler: nil]; } else { // when an app is in foreground -> will show the in-app UI for incoming call } } ``` > All the above code snippets can be found in a ready [RNVideoChat code sample](https://github.com/ConnectyCube/connectycube-reactnative-samples/tree/master/RNVideoChat) with CallKit integrated.
# Video Conferencing
> Discover the simplicity of integrating conference video calling into your ReactNative app with our easy-to-use API. Empower users to connect from anywhere.
ConnectyCube **Multiparty Video Conferencing API** is built on top of [WebRTC](https://webrtc.org/) protocol and based on top of [WebRTC SFU](https://webrtcglossary.com/sfu/) architecture. Max people per Conference call is 12. Video Conferencing is available starting from [Advanced plan](https://connectycube.com/pricing/). > To get a difference between **P2P calling** and **Conference calling** please read our [ConnectyCube Calling API comparison](https://connectycube.com/2020/04/15/connectycube-calling-api-comparison/) blog page. ## Features supported [Section titled “Features supported”](#features-supported) * Video/Audio Conference with up to 12 people * Join-Rejoin video room functionality (like Skype) * Guest rooms * Mute/Unmute audio/video streams * Display bitrate * Switch video input device (camera) * Switch audio input device (microphone) ## Preparations [Section titled “Preparations”](#preparations) ### Set up config [Section titled “Set up config”](#set-up-config) In order to start working with Multiparty Video Conferencing API you need to initialize a client: ```javascript const credentials = { appId: ..., authKey: "...", } const MULTIPARTY_SERVER_ENDPOINT = 'wss://...:8989'; const appConfig = { debug: { mode: 1 }, conference: { server: MULTIPARTY_SERVER_ENDPOINT }, } ConnectyCube.init(credentials, appConfig) ``` > Default multiparty server endpoint is wss\://janus.connectycube.com:8989 ([see](/js/#default-configuration)). ## Connect WebRTC lib [Section titled “Connect WebRTC lib”](#connect-webrtc-lib) Since “react-native-connectycube” version 3.34.0, the “react-native-webrtc” has been replaced from dependencies to peerDependencies to support autolinking. Install the “react-native-webrtc” and follow the [Getting started](https://github.com/react-native-webrtc/react-native-webrtc?tab=readme-ov-file#getting-started). Configure your [iOS](https://github.com/react-native-webrtc/react-native-webrtc/blob/master/Documentation/iOSInstallation.md) and [Android](https://github.com/react-native-webrtc/react-native-webrtc/blob/master/Documentation/AndroidInstallation.md) projects. Until “react-native-connectycube” version 3.34.0, the “react-native-webrtc” is included to “react-native-connectycube”. Follow the [Android Manual Linking](https://github.com/react-native-webrtc/react-native-webrtc/blob/1.98.0/Documentation/AndroidInstallation.md) and [iOS Manual Linking](https://github.com/react-native-webrtc/react-native-webrtc/blob/1.98.0/Documentation/iOSInstallation.md) guides. ## Create meeting [Section titled “Create meeting”](#create-meeting) In order to have a conference call, a meeting object has to be created. ```javascript const params = { name: "My meeting", start_date: timestamp, end_date: timestamp attendees: [ {id: 123, email: "..."}, {id: 124, email: "..."} ], record: false, chat: false }; ConnectyCube.meeting.create(params) .then(meeting => { const confRoomId = meeting._id; }) .catch(error => { }); ``` * As for `attendees` - either ConnectyCube users ids or external emails can be provided. * If you want to schedule a meeting - pass `start_date` and `end_date`. * Pass `chat: true` if you want to have a chat connected to meeting. * Pass `record: true` if you want to have a meeting call recorded. Read more about Recording feature Once meeting is created, you can use `meeting._id` as a conf room identifier in the below requests when join a call. ## Create call session [Section titled “Create call session”](#create-call-session) Once a meeting is created/retrieved, you can create a conf call session: ```javascript const session = ConnectyCube.videochatconference.createNewSession(); ``` Once a session is created, you can interact with a Video Conferencing API. ## Access local media stream [Section titled “Access local media stream”](#access-local-media-stream) In order to have a video chat session you need to get an access to the user’s devices (webcam / microphone): ```javascript const mediaParams = { audio: true, video: true, }; session .getUserMedia(mediaParams) .then((localStream) => {}) .catch((error) => {}); ``` This method lets the browser ask the user for permission to use devices. You should allow this dialog to access the stream. Otherwise, the browser can’t obtain access and will throw an error for `getUserMedia` callback function. For more information about possible audio/video constraints, here is a good code sample from WebRTC team how to work with getUserMedia constraints: ## Attach local media stream [Section titled “Attach local media stream”](#attach-local-media-stream) Then you should attach your local media stream to a video element: ```javascript import {RTCView} from 'react-native-connectycube'; // pass a local or remote stream to the RTCView component ... ... ``` ## Join room [Section titled “Join room”](#join-room) To jump into video chat with users you should join it: ```javascript session .join(roomId, userId, userDisplayName) .then(() => {}) .catch((error) => {}); ``` To check current joined video room use the following property: ```javascript const roomId = session.currentRoomId; ``` ## Join as listener [Section titled “Join as listener”](#join-as-listener) It can be a requirement where it needs to join a room as listener only, w/o publishing own media stream. It can be useful for a case with a teacher and many students where normally students join a call as listeners and only a teacher publishes own media stream: ```javascript session .joinAsListener(confRoomId, userId, userDisplayName) .then(() => {}) .catch((error) => {}); ``` ## List online participants [Section titled “List online participants”](#list-online-participants) To list online users in a room: ```javascript session .listOfOnlineParticipants() .then((participants) => {}) .catch((error) => {}); ``` ## Events [Section titled “Events”](#events) There are 6 events you can listen for: ```javascript ConnectyCube.videochatconference.onParticipantJoinedListener = ( session, userId, userDisplayName, isExistingParticipant ) => {}; ConnectyCube.videochatconference.onParticipantLeftListener = (session, userId) => {}; ConnectyCube.videochatconference.onRemoteStreamListener = (session, userId, stream) => {}; ConnectyCube.videochatconference.onSlowLinkListener = (session, userId, uplink, nacks) => {}; ConnectyCube.videochatconference.onRemoteConnectionStateChangedListener = (session, userId, iceState) => {}; ConnectyCube.videochatconference.onSessionConnectionStateChangedListener = (session, iceState) => {}; ``` ## Mute/Unmute audio [Section titled “Mute/Unmute audio”](#muteunmute-audio) You can mute/unmute your own audio: ```javascript // mute session.muteAudio(); // unmute session.unmuteAudio(); //check mute state session.isAudioMuted(); // true/false ``` ## Mute/Unmute video [Section titled “Mute/Unmute video”](#muteunmute-video) You can mute/unmute your own video: ```javascript // mute session.muteVideo(); // unmute session.unmuteVideo(); //check mute state session.isVideoMuted(); // true/false ``` ## List of devices [Section titled “List of devices”](#list-of-devices) ```javascript // get all devices ConnectyCube.videochatconference .getMediaDevices() .then((allDevices) => {}) .catch((error) => {}); // only video devices ConnectyCube.videochatconference .getMediaDevices(ConnectyCube.videochatconference.DEVICE_INPUT_TYPES.VIDEO) .then((videoDevices) => {}) .catch((error) => {}); // only audio devices ConnectyCube.videochatconference .getMediaDevices(ConnectyCube.videochatconference.DEVICE_INPUT_TYPES.AUDIO) .then((audioDevices) => {}) .catch((error) => {}); ``` ## Switch video cameras [Section titled “Switch video cameras”](#switch-video-cameras) ```javascript localStream.getVideoTracks().forEach((track) => track._switchCamera()); ``` ## Switch audio output [Section titled “Switch audio output”](#switch-audio-output) 1. connect and install lib 2. Use `InCallManager` class to switch audio output: ```javascript import InCallManager from 'react-native-incall-manager'; ... let isSpeakerOn = true; // false InCallManager.setSpeakerphoneOn(isSpeakerOn); ``` Also, pay attention to [InCall Manager lib](https://github.com/react-native-webrtc/react-native-incall-manager) if you need to use one of the options below: * Manage devices events like wired-headset plugged-in state, proximity sensors and expose functionalities to javascript. * Automatically route audio to proper devices based on events and platform API. * Toggle speaker or microphone on/off, toggle flashlight on/off * Play ringtone/ringback/dtmftone ## Screen Sharing [Section titled “Screen Sharing”](#screen-sharing) Request a desktop stream by calling `getDisplayMedia`: ```javascript session .getDisplayMedia() .then((localDesktopStream) => {}) .catch((error) => {}); ``` In React Native, the [getDisplayMedia](https://github.com/react-native-webrtc/react-native-webrtc/blob/fe5ce9798cae5eb53fa028309b0217d7c22f255d/src/getDisplayMedia.ts#L9) method does not accept constrains as a parameter due to [react-native-webrtc](https://github.com/react-native-webrtc/react-native-webrtc) limitations. If the local stream already exists, the next call to getUserMedia or getDisplayMedia will update the tracks in the stream and preserve the track’s enabled state for the audio track. ### Screen Sharing on Android [Section titled “Screen Sharing on Android”](#screen-sharing-on-android) Follow this guide to configure [Screen Sharing on Android](https://github.com/react-native-webrtc/react-native-webrtc/blob/master/Documentation/AndroidInstallation.md#screen-sharing) and this to support [Screen Capture on Android 10+](https://github.com/react-native-webrtc/react-native-webrtc/blob/master/Documentation/AndroidInstallation.md#screen-capture-support---android-10). Call the `getDisplayMedia` after starting a ForegroundService: ```javascript import { Platform } from 'react-native'; import notifee, { AndroidImportance } from '@notifee/react-native'; /* ... */ const ScreenSharingComponent() { const mediaParams = { audio: true, video: true, }; const startShareScreen = async () => { if (Platform.OS === 'android') { const channelId = await notifee.createChannel({ id: 'screen_capture', name: 'Screen Capture', lights: false, vibration: false, importance: AndroidImportance.DEFAULT, }); await notifee.displayNotification({ title: 'Screen Capture', body: 'Capturing...', android: { channelId, asForegroundService: true, }, }); } // Capturing a screen const stream = await session.getDisplayMedia(); }; const stopShareScreen = async () => { if (Platform.OS === 'android') { await notifee.stopForegroundService(); } //Get back media stream from camera or call `session.stop(extension)` const stream = await session.getUserMedia(mediaParams); }; return <>{/* ... */} } export default ScreenSharingComponent; ``` ### Screen Sharing on iOS [Section titled “Screen Sharing on iOS”](#screen-sharing-on-ios) Preform the [Screen Sharing integration for iOS](https://jitsi.github.io/handbook/docs/dev-guide/dev-guide-ios-sdk/#screen-sharing-integration) guide from Jitsi. Use `` component from ‘react-native-webrtc’ to prepare: ```javascript import React from 'react'; import { findNodeHandle, Platform, NativeModules } from 'react-native'; import { ScreenCapturePickerView } from 'react-native-webrtc'; /* ... */ const ScreenSharingComponent() { const screenCaptureView = React.useRef(null); const mediaParams = { audio: true, video: true, }; const startShareScreen = async () => { if (Platform.OS === 'ios') { const reactTag = findNodeHandle(screenCaptureView.current); await NativeModules.ScreenCapturePickerViewManager.show(reactTag); } // Capturing a screen const stream = await session.getDisplayMedia(); }; const stopShareScreen = async () => { // Get back media stream from camera or call `session.stop(extension)` const stream = await session.getUserMedia(mediaParams); }; return <> {/* ... */} {Platform.OS === 'ios' && ( )} } export default ScreenSharingComponent; ``` ## Get remote user bitrate [Section titled “Get remote user bitrate”](#get-remote-user-bitrate) ```javascript const bitrate = session.getRemoteUserBitrate(userId); ``` ## Get remote user mic level [Section titled “Get remote user mic level”](#get-remote-user-mic-level) ```javascript const micLevel = session.getRemoteUserVolume(userId); ``` ## Leave room and destroy conf session [Section titled “Leave room and destroy conf session”](#leave-room-and-destroy-conf-session) To leave current joined video room: ```javascript session .leave() .then(() => {}) .catch((error) => {}); ``` ## Retrieve meetings [Section titled “Retrieve meetings”](#retrieve-meetings) Retrieve a meeting by id: ```javascript const params = { _id: meetingId, }; ConnectyCube.meeting .get(params) .then((meeting) => {}) .catch((error) => {}); ``` Retrieve a list of meetings: ```javascript const params = { limit: 5, offset: 0 }; ConnectyCube.meeting .get(params) .then((meetings) => {}) .catch((error) => {}); ``` ## Edit meeting [Section titled “Edit meeting”](#edit-meeting) A meeting creator can edit a meeting: ```javascript const params = { name, start_date, end_date }; ConnectyCube.meeting .update(meetingId, params) .then((meeting) => {}) .catch((error) => {}); ``` ## Delete meeting [Section titled “Delete meeting”](#delete-meeting) A meeting creator can delete a meeting: ```javascript ConnectyCube.meeting .delete(meetingId) .then(() => {}) .catch((error) => {}); ``` ## Recording [Section titled “Recording”](#recording) Server-side recording is available. Read more about Recording feature ### Retrieve recordings with download url [Section titled “Retrieve recordings with download url”](#retrieve-recordings-with-download-url) ```javascript ConnectyCube.meeting .getRecordings(meetingId) .then(() => {}) .catch((error) => {}); ``` ## Continue call in background [Section titled “Continue call in background”](#continue-call-in-background) If you are developing dedicated apps for iOS and Android - it’s required to apply additional configuration for the app to keeping the call alive when it goes into the background. \*\*iOS: \*\* There is no way to continue a video call in background because of some OS restrictions. What is supported there is to continue with voice calling while an app is in background. Basically, the recommended to achieve this is to switch off device camera when an app goes to background and then switch camera on back when an app goes to foreground. Furthermore, even voice background call are blocked by default on iOS. To unblock - you need to setup proper background mode capabilities in your project. Please find the [Enabling Background Audio link](https://developer.apple.com/documentation/avfoundation/media_playback_and_selection/creating_a_basic_video_player_ios_and_tvos/enabling_background_audio) with more information how to do it properly. Generally speaking, you need to enable `Voice over IP` and `Remote notifications` capabilities:  \*\*Android: \*\* For Android, we also recommend to implement the same camera switch flow when go to background and then return to foreground. To keep the call while in background, we recomment to use the **react-native-background-actions** library. The flow is the following: * when start a call or go background -> display notification * when stop call or return to foreground -> hide notification ```javascript // Background Activity import BackgroundService from "react-native-background-actions"; startBackgroundMode = () => { this.stopBackgroundMode(); const options = { taskName: "AppName", taskTitle: "You have an active call", taskDesc: "Press to return", taskIcon: { name: "ic_notification", type: "mipmap", }, linkingURI: "appName://foreground", }; BackgroundService.start(async (params) => { await new Promise(async () => {}); }, options); }; stopBackgroundMode = (force = false) => { if (BackgroundService.isRunning() || force) { return BackgroundService.stop(); } }; ```
# Address Book
> Effortlessly upload, sync, and access ConnectyCube users from your phone contacts in your ReactNative app with Address Book API.
Address Book API provides an interface to work with phone address book, upload it to server and retrieve already registered ConnectyCube users from your address book. With conjunction of [User authentication via phone number](/reactnative/authentication-and-users#authentication-via-phone-number) you can easily organise a state of the art logic in your App where you can easily start chatting with your phone contacts, without adding them manually as friends - the same what you can see in WhatsApp, Telegram, Facebook Messenger and Viber. ## Upload Address Book [Section titled “Upload Address Book”](#upload-address-book) First of all you need to upload your Address Book to the backend. It’s a normal practice to do a full upload for the 1st time and then upload diffs on future app logins. ```javascript const CONTACTS = [ { name: "Gordie Kann", phone: "1879108395", }, { name: "Wildon Gilleon", phone: "2759108396", }, { name: "Gaston Center", phone: "3759108396", }, ]; const options = {}; // const options = {'force': 1, 'udid': 'XXX'}; ConnectyCube.addressbook .uploadAddressBook(CONTACTS, options) .then(() => {}) .catch((error) => {}); ``` Response example from `ConnectyCube.addressbook.uploadAddressBook(params)` - [see](/server/address_book#response) * You also can edit an existing contact by providing a new name for it. * You also can upload more contacts, not just all in one request - they will be added to your address book on the backend. If you want to override the whole address book on the backend - just provide `force: 1` option. * You also can remove a contact by setting `contact.destroy = 1;` * A device UDID is used in cases where user has 2 or more devices and contacts sync is off. Otherwise - user has a single global address book. ## Retrieve Address Book [Section titled “Retrieve Address Book”](#retrieve-address-book) If you want you can retrieve your uploaded address book: ```javascript ConnectyCube.addressbook .get() .then((result) => {}) .catch((error) => {}); ``` or with UDID: ```javascript const UDID = "XXX"; ConnectyCube.addressbook .get(UDID) .then((result) => {}) .catch((error) => {}); ``` Response example from `ConnectyCube.addressbook.get()` - [see](/server/address_book#response-1) ## Retrieve Registered Users [Section titled “Retrieve Registered Users”](#retrieve-registered-users) Using this request you can easily retrieve the ConnectyCube users - you phone Address Book contacts that already registered in your app, so you can start communicate with these users right away: ```javascript ConnectyCube.addressbook .getRegisteredUsers() .then((result) => {}) .catch((error) => {}); ``` Response example from `ConnectyCube.addressbook.getRegisteredUsers()` - [see](/server/address_book#response-2) If isCompact = true - server will return only id and phone fields of User. Otherwise - all User’s fields will be returned. ## Push notification on new contact joined [Section titled “Push notification on new contact joined”](#push-notification-on-new-contact-joined) There is a way to get a push notification when some contact from your Address Book registered in an app. You can enable this feature at [ConnectyCube Dashboard](https://admin.connectycube.com), Users module, Settings tab: 
# Authentication and Users
> Simplify user authentication in your ReactNative app with our definitive API guide. Fortify your app's defenses and protect user data effectively.
Every user has to authenticate with ConnectyCube before using any ConnectyCube functionality. When someone connects with an application using ConnectyCube, the application will need to obtain a session token which provides temporary, secure access to ConnectyCube APIs. A session token is an opaque string that identifies a user and an application. ## Create session token [Section titled “Create session token”](#create-session-token) As a starting point, the user’s session token needs to be created allowing user any further actions within the app. Pass login/email and password to identify a user: ```javascript const userCredentials = { login: "cubeuser", password: "awesomepwd" }; ConnectyCube.createSession(userCredentials) .then((session) => {}) .catch((error) => {}); ``` **Note:** With the request above, **the user is created automatically on the fly upon session creation** using the login (or email) and password from the request parameters. **Important:** For better security it is recommended to deny the session creation without an existing user.\ For this, set ‘Session creation without an existing user entity’ to **Deny** under the **Application -> Overview -> Permissions** in the [admin panel](https://admin.connectycube.com/apps). ### Authentication via phone number [Section titled “Authentication via phone number”](#authentication-via-phone-number) Sign In with phone number is supported with ([Firebase integration](https://firebase.google.com/docs/auth/web/phone-auth)). You need to create Firebase `project_id` and obtain Firebase `access_token` after SMS code verification, then pass these parameters to `login` method: ```javascript const userCredentials = { provider: "firebase_phone", "firebase_phone[project_id]": "...", "firebase_phone[access_token]": "...", }; ConnectyCube.createSession(userCredentials) .then((user) => {}) .catch((error) => {}); ``` > **Note** > > In order to login via phone number you need to create a session token first. ### Authentication via Firebase email [Section titled “Authentication via Firebase email”](#authentication-via-firebase-email) Sign In with email is supported with ([Firebase integration](https://firebase.google.com/docs/auth/web/password-auth)). You need to create Firebase `project_id` and obtain Firebase `access_token` after email/password verification, then pass these parameters to `login` method: ```javascript const userCredentials = { provider: 'firebase_email', firebase_email: { project_id: 'XXXXXXXXXXX', access_token: 'XXXXXXXXXXXYYYYYY' } }; ConnectyCube.createSession(userCredentials) .then((user) => {}) .catch((error) => {}); ``` > **Note** > > In order to login via email you need to create a session token first. ### Authentication via external identity provider [Section titled “Authentication via external identity provider”](#authentication-via-external-identity-provider) **Custom Identity Provider (CIdP)** feature is necessary if you have your own user database and want to authenticate users in ConnectyCube against it. It works the same way as Facebook/Twitter SSO. With Custom Identity Provider feature you can continue use your user database instead of storing/copying user data to ConnectyCube database. #### CIdP high level integration flow [Section titled “CIdP high level integration flow”](#cidp-high-level-integration-flow) To get started with **CIdP** integration, check the [Custom Identity Provider guide](/guides/custom-identity-provider) which describes high level integration flow. #### How to login via CIdP [Section titled “How to login via CIdP”](#how-to-login-via-cidp) Once you done with the setup mapping in ConnectyCube Dashboard, it’s time to verify the integration. To perform CIdP login, the same ConnectyCube [User Login API](/reactnative/authentication-and-users/#upgrade-session-token-user-login) is used. You just use existing login request params to pass your external user token: ```javascript const userCredentials = { login: "eyJhbGciOiJIUzI1NiIsInR5cCI6IkpXVCJ9.eyJpZCI6MTIzNDU2Nzg5LCJuYW1lIjoiSm9zZXBoIn0.OpOSSw7e485LOP5PrzScxHb7SR6sAOMRckfFwi4rp7o" }; ConnectyCube.createSession(userCredentials) .then((user) => {}) .catch((error) => {}); ``` Once the login is successful, ConnectyCube will create an underalying User entity, so then you can use ConnectyCube APIs in a same way as you do with a normal login. With CIdP we do not have/store any user password in ConnectyCube User entity. Following further integration, you may need to connect to Chat. In a case of CIdP login, you do not have a user password. In such cases you should use ConnectyCube session token as a password for chat connection. [Follow the Connect to Chat with CIdP guide](/reactnative/messaging/#connect-to-chat-using-custom-authentication-providers). ### Create guest session [Section titled “Create guest session”](#create-guest-session) To create a session with guest user use the following code: ```javascript const guestUserCredentials = { guest: '1', full_name: 'Awesome Smith' }; ConnectyCube.createSession(guestUserCredentials) .then((session) => {}) .catch((error) => {}); ``` ## Session expiration [Section titled “Session expiration”](#session-expiration) Expiration time for session token is 2 hours after last request to API. If you perform query with expired token, you will receive the error **Required session does not exist**. In this case you need to recreate a session token. There is a special callback function to handle this case: ```javascript const CONFIG = { on: { sessionExpired: (handleResponse, retry) => { // call handleResponse() if you do not want to process a session expiration, // so an error will be returned to origin request // handleResponse(); ConnectyCube.createSession() .then(retry) .catch((error) => {}); }, }, }; ConnectyCube.init(CREDENTIALS, CONFIG); ``` ## Destroy session token [Section titled “Destroy session token”](#destroy-session-token) To destroy a session use the following code: ```javascript ConnectyCube.destroySession().catch((error) => {}); ``` ## User signup [Section titled “User signup”](#user-signup) Only login (or email) + password are required for user to sign up. Other parameters are optional: ```javascript const userProfile = { login: "marvin18", password: "supersecurepwd", email: "awesomeman@gmail.com", full_name: "Marvin Simon", phone: "47802323143", website: "https://dozensofdreams.com", tag_list: ["iphone", "apple"], custom_data: JSON.stringify({ middle_name: "Bartoleo" }), }; ConnectyCube.users .signup(userProfile) .then((user) => {}) .catch((error) => {}); ``` ## User profile update [Section titled “User profile update”](#user-profile-update) ```javascript const updatedUserProfile = { login: "marvin18sim", full_name: "Mar Sim", }; ConnectyCube.users .update(updatedUserProfile) .then((user) => {}) .catch((error) => {}); ``` If you want to change your password, you need to provide 2 parameters: `password` and `old_password`. Updated `user` entity will be returned. ## User avatar [Section titled “User avatar”](#user-avatar) You can set a user’s avatar. You just need to upload it to the ConnectyCube cloud storage and then connect to user. ```javascript // for example, a file from HTML form input field const inputFile = $("input[type=file]")[0].files[0]; const fileParams = { name: inputFile.name, file: inputFile, type: inputFile.type, size: inputFile.size, public: false, }; const updateUser = (uploadedFile) => { const updatedUserProfile = { avatar: uploadedFile.uid }; return ConnectyCube.users.update(updatedUserProfile); }; ConnectyCube.storage .createAndUpload(fileParams) .then(updateUser) .then((updatedUser) => {}) .catch((error) => {}); ``` Now, other users can get you avatar: ```javascript const avatarUID = updatedUser.avatar; const avatarURL = ConnectyCube.storage.privateUrl(avatarUID); const avatarHTML = ""; ``` ## Password reset [Section titled “Password reset”](#password-reset) It’s possible to reset a password via email: ```javascript ConnectyCube.users .resetPassword("awesomeman@gmail.com") .then((result) => {}) .catch((error) => {}); ``` If provided email is valid - an email with password reset instruction will be sent to it. ## Retrieve users V2 [Section titled “Retrieve users V2”](#retrieve-users-v2) ### Examples [Section titled “Examples”](#examples) Retrieve users by ID ```javascript const searchParams = { limit: 10, offset: 50, id: { in: [51941, 51946] } } ConnectyCube.users.getV2(searchParams) .then((result) => {}) .catch((error) => {}); ``` Retrieve users by login ```javascript const searchParams = { login: 'adminFirstUser' } ConnectyCube.users.getV2(searchParams) .then((result) => {}) .catch((error) => {}); ``` Retrieve users by last\_request\_at ```javascript const date = new Date(2017, 10, 10) const searchParams = { last_request_at: { gt: date } } ConnectyCube.users.getV2(searchParams) .then((result) => {}) .catch((error) => {}); ``` More information (fields, operators, request rules) available [here](/server/users#retrieve-users-v2) ## Retrieve users V1 (**Deprecated**) [Section titled “Retrieve users V1 (Deprecated)”](#retrieve-users-v1-deprecated) ### Retrieve users by ID (**Deprecated**) [Section titled “Retrieve users by ID (Deprecated)”](#retrieve-users-by-id-deprecated) ```javascript const params = { page: 1, per_page: 5, filter: { field: "id", param: "in", value: [51941, 51946], }, }; ConnectyCube.users .get(params) .then((result) => {}) .catch((error) => {}); ``` ### Retrieve user by login (**Deprecated**) [Section titled “Retrieve user by login (Deprecated)”](#retrieve-user-by-login-deprecated) ```javascript const searchParams = { login: "marvin18" }; ConnectyCube.users .get(searchParams) .then((result) => {}) .catch((error) => {}); ``` ### Retrieve user by email (**Deprecated**) [Section titled “Retrieve user by email (Deprecated)”](#retrieve-user-by-email-deprecated) ```javascript const searchParams = { email: "marvin18@example.com" }; ConnectyCube.users .get(searchParams) .then((result) => {}) .catch((error) => {}); ``` ### Retrieve users by full name (**Deprecated**) [Section titled “Retrieve users by full name (Deprecated)”](#retrieve-users-by-full-name-deprecated) ```javascript const searchParams = { full_name: "Marvin Samuel" }; ConnectyCube.users .get(searchParams) .then((result) => {}) .catch((error) => {}); ``` ### Retrieve user by phone number (**Deprecated**) [Section titled “Retrieve user by phone number (Deprecated)”](#retrieve-user-by-phone-number-deprecated) ```javascript const searchParams = { phone: "44678162873" }; ConnectyCube.users .get(searchParams) .then((result) => {}) .catch((error) => {}); ``` ### Retrieve user by external ID (**Deprecated**) [Section titled “Retrieve user by external ID (Deprecated)”](#retrieve-user-by-external-id-deprecated) ```javascript const searchParams = { external_user_id: "675373912" }; ConnectyCube.users .get(searchParams) .then((result) => {}) .catch((error) => {}); ``` ### Retrieve users by tags (**Deprecated**) [Section titled “Retrieve users by tags (Deprecated)”](#retrieve-users-by-tags-deprecated) ```javascript const searchParams = { tags: ["apple"] }; ConnectyCube.users .get(searchParams) .then((result) => {}) .catch((error) => {}); ``` ## Delete user [Section titled “Delete user”](#delete-user) A user can delete himself from the platform: ```javascript ConnectyCube.users .delete() .then((result) => {}) .catch((error) => {}); ```
# Custom Data
> Maximize your ReactNative app's potential with customizable data cloud storage solutions. Tailor data structures to match your application's unique requirements.
Custom Data, also known as cloud tables or custom objects, provide users with the flexibility to define and manage data in a way that is specific to their application’s requirements. Here are some common reasons why you might need use custom data in your app: * Custom Data allows you to define data structures that align precisely with your application’s needs. This is particularly useful when dealing with complex or unique data types that don’t fit well into standard ConnectyCube models. * In certain applications, there may be entities or objects that are unique to that particular use case. Custom Data enable the representation of these entities in the database, ensuring that the data storage is optimized for the application’s logic. * Custom Data allows you to extend the functionality of the app by introducing new types of data that go beyond what the ConnectyCube platform’s standard models support. Custom Data empower you to introduce these extensions and additional features. * In situations where data needs to be migrated from an existing system or transformed in a specific way, Custom Data offer the flexibility to accommodate these requirements. * Your application needs to integrate with external systems or APIs, Custom Data can be designed to align seamlessly with the data structures of your external systems. ## Get started with SDK [Section titled “Get started with SDK”](#get-started-with-sdk) Follow the [Getting Started guide](/js/) on how to connect ConnectyCube SDK and start building your first app. ## Preparations [Section titled “Preparations”](#preparations) In order to start using Custom Data you need first create the data scheme in the ConnectyCube Admin panel. For it navigate to **`Home -> Your App -> Custom -> List`** then click on **`ADD`** and from the dropdown menu select **`ADD NEW CLASS`**. In the opened dialog, enter your model name and add the necessary fields. The ConnectyCube Custom Data models’ fields support various data types or arrays (except `Location`). These include: * Integer (e.g. `8222456`); * Float (e.g. `1.25`); * Boolean (`true` or `false`); * String (e.g. `"some text"`); * Location (the array what consist of **two** `numbers`s); After adding all the required fields, click the **`CREATE CLASS`** button to save your scheme.  Newly created class is now available and contains the following data: * **\_id** - record identifier generated by system automatically * **user\_id** - identifier of user who created a record * **\_parent\_id** - by default is null * **field\_1** - field defined in a scheme * **field\_2** - field defined in a scheme * … * **field\_N** - field defined in a scheme * **created\_at** - date and time when a record is created  After that you can perform all **CRUD** operations with your Custom Data. > **Note**: The **Class name** field will be represented as the DB table name and will be used for identification of your requests during the work with Custom Data. ## Permissions [Section titled “Permissions”](#permissions) Access control list (ACL) is a list of permissions attached to some object. An ACL specifies which users have an access to objects, as well as what operations are allowed with such objects. Each entry in a typical ACL specifies a subject and an operation. ACL models may be applied to collections of objects as well as to individual entities within the system’s hierarchy. Adding the Access Control list is only available within the Custom Data module. ### Permissions scheme [Section titled “Permissions scheme”](#permissions-scheme) ConnectyCube permission scheme contains five permissions levels: * **Open** (open) - any user within the application can access the record(s) in the class and perform actions with the record * **Owner** (owner) - only the Owner (the user who created a record) is authorized to perform actions with the record * **Not allowed** (not\_allowed) - no one (except the Account Administrator) can proceed with a chosen action * **Open for groups** (open\_for\_groups) - users with the specified tag(s) will be included in the group that is authorized to perform actions with a record. Multiple groups can be specified (number of groups is not limited). * **Open for users ids** (open\_for\_users\_ids) - only users with listed IDs can perform actions with a record. Actions for work with an entity: * **Create** - create a new record * **Read** - retrieve information about a record and view it in the read-only mode * **Update** - update any parameter of the chosen record that can be updated by user * **Delete** - delete a record To set a permission schema for the Class, go to ConnectyCube dashboard and find a required class within Custom Data module Click on **`EDIT PERMISSION`** button to open permissions schema to edit. Each listed action has a separate permission level to select. The exception is a ‘Create’ action that isn’t available for ‘Owner’ permission level.  ### Permission levels [Section titled “Permission levels”](#permission-levels) Two access levels are available in the ConnectyCube: access to Class and access to Record. Only one permission schema can be applied for the record. Using the Class permission schema means that the Record permission schema won’t be affected on a reсord. **Class entity** **Class** is an entity that contains records. Class can be created via ConnectyCube dashboard only within Custom data module. Operations with Class entity are not allowed in API. All actions (Create, Read, Update and Delete) that are available for the ‘Class’ entity are also applicable for all records within a class. Default Class permission schema is using during the creation of a class: * **Create:** Open * **Read:** Open * **Update:** Owner * **Delete:** Owner To enable applying Class permissions for any of the action types, ‘Use Class permissions’ check box should be ticked. It means that the record permission schema (if existing) won’t be affected on a record. **Record entity** **Record** is an entity within the Class in the Custom Data module that can be created in ConnectyCube dashboard and via API. Each record within a Class has its own permission level. Unlike Class entity, ‘Not allowed’ permission level isn’t available for a record as well as only three actions are available to work with a record - read, update and delete. Default values for Record permission scheme: * Read: Open * Update: Owner * Delete: Owner To set a separate permission scheme for a record, open a record to edit and click on **`SET PERMISSION ON RECORD`** button:  Define the permission level for each of available actions. ## Create a new record [Section titled “Create a new record”](#create-a-new-record) Create a new record with the defined parameters in the class. Fields that weren’t defined in the request but are available in the scheme (class) will have null values. ```javascript const className = 'call_history_item'; const record = { 'call_name': 'Group call', 'call_participants': [2325293, 563541, 563543], 'call_start_time': 1701789791673, 'call_end_time': 0, 'call_duration': 0, 'call_state': 'accepted', 'is_group_call': true, 'call_id': 'f8c3de3d-1fea-4d7c-a8b0-29f63c4c3454', 'user_id': 2325293, 'caller_location': [50.004444, 36.234380] } try { const result = await ConnectyCube.data.create(className, record); console.log(result) } catch (error) { console.error(error) } ``` ### Create a record with permissions [Section titled “Create a record with permissions”](#create-a-record-with-permissions) To create a new record with permissions, add the `permissions` parameter to a record. In this case, the request will look like this: ```javascript const className = 'call_history_item'; const record = { call_name: 'Group call', call_participants: [2325293, 563541, 563543], call_start_time: 1701789791673, call_end_time: 0, call_duration: 0, call_state: 'accepted', is_group_call: true, call_id: 'f8c3de3d-1fea-4d7c-a8b0-29f63c4c3454', user_id: 2325293, caller_location: [50.004444, 36.234380], permissions: { read: { access: 'owner' }, update: { access: 'open_for_users_ids', ids: [563541, 563543] }, delete: { access: 'open_for_groups', groups: ['group87', 'group108'] } } } try { const result = await ConnectyCube.data.create(className, record); console.log(result) } catch (error) { console.error(error) } ``` ## Create multi records [Section titled “Create multi records”](#create-multi-records) Create several new records in the class. Fields that weren’t defined in the request but available in the scheme would have null values. ```javascript const className = 'call_history_item'; const record_1 = { 'call_name': 'Group call 1', 'call_participants': [2325293, 563541, 563543], 'call_start_time': 1701789791673, 'call_end_time': 0, 'call_duration': 0, 'call_state': 'accepted', 'is_group_call': true, 'call_id': 'f8c3de3d-1fea-4d7c-a8b0-29f63c4c3454', 'user_id': 2325293, 'caller_location': [50.004444, 36.234380] } const record_2 = { 'call_name': 'Group call 2', 'call_participants': [2325293, 563541, 563543], 'call_start_time': 1701789832955, 'call_end_time': 0, 'call_duration': 0, 'call_state': 'accepted', 'is_group_call': true, 'call_id': 'a2a7bc3f-2eeb-3d72-11b0-566d3c4c2748', 'user_id': 2325293, 'caller_location': [50.004444, 36.234380] } const records = [record_1, record_2] try { const result = await ConnectyCube.data.create(className, records); console.log(result.items) } catch (error) { console.error(error) } ``` ## Retrieve record by ID [Section titled “Retrieve record by ID”](#retrieve-record-by-id) Retrieve the record by specifying its identifier. ```javascript const className = 'call_history_item'; const id = '656f407e29d6c5002fce89dc'; try { const result = await ConnectyCube.data.list(className, id); console.log(result.items) } catch (error) { console.error(error) } ``` ## Retrieve records by IDs [Section titled “Retrieve records by IDs”](#retrieve-records-by-ids) Retrieve records by specifying their identifiers. ```javascript const className = 'call_history_item'; const ids = ['656f407e29d6c5002fce89dc', '5f985984ca8bf43530e81233']; // or `const ids = '656f407e29d6c5002fce89dc,5f985984ca8bf43530e81233'`; try { const result = await ConnectyCube.data.list(className, ids); console.log(result.items) } catch (error) { console.error(error) } ``` ## Retrieve records within a class [Section titled “Retrieve records within a class”](#retrieve-records-within-a-class) Search records within the particular class. > **Note:** If you are sorting records by time, use the `_id` field. It is indexed and it will be much faster than sorting by `created_at` field. The list of additional parameter for sorting, filtering, aggregation of the search response is provided by link ```javascript const className = 'call_history_item'; const filters = { call_start_time: { gt: 1701789791673 } }; try { const result = await ConnectyCube.data.list(className, filter); console.log(result.items) } catch (error) { console.error(error) } ``` ## Retrieve the record’s permissions [Section titled “Retrieve the record’s permissions”](#retrieve-the-records-permissions) > **Note:** record permissions are checked during request processing. Only the owner has an ability to view a record’s permissions. ```javascript const className = 'call_history_item'; const id = '656f407e29d6c5002fce89dc'; try { const result = await ConnectyCube.data.readPermissions(className, id); console.log(result.permissions) console.log(result.record_is) } catch (error) { console.error(error) } ``` ## Update record by ID [Section titled “Update record by ID”](#update-record-by-id) Update record data by specifying its ID. ```javascript const className = 'call_history_item'; const params = { id: '656f407e29d6c5002fce89dc', call_end_time: 1701945033120, }; try { const result = await ConnectyCube.data.update(className, params); console.log(result) } catch (error) { console.error(error) } ``` ## Update records by criteria [Section titled “Update records by criteria”](#update-records-by-criteria) Update records found by the specified search criteria with a new parameter(s). The structure of the parameter `search_criteria` and the list of available operators provided by link ```javascript const className = 'call_history_item'; const params = { search_criteria: { user_id: 1234567 }, call_name: 'Deleted user' }; try { const result = await ConnectyCube.data.update(className, params); console.log(result.items) } catch (error) { console.error(error) } ``` ## Update multi records [Section titled “Update multi records”](#update-multi-records) Update several records within a class by specifying new values. ```javascript const className = 'call_history_item'; const params = [{ id: '656f407e29d6c5002fce89dc', call_end_time: 1701945033120, }, { id: '5f998d3bca8bf4140543f79a', call_end_time: 1701945033120, }]; try { const result = await ConnectyCube.data.update(className, params); console.log(result.items) } catch (error) { console.error(error) } ``` ## Delete record by ID [Section titled “Delete record by ID”](#delete-record-by-id) Delete a record from a class by record identifier. ```javascript const className = 'call_history_item'; const id = '5f998d3bca8bf4140543f79a'; try { await ConnectyCube.data.delete(className, id); } catch (error) { console.error(error) } ``` ## Delete several records by their IDs [Section titled “Delete several records by their IDs”](#delete-several-records-by-their-ids) Delete several records from a class by specifying their identifiers. If one or more records can not be deleted, an appropriate error is returned for that record(s). ```javascript const className = 'call_history_item'; const ids = ['656f407e29d6c5002fce89dc', '5f998d3bca8bf4140543f79a']; try { const result = await ConnectyCube.data.delete(className, id); console.log(result) } catch (error) { console.error(error) } ``` ## Delete records by criteria [Section titled “Delete records by criteria”](#delete-records-by-criteria) Delete records from the class by specifying a criteria to find records to delete. The search query format is provided by link ```javascript const className = 'call_history_item'; const params = { call_id: { in: ['f8c3de3d-1fea-4d7c-a8b0-29f63c4c3454'] } }; try { const result = await ConnectyCube.data.delete(className, params); console.log(result) } catch (error) { console.error(error) } ``` ## Relations [Section titled “Relations”](#relations) Objects (records) in different classes can be linked with a `parentId` field. If the record from the **Class 1** is pointed with a record from **Class 2** via its `parentId`, the `parentId` field will contain an ID of a record from the **Class 2**. If a record from the **Class 2** is deleted, all its children (records of the **Class 1** with `parentId` field set to the **Class 2** record ID) will be automatically deleted as well. The linked children can be retrieved with `_parent_id={id_of_parent_class_record}` parameter.
# Push Notifications
> Elevate ReactNative app's performance with push notifications API guide. Keep users engaged with real-time updates, ensuring seamless interaction on the go.
Push Notifications provide a way to deliver some information to users while they are not using your app actively. The following use cases can be covered additionally with push notifications: * send a chat message when a recipient is offline (a push notification will be initiated automatically in this case) * make a video call with offline opponents (need to send a push notification manually) > Ready push notifications code sample DEMO is available as a part of [React Native Chat code sample](https://github.com/ConnectyCube/connectycube-reactnative-samples/tree/master/RNChat) (src/services/push-notification.js) > Ready push notifications + VOIP push notifications + CallKit code sample DEMO is available as a part of [React Native Video Chat code sample](https://github.com/ConnectyCube/connectycube-reactnative-samples/tree/master/RNVideoChat) ## Configuration [Section titled “Configuration”](#configuration) In order to start work with push notifications you need to configure it. First of all we need to install [react-native-notifications](https://github.com/wix/react-native-notifications) lib. Just follow the ‘Installation’ guide in the lib’s README and then do the rest manual setup steps. Then follow the platform specific steps. ### iOS [Section titled “iOS”](#ios) 1. First of all you need to generate Apple push certificate (\*.p12 file) and upload it to ConnectyCube dashboard. Here is a guide on how to create a certificate 2. Upload Apple push certificate (\*.p12 file) to ConnectyCube dashboard: * Open your ConnectyCube Dashboard at [admin.connectycube.com](https://admin.connectycube.com) * Go to **Push notifications** module, **Credentials** page * Upload the newly created APNS certificate on **Apple Push Notification Service (APNS)** form.  3. Lastly, open Xcode project of your Flutter app and enable Push Notifications capabilities. Open Xcode, choose your project file, Signing & Capabilities tab and then add a Push Notifications capability. Also - tick a ‘Remote notifications’ checkbox in Background Modes section. 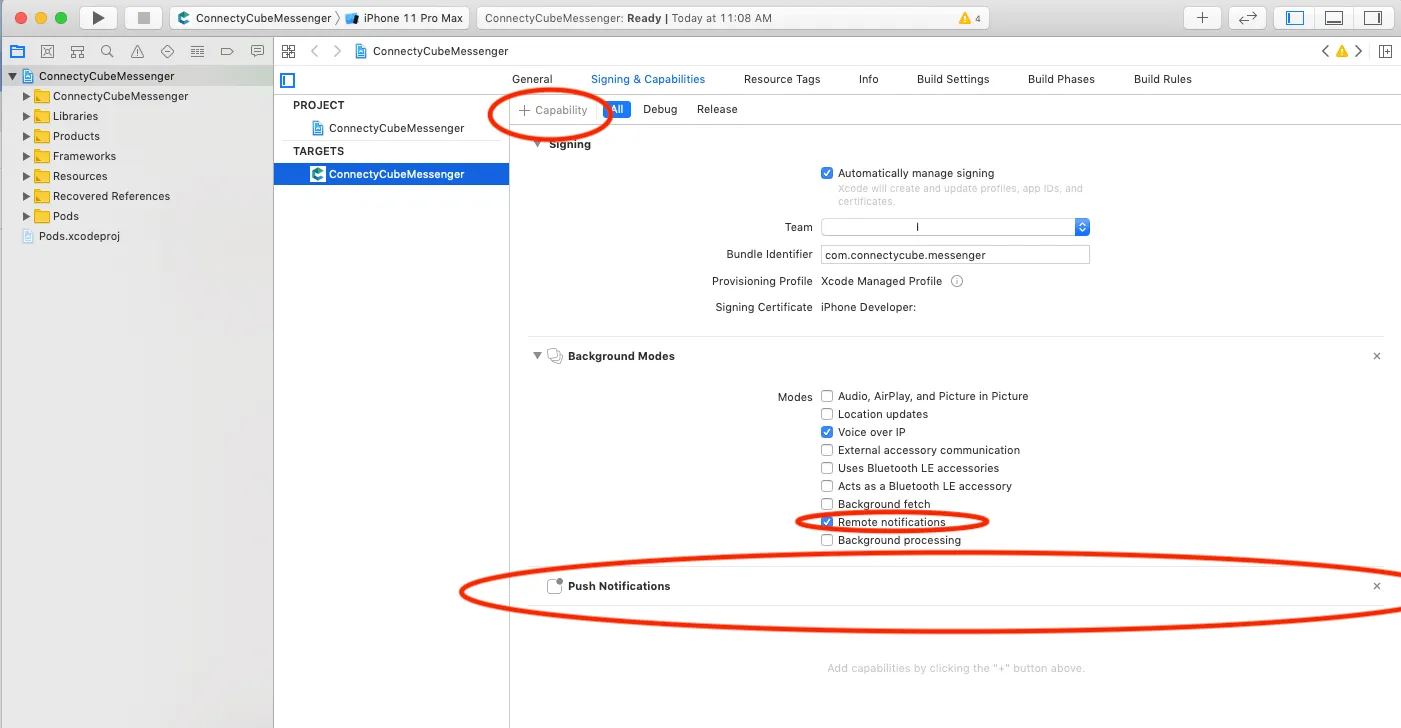 ### Android [Section titled “Android”](#android) #### Configure Firebase project and Service account key (recommended) [Section titled “Configure Firebase project and Service account key (recommended)”](#configure-firebase-project-and-service-account-key-recommended) In order to start working with push notifications functionality you need to configure it. 1. Create and configure your [Firebase project](https://console.firebase.google.com) and obtain the **Service account key**. If you have any difficulties with Firebase project registration, [follow our guide](/android/firebase-setup-guide). To find your **FCM service account key** go to your **Firebase console > Cloud Messaging > Manage Service Accounts** section: 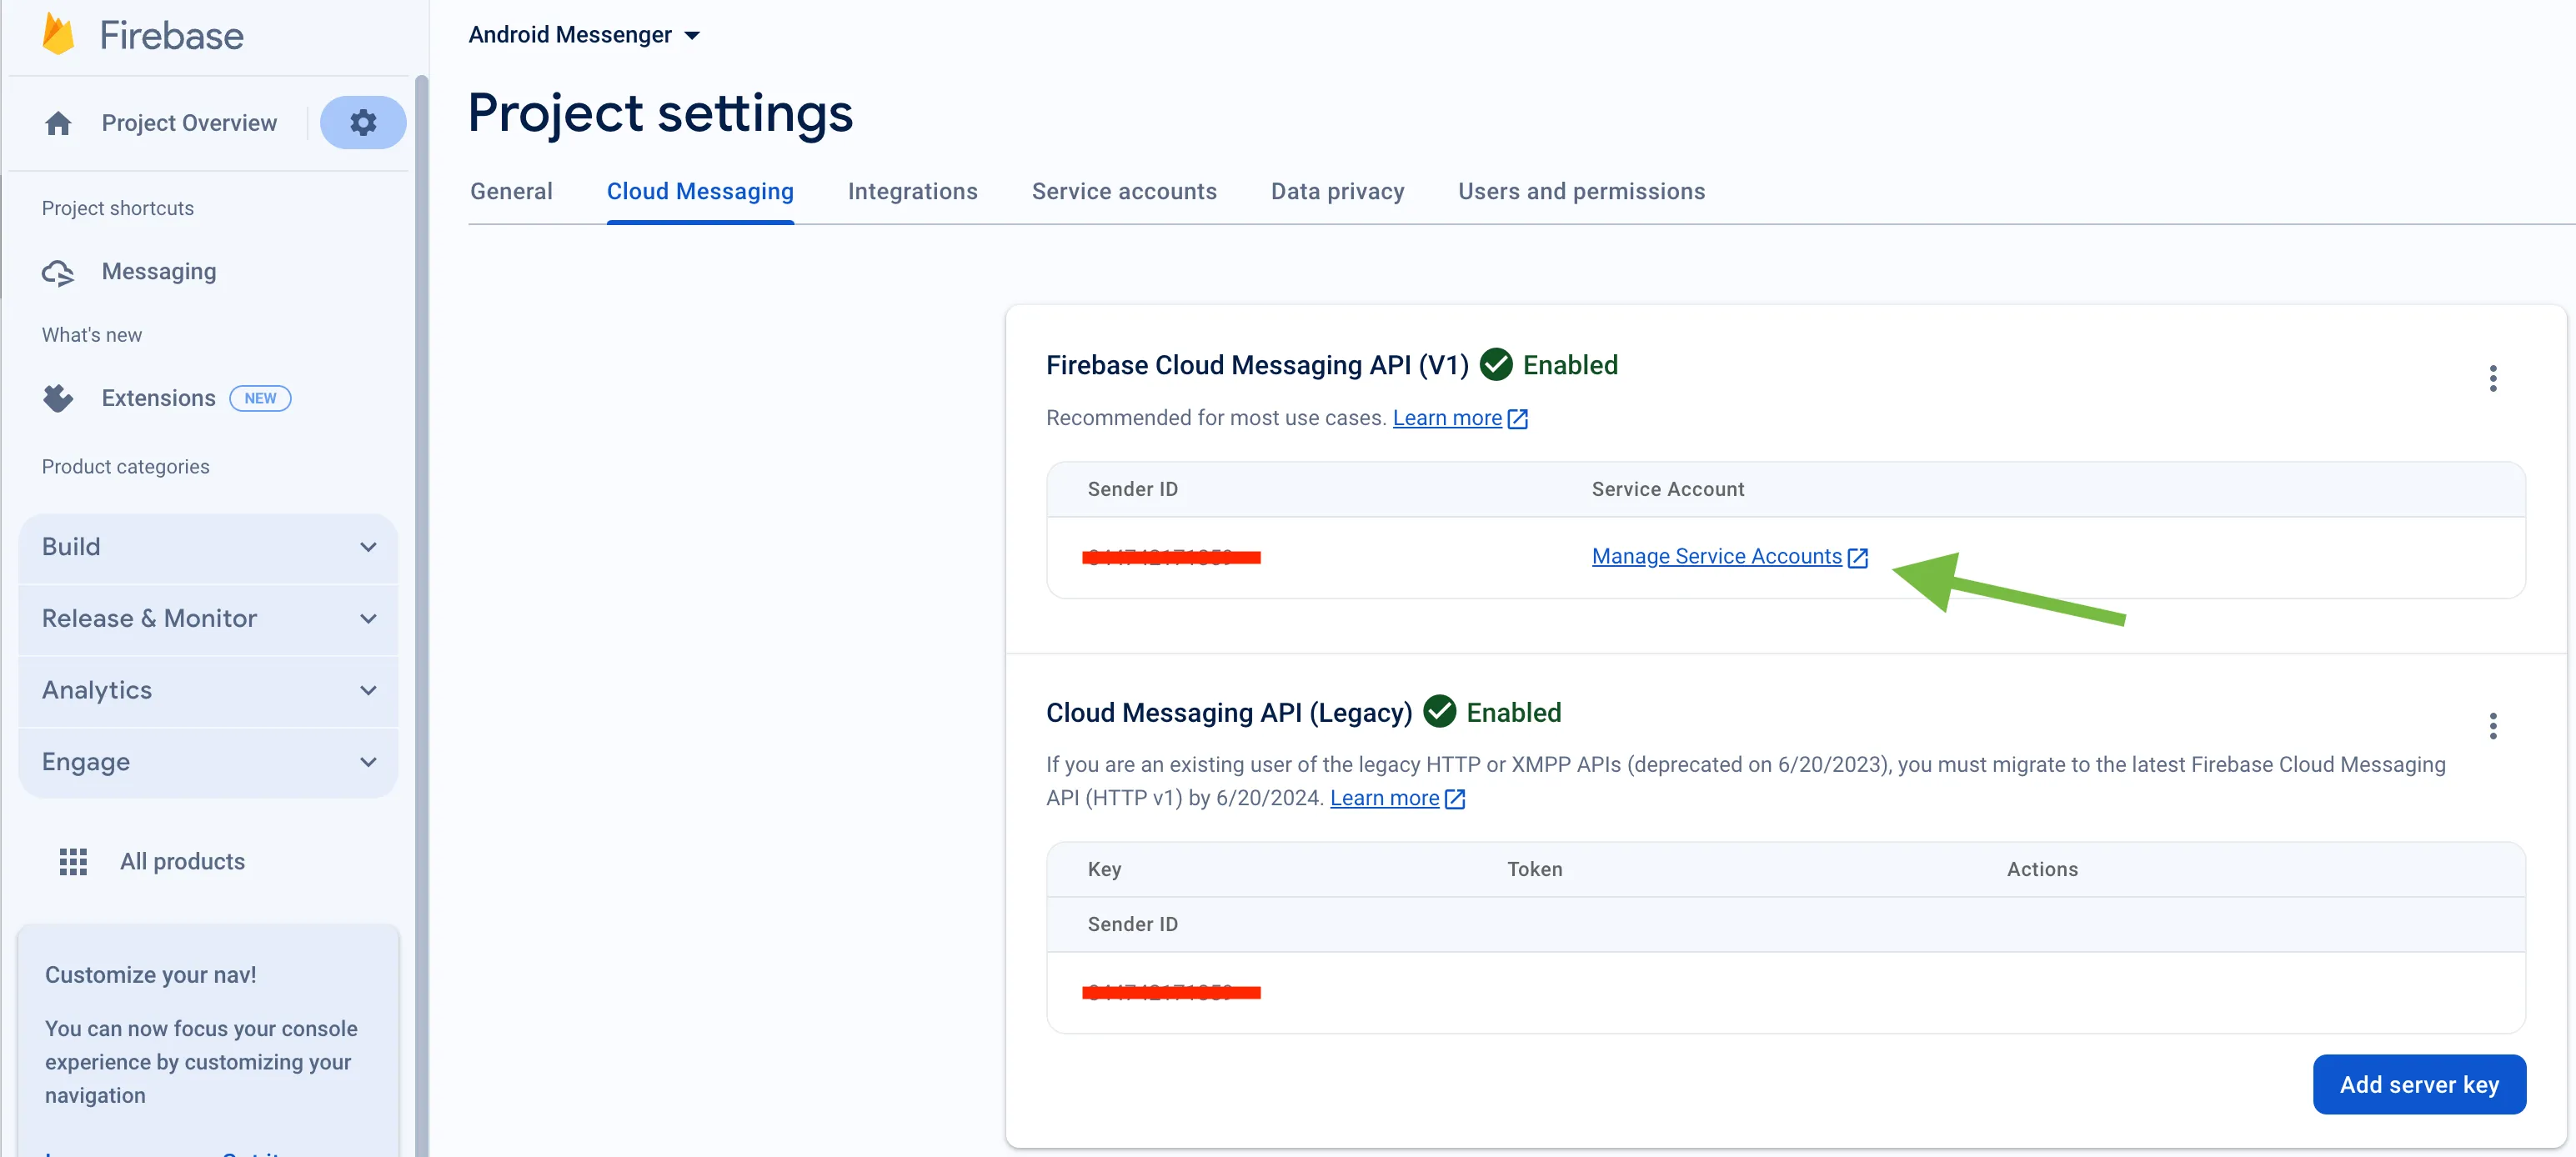 2. Select and configure **Manage Keys** option:  3. Select **ADD KEY**, **Create new key**: 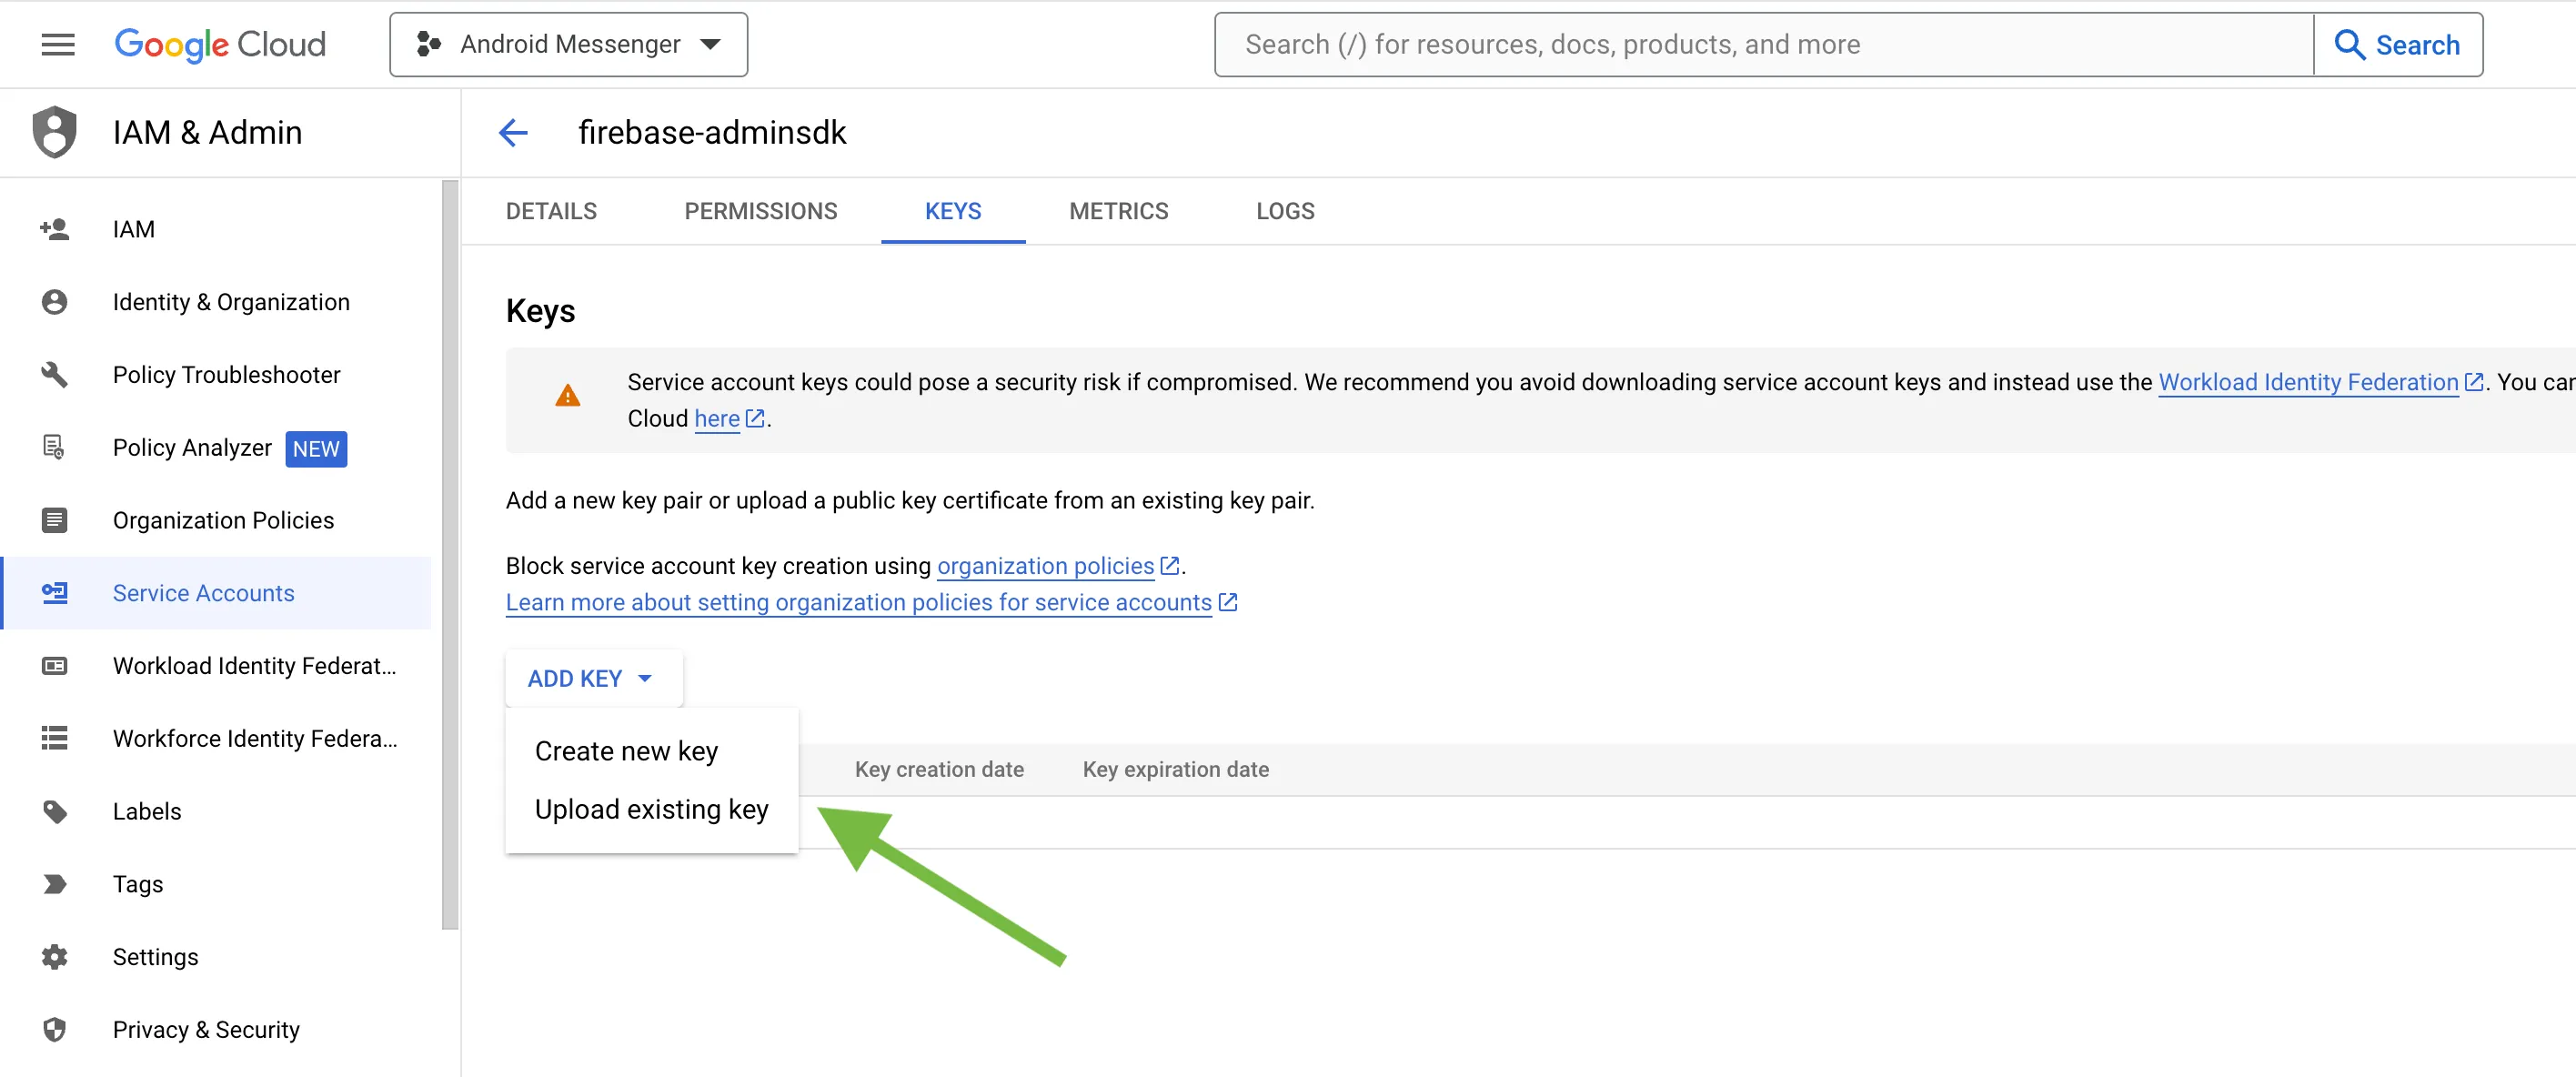 4. Select **Key type** (json recommended) and create: 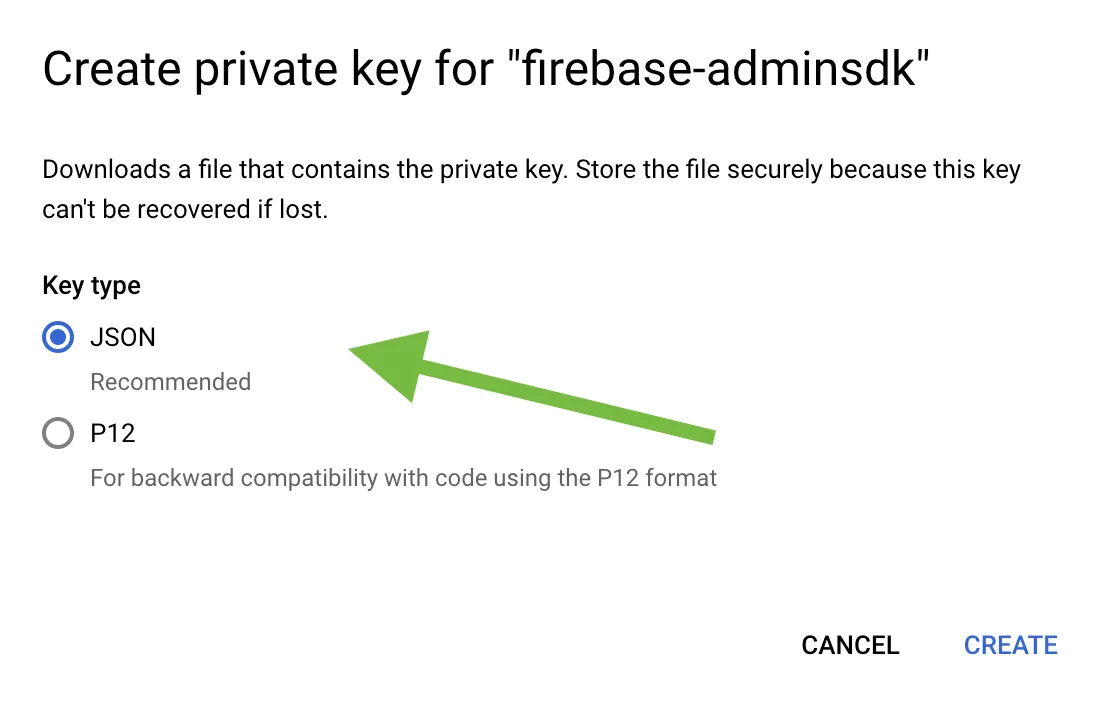 5. Save it locally:  6. Browse your saved **FCM Service account key** in your **Dashboard > Your App > Push Notifications > Credentials**, select the environment for which you are adding the key. Use the same key for development and production zones. 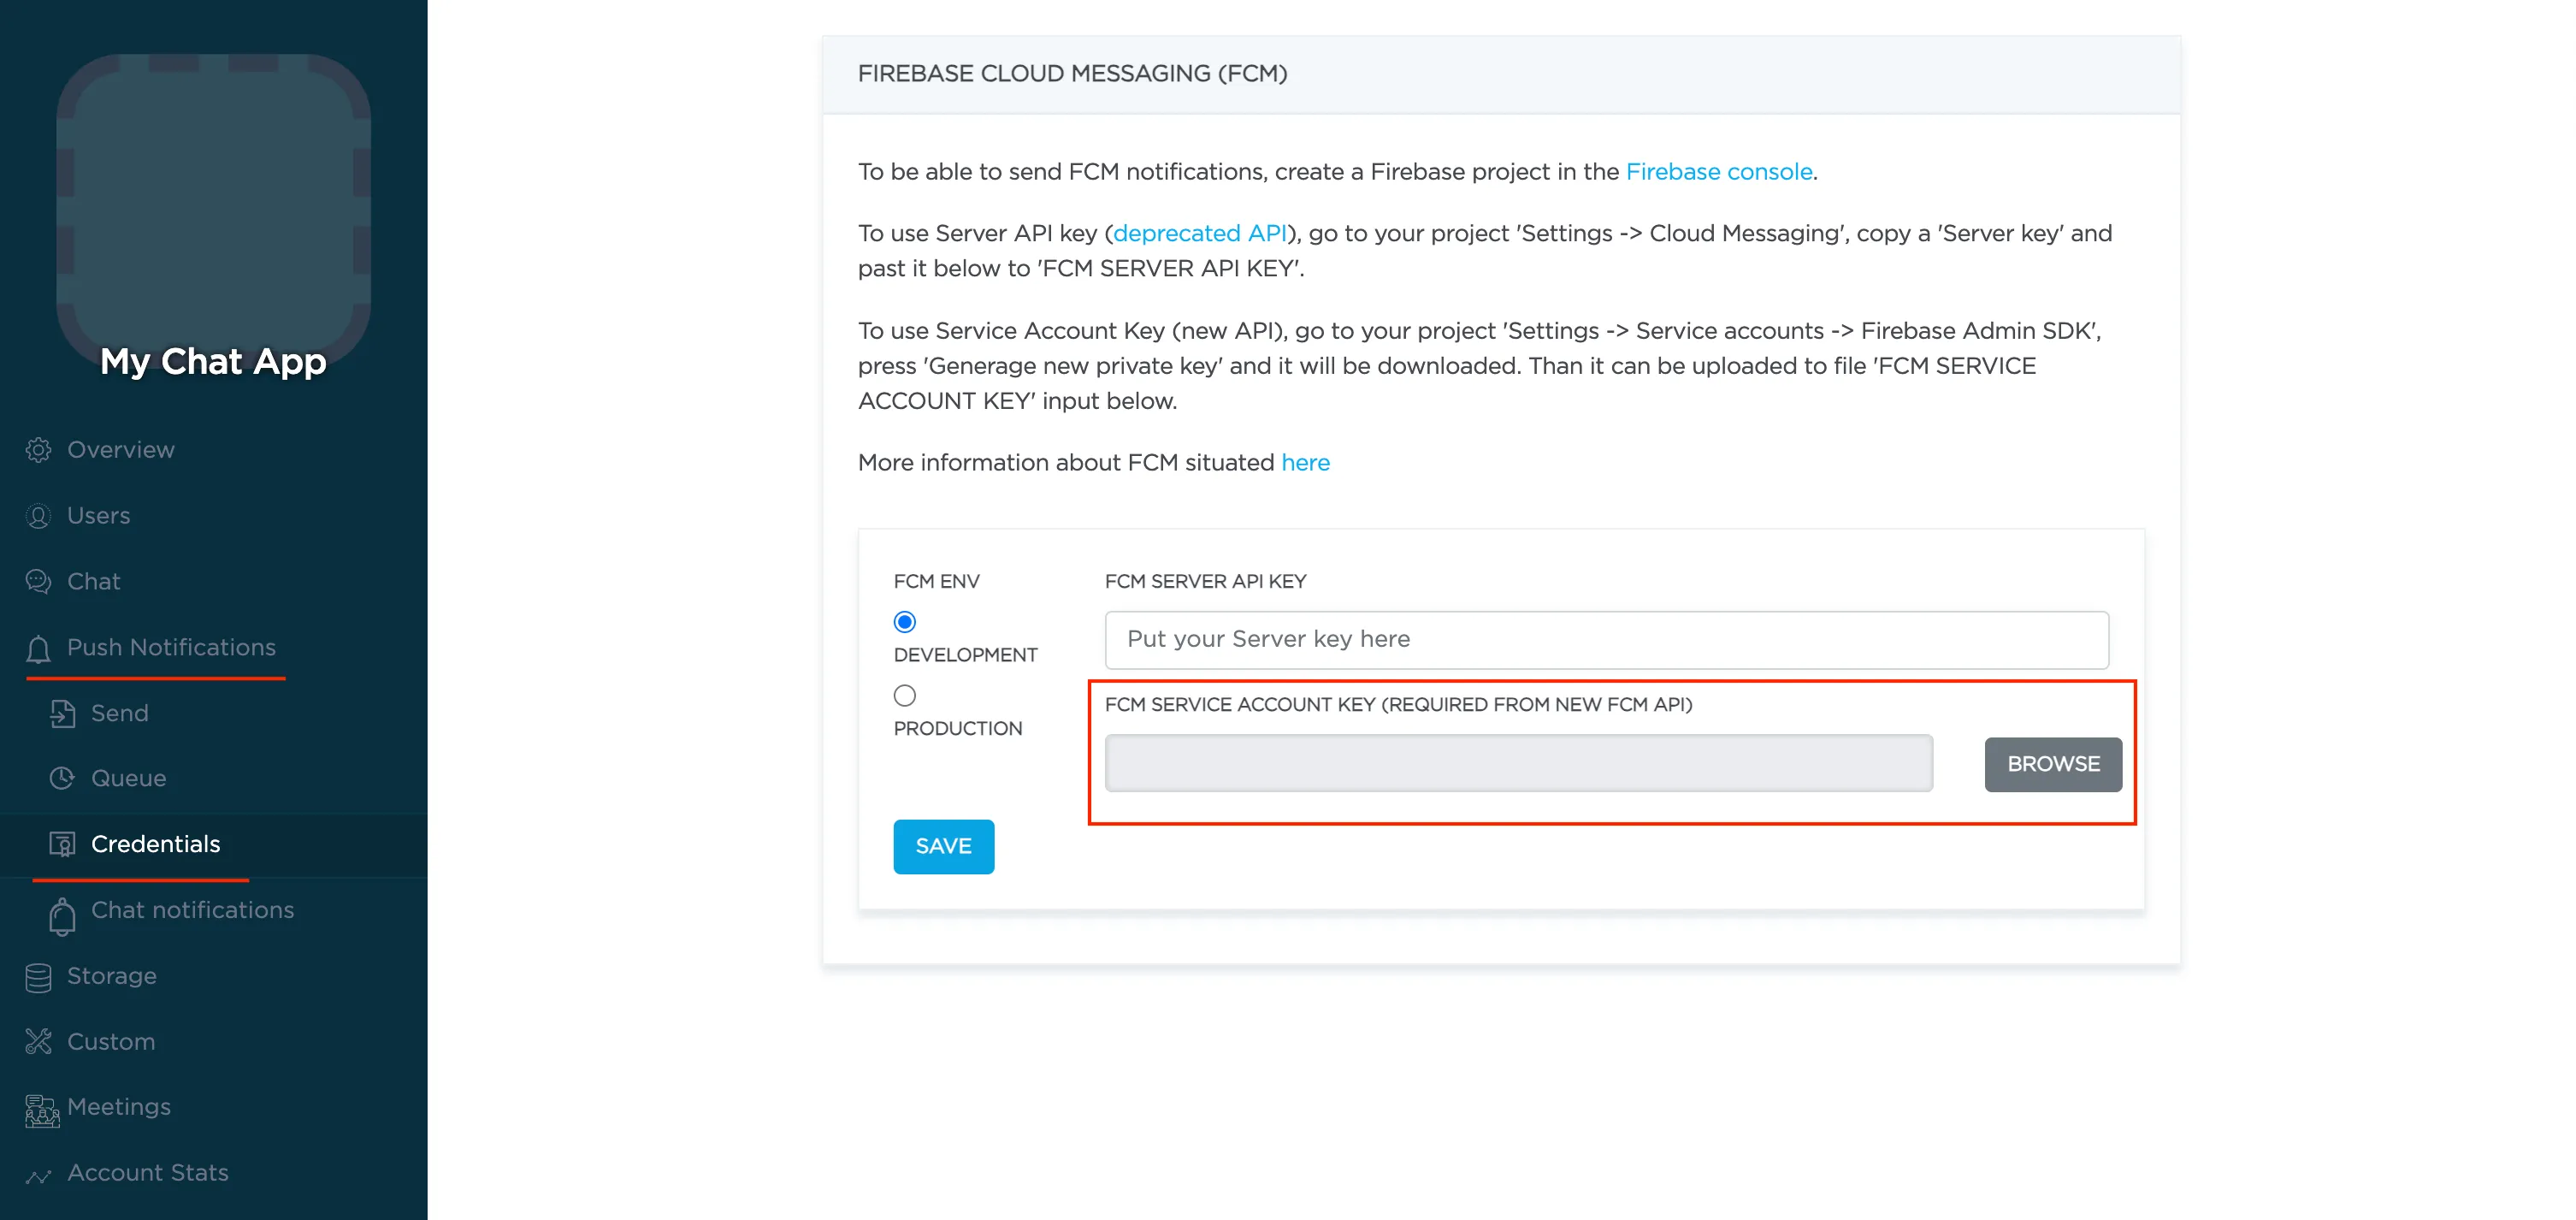 7. Copy **Sender ID** value from your Firebase console **Cloud Messaging** section. It will be required on a following step, when init **react-native-push-notification** lib: 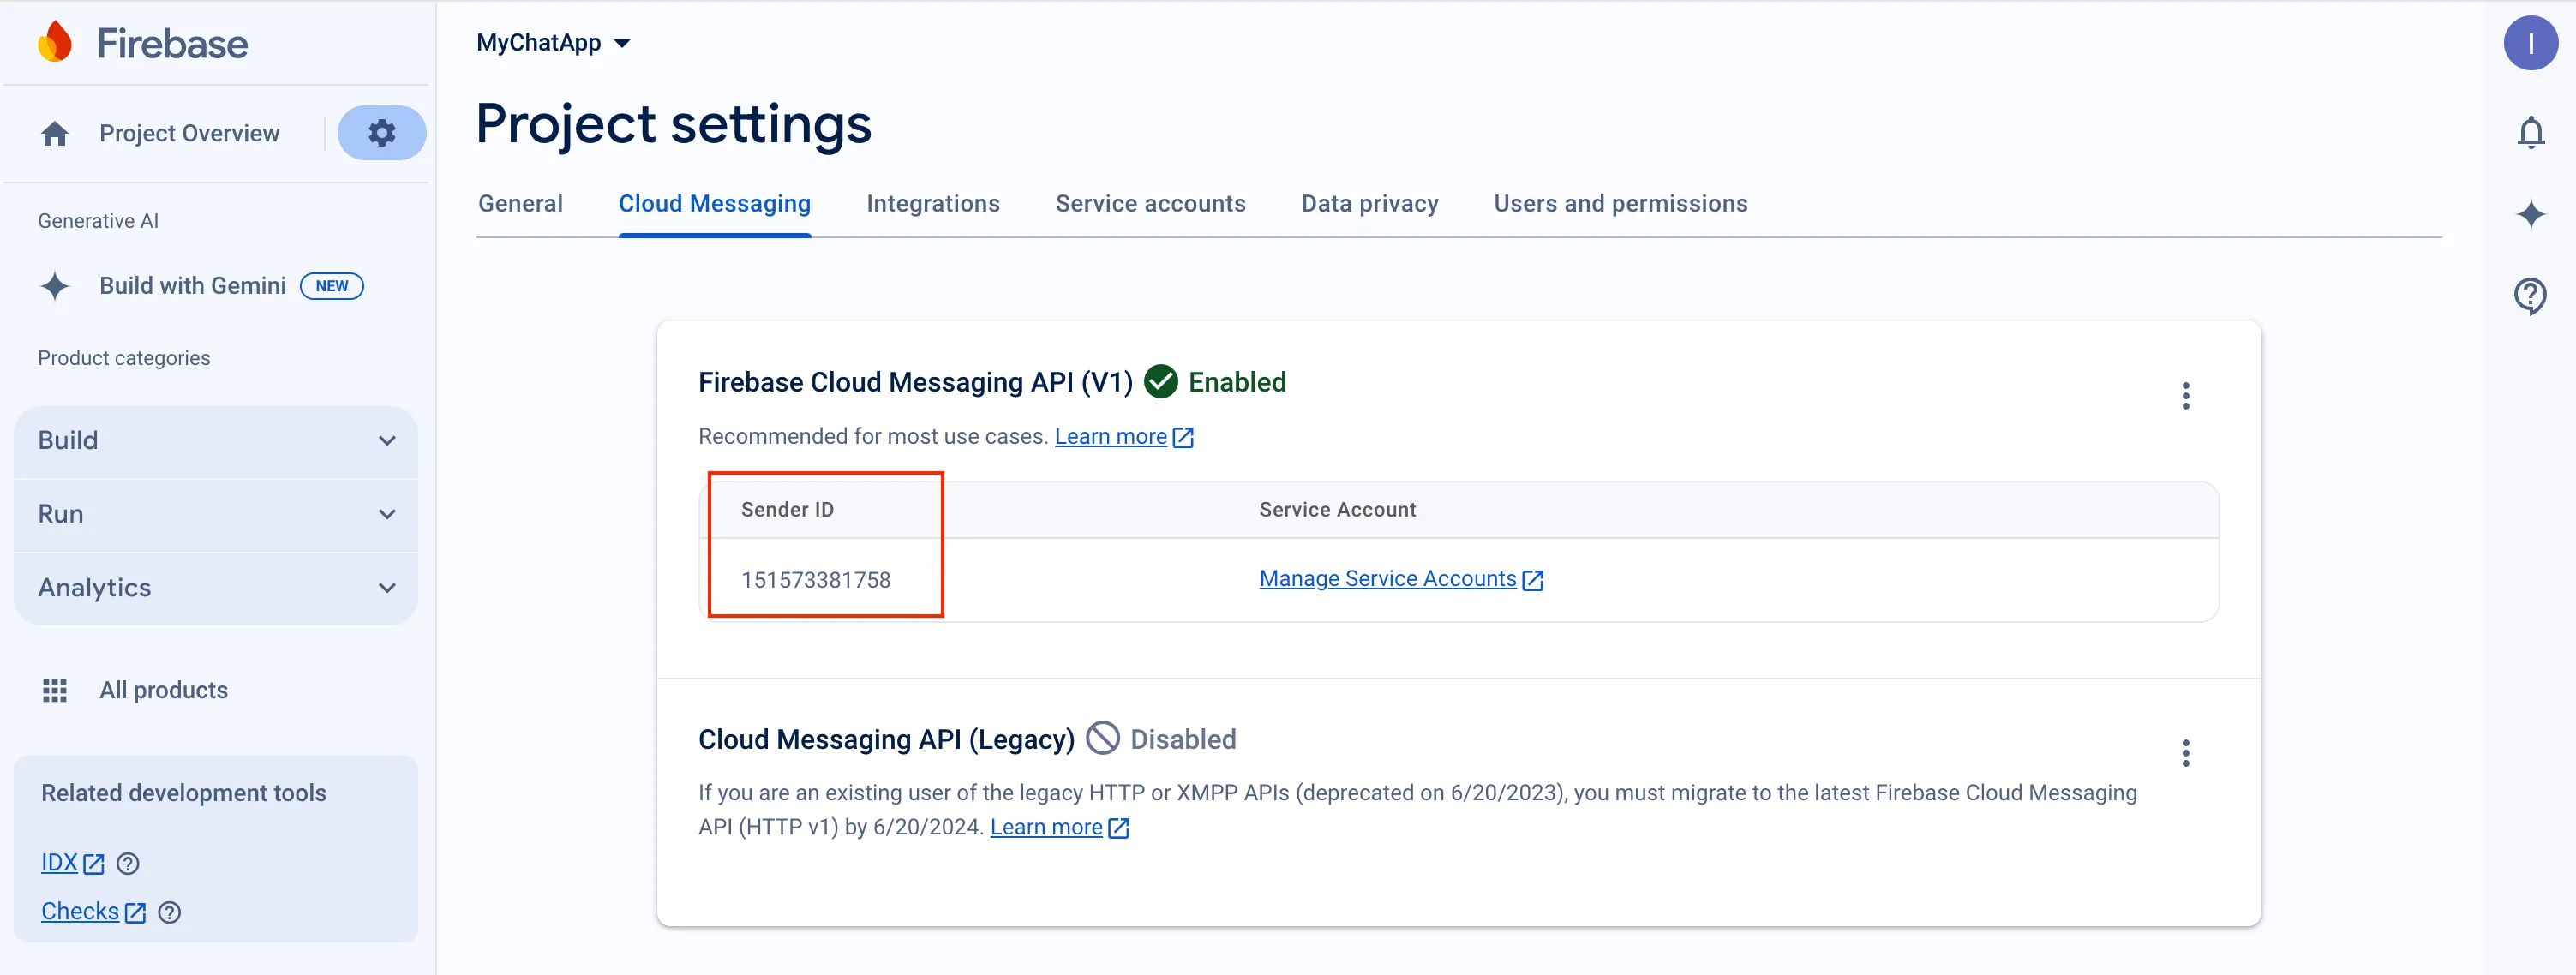 8. In order to use push notifications on Android, you need to create `google-services.json` file and copy it into project’s `android/app` folder. Also, you need to update the `applicationId` in `android/app/build.gradle` to the one which is specified in `google-services.json`, so they must match. If you have no existing API project yet, the easiest way to go about in creating one is using this [step-by-step installation process](https://firebase.google.com/docs/android/setup) #### Configure Firebase project and Server key (DEPRECATED) [Section titled “Configure Firebase project and Server key (DEPRECATED)”](#configure-firebase-project-and-server-key-deprecated) 1. Create and configure your [Firebase project](https://console.firebase.google.com) and obtain the **Server key**. If you have any difficulties with Firebase project registration, [follow our guide](/android/firebase-setup-guide). To find your **FCM server key** go to your **Firebase console > Cloud Messaging** section: 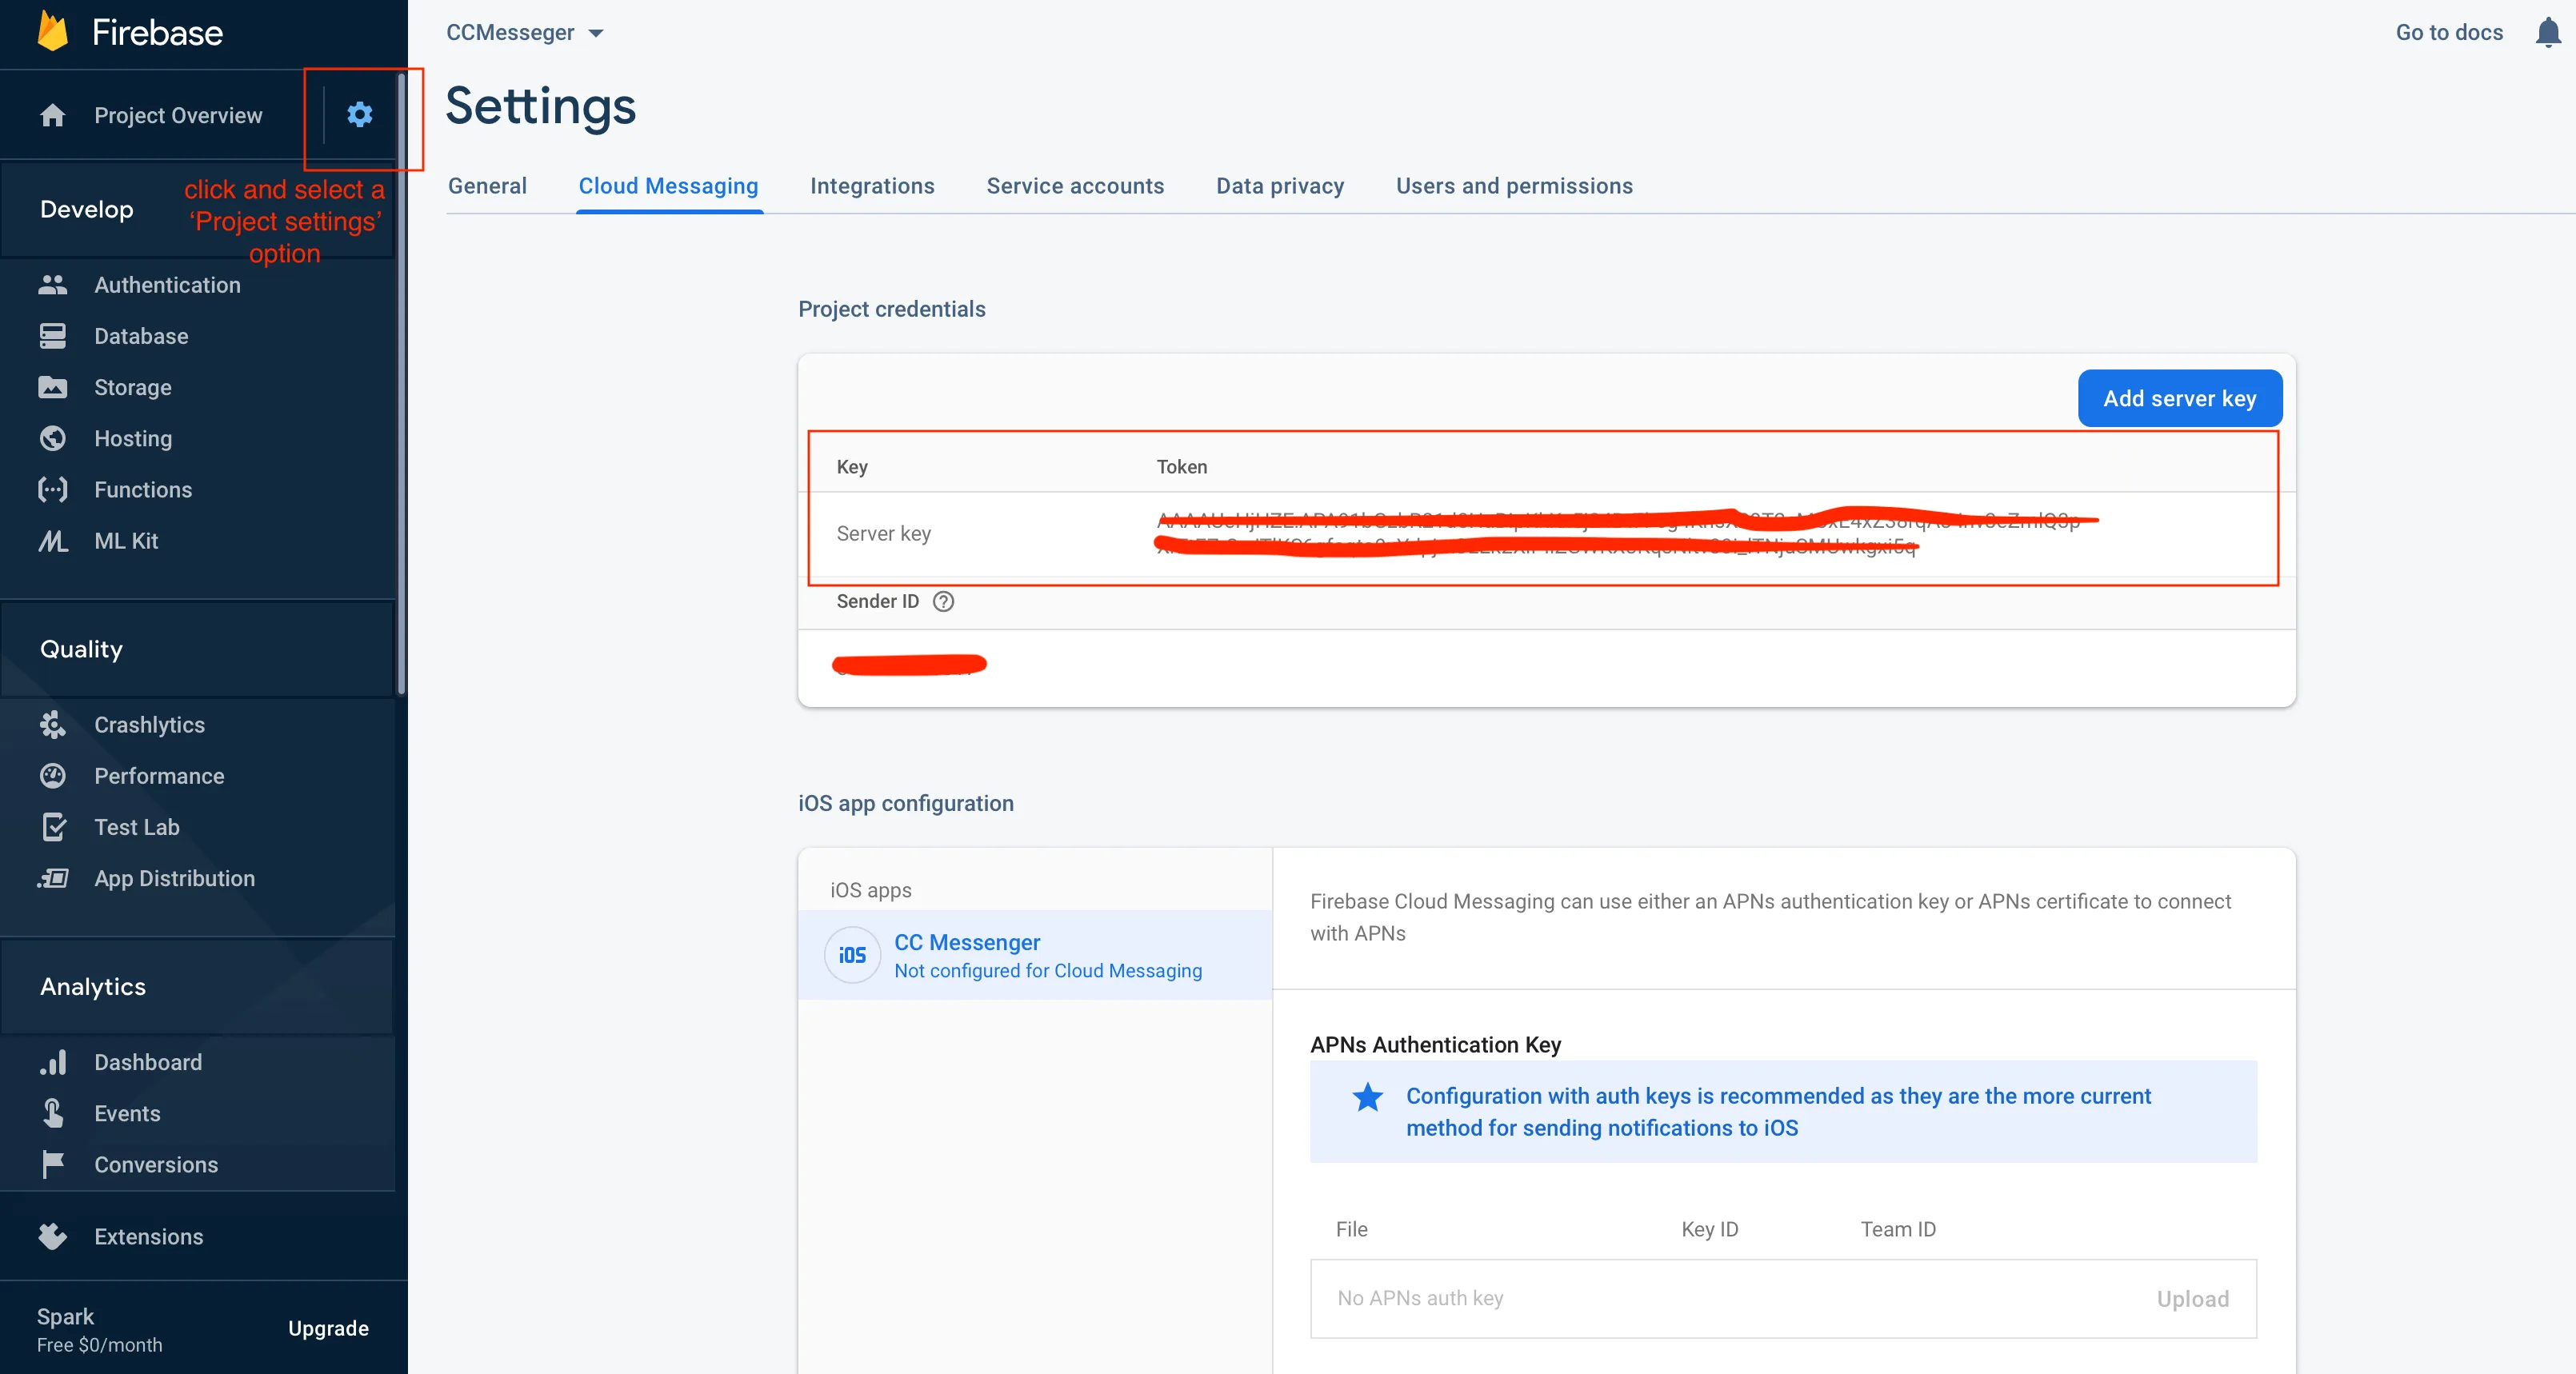 2. Copy your **FCM server key** to your **Dashboard > Your App > Push Notifications > Credentials**, select the environment for which you are adding the key and hit **Save key**. Use the same key for development and production zones. 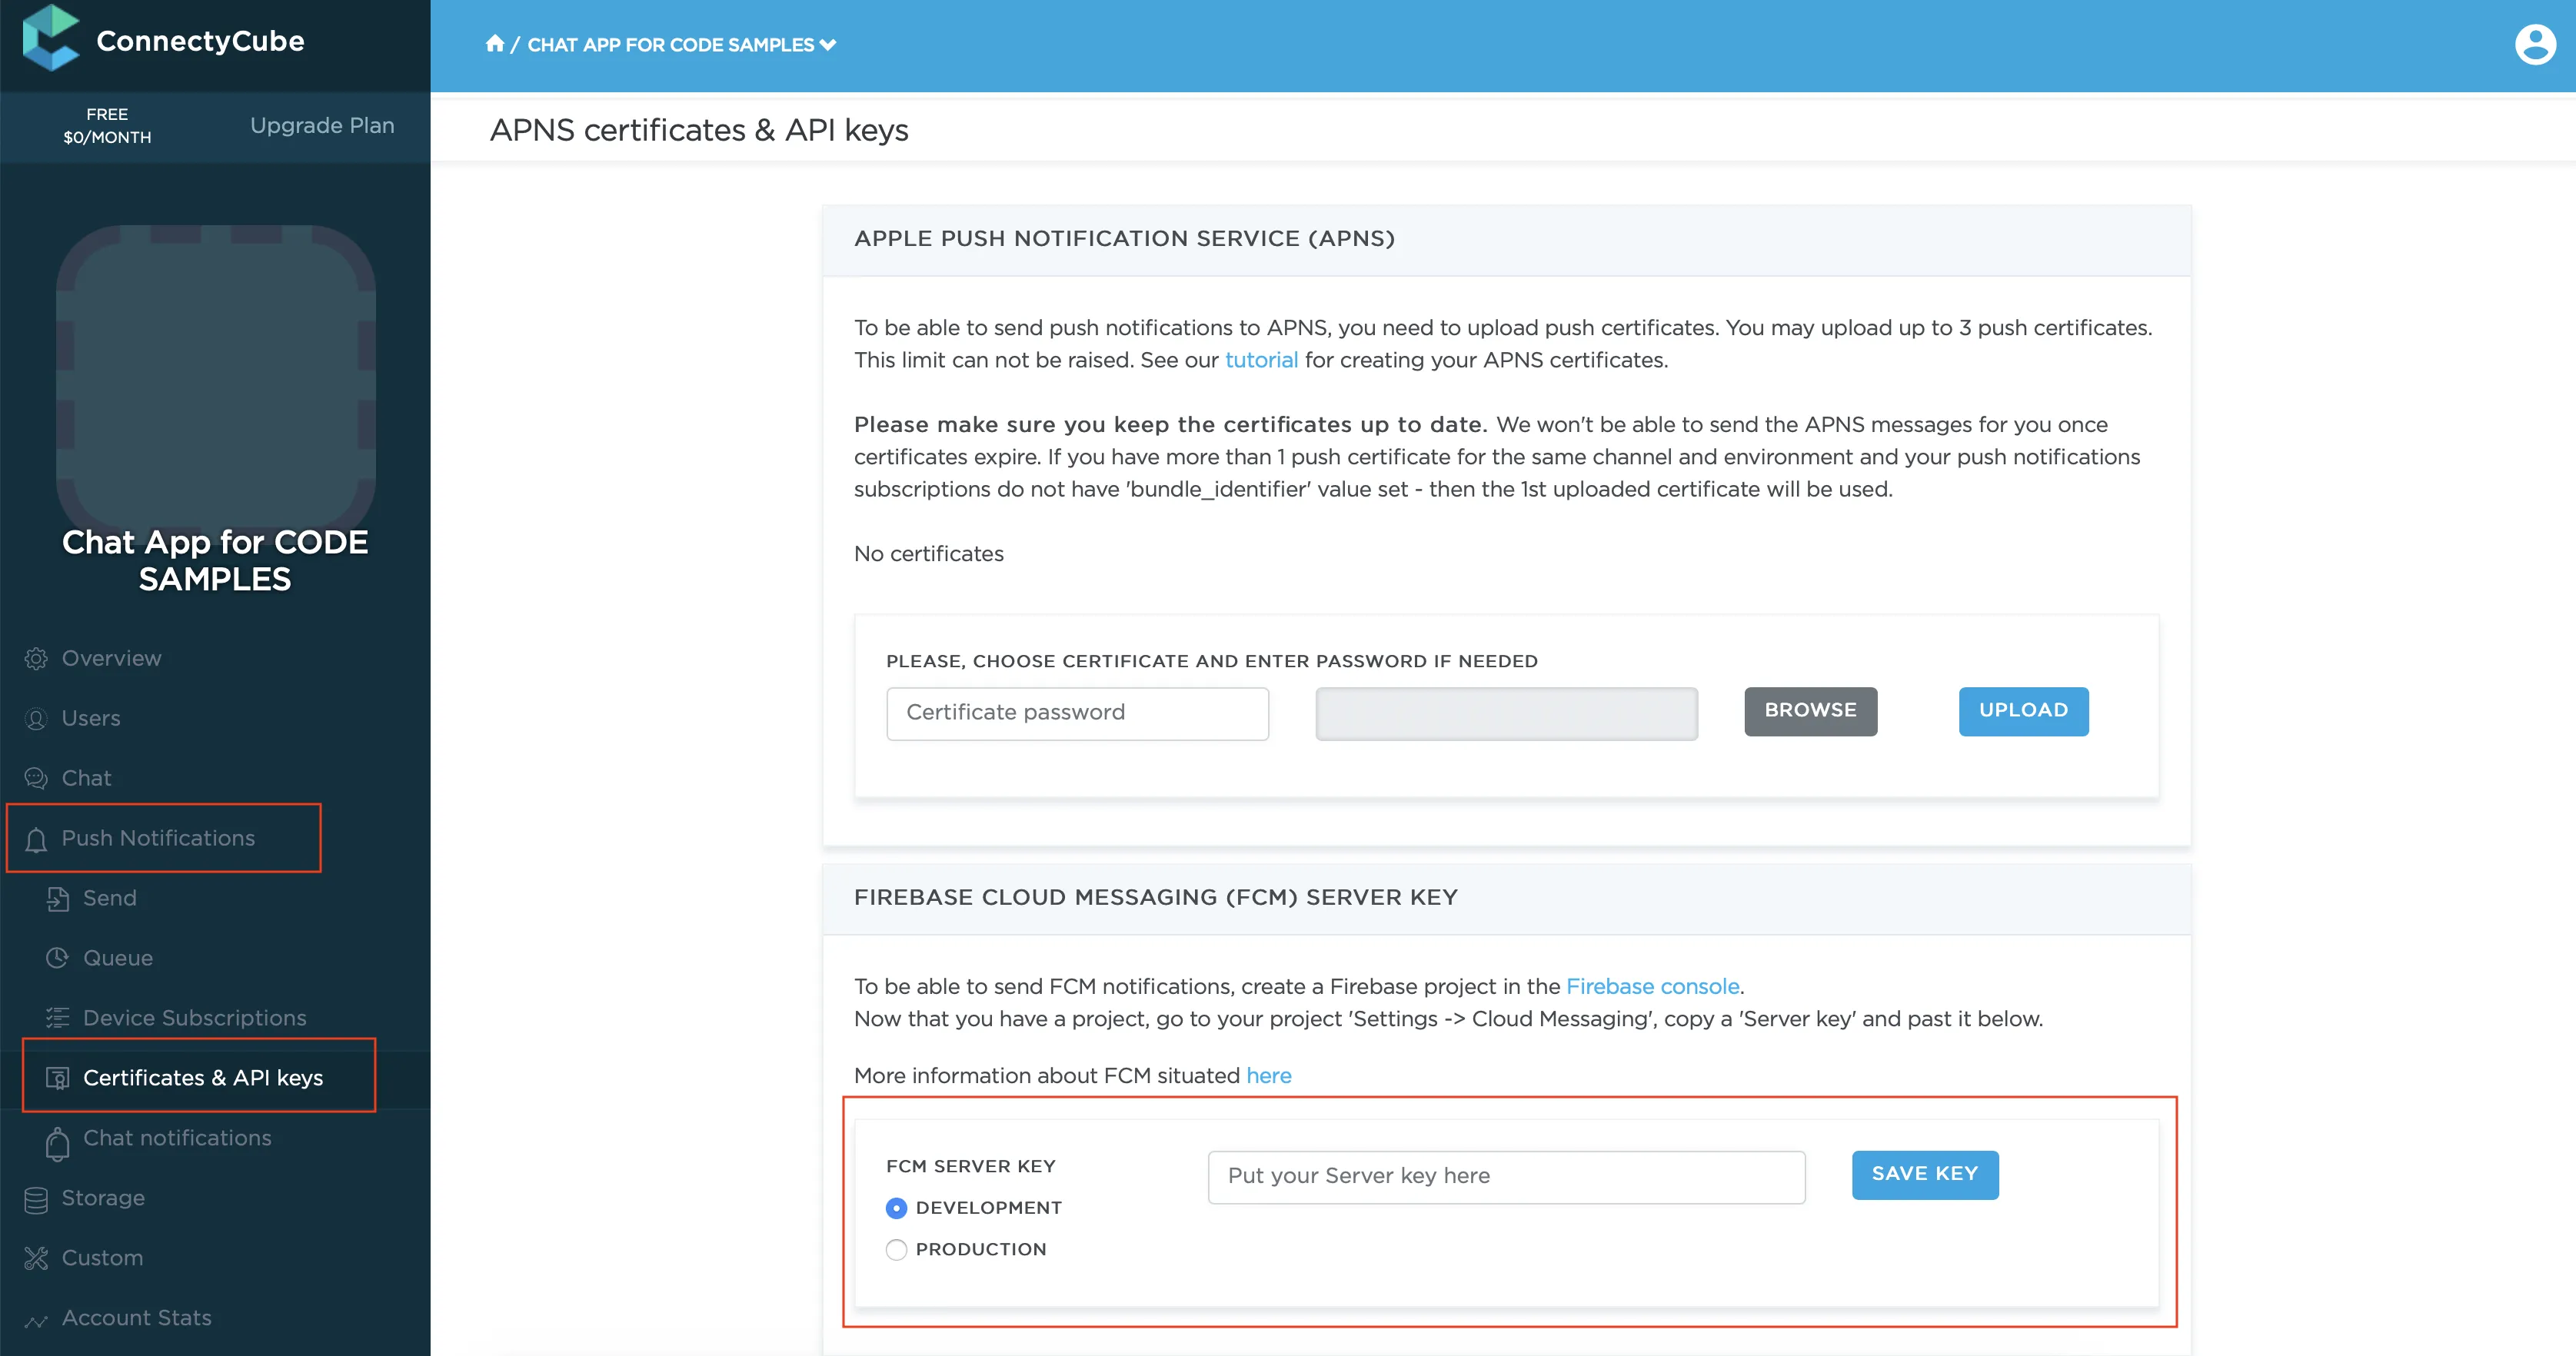 3. Copy **Sender ID** value from your Firebase console **Cloud Messaging** section. It will be required on a following step, when init **react-native-push-notification** lib:  4. In order to use push notifications on Android, you need to create `google-services.json` file and copy it into project’s `android/app` folder. Also, you need to update the `applicationId` in `android/app/build.gradle` to the one which is specified in `google-services.json`, so they must match. If you have no existing API project yet, the easiest way to go about in creating one is using this [step-by-step installation process](https://firebase.google.com/docs/android/setup) ## react-native-notifications lib installation [Section titled “react-native-notifications lib installation”](#react-native-notifications-lib-installation) * [react-native-notifications iOS Installation](https://wix.github.io/react-native-notifications/docs/installation-ios) * [react-native-notifications Android Installation](https://wix.github.io/react-native-notifications/docs/installation-android) ## Init react-native-notifications lib [Section titled “Init react-native-notifications lib”](#init-react-native-notifications-lib) The following installation steps are a TL;DR of [react-native-notifications Getting Started](https://wix.github.io/react-native-notifications/docs/getting-started). You can entierly follow it OR use our guide below. ```javascript import { Notifications } from 'react-native-notifications'; ... init() { if (Platform.OS === 'ios') { Notifications.ios.checkPermissions().then((currentPermissions) => { console.log('Badges enabled: ' + !!currentPermissions.badge); console.log('Sounds enabled: ' + !!currentPermissions.sound); console.log('Alerts enabled: ' + !!currentPermissions.alert); console.log('Car Play enabled: ' + !!currentPermissions.carPlay); console.log('Critical Alerts enabled: ' + !!currentPermissions.criticalAlert); console.log('Provisional enabled: ' + !!currentPermissions.provisional); console.log('Provides App Notification Settings enabled: ' + !!currentPermissions.providesAppNotificationSettings); console.log('Announcement enabled: ' + !!currentPermissions.announcement); }); } Notifications.getInitialNotification().then((notification) => { console.log("Initial notification was:", (notification ? notification.payload : 'N/A')); // this.displayNotification({message: "hello"}); }) .catch((err) => console.error("getInitialNotifiation() failed", err)); Notifications.events().registerRemoteNotificationsRegistered((event) => { // TODO: Send the token to my server so it could send back push notifications... console.log("[PushNotificationService] Device Token Received", event.deviceToken); this.subscribeToPushNotification(event.deviceToken) }); Notifications.events().registerRemoteNotificationsRegistrationFailed((event) => { console.error("[PushNotificationService] Failed to get Device Token", event); }); Notifications.events().registerNotificationReceivedForeground((notification, completion) => { console.log(`[PushNotificationService] Notification received in foreground`, notification.payload, notification?.payload?.message); if (Platform.OS === 'android') { PushNotificationService.displayNotification(notification.payload); } completion({alert: false, sound: false, badge: false}); }); Notifications.events().registerNotificationReceivedBackground((notification, completion) => { console.log("[PushNotificationService] Notification Received - Background", notification.payload, notification?.payload?.message); if (Platform.OS === 'android') { PushNotificationService.displayNotification(notification.payload); } // Calling completion on iOS with `alert: true` will present the native iOS inApp notification. completion({alert: true, sound: true, badge: false}); }); Notifications.events().registerNotificationOpened(async (notification, completion) => { console.log(`[PushNotificationService] Notification opened`, notification.payload); await this.onNotificationOpened(notification.payload) completion(); }); Notifications.registerRemoteNotifications(); } ``` ## Subscribe to push notifications [Section titled “Subscribe to push notifications”](#subscribe-to-push-notifications) In order to start receiving push notifications you need to subscribe your current device as follows: ```javascript import ConnectyCube from "react-native-connectycube"; ... Notifications.events().registerRemoteNotificationsRegistered((event) => { // TODO: Send the token to my server so it could send back push notifications... console.log("[PushNotificationService] Device Token Received", event.deviceToken); this.subscribeToPushNotification(event.deviceToken) }); ... subscribeToPushNotification(deviceToken) { const DeviceInfo = require('react-native-device-info').default const params = { // for iOS VoIP it should be 'apns_voip' notification_channel: Platform.OS === 'ios' ? 'apns' : 'gcm', device: { platform: Platform.OS, udid: DeviceInfo.getUniqueID() }, push_token: { environment: __DEV__ ? 'development' : 'production', client_identification_sequence: deviceToken, bundle_identifier: "com.your.app.package.id" } } ConnectyCube.pushnotifications.subscriptions.create(params) .then(result => {}) .catch(error => {}); } ``` ## Send push notifications [Section titled “Send push notifications”](#send-push-notifications) You can manually initiate a push notification to user/users on any event in your application. To do so you need to form a push notification parameters (payload) and set the push recipients: ```javascript const payload = JSON.stringify({ message: "Alice is calling you", ios_badge: 1, // ios_voip: 1 }); const pushParameters = { notification_type: "push", user: { ids: [21, 12] }, // recipients. environment: __DEV__ ? "development" : "production", message: ConnectyCube.pushnotifications.base64Encode(payload), }; ConnectyCube.pushnotifications.events .create(pushParameters) .then((result) => {}) .catch((error) => {}); ``` Please refer [Universal Push Notifications standard parameters](/server/push_notifications#universal-push-notifications) section on how to form the payload. ## Receive push notifications [Section titled “Receive push notifications”](#receive-push-notifications) ```javascript Notifications.events().registerNotificationReceivedForeground((notification, completion) => { console.log(`[PushNotificationService] Notification received in foreground`, notification.payload, notification?.payload?.message); if (Platform.OS === 'android') { PushNotificationService.displayNotification(notification.payload); } completion({alert: false, sound: false, badge: false}); }); Notifications.events().registerNotificationReceivedBackground((notification, completion) => { console.log("[PushNotificationService] Notification Received - Background", notification.payload, notification?.payload?.message); if (Platform.OS === 'android') { PushNotificationService.displayNotification(notification.payload); } // Calling completion on iOS with `alert: true` will present the native iOS inApp notification. completion({alert: true, sound: true, badge: false}); }); static displayNotification(payload) { const extra = {dialog_id: payload.dialog_id, isLocal: true} const localNotification = Notifications.postLocalNotification({ body: payload.message, title: "New message", // TODO: to use here chat name/sender name // sound: "chime.aiff", silent: false, category: "SOME_CATEGORY", userInfo: extra, extra, }); } ``` Here you can add an appropriate logic in your app. The things can be one of the following: * If this is a chat message, once clicked on it - we can redirect a user to an appropriate chat by **dialog\_id** data param * Raise a local notification with an alternative info to show for a user ## Receive pushes in killed state (Android) [Section titled “Receive pushes in killed state (Android)”](#receive-pushes-in-killed-state-android) There was an issue on Android with receiving a callback when a push arrived and an app is in killed/dead state. We addressed it here: * we created a patch to push notification lib - [patches/react-native-notifications+4.3.1.patch](https://github.com/ConnectyCube/connectycube-reactnative-samples/blob/master/RNChat/patches/react-native-notifications%2B4.3.1.patch) - which is applied automatically when you do yarn (it’s specified as a part of `package.json` postinstall step - `"postinstall": "patch-package && npx jetify && cd ios && pod install"`) * you also need to add `` into `AndroidManifest.xml` file * and now you can process the notifications in killed/dead state via the following code snippet: ```javascript const { AppRegistry } = require("react-native"); // https://reactnative.dev/docs/headless-js-android // AppRegistry.registerHeadlessTask( "JSNotifyWhenKilledTask", () => { return async (notificationBundle) => { console.log('[JSNotifyWhenKilledTask] notificationBundle', notificationBundle); PushNotificationService.displayNotification(notificationBundle); } }, ); ``` > Ready push notifications code sample DEMO is available as a part of [React Native Chat code sample](https://github.com/ConnectyCube/connectycube-reactnative-samples/tree/master/RNChat) (src/services/push-notification.js) ## Unsubscribe from push notifications [Section titled “Unsubscribe from push notifications”](#unsubscribe-from-push-notifications) In order to unsubscribe and stop receiving push notifications you need to list your current subscriptions and then choose those to be deleted: ```javascript const deleteSubscription = (subscriptions) => { let subscriptionIdToDelete; subscriptions.forEach((sbs) => { if (sbs.subscription.device.platform === Platform.OS && sbs.subscription.device.udid === DeviceInfo.getUniqueID()) { subscriptionIdToDelete = sbs.subscription.id; } }); if (subscriptionIdToDelete) { ConnectyCube.pushnotifications.subscriptions.delete(subscriptionIdToDelete); } }; ConnectyCube.pushnotifications.subscriptions .list() .then(deleteSubscription) .catch((error) => {}); ``` ## VoIP push notifications [Section titled “VoIP push notifications”](#voip-push-notifications) ConnectyCube supports iOS VoIP push notifications via same API described above. The main use case for iOS VoIP push notifications is to show a native calling interface on incoming call when an app is in killed/background state - via CallKit. The common flow of using VoIP push notifications is the following: * for VoIP pushes it requires to generate a separated VoIP device token. With [react-native-notifications](https://github.com/wix/react-native-notifications) lib it can be done the following way: ```javascript if (Platform.OS === 'ios') { Notifications.ios.registerPushKit(); } ``` * then when token is retrieved, you need to subscribe to voip pushes by passing a `notification_channel: apns_voip` channel in a subscription request: ```javascript if (Platform.OS === 'ios') { Notifications.ios.events().registerPushKitRegistered(event => { this.subscribeToVOIPPushNotifications(event.pushKitToken); }); } ... subscribeToVOIPPushNotifications(deviceToken) { const params = { notification_channel: 'apns_voip', device: { platform: Platform.OS, udid: getUniqueId() }, push_token: { environment: __DEV__ ? 'development' : 'production', client_identification_sequence: deviceToken } } ConnectyCube.pushnotifications.subscriptions.create(params) .then(result => { console.log("[PushNotificationsService][subscribeToVOIPPushNotifications] Ok"); }).catch(error => { console.warn("[PushNotificationsService][subscribeToVOIPPushNotifications] Error", error); }); } ``` * then when you want to send a voip push notification, use `ios_voip: 1` parameter in a push payload in a create event request: ```javascript const pushParams = { message: `Incoming call from ${currentUser.full_name}`, ios_voip: 1, handle: currentUser.full_name, initiatorId: callSession.initiatorID, opponentsIds: selectedOpponentsIds.join(","), uuid: callSession.ID, callType: callType === ConnectyCube.videochat.CallType.VIDEO ? "video" : "audio" }; this.sendPushNotification(selectedOpponentsIds, pushParams); ... sendPushNotification(recipientsUsersIds, params) { const payload = JSON.stringify(params); const pushParameters = { notification_type: "push", user: { ids: recipientsUsersIds }, environment: __DEV__ ? "development" : "production", message: ConnectyCube.pushnotifications.base64Encode(payload), }; ConnectyCube.pushnotifications.events.create(pushParameters) .then(result => { console.log("[PushNotificationsService][sendPushNotification] Ok"); }).catch(error => { console.warn("[PushNotificationsService][sendPushNotification] Error", error); }); } ``` ## react-native-firebase lib [Section titled “react-native-firebase lib”](#react-native-firebase-lib) In a case you use a [react-native-firebase](https://rnfirebase.io) lib for push notifications integration - please refer a GitHub issue for any potential drawnbacks ## notifee lib [Section titled “notifee lib”](#notifee-lib) In a case you use a [notifee](https://notifee.app/react-native/docs/ios/remote-notification-support) lib for push notifications integration - please refer a GitHub issue for any potential drawnbacks ## Expo [Section titled “Expo”](#expo) If you use React Native [Expo](https://expo.dev), then it requires to provide an [experienceId](https://docs.expo.dev/push-notifications/sending-notifications-custom/) in a push payload for a push to be delivered successfully. It is passed to the expo app so if the device has more than one Expo app it knows which messages are for which app. Without this Expo can’t handle the data messages. **experienceId** follows this format: **@yourExpoUsername/yourProjectSlug**. For the push notifications initiated via API you can provide it by yourself. For the push notifications initiate automatically for offline users in chat - you can provide this filed at **Admin panel > Chat > Offline notifications**. There is a React Native block with ‘experienceId’ field value.
# Streaming
> Leverage ConnectyCube's streaming feature for dynamic real-time interactions in React Native app. Ideal for interactive sessions, such as teachers broadcasting to multiple students.
ConnectyCube streaming is built on top of [WebRTC](https://webrtc.org/) protocol. The main use case for streaming is with a teacher and many students where normally students join a call as listeners and only a teacher publishes own media stream: **Streaming API** is built on top of [Video Conferencing API](/reactnative/videocalling-conference), hence same API documentation should be followed. The only difference is when join a room - a `session.joinAsListener(...)` API should be used at students side instead of `session.join(...)` API at teacher’s side. This method allows to join a conference room w/o publishing own media stream.
# Whiteboard
> Enable dynamic collaboration in chat with ConnectyCube Whiteboard API. Ideal for remote meetings, teaching environments, sales demos, real-time workflows.
ConnectyCube **Whiteboard API** allows to create whiteboard functionality and associate it with a chat dialog. Chat dialog’s users can collaborate and draw simultaneously on a whiteboard. You can do freehand drawing with a number of tools, add shapes, lines, text and erase. To share boards, you just get an easy link which you can email. Your whiteboard stays safe in the cloud until you’re ready to return to it.  The most popular use cases for using the whiteboard: * Remote meetings * Remote teaching * Sales presentations * Workflows * Real-time collaboration ## Get started with SDK [Section titled “Get started with SDK”](#get-started-with-sdk) Follow the [Getting Started guide](/reactnative/) on how to connect ConnectyCube SDK and start building your first app. ## Preparations [Section titled “Preparations”](#preparations) In order to start using whiteboard, an additional config has to be provided: ```javascript const CONFIG = { ... whiteboard: { server: 'https://whiteboard.connectycube.com' } } ConnectyCube.init(CREDS, CONFIG); ``` Then, ConnectyCube whiteboard is associated with a chat dialog. In order to create a whiteboard, you need to have a chat dialog. Refer to [chat dialog creation API](/js/messaging#create-new-dialog). ## Create whiteboard [Section titled “Create whiteboard”](#create-whiteboard) When create a whiteboard you need to pass a name (any) and a chat dialog id to which whiteboard will be connected. ```javascript const params = { name: 'New Whiteboard', chat_dialog_id: "5356c64ab35c12bd3b108a41" }; ConnectyCube.whiteboard.create(params) .then(whiteboard => { const wid = whiteboard._id; }) .catch(error => { }); ``` Once whiteboard is created - a user can display it in app in a WebView using the following url: `https://whiteboard.connectycube.com?whiteboardid=<_id>&username=&title=` For `username` - any value can be provided. This is to display a text hint near the drawing arrow. ## Retrieve whiteboards [Section titled “Retrieve whiteboards”](#retrieve-whiteboards) Use the following code snippet to retrieve a list of whiteboards associated with a chat dialog: ```javascript const params = {chat_dialog_id: "5456c64ab35c17bd3b108a76"}; ConnectyCube.whiteboard.get(params) .then(whiteboard => { }) .catch(error => { }); ``` ## Update whiteboard [Section titled “Update whiteboard”](#update-whiteboard) A whiteboard can be updated, e.g. its name: ```javascript const whiteboardId = "5456c64ab35c17bd3b108a76"; const params = { name: 'New Whiteboard', }; ConnectyCube.whiteboard.update(whiteboardId, params) .then(whiteboard => { }) .catch(error => { }); ``` ## Delete whiteboard [Section titled “Delete whiteboard”](#delete-whiteboard) ```javascript const whiteboardId = "5456c64ab35c17bd3b108a76"; ConnectyCube.whiteboard.delete(whiteboardId) .then(whiteboard => { }) .catch(error => { }); ```
# Send first chat message
> Step-by-step guide to sending your first chat message using ConnectyCube Flutter Chat SDK - what exactly to do when you want to build a chat.
The **ConnectyCube Chat API** is a set of tools that enables developers to integrate real-time messaging into their web and mobile applications. With this API, users can build powerful chat functionalities that support one-on-one messaging, group chats, typing indicators, message history, delivery receipts, and push notifications. If you’re planning to build a new app, we recommend starting with one of our [code samples apps](/flutter/getting-started/code-samples/) as a foundation for your client app.\ If you already have an app and you are looking to add chat to it, proceed with this guide. This guide walks you through installing the ConnectyCube SDK in your app, configure it and then sending your first message to the opponent in 1-1 chat. ## Before you start [Section titled “Before you start”](#before-you-start) Before you start, make sure: 1. You have access to ConnectyCube account. If you don’t have an account, [sign up here](https://admin.connectycube.com/register). 2. An app created in ConnectyCube dashboard. Once logged into [your ConnectyCube account](https://admin.connectycube.com/signin), create a new application and make a note of the app credentials (app ID and auth key) that you’ll need for authentication. ## Step 1: Configure SDK [Section titled “Step 1: Configure SDK”](#step-1-configure-sdk) To use chat in a client app, you should install, import and configure ConnectyCube SDK. **Note:** If the app is already created during the onboarding process and you followed all the instructions, you can skip the ‘Configure SDK’ step and start with [Required preparations for supported platforms](#step-2-required-preparations-for-supported-platforms) . ### Install SDK [Section titled “Install SDK”](#install-sdk) Install package from the command line: ```bash flutter pub add connectycube_sdk ``` ### Import SDK [Section titled “Import SDK”](#import-sdk) Add the following import statement to start using all classes and methods. ```dart import 'package:connectycube_sdk/connectycube_sdk.dart'; ``` ### Initialize SDK [Section titled “Initialize SDK”](#initialize-sdk) Initialize the SDK with your ConnectyCube application credentials. You can access your application credentials in [ConnectyCube Dashboard](https://admin.connectycube.com): * SDK v3 ```dart String appId = ""; String authKey = ""; init(appId, authKey); ``` * SDK v2 ```dart String appId = ""; String authKey = ""; String authSecret = ""; init(appId, authKey, authSecret); ``` After all the above is done, the app is ready to be enriched with chat functionality. ## Step 2: Create and Authorise User [Section titled “Step 2: Create and Authorise User”](#step-2-create-and-authorise-user) As a starting point, the user’s session token needs to be created allowing to send and receive messages in chat. ```dart CubeUser user = CubeUser(login: "user_login", password: "super_sequre_password"); createSession(user) .then((cubeSession) {}) .catchError((error){}); ``` **Note:** With the request above, **the user is created automatically on the fly upon session creation** using the login (or email) and password from the request parameters. **Important:** such approach with the automatic user creation works well for testing purposes and while the application isn’t launched on production. For better security it is recommended to deny the session creation without an existing user.\ For this, set ‘Session creation without an existing user entity’ to **Deny** under the **Application -> Overview -> Permissions** in the [admin panel](https://admin.connectycube.com/apps). ## Step 3: Connect User to chat [Section titled “Step 3: Connect User to chat”](#step-3-connect-user-to-chat) Connecting to the chat is an essential step in enabling real-time communication. By establishing a connection, the user is authenticated on the chat server, allowing them to send and receive messages instantly. Without this connection, the app won’t be able to interact with other users in the chat. ```dart CubeUser user = CubeUser(id: 4448514, password: "supersecurepwd"); CubeChatConnection.instance.login(user) .then((loggedUser) {}) .catchError((error) {}); ``` ## Step 4: Create 1-1 chat [Section titled “Step 4: Create 1-1 chat”](#step-4-create-1-1-chat) Creating a 1-1 chat is essential because it gives a unique conversation ID to correctly route and organize your message to the intended user. You need to pass `type = CubeDialogType.PRIVATE` and an **ID** of an opponent you want to create a chat with: ```dart CubeDialog dialog = CubeDialog( CubeDialogType.PRIVATE, occupantsIds: [56]); createDialog(dialog) .then((createdDialog) {}) .catchError((error) {}); ``` ## Step 5: Send / Receive chat messages [Section titled “Step 5: Send / Receive chat messages”](#step-5-send--receive-chat-messages) Once the 1-1 chat is set up, you can use it to exchange messages seamlessly. This code example demonstrates how to send and receive messages in the created 1-1 chat: ```dart // some dialog, which must contains opponent's id in 'occupantsIds' for CubeDialogType.PRIVATE and // 'dialogId' for other types of dialogs CubeDialog createdDialog = ...; CubeMessage message = CubeMessage(); message.body = "How are you today?"; message.dateSent = DateTime.now().millisecondsSinceEpoch; message.markable = true; message.saveToHistory = true; createdDialog.sendMessage(message) .then((cubeMessage) {}) .catchError((error) {}); // to listen messages ChatMessagesManager chatMessagesManager = CubeChatConnection.instance.chatMessagesManager; chatMessagesManager.chatMessagesStream.listen((newMessage) { // new message received }).onError((error) { // error received }); ``` Congratulations! You’ve mastered the basics of sending a chat message in ConnectyCube. #### What’s next? [Section titled “What’s next?”](#whats-next) To take your chat experience to the next level, explore ConnectyCube advanced functionalities, like adding typing indicators, using emojis, sending attachments, and more. Follow the [Chat API documentation](/flutter/messaging) to enrich your app and engage your users even further!
# Make first call
> A guide with the essential steps of how to make the first call via ConnectyCube Flutter Video SDK - from session creation to initialising and accepting the call.
**ConnectyCube’s Video Calling Peer-to-Peer (P2P) API** provides a solution for integrating real-time video and audio calling into your application. This API enables you to create smooth one-on-one and group video calls, supporting a wide range of use cases like virtual meetings, telemedicine consultations, social interactions, and more. The P2P approach ensures that media streams are transferred directly between users whenever possible, minimizing latency and delivering high-quality audio and video. If you’re planning to build a new app, we recommend starting with one of our [code samples apps](/flutter/getting-started/code-samples/) as a foundation for your client app.\ If you already have an app and you are looking to add chat to it, proceed with this guide. This guide walks you through installing the ConnectyCube SDK in your app, configure it and then initiating the call to the opponent. ## Before you start [Section titled “Before you start”](#before-you-start) Before you start, make sure: 1. You have access to ConnectyCube account. If you don’t have an account, [sign up here](https://admin.connectycube.com/register). 2. An app created in ConnectyCube dashboard. Once logged into [your ConnectyCube account](https://admin.connectycube.com/signin), create a new application and make a note of the app credentials (app ID and auth key) that you’ll need for authentication. ## Step 1: Configure SDK [Section titled “Step 1: Configure SDK”](#step-1-configure-sdk) To use voice and video calls in a client app, you should install, import and configure ConnectyCube SDK. **Note:** If the app is already created during the onboarding process and you followed all the instructions, you can skip the ‘Configure SDK’ step and start with [Required preparations for supported platforms](#step-2-required-preparations-for-supported-platforms) . ### Install SDK [Section titled “Install SDK”](#install-sdk) Install package from the command line: ```bash flutter pub add connectycube_sdk ``` ### Import SDK [Section titled “Import SDK”](#import-sdk) Add the following import statement to start using all classes and methods. ```dart import 'package:connectycube_sdk/connectycube_sdk.dart'; ``` ### Initialize SDK [Section titled “Initialize SDK”](#initialize-sdk) Initialize the SDK with your ConnectyCube application credentials. You can access your application credentials in [ConnectyCube Dashboard](https://admin.connectycube.com): * SDK v3 ```dart String appId = ""; String authKey = ""; init(appId, authKey); ``` * SDK v2 ```dart String appId = ""; String authKey = ""; String authSecret = ""; init(appId, authKey, authSecret); ``` After all the above is done, the app is ready to be enriched with the voice and video calls functionality. ## Step 2: Required preparations for supported platforms [Section titled “Step 2: Required preparations for supported platforms”](#step-2-required-preparations-for-supported-platforms) #### iOS [Section titled “iOS”](#ios) Add the following entries to your *Info.plist* file, located in *project root/ios/Runner/Info.plist*: ```dart NSCameraUsageDescription$(PRODUCT_NAME) Camera Usage!NSMicrophoneUsageDescription$(PRODUCT_NAME) Microphone Usage! ``` These entries allow your app to access the camera and microphone. #### Android [Section titled “Android”](#android) Ensure the following permission is present in your Android Manifest file, located in *project root/android/app/src/main/AndroidManifest.xml*: ```dart ``` If you need to use a Bluetooth device, please add: ```dart ``` The Flutter project template adds it, so it may already be there. Also you will need to set your build settings to Java 8, because official WebRTC jar now uses static methods in EglBase interface. Just add this to your app level build.gradle: ```dart android { //... compileOptions { sourceCompatibility JavaVersion.VERSION_1_8 targetCompatibility JavaVersion.VERSION_1_8 } } ``` If necessary, in the same build.gradle you will need to increase minSdkVersion of defaultConfig up to 18 (currently default Flutter generator set it to 16). #### macOS [Section titled “macOS”](#macos) Add the following entries to your *.entitlements* files, located in *project root/macos/Runner*: ```dart com.apple.security.network.clientcom.apple.security.device.audio-inputcom.apple.security.device.camera ``` These entries allow your app to access the internet, microphone, and camera. #### Windows / Web / Linux [Section titled “Windows / Web / Linux”](#windows--web--linux) It does not require any special preparations. ## Step 3: Create and Authorise User [Section titled “Step 3: Create and Authorise User”](#step-3-create-and-authorise-user) As a starting point, the user’s session token needs to be created allowing to send and receive messages in chat. ```dart CubeUser user = CubeUser(login: "user_login", password: "super_sequre_password"); createSession(user) .then((cubeSession) {}) .catchError((error){}); ``` **Note:** With the request above, **the user is created automatically on the fly upon session creation** using the login (or email) and password from the request parameters. **Important:** such approach with the automatic user creation works well for testing purposes and while the application isn’t launched on production. For better security it is recommended to deny the session creation without an existing user.\ For this, set ‘Session creation without an existing user entity’ to **Deny** under the **Application -> Overview -> Permissions** in the [admin panel](https://admin.connectycube.com/apps). ## Step 4: Connect User to chat [Section titled “Step 4: Connect User to chat”](#step-4-connect-user-to-chat) Connecting to the chat is an essential step in enabling real-time communication. **ConnectyCube Chat API** is used as a signaling transport for Video Calling API, so in order to start using Video Calling API you need to connect to Chat: ```dart CubeUser user = CubeUser(id: 4448514, password: "supersecurepwd"); CubeChatConnection.instance.login(user) .then((loggedUser) {}) .catchError((error) {}); ``` ## Step 5: P2PClient setup [Section titled “Step 5: P2PClient setup”](#step-5-p2pclient-setup) To manage P2P calls in Flutter you should use `P2PClient`. The code below shows how to proceed with the functionality: ```dart P2PClient callClient = P2PClient.instance; // returns instance of P2PClient callClient.init(); // starts listening of incoming calls //callClient.destroy(); // stops listening incoming calls and clears callbacks // calls when P2PClient receives new incoming call callClient.onReceiveNewSession = (incomingCallSession) { }; // calls when any callSession closed callClient.onSessionClosed = (closedCallSession) { }; // creates new P2PSession callClient.createCallSession(callType, opponentsIds); ``` ## Step 6: Create call session [Section titled “Step 6: Create call session”](#step-6-create-call-session) In order to use Video Calling API you need to create a call session object - choose your opponents you will have a call with and a type of session (VIDEO or AUDIO). `P2PSession` creates via `P2PClient`: ```dart P2PClient callClient; //callClient created somewhere Set opponentsIds = {}; int callType = CallType.VIDEO_CALL; // or CallType.AUDIO_CALL P2PSession callSession = callClient.createCallSession(callType, opponentsIds); ``` ## Step 7: Add listeners [Section titled “Step 7: Add listeners”](#step-7-add-listeners) Below described the main helpful callbacks and listeners: ```dart callSession.onLocalStreamReceived = (mediaStream) { // called when local media stream completely prepared // display the stream in UI // ... }; callSession.onRemoteStreamReceived = (callSession, opponentId, mediaStream) { // called when remote media stream received from opponent }; callSession.onRemoteStreamRemoved = (callSession, opponentId, mediaStream) { // called when remote media was removed }; callSession.onUserNoAnswer = (callSession, opponentId) { // called when did not receive an answer from opponent during timeout (default timeout is 60 seconds) }; callSession.onCallRejectedByUser = (callSession, opponentId, [userInfo]) { // called when received 'reject' signal from opponent }; callSession.onCallAcceptedByUser = (callSession, opponentId, [userInfo]){ // called when received 'accept' signal from opponent }; callSession.onReceiveHungUpFromUser = (callSession, opponentId, [userInfo]){ // called when received 'hungUp' signal from opponent }; callSession.onSessionClosed = (callSession){ // called when current session was closed }; ``` ## Step 8: Initiate call [Section titled “Step 8: Initiate call”](#step-8-initiate-call) ```dart Map userInfo = {}; callSession.startCall(userInfo); ``` The `userInfo` is used to pass any extra parameters in the request to your opponents. After this, your opponents will receive a new call session in callback: ```dart callClient.onReceiveNewSession = (incomingCallSession) { }; ``` ## Step 9: Accept call [Section titled “Step 9: Accept call”](#step-9-accept-call) To accept a call the following code snippet is used: ```dart Map userInfo = {}; // additional info for other call members callSession.acceptCall(userInfo); ``` After this, you will get a confirmation in the following callback: ```dart callSession.onCallAcceptedByUser = (callSession, opponentId, [userInfo]){ }; ``` Also, both the caller and opponent will get a special callback with the remote stream: ```dart callSession.onRemoteStreamReceived = (callSession, opponentId, mediaStream) { // create video renderer and set media stream to it RTCVideoRenderer streamRender = RTCVideoRenderer(); await streamRender.initialize(); streamRender.srcObject = mediaStream; streamRender.objectFit = RTCVideoViewObjectFit.RTCVideoViewObjectFitCover; // create view to put it somewhere on screen RTCVideoView videoView = RTCVideoView(streamRender); }; ``` Great work! You’ve completed the essentials of making a call in ConnectyCube. From this point, you and your opponents should start seeing each other. #### What’s next? [Section titled “What’s next?”](#whats-next) To enhance your calling feature with advanced functionalities, such as call recording, screen sharing, or integrating emojis and attachments during calls, follow the API guides below. These additions will help create a more dynamic and engaging experience for your users! * [Voice/video calling SDK documentation](/flutter/videocalling) * [Conference calling SDK documentation](/flutter/videocalling-conference/)
# Chat
> Integrate powerful chat functionality into your Flutter app effortlessly with our versatile Chat APIs. Enhance user communication and engagement.
ConnectyCube Chat API is built on top of Real-time(XMPP) protocol. In order to use it you need to setup real-time connection with ConnectyCube Chat server and use it to exchange data. By default Real-time Chat works over secure TLS connection. ## Connect to chat [Section titled “Connect to chat”](#connect-to-chat) ```dart CubeUser user = CubeUser(id: 4448514, password: "awesomepwd"); CubeChatConnection.instance.login(user) .then((loggedUser) {}) .catchError((error) {}); ``` Use `connectionStateStream` to listen different connection states: ```dart CubeChatConnection.instance.connectionStateStream.listen((state) { log("New chat connection state is $state", TAG); switch (state){ case CubeChatConnectionState.Idle: // instance of connection was created break; case CubeChatConnectionState.Authenticated: // user successfully authorised on ConnectyCube server break; case CubeChatConnectionState.AuthenticationFailure: // error(s) was occurred during authorisation on ConnectyCube server break; case CubeChatConnectionState.Reconnecting: // started reconnection to the chat break; case CubeChatConnectionState.Resumed: // chat connection was resumed break; case CubeChatConnectionState.Ready: // chat connection fully ready for realtime communications break; case CubeChatConnectionState.ForceClosed: // chat connection was interrupted break; case CubeChatConnectionState.Closed: // chat connection was closed break; } }); ``` ### Connect to chat using custom authentication providers [Section titled “Connect to chat using custom authentication providers”](#connect-to-chat-using-custom-authentication-providers) In some cases we don’t have a user’s password, for example when login via: * Facebook * Twitter * Firebase phone authorization * Custom identity authentication * etc. In such cases ConnectyCube API provides possibility to use ConnectyCube session token as a password for chat connection: ```dart // get current ConnectyCube session token and set as user's password String token = CubeSessionManager.instance.activeSession?.token; CubeUser user = CubeUser(id: 4448514, password: token); ``` ## Disconnect [Section titled “Disconnect”](#disconnect) ```dart CubeChatConnection.instance.logout(); ``` To **fully destroy** chat connection use `cubeChatConnection.destroy`: ```dart CubeChatConnection.instance.destroy(); ``` ## Reconnection [Section titled “Reconnection”](#reconnection) The SDK will try to reconnect to the chat after lost connection. To configure internal reconnection manager use next code snippet: ```dart CubeChatConnectionSettings chatConnectionSettings = CubeChatConnectionSettings.instance; chatConnectionSettings.totalReconnections = 5; // set 0 to disable internal reconnection manager or value more than 0 to set quantity of times to try to reconnect, default 5 times chatConnectionSettings.reconnectionTimeout = 5000; // timeout in milliseconds between reconnection attempts, default 5000 milliseconds ``` Additional to the internal reconnection manager or instead of it you can use your own reconnection manager. For it you can use for example [connectivity](https://pub.dev/packages/connectivity) library from [pub.dev](https://pub.dev/) repo. You can use code snippet below to listen internet connection state and start relogin to the chat when internet connection will be established: ```dart connectivityStateSubscription = Connectivity().onConnectivityChanged.listen((connectivityType) { if (connectivityType != ConnectivityResult.none) { bool isChatDisconnected = CubeChatConnection.instance.chatConnectionState == CubeChatConnectionState.Closed; if (isChatDisconnected && CubeChatConnection.instance.currentUser != null) { CubeChatConnection.instance.relogin(); } } }); ``` Additionaly you can try reconnect to the chat immediately after lost chat connection, for it use: ```dart cubeChatConnectionStateSubscription = CubeChatConnection.instance.connectionStateStream.listen((state) { if (state == CubeChatConnectionState.Closed) { Connectivity().checkConnectivity().then((connectivityType) { if (connectivityType != ConnectivityResult.none) { if (CubeChatConnection.instance.currentUser != null) { CubeChatConnection.instance.relogin(); } } }); } }); ``` ## Dialogs [Section titled “Dialogs”](#dialogs) All chats between users are organized in dialogs. The are 4 types of dialogs: * 1-1 chat - a dialog between 2 users. * group chat - a dialog between specified list of users. * public group chat - an open dialog. Any user from your app can chat there. * broadcast - chat where a message is sent to all users within application at once. All the users from the application are able to join this group. Broadcast dialogs can be created only via Admin panel. You need to create a new dialog and then use it to chat with other users. You also can obtain a list of your existing dialogs. ## Create new dialog [Section titled “Create new dialog”](#create-new-dialog) ### Create 1-1 chat [Section titled “Create 1-1 chat”](#create-1-1-chat) You need to pass `type = CubeDialogType.PRIVATE` and an id of an opponent you want to create a chat with: ```dart CubeDialog newDialog = CubeDialog( CubeDialogType.PRIVATE, occupantsIds: [56]); createDialog(newDialog) .then((createdDialog) {}) .catchError((error) {}); ``` ### Create group chat [Section titled “Create group chat”](#create-group-chat) You need to pass `type = CubeDialogType.GROUP` and ids of opponents you want to create a chat with: ```dart CubeDialog newDialog = CubeDialog( CubeDialogType.GROUP, name: "Hawaii relax team", description: "Some description", occupantsIds: [56, 98, 34], photo: "https://some.url/to/avatar.jpeg"); createDialog(newDialog) .then((createdDialog) {}) .catchError((error) {}); ``` ### Create public group chat [Section titled “Create public group chat”](#create-public-group-chat) It’s possible to create a public group chat, so any user from you application can join it. There is no a list with occupants,\ this chat is just open for everybody. You need to pass `type = CubeDialogType.PUBLIC` and ids of opponents you want to create a chat with: ```dart CubeDialog newDialog = CubeDialog( CubeDialogType.PUBLIC, name: "Blockchain trends", description: "Public dialog Description", photo: "https://some.url/to/avatar.jpeg"); createDialog(newDialog) .then((createdDialog) {}) .catchError((error) {}); ``` ### Chat metadata [Section titled “Chat metadata”](#chat-metadata) A dialog can have up to 3 custom sub-fields to store additional information that can be linked to chat. To start using extensions, allowed fields should be added first. Go to [Admin panel](https://admin.connectycube.com) > Chat > Custom Fields and provide allowed custom fields.  When create a dialog, the `extensions` field object must contain allowed fields only. Others fields will be ignored. The values will be casted to string. ```dart CubeDialog newDialog = CubeDialog(CubeDialogType.GROUP); newDialog.name = 'Friday party'; newDialog.occupantsIds = [29085, 29086, 29087]; newDialog.description = 'lets dance the night away'; newDialog.extensions = {'location': 'Sun bar'}; await createDialog(newDialog) .then((createdDialog) {}) .catchError((onError) {}); ``` When remove custom field in Admin panel, this field will be removed in all dialogs respectively. These parameters also can be used as a filter for retrieving dialogs. ### Chat permissions [Section titled “Chat permissions”](#chat-permissions) Chat could have different permissions to managa data access. This is managed via `permissions` field. At the moment, only one permission available - `allow_preview` - which allows to retrieve dialog’s messages for user who is not a member of dialog. This is useful when implement feature like Channels where a user can open chat and preview messages w/o joining it. > **Note** > > To preview messages w/o joining to dialog pass `preview` operator in request to get messages. ## List dialogs [Section titled “List dialogs”](#list-dialogs) It’s common to request all your dialogs on every app login: ```dart Map additionalParams = { 'updated_at[gt]': 1583402980 }; getDialogs(additionalParams) .then((pagedResult) {}) .catchError((error) {}); ``` If you want to retrieve only dialogs updated after some specific date time, you can use `updated_at[gt]` filter.\ This is useful if you cache dialogs somehow and do not want to obtain the whole list of your dialogs on every app start. ## Update dialog [Section titled “Update dialog”](#update-dialog) User can update group chat name, photo or add/remove occupants: ```dart String dialogId = "5356c64ab35c12bd3b108a41"; CubeDialogCustomData customData = CubeDialogCustomData("CustomDataClassName"); customData.fields['integer_field_name'] = 12345; customData.fields['string_field_name'] = "test string"; UpdateDialogParams updateDialogParams = UpdateDialogParams(); updateDialogParams.customData = customData; updateDialogParams.newName = "New name"; updateDialogParams.newDescription = "New decription"; updateDialogParams.newPhoto = ""; updateDialogParams.addOccupantIds = {563547, 563549, 563550}; updateDialogParams.deleteOccupantIds = {88708}; updateDialogParams.addAdminIds = {563550}; updateDialogParams.deleteAdminIds = {88709}; updateDialogParams.addPinnedMsgIds = {"88709sdfkahfkahfk"}; updateDialogParams.deletePinnedMsgIds = {"87987sdjkgskldglsksdfkahfkahfk"}; updateDialog(dialogId, updateDialogParams.getUpdateDialogParams()) .then((updatedDialog) {}) .catchError((error) {}); ``` > **Note** > > Only group chat owner or admins can remove other users from group chat. ## Remove dialog [Section titled “Remove dialog”](#remove-dialog) The following snippet is used to delete a dialog: ```dart String dialogId = "5e343635ca8bf479f70453f2"; bool force = false; // true - to delete everywhere, false - to delete for himself deleteDialog(dialogId, force) .then((voidResult) {}) .catchError((error) {}); ``` This request will remove this dialog for current user, but other users still will be able to chat there. Only group chat owner can remove the group dialog for all users. You can also delete multiple dialogs in a single request. ```dart Set ids = {"5e3434e0ca8bf479f70452f1", "5e3302f0ca8bf42b6c"}; bool force = false; // true - to delete everywhere, false - to delete for himself deleteDialogs(ids, force) .then((deleteItemsResult) {}) .catchError((error) {}); ``` ## Subscribe to public dialog [Section titled “Subscribe to public dialog”](#subscribe-to-public-dialog) In order to be able to chat in public dialog, you need to subscribe to it: ```dart String dialogId = "5356c64ab35c12bd3b108a41"; subscribeToPublicDialog(dialogId) .then((cubeDialog) {}) .catchError((error) {}); ``` ## Unsubscribe from public dialog [Section titled “Unsubscribe from public dialog”](#unsubscribe-from-public-dialog) ```dart String dialogId = "5356c64ab35c12bd3b108a41"; unSubscribeFromPublicDialog(dialogId) .then((voidResult) {}) .catchError((error) {}); ``` ## Retrieve public dialog occupants [Section titled “Retrieve public dialog occupants”](#retrieve-public-dialog-occupants) A public chat dialog can have many occupants. There is a separated API to retrieve a list of public dialog occupants: ```dart String dialogId = "5356c64ab35c12bd3b108a41"; getDialogOccupants(dialogId) .then((pagedResult) {}) .catchError((error) {}); ``` ## Add / Remove admins [Section titled “Add / Remove admins”](#add--remove-admins) Options to add or remove admins from the dialog can be done by Super admin (dialog’s creator) only.\ Options are supported in group chat, public or broadcast. Up to 5 admins can be added to chat. ```dart String dialogId = "5356c64ab35c12bd3b108a41"; addRemoveAdmins(dialogId, toAddIds: {45, 59}, toRemoveIds: {88708, 88709}) .then((cubeDialog) {}) .catchError((error) {}); ``` ## Update notifications settings [Section titled “Update notifications settings”](#update-notifications-settings) A user can turn on/off push notifications for offline messages in a dialog.\ By default push notification are turned ON, so offline user receives push notifications for new messages in a chat. ```dart String dialogId = "5356c64ab35c12bd3b108a41"; bool enable = true; // true - to enable, false - to disable updateDialogNotificationsSettings(dialogId, enable) .then((isEnabled) {}) .catchError((error) {}); ``` ## Get notifications settings [Section titled “Get notifications settings”](#get-notifications-settings) Check a status of notifications setting - either it is ON or OFF for a particular chat. Available responses: true - enabled, false - disabled. ```dart String dialogId = "5356c64ab35c12bd3b108a41"; getDialogNotificationsSettings(dialogId) .then((isEnabled) {}) .catchError((error) {}); ``` ## Chat history [Section titled “Chat history”](#chat-history) Every chat dialog stores its chat history which you can retrieve: ```dart String dialogId = "5356c64ab35c12bd3b108a41"; GetMessagesParameters params = GetMessagesParameters(); params.limit = 100; params.filters = [RequestFilter("", "date_sent", QueryRule.GT, 1583402980)]; params.markAsRead = true; params.sorter = RequestSorter(OrderType.DESC, "", "date_sent"); getMessages(dialogId, params.getRequestParameters()) .then((pagedResult) {}) .catchError((error) {}); ``` If you want to retrieve chat messages that were sent after or before specific date time only, you can use `"date_sent", QueryRule.GT` or `"date_sent", QueryRule.LT` filter.\ This is useful if you implement pagination for loading messages in your app. ## Send/Receive chat messages [Section titled “Send/Receive chat messages”](#sendreceive-chat-messages) ```dart // some dialog, which must contains opponent's id in 'occupantsIds' for CubeDialogType.PRIVATE and // 'dialogId' for other types of dialogs CubeDialog cubeDialog; // some dialog, which must contains opponent's id in 'occupantsIds' CubeMessage message = CubeMessage(); message.body = "How are you today?"; message.dateSent = DateTime.now().millisecondsSinceEpoch; message.markable = true; message.saveToHistory = true; cubeDialog.sendMessage(message) .then((cubeMessage) {}) .catchError((error) {}); // to listen messages ChatMessagesManager chatMessagesManager = CubeChatConnection.instance.chatMessagesManager; chatMessagesManager.chatMessagesStream.listen((newMessage) { // new message received }).onError((error) { // error received }); ``` ## Message metadata [Section titled “Message metadata”](#message-metadata) A chat message can have custom sub-fields to store additional information that can be linked to the particular chat message. When create a message, the custom data can be attached via `properties` field: ```dart CubeMessage message = CubeMessage(); message.properties["field_one"] = "value_one"; message.properties["field_two"] = "value_two"; ``` ## ‘Sent’ status [Section titled “‘Sent’ status”](#sent-status) (coming soon) ## ‘Delivered’ status [Section titled “‘Delivered’ status”](#delivered-status) The following callback is used to track the ‘delivered’ status: ```dart MessagesStatusesManager messagesStatusesManager = CubeChatConnection.instance.messagesStatusesManager; messagesStatusesManager.deliveredStream.listen((messageStatuses){ print("Message RECEIVED ${messageStatuses.userId}, ${messageStatuses.messageId}, ${messageStatuses.dialogId}"); }); ``` The SDK sends the ‘delivered’ status automatically when the message is received by the recipient. This is controlled by `markable = true` parameter when you send a message. If `markable` is `false` or omitted,\ then you can send the delivered status manually: ```dart CubeDialog cubeDialog; // some dialog CubeMessage originalMessage; // message to be marked as delivered cubeDialog.deliverMessage(originalMessage) .then((voidResult) {}) .catchError((error) {}); ``` ## ‘Read’ status [Section titled “‘Read’ status”](#read-status) Send the ‘read’ status: ```dart CubeDialog cubeDialog; // some dialog CubeMessage originalMessage; // message to be marked as read cubeDialog.readMessage(originalMessage) .then((voidResult) {}) .catchError((error) {}); // listen read status MessagesStatusesManager messagesStatusesManager = CubeChatConnection.instance.messagesStatusesManager; messagesStatusesManager.readStream.listen((messageStatuses){ print("Message READ ${messageStatuses.userId}, ${messageStatuses.messageId}, ${messageStatuses.dialogId}"); }); ``` ## ‘Is typing’ status [Section titled “‘Is typing’ status”](#is-typing-status) The following ‘typing’ notifications are supported: * typing: The user is composing a message. The user is actively interacting with a message input interface specific to this chat session (e.g., by typing in the input area of a chat screen) * stopped: The user had been composing but now has stopped. The user has been composing but has not interacted with the message input interface for a short period of time (e.g., 30 seconds) Send the ‘is typing’ status: ```dart CubeDialog cubeDialog; // some dialog cubeDialog.sendIsTypingStatus(); cubeDialog.sendStopTypingStatus(); TypingStatusesManager typingStatusesManager = CubeChatConnection.instance.typingStatusesManager; typingStatusesManager.isTypingStream.listen((typingStatus){ // for CubeDialogType.PRIVATE typingStatus.dialogId will be null log("IS_TYPING received: ${typingStatus.userId}, ${typingStatus.dialogId}"); }); typingStatusesManager.stopTypingStream.listen((typingStatus){ // for CubeDialogType.PRIVATE typingStatus.dialogId will be null log("STOP_TYPING received: ${typingStatus.userId}, ${typingStatus.dialogId}"); }); ``` ## Attachments [Section titled “Attachments”](#attachments) Chat attachments are supported with the cloud storage API. In order to send a chat attachment you need\ to upload the file to ConnectyCube cloud storage and obtain a link to the file (file UID).\ Then you need to include this UID into chat message and send it. ```dart CubeDialog cubeDialog; // some dialog File file; // some file on device storage uploadFile(file) .then((cubeFile) { CubeMessage message = CubeMessage(); message.body = "Attachment"; message.saveToHistory = true; message.markable = true; CubeAttachment attachment = CubeAttachment(); attachment.uid = cubeFile.uid; attachment.type = CubeAttachmentType.IMAGE_TYPE; message.attachments = [attachment]; return cubeDialog.sendMessage(message); }).catchError((error) {}); ``` The same flow is supported on the receiver’s side. When you receive a message, you need to get the file UID\ and then download the file from the cloud storage. ```dart ChatMessagesManager chatMessagesManager = CubeChatConnection.instance.chatMessagesManager; chatMessagesManager.chatMessagesStream.listen((incomingMessage) { String attachmentUid = incomingMessage.attachments?.first?.uid; if (attachmentUid != null) { String attachmentUrl = getPrivateUrlForUid(attachmentUid); } }); ``` ## Update chat message [Section titled “Update chat message”](#update-chat-message) **Via HTTP API** Update message/messages on a backend for dialog ID: ```dart String messageId = "5e3938d3ca8bf410bc80008d"; // id of message to be updated String dialogId = "5356c64ab35c12bd3b108a41"; // id of dialog, from which is message UpdateMessageParameters updateMessageParameters = UpdateMessageParameters(); updateMessageParameters.newBody = "Updated body"; //updateMessageParameters.delivered = true; // mark message as delivered updateMessageParameters.read = true; // mark message as read updateMessage(messageId, dialogId, updateMessageParameters.getRequestParameters()) .then((voidResult) {}) .catchError((error) {}); //update multiple messages String dialogId = "5356c64ab35c12bd3b108a41"; // id of dialog, from which are messages Set messagesIds = {"5e3938d3ca8bf410bc80008d", "5e3938d3ca8bf410bc800bc80"}; //messages ids to be marked UpdateMessageParameters updateMessageParameters = UpdateMessageParameters(); //updateMessageParameters.delivered = true; // mark message as delivered updateMessageParameters.read = true; // mark message as read updateMessages(dialogId, parameters.getRequestParameters(), messagesIds) .then((voidResult) {}) .catchError((error) {}); ``` **Via Chat connection** Use the following code snippet to edit a message (correct message body). ```dart CubeDialog cubeDialog; // the dialog where you want to update a message CubeMessage originalMessage; // the original message with updated body bool isLast = true; // set `true` if original message is last in chat history, or `false` if not cubeDialog.editMessage(originalMessage, isLast).then((value) { // the message successfully updated }).catchError((onError) { // got error during update the message }); ``` Other user(s) will receive the ‘edit’ message info to the listener: ```dart CubeChatConnection.instance.messagesStatusesManager!.editedStream.listen((editStatus) { // the message was edited, update your UI }); ``` ## Mark as read all chat messages [Section titled “Mark as read all chat messages”](#mark-as-read-all-chat-messages) The following snippet is used to mark all messages as read on a backend for dialog ID: ```dart String dialogId = "5356c64ab35c12bd3b108a41"; // id of dialog, from which is message UpdateMessageParameters updateMessageParameters = UpdateMessageParameters(); //updateMessageParameters.delivered = true; // mark message as delivered updateMessageParameters.read = true; // mark messages as read updateMessages(dialogId, updateMessageParameters.getRequestParameters()) .then((voidResult) {}) .catchError((error) {}); ``` ## Message reactions [Section titled “Message reactions”](#message-reactions) ### Add/Remove reactions [Section titled “Add/Remove reactions”](#addremove-reactions) User can add/remove message reactions and listen message reaction events Add ```dart var messageId = '58e6a9c8a1834a3ea6001f15'; var reaction = '🔥'; addMessageReaction(messageId, reaction) .then((_) {}) .catchError((onError) {}); ``` Remove ```dart var messageId = '58e6a9c8a1834a3ea6001f15'; var reaction = '👎'; removeMessageReaction(messageId, reaction) .then((_) {}) .catchError((onError) {}); ``` Add/Remove ```dart var messageId = '58e6a9c8a1834a3ea6001f15'; var reactionToAdd = '👎'; var reactionToRemove = '🚀'; updateMessageReactions( messageId, addReaction: reactionToAdd, removeReaction: reactionToRemove) .then((_) {}) .catchError((onError) {}); ``` ### Listen reactions [Section titled “Listen reactions”](#listen-reactions) ```dart CubeChatConnection.instance.messagesReactionsManager?.reactionsStream.listen((reaction) { // var dialogId = reaction.dialogId; // var messageId = reaction.messageId; // var addReaction = reaction.addReaction; // var removeReaction = reaction.removeReaction; }); ``` ### List message reactions [Section titled “List message reactions”](#list-message-reactions) User can list message reactions ```dart var messageId = '58e6a9c8a1834a3ea6001f15'; getMessageReactions(messageId).then((reactions) { // the result contains the map where key is the reaction and value is the list of users' ids who reacted with this reaction }).catchError((onError) {}); ``` Response example from `getMessageReactions(messageId)` - [see](/server/chat#response-22) ## Delete chat messages [Section titled “Delete chat messages”](#delete-chat-messages) **Via HTTP API** The following snippet is used to remove chat message/messages: ```dart List ids = ["5e394e7bca8bf410bc8017b0", "5e394e7bca8bf466137fa1eb"]; bool force = false; // true - to delete everywhere, false - to delete for himself deleteMessages(ids, force) .then((deleteItemsResult) {}) .catchError((error) {}); ``` This request will remove the messages from current user history only, without affecting the history of other users. **Via Chat connection** Use the following code snippet to delete a message. ```dart CubeDialog cubeDialog; // the dialog where you want to delete a message CubeMessage originalMessage; // the original message you want to delete cubeDialog.deleteMessage(originalMessage).then((value) { // the message successfully deleted }).catchError((onError) { // got error during delete the message }); ``` Other user(s) will receive the ‘delete’ message info to the listener: ```dart CubeChatConnection.instance.messagesStatusesManager!.deletedStream.listen((status) { // the message was deleted, update your UI }); ``` ## Unread messages count [Section titled “Unread messages count”](#unread-messages-count) You can request total unread messages count and unread count for particular dialog: ```dart List dialogsIds = ["5e3938d3ca8bf410bc80008c"]; // skip this parameter to get data about all dialogs getUnreadMessagesCount(dialogsIds) .then((unreadCount) {}) // map contains 'total' field and matches dialogId:unreadCount .catchError((error) {}); ``` ## Global search [Section titled “Global search”](#global-search) The following API is used to search for messages and chat dialogs: ```dart GlobalSearchParams additionalParams = GlobalSearchParams(); additionalParams.limit = 3; additionalParams.endDate = DateTime(2020, 1, 1); additionalParams.startDate = DateTime.now(); additionalParams.dialogIds = ["5e3438c7ca8bf479f704560c"]; searchText("Search query", additionalParams.getSearchParams()) .then((globalSearchResult) {}) .catchError((error) {}); ``` Please refer to [Global search parameters](/server/chat#global-search) for more info on how to form search params. ## Chat alerts [Section titled “Chat alerts”](#chat-alerts) When you send a chat message and the recipient/recipients is offline, then automatic push notification will be fired. In order to receive push notifications you need to subscribe for it. Please refer to [Push Notifications](/flutter/push-notifications) guide. To configure push template which users receive - go to [Dashboard Console, Chat Alerts page](https://admin.connectycube.com/) Also, here is a way to avoid automatically sending push notifications to offline recipient/recipients. For it add the `silent` parameter with value `1` to the `properties` field of the instance of a `CubeMessage`. ```dart var message; // some instance of `CubeMessage` message.properties['silent'] = '1'; ``` After sending such a message, the server won’t create the push notification for offline recipient/recipients. ## Mark a client as Active/Inactive [Section titled “Mark a client as Active/Inactive”](#mark-a-client-as-activeinactive) When you send a chat message and the recipient/recipients is offline, then automatic push notification will be fired. Sometimes a client app can be in a background mode, but still online. In this case it’s useful to let server know that a user wants to receive push notifications while still is connected to chat. For this particular case we have 2 handy methods: `markInactive` and `markActive`: ```dart CubeChatConnection.instance.markActive(); ``` ```dart CubeChatConnection.instance.markInactive(); ``` The common use case for these APIs is to call `markInactive` when an app goes to background mode and to call `markActive` when an app goes to foreground mode. ## Get last activity [Section titled “Get last activity”](#get-last-activity) There is a way to get an info when a user was active last time, in seconds. This is a modern approach for messengers apps, e.g. to display this info on a Contacts screen or on a User Profile screen. ```dart int userId = 123234; CubeChatConnection.instance.getLasUserActivity(userId) .then((seconds) { // 'userId' was 'seconds' ago }).catchError((error){ // 'userId' never logged to the chat }); ``` ## Last activity subscription [Section titled “Last activity subscription”](#last-activity-subscription) Listen to user last activity status via subscription. Use the code below to subscribe for the last activity events. You can leave the `callback` at `null` if you don’t want to listen to evens for the specific user. ```dart CubeChatConnection.instance.lastActivityManager?.subscribeToUserLastActivityStatus(userId, callback: (seconds){ }); ``` Use the code below to unsubscribe from the last activity events. ```dart CubeChatConnection.instance.lastActivityManager?.unsubscribeFromUserLastActivityStatus(userId); ``` Use the listener below if you want to listen to events from all users you subscribed to: ```dart CubeChatConnection.instance.lastActivityManager?.lastActivityStream.listen((lastActivityEvent) { log("lastActivityEvent: userId = ${lastActivityEvent.userId}, seconds = ${lastActivityEvent.seconds}"); }); ``` ## System messages [Section titled “System messages”](#system-messages) In a case you want to send a non text message data, e.g. some meta data about chat,\ some events or so - there is a system notifications API to do so: ```dart SystemMessagesManager systemMessagesManager = CubeChatConnection.instance.systemMessagesManager; CubeMessage systemMessage = CubeMessage(); systemMessage.recipientId = 563550; systemMessage.properties["custom_param_1"] = "custom_param_1"; systemMessage.properties["custom_param_2"] = "custom_param_2"; systemMessage.properties["custom_param_3"] = "custom_param_3"; systemMessagesManager.sendSystemMessage(systemMessage); // listen system messages systemMessagesManager.systemMessagesStream.listen((systemMessage) { log("Receive NEW system message: $systemMessage"); }).onError((error) { log("Receive system message ERROR $error")); }); ``` ## Moderation [Section titled “Moderation”](#moderation) The moderation capabilities help maintain a safe and respectful chat environment. We have options that allow users to report inappropriate content and manage their personal block lists, giving them more control over their experience. ### Report user [Section titled “Report user”](#report-user) For user reporting to work, it requires the following: 1. Go to [ConnectyCube Daashboard](https://admin.connectycube.com/) 2. select your Application 3. Navigate to **Custom** module via left sidebar 4. Create new table called **UserReports** with the following fields: * **reportedUserId** - integer * **reason** - string  Once the table is created, you can create a report with the following code snippet and then see all the reports in Dashboard: ```dart CubeCustomObject cubeCustomObject = CubeCustomObject("UserReports"); cubeCustomObject.fields = { 'reportedUserId': 45, 'reason': 'User is spamming with bad words', }; createCustomObject(cubeCustomObject).then((createdObject) { }).catchError((onError) {}); ``` ### Report message [Section titled “Report message”](#report-message) For message reporting to work, the same approach to user reporting above could be used. You need to create new table called **MessageReports** with the following fields: * **reportedMessageId** - integer * **reason** - string Once the table is created, you can create a report with the following code snippet and then see all the reports in Dashboard: ```dart CubeCustomObject cubeCustomObject = CubeCustomObject("MessageReports"); cubeCustomObject.fields = { 'reportedMessageId': '58e6a9c8a1834a3ea6001f15', 'reason': 'The message contains phishing links', }; createCustomObject(cubeCustomObject).then((createdObject) { }).catchError((onError) {}); ``` ### Block user [Section titled “Block user”](#block-user) Block list (aka Privacy list) allows enabling or disabling communication with other users. You can create, modify, or delete privacy lists, define a default list. > The user can have multiple privacy lists, but only one can be active. #### Create privacy list [Section titled “Create privacy list”](#create-privacy-list) A privacy list must have at least one element in order to be created. You can choose a type of blocked logic. There are 2 types: * Block in one way. When you blocked a user, but you can send messages to him. * Block in two ways. When you blocked a user and you also can’t send messages to him. ```dart var listName = 'custom'; var items = [ CubePrivacyListItem(34, CubePrivacyAction.deny, isMutual: false), CubePrivacyListItem(48, CubePrivacyAction.deny), CubePrivacyListItem(18, CubePrivacyAction.allow) ]; CubeChatConnection.instance.privacyListsManager?.createList(listName, items).then((users) { // privacy list was created successfully }).catchError((exception) { // error occurred during creation privacy list }); ``` > In order to be used the privacy list should be not only set, but also activated(set as default). #### Activate privacy list [Section titled “Activate privacy list”](#activate-privacy-list) In order to activate rules from a privacy list you should set it as default: ```dart var listName = 'custom'; CubeChatConnection.instance.privacyListsManager?.setDefaultList(listName).then((users) { }).catchError((exception) { }); ``` #### Update privacy list [Section titled “Update privacy list”](#update-privacy-list) There is a rule you should follow to update a privacy list: * If you want to update or set new privacy list instead of current one, you should decline current default list first. ```dart var listName = 'custom'; var items = [ CubePrivacyListItem(34, CubePrivacyAction.deny, isMutual: false), CubePrivacyListItem(48, CubePrivacyAction.deny), CubePrivacyListItem(18, CubePrivacyAction.allow) ]; CubeChatConnection.instance.privacyListsManager ?.declineDefaultList() .then((voidResult) => CubeChatConnection.instance.privacyListsManager ?.createList(listName, items)) .then((list) => CubeChatConnection.instance.privacyListsManager ?.setDefaultList(listName)) .then((updatedList) { }); ``` #### Retrieve privacy list names [Section titled “Retrieve privacy list names”](#retrieve-privacy-list-names) To get a list of all your privacy lists’ names use the following request: ```dart CubeChatConnection.instance.privacyListsManager?.getAllLists().then((result) { log('active: ${result.activeList}'); log('default: ${result.defaultList}'); log('allPrivacyLists: ${result.allPrivacyLists}'); }).catchError((exception) { }); ``` #### Retrieve privacy list with name [Section titled “Retrieve privacy list with name”](#retrieve-privacy-list-with-name) To get the privacy list by name you should use the following method: ```dart var listName = 'custom'; CubeChatConnection.instance.privacyListsManager?.getList(listName).then((items) { log('items: $items}'); }).catchError((exception) { }); ``` #### Remove privacy list [Section titled “Remove privacy list”](#remove-privacy-list) To delete a list you can call a method below: ```dart var listName = 'custom'; CubeChatConnection.instance.privacyListsManager?.removeList(listName).then((voidResult) { }).catchError((exception) { }); ``` #### Blocked user attempts to communicate with user [Section titled “Blocked user attempts to communicate with user”](#blocked-user-attempts-to-communicate-with-user) Blocked users will be receiving an error when trying to chat with a user in a 1-1 chat and will be receiving nothing in a group chat: ```dart CubeChatConnection.instance.chatMessagesManager?.chatMessagesStream.handleError((errorPacket){ }); ``` ## Ping server [Section titled “Ping server”](#ping-server) Sometimes, it can be cases where TCP connection to Chat server can go down without the application layer knowing about it. To check that chat connection is still alive or to keep it to be alive there is a ping method: ```dart const msTimeout = 3000; CubeChatConnection.instance.pingWithTimeout(msTimeout: msTimeout).then((_) { }).catchError((e) { // No connection with server // Let's try to re-connect // ... }); ```
# Video Calling
> Empower your Flutter applications with our Video Calling P2P API. Enable secure and immersive peer-to-peer video calls for enhanced user experience
ConnectyCube **Video Calling P2P API** is built on top of [WebRTC](https://webrtc.org/) protocol and based on top of [WebRTC Mesh](https://webrtcglossary.com/mesh/) architecture. Max people per P2P call is 4. > To get a difference between **P2P calling** and **Conference calling** please read our [ConnectyCube Calling API comparison](https://connectycube.com/2020/04/15/connectycube-calling-api-comparison/) blog page. ## Required preparations for supported platforms [Section titled “Required preparations for supported platforms”](#required-preparations-for-supported-platforms) #### iOS [Section titled “iOS”](#ios) Add the following entries to your *Info.plist* file, located in `/ios/Runner/Info.plist`: ```xml NSCameraUsageDescription$(PRODUCT_NAME) Camera Usage!NSMicrophoneUsageDescription$(PRODUCT_NAME) Microphone Usage! ``` This entries allow your app to access the camera and microphone. #### Android [Section titled “Android”](#android) Ensure the following permission is present in your Android Manifest file, located in `/android/app/src/main/AndroidManifest.xml`: ```xml ``` If you need to use a Bluetooth device, please add: ```xml ``` The Flutter project template adds it, so it may already be there. Also you will need to set your build settings to Java 8, because official WebRTC jar now uses static methods in `EglBase` interface. Just add this to your app level `build.gradle`: ```groovy android { //... compileOptions { sourceCompatibility JavaVersion.VERSION_1_8 targetCompatibility JavaVersion.VERSION_1_8 } } ``` If necessary, in the same `build.gradle` you will need to increase `minSdkVersion` of `defaultConfig` up to `18` (currently default Flutter generator set it to `16`). #### macOS [Section titled “macOS”](#macos) Add the following entries to your *\*.entitlements* files, located in `/macos/Runner`: ```xml com.apple.security.network.clientcom.apple.security.device.audio-inputcom.apple.security.device.camera ``` This entries allow your app to access the internet, microphone, and camera. #### Windows [Section titled “Windows”](#windows) It does not require any special preparations. #### Web [Section titled “Web”](#web) It does not require any special preparations. #### Linux [Section titled “Linux”](#linux) It does not require any special preparations. ## P2PClient setup [Section titled “P2PClient setup”](#p2pclient-setup) [ConnectyCube Chat API](/flutter/messaging) is used as a signaling transport for Video Calling API, so in order to start using Video Calling API you need to [connect to Chat](/flutter/messaging#connect-to-chat). To manage P2P calls in flutter you should use `P2PClient`. Please see code below to find out possible functionality. ```dart P2PClient callClient = P2PClient.instance; // returns instance of P2PClient callClient.init(); // starts listening of incoming calls callClient.destroy(); // stops listening incoming calls and clears callbacks // calls when P2PClient receives new incoming call callClient.onReceiveNewSession = (incomingCallSession) { }; // calls when any callSession closed callClient.onSessionClosed = (closedCallSession) { }; // creates new P2PSession callClient.createCallSession(callType, opponentsIds); ``` ## Create call session [Section titled “Create call session”](#create-call-session) In order to use Video Calling API you need to create a call session object - choose your opponents with whom you will have a call and a type of session (VIDEO or AUDIO). `P2PSession` creates via `P2PClient`: ```dart P2PClient callClient; //callClient created somewhere Set opponentsIds = {}; int callType = CallType.VIDEO_CALL; // or CallType.AUDIO_CALL P2PSession callSession = callClient.createCallSession(callType, opponentsIds); ``` ## Add listeners [Section titled “Add listeners”](#add-listeners) Below described main helpful callbacks and listeners: ```dart callSession.onLocalStreamReceived = (mediaStream) { // called when local media stream completely prepared // display the stream in UI // ... }; callSession.onRemoteStreamReceived = (callSession, opponentId, mediaStream) { // called when remote media stream received from opponent }; callSession.onRemoteStreamRemoved = (callSession, opponentId, mediaStream) { // called when remote media was removed }; callSession.onUserNoAnswer = (callSession, opponentId) { // called when did not receive an answer from opponent during timeout (default timeout is 60 seconds) }; callSession.onCallRejectedByUser = (callSession, opponentId, [userInfo]) { // called when received 'reject' signal from opponent }; callSession.onCallAcceptedByUser = (callSession, opponentId, [userInfo]){ // called when received 'accept' signal from opponent }; callSession.onReceiveHungUpFromUser = (callSession, opponentId, [userInfo]){ // called when received 'hungUp' signal from opponent }; callSession.onSessionClosed = (callSession){ // called when current session was closed }; ``` ## Initiate a call [Section titled “Initiate a call”](#initiate-a-call) ```dart Map userInfo = {}; callSession.startCall(userInfo); ``` The `userInfo` is used to pass any extra parameters in the request to your opponents. After this, your opponents will receive a new call session in callback: ```dart callClient.onReceiveNewSession = (incomingCallSession) { }; ``` ## Accept a call [Section titled “Accept a call”](#accept-a-call) To accept a call the following code snippet is used: ```dart Map userInfo = {}; // additional info for other call members callSession.acceptCall(userInfo); ``` After this, you will get a confirmation in the following callback: ```dart callSession.onCallAcceptedByUser = (callSession, opponentId, [userInfo]){ }; ``` Also, both the caller and opponents will get a special callback with the remote stream: ```dart callSession.onRemoteStreamReceived = (callSession, opponentId, mediaStream) { // create video renderer and set media stream to it RTCVideoRenderer streamRender = RTCVideoRenderer(); await streamRender.initialize(); streamRender.srcObject = mediaStream; streamRender.objectFit = RTCVideoViewObjectFit.RTCVideoViewObjectFitCover; // create view to put it somewhere on screen RTCVideoView videoView = RTCVideoView(streamRender); }; ``` From this point, you and your opponents should start seeing each other. ## Receive a call in background [Section titled “Receive a call in background”](#receive-a-call-in-background) See [CallKit section](#callkit) below. ## Reject a call [Section titled “Reject a call”](#reject-a-call) ```dart Map userInfo = {}; // additional info for other call members callSession.reject(userInfo); ``` After this, the caller will get a confirmation in the following callback: ```dart callSession.onCallRejectedByUser = (callSession, opponentId, [userInfo]) { }; ``` Sometimes, it could a situation when you received a call request and want to reject it, but the call session object has not arrived yet. It could be in a case when you integrated CallKit to receive call requests while an app is in background/killed state. To do a reject in this case, the following snippet can be used: ```dart String callSessionId; // the id of incoming call session Set callMembers; // the ids of all call members including the caller and excluding the current user Map userInfo = {}; // additional info about performed action (optional) rejectCall(callSessionId, callMembers, userInfo: userInfo); ``` ## End a call [Section titled “End a call”](#end-a-call) ```dart Map userInfo = {}; // additional info for other call members callSession.hungUp(userInfo); ``` After this, the opponents will get a confirmation in the following callback: ```dart callSession.onReceiveHungUpFromUser = (callSession, opponentId, [userInfo]){ }; ``` ## Monitor connection state [Section titled “Monitor connection state”](#monitor-connection-state) To monitor the states of your peer connections (users) you need to implement the `RTCSessionStateCallback` abstract class: ```dart callSession.setSessionCallbacksListener(this); callSession.removeSessionCallbacksListener(); ``` ```dart /// Called in case when connection with the opponent is started establishing @override void onConnectingToUser(P2PSession session, int userId) {} /// Called in case when connection with the opponent is established @override void onConnectedToUser(P2PSession session, int userId) {} /// Called in case when connection is closed @override void onConnectionClosedForUser(P2PSession session, int userId) {} /// Called in case when the opponent is disconnected @override void onDisconnectedFromUser(P2PSession session, int userId) {} /// Called in case when connection has failed with the opponent @override void onConnectionFailedWithUser(P2PSession session, int userId) {} ``` ## Tackling Network changes [Section titled “Tackling Network changes”](#tackling-network-changes) If a user’s network environment changes (e.g., switching from Wi-Fi to mobile data), the existing call connection might no longer be valid. Normally, in a case of short network interruptions, the ConnectyCube SDK will automatically restore the call so you can see via `RTCSessionStateCallback` callback with `peer connection state` changing to `onDisconnectedFromUser` and then again to `onConnectedToUser`. But not all cases are the same, and in some of them the connection needs to be **manually** refreshed due to various issues like NAT or firewall behavior changes or even longer network environment changes, e.g. when a user is offline for more than 30 seconds. This is where ICE restart helps to re-establish the connection to find a new network path for communication. The correct and recommended way for an application to handle all such ‘bad’ cases is to trigger an ICE restart when the connection state goes to either `FAILED` or `DISCONNECTED` for an extended period of time (e.g. > 30 seconds). ```dart code snippet with ice restart (coming soon) ``` ## Mute audio [Section titled “Mute audio”](#mute-audio) ```dart bool mute = true; // false - to unmute, default value is false callSession.setMicrophoneMute(mute); ``` ## Switch audio output [Section titled “Switch audio output”](#switch-audio-output) For iOS/Android platforms use: ```dart bool enabled = false; // true - to switch to sreakerphone, default value is false callSession.enableSpeakerphone(enable); ``` For Chrome-based browsers and Desktop platforms use: ```dart if (kIsWeb) { remoteRenderers.forEach(renderer) { renderer.audioOutput(deviceId); }); } else { callSession.selectAudioOutput(deviceId); } ``` ## Mute video [Section titled “Mute video”](#mute-video) ```dart bool enabled = false; // true - to enable local video track, default value for video calls is true callSession.setVideoEnabled(enabled); ``` ## Switch video cameras [Section titled “Switch video cameras”](#switch-video-cameras) For iOS/Android platforms use: ```dart callSession.switchCamera().then((isFrontCameraSelected){ if(isFrontCameraSelected) { // front camera selected } else { // back camera selected } }).catchError((error) { // switching camera failed }); ``` For the Web platform and Desktop platforms use: ```dart callSession.switchCamera(deviceId: deviceId); ``` ## Get available cameras list [Section titled “Get available cameras list”](#get-available-cameras-list) ```dart var cameras = await callSession.getCameras(); // call only after `initLocalMediaStream()` ``` ## Get available Audio input devices list [Section titled “Get available Audio input devices list”](#get-available-audio-input-devices-list) ```dart var audioInputs = await callSession.getAudioInputs(); // call only after `initLocalMediaStream()` ``` ## Get available Audio output devices list [Section titled “Get available Audio output devices list”](#get-available-audio-output-devices-list) ```dart var audioOutputs = await callSession.getAudioOutputs(); // call only after `initLocalMediaStream()` ``` ## Use the custom media stream [Section titled “Use the custom media stream”](#use-the-custom-media-stream) ```dart MediaStream customMediaStream; callSession.replaceMediaStream(customMediaStream); ``` ## Toggle the torch [Section titled “Toggle the torch”](#toggle-the-torch) ```dart var enable = true; // false - to disable the torch callSession.setTorchEnabled(enable); ``` ## Screen Sharing [Section titled “Screen Sharing”](#screen-sharing) The Screen Sharing feature allows you to share the screen from your device to other call members. Currently the Connectycube Flutter SDK supports the Screen Sharing feature for all supported platforms. For switching to the screen sharing during the call use next code snippet: ```dart P2PSession callSession; // the existing call session callSession.enableScreenSharing(true, requestAudioForScreenSharing: true); // for switching to the screen sharing callSession.enableScreenSharing(false); // for switching to the camera streaming ``` ### Android specifics of targeting the `targetSdkVersion` to the version **31** and above [Section titled “Android specifics of targeting the targetSdkVersion to the version 31 and above”](#android-specifics-of-targeting-the-targetsdkversion-to-the-version-31-and-above) After updating the `targetSdkVersion` to the version **31** you can encounter an error: ```log java.lang.SecurityException: Media projections require a foreground service of type ServiceInfo.FOREGROUND_SERVICE_TYPE_MEDIA_PROJECTION ``` To avoid it do the next changes and modifications in your project: 1. Connect the `flutter_background` plugin to your project using: ```yaml flutter_background: ^x.x.x ``` 2. Add to the file `app_name/android/app/src/main/AndroidManifest.xml` to section `manifest` next permissions: ```xml ``` 3. Add to the file `app_name/android/app/src/main/AndroidManifest.xml` to section `application` next service: ```xml ``` 4. Create the next function somewhere in your project: ```dart Future initForegroundService() async { final androidConfig = FlutterBackgroundAndroidConfig( notificationTitle: 'App name', notificationText: 'Screen sharing is in progress', notificationImportance: AndroidNotificationImportance.Default, notificationIcon: AndroidResource( name: 'ic_launcher_foreground', defType: 'drawable'), ); return FlutterBackground.initialize(androidConfig: androidConfig); } ``` and call it somewhere after the initialization of the app or before starting the screen sharing. 5. Call the function `FlutterBackground.enableBackgroundExecution()` just before starting the screen sharing and function `FlutterBackground.disableBackgroundExecution()` after ending the screen sharing or finishing the call. ### IOS screen sharing using the Screen Broadcasting feature. [Section titled “IOS screen sharing using the Screen Broadcasting feature.”](#ios-screen-sharing-using-the-screen-broadcasting-feature) The Connectycube Flutter SDK supports two types of Screen sharing on the iOS platform. There are **In-app screen sharing** and **Screen Broadcasting**. The **In-app screen sharing** doesn’t require any additional preparation on the app side. But the **Screen Broadcasting** feature requires some. All required features we already added to our [P2P Calls sample](https://github.com/ConnectyCube/connectycube-flutter-samples/tree/master/p2p_call_sample). Below is the step-by-step guide on adding it to your app. It contains the following steps: 1. Add the `Broadcast Upload Extension`; 2. Add required files from our sample to your iOS project; 3. Update project configuration files with your credentials; #### Add the `Broadcast Upload Extension` [Section titled “Add the Broadcast Upload Extension”](#add-the-broadcast-upload-extension) For creating the extension you need to add a new target to your application, selecting the `Broadcast Upload Extension` template. Fill in the desired name, change the language to Swift, make sure `Include UI Extension` (see screenshot) is not selected, as we don’t need custom UI for our case, then press Finish. You will see that a new folder with the extension’s name was added to the project’s tree, containing the `SampleHandler.swift` class. Also, make sure to update the Deployment Info, for the newly created extension, to iOS 14 or newer. To learn more about creating App Extensions check the [official documentation](https://developer.apple.com/library/archive/documentation/General/Conceptual/ExtensibilityPG/ExtensionCreation.html). `` #### Add the required files from our sample to your own iOS project [Section titled “Add the required files from our sample to your own iOS project”](#add-the-required-files-from-our-sample-to-your-own-ios-project) After adding the extension you should add prepared files from our sample to your own project. Copy next files from our [`Broadcast Extension`](https://github.com/ConnectyCube/connectycube-flutter-samples/tree/master/p2p_call_sample/ios/Broadcast%20Extension) directory: `Atomic.swift`, `Broadcast Extension.entitlements` (the name can be different according to your extension’s name), `DarwinNotificationCenter.swift`, `SampleHandler.swift` (replace the automatically created file), `SampleUploader.swift`, `SocketConnection.swift`. Then open your project in Xcode and link these files with your iOS project using Xcode tools. For it, call the context menu of your extension directory, select ‘Add Files to “Runner”…’ (see screenshot) and select files copied to your extension directory before. `` #### Update project configuration files [Section titled “Update project configuration files”](#update-project-configuration-files) Do the following for your iOS project configuration files: 1. Add both the app and the extension to the same App Group. For it, add to both (app and extension) `*.entitlements` files next lines: ```xml com.apple.security.application-groupsgroup.com.connectycube.flutter ``` where the `group.com.connectycube.flutter` is your App group. To learn about working with app groups, see [Adding an App to an App Group](https://developer.apple.com/library/archive/documentation/Miscellaneous/Reference/EntitlementKeyReference/Chapters/EnablingAppSandbox.html#//apple_ref/doc/uid/TP40011195-CH4-SW19). We recommend you create the app group in the Apple Developer Console before. Next, add the App group id value to the app’s `Info.plist` of your app for the `RTCAppGroupIdentifier` key: ```xml RTCAppGroupIdentifiergroup.com.connectycube.flutter ``` where the `group.com.connectycube.flutter` is your App group. 2. Add a new key `RTCScreenSharingExtension` to the app’s `Info.plist` with the extension’s `Bundle Identifier` as the value: ```xml RTCScreenSharingExtensioncom.connectycube.flutter.p2p-call-sample.app.Broadcast-Extension ``` where the `com.connectycube.flutter.p2p-call-sample.app.Broadcast-Extension` is the Bundle ID of your Broadcast Extension. Take it from the Xcode `` 3. Update `SampleHandler.swift`’s `appGroupIdentifier` constant with the App Group name your app and extension are both registered to. ```swift static let appGroupIdentifier = "group.com.connectycube.flutter" ``` where the `group.com.connectycube.flutter` is your app group. 4. Make sure `voip` is added to `UIBackgroundModes`, in the app’s `Info.plist`, in order to work when the app is in the background. ```xml UIBackgroundModesremote-notificationvoipaudio ``` After performing mentioned actions you can switch to Screen sharing during the call using `useIOSBroadcasting = true`: ```dart _callSession.enableScreenSharing(true, useIOSBroadcasting: true); ``` ### Requesting desktop capture source [Section titled “Requesting desktop capture source”](#requesting-desktop-capture-source) Desktop platforms require the capture source (Screen or Window) for screen sharing. We prepared a widget ready for using that requests the available sources from the system and provides them to a user for selection. After that, you can use it as the source for screen sharing. In code it can look in a next way: ```dart var desktopCapturerSource = isDesktop ? await showDialog( context: context, builder: (context) => ScreenSelectDialog()) : null; callSession.enableScreenSharing(true, desktopCapturerSource: desktopCapturerSource); ``` The default capture source (usually it is the default screen) will be captured if set `null` as a capture source for the desktop platform. ## WebRTC Stats reporting [Section titled “WebRTC Stats reporting”](#webrtc-stats-reporting) Stats reporting is an insanely powerful tool that can provide detailed info about a call. There is info about the media, peer connection, codecs, certificates, etc. To enable stats report you should first set stats reporting frequency using `RTCConfig`. ```dart RTCConfig.instance.statsReportsInterval = 200; // receive stats report every 200 milliseconds ``` Then you can subscribe to the stream with reports using the instance of the call session: ```dart _callSession.statsReports.listen((event) { var userId = event.userId; // the user's id the stats related to var stats = event.stats; // available stats }); ``` To disable fetching Stats reports set this parameter as 0. ### Monitoring mic level and video bitrate using Stats [Section titled “Monitoring mic level and video bitrate using Stats”](#monitoring-mic-level-and-video-bitrate-using-stats) Also, we prepared the helpful manager `CubeStatsReportsManager` for processing Stats reports and getting some helpful information like the opponent’s mic level and video bitrate. For its work, you just need to configure the `RTCConfig` as described above. Then create the instance of `CubeStatsReportsManager` and initialize it with the call session. ```dart final CubeStatsReportsManager _statsReportsManager = CubeStatsReportsManager(); _statsReportsManager.init(_callSession); ``` After that you can subscribe on the interested data: ```dart _statsReportsManager.micLevelStream.listen((event) { var userId = event.userId; var micLevel = event.micLevel; // the mic level from 0 to 1 }); _statsReportsManager.videoBitrateStream.listen((event) { var userId = event.userId; var bitRate = event.bitRate; // the video bitrate in kbits/sec }); ``` After finishing the call you should dispose of the manager for avoiding memory leaks. You can do it in the `onSessionClosed` callback: ```dart void _onSessionClosed(session) { // ... _statsReportsManager.dispose(); // .. } ``` ## Configurations [Section titled “Configurations”](#configurations) ConnectyCube Flutter SDK provides possibility to change some default parameters for call session. ### Media stream configurations [Section titled “Media stream configurations”](#media-stream-configurations) Use instance of `RTCMediaConfig` class to change some default media stream configs. ```dart RTCMediaConfig mediaConfig = RTCMediaConfig.instance; mediaConfig.minHeight = 720; // sets preferred minimal height for local video stream, default value is 320 mediaConfig.minWidth = 1280; // sets preferred minimal width for local video stream, default value is 480 mediaConfig.minFrameRate = 30; // sets preferred minimal framerate for local video stream, default value is 25 mediaConfig.maxBandwidth = 512; // sets initial maximum bandwidth in kbps, set to `0` or `null` for disabling the limitation, default value is 0 ``` ### Call quality [Section titled “Call quality”](#call-quality) **Limit bandwidth** Despite WebRTC engine uses automatic quality adjustement based on available Internet bandwidth, sometimes it’s better to set the max available bandwidth cap which will result in a better and smoother user experience. For example, if you know you have a bad internet connection, you can limit the max available bandwidth to e.g. 256 Kbit/s. This can be done either when initiate a call via `RTCMediaConfig.instance.maxBandwidth = 512` which will result in limiting the max vailable bandwidth for ALL participants or/and during a call: ```dart callSession.setMaxBandwidth(256); // set some maximum value to increase the limit ``` which will result in limiting the max available bandwidth for current user only. ### Call connection configurations [Section titled “Call connection configurations”](#call-connection-configurations) Use instance of `RTCConfig` class to change some default call connection configs. ```dart RTCConfig config = RTCConfig.instance; config.noAnswerTimeout = 90; // sets timeout in seconds before stop dilling to opponents, default value is 60 config.dillingTimeInterval = 5; // time interval in seconds between 'invite call' packages, default value is 3 seconds, min value is 3 seconds config.statsReportsInterval = 300; // the time interval in milliseconds of periodic fetching reports, default value is 0 (disabled) ``` ## Recording [Section titled “Recording”](#recording) (coming soon) ## CallKit [Section titled “CallKit”](#callkit) > A ready [Flutter P2P Calls sample](https://github.com/ConnectyCube/connectycube-flutter-samples/tree/master/p2p_call_sample) with CallKit integrated is available at GitHub. All the below code snippets will be taken from it. For mobile apps, it can be a situation when an opponent’s user app is either in closed (killed)or background (inactive) state. In this case, to be able to still receive a call request, a flow called CallKit is used. It’s a mix of CallKit API + Push Notifications API + VOIP Push Notifications API. The complete flow is similar to the following: * a call initiator should send a push notification (for iOS it’s a VOIP push notification) along with a call request * when an opponent’s app is killed or in a background state - an opponent will receive a push notification about an incoming call, so the CallKit incoming call screen will be displayed, where a user can accept/reject the call. The [ConnectyCube Flutter Call Kit](https://pub.dev/packages/connectycube_flutter_call_kit) plugin should be used to integrate CallKit functionality. Below we provide a detailed guide on additional steps that needs to be performed in order to integrate CallKit into a Flutter app. ### Connect the [ConnectyCube Flutter Call Kit](https://pub.dev/packages/connectycube_flutter_call_kit) plugin [Section titled “Connect the ConnectyCube Flutter Call Kit plugin”](#connect-theconnectycube-flutter-call-kit-plugin) Please follow the [plugin’s guide](https://pub.dev/packages/connectycube_flutter_call_kit#configure-your-project) on how to connect it to your project. **Initiate a call** When initiate a call via `callSession.startCall()`, additionally we need to send a push notification (standard for Android user and VOIP for iOS). This is required for an opponent(s) to be able to receive an incoming call request when an app is in the background or killed state. The following request will initiate a standard push notification for Android and a VOIP push notification for iOS: ```dart P2PSession callSession; // the call session created before CreateEventParams params = CreateEventParams(); params.parameters = { 'message': "Incoming ${callSession.callType == CallType.VIDEO_CALL ? "Video" : "Audio"} call", 'call_type': callSession.callType, 'session_id': callSession.sessionId, 'caller_id': callSession.callerId, 'caller_name': callerName, 'call_opponents': callSession.opponentsIds.join(','), 'signal_type': 'startCall', 'ios_voip': 1, }; params.notificationType = NotificationType.PUSH; params.environment = kReleaseMode ? CubeEnvironment.PRODUCTION : CubeEnvironment.DEVELOPMENT; params.usersIds = callSession.opponentsIds.toList(); createEvent(params.getEventForRequest()).then((cubeEvent) { // event was created }).catchError((error) { // something went wrong during event creation }); ``` ### Receive call request in background/killed state [Section titled “Receive call request in background/killed state”](#receive-call-request-in-backgroundkilled-state) The goal of CallKit is to receive call requests when an app is in the background or killed state. For iOS we will use CallKit and for Android we will use standard capabilities. The [ConnectyCube Flutter Call Kit](https://pub.dev/packages/connectycube_flutter_call_kit) plugin covers all main functionality for receiving the calls in the background. First of all, you need to subscribe on a push notifications to have the possibility of receiving a push notifications in the background. You can request the subscription token from the [ConnectyCube Flutter Call Kit](https://pub.dev/packages/connectycube_flutter_call_kit) plugin. It will return the VoIP token for iOS and the common FCM token for Android. Then you can create the subscription using the token above. In code it will look next: ```dart ConnectycubeFlutterCallKit.getToken().then((token) { if (token != null) { subscribe(token); } }); subscribe(String token) async { CreateSubscriptionParameters parameters = CreateSubscriptionParameters(); parameters.pushToken = token; parameters.environment = kReleaseMode ? CubeEnvironment.PRODUCTION : CubeEnvironment.DEVELOPMENT; if (Platform.isAndroid) { parameters.channel = NotificationsChannels.GCM; parameters.platform = CubePlatform.ANDROID; } else if (Platform.isIOS) { parameters.channel = NotificationsChannels.APNS_VOIP; parameters.platform = CubePlatform.IOS; } String? deviceId = await PlatformDeviceId.getDeviceId; parameters.udid = deviceId; var packageInfo = await PackageInfo.fromPlatform(); parameters.bundleIdentifier = packageInfo.packageName; createSubscription(parameters.getRequestParameters()).then((cubeSubscriptions) { log('[subscribe] subscription SUCCESS'); }).catchError((error) { log('[subscribe] subscription ERROR: $error'); }); } ``` During the Android app life, the FCM token can be refreshed. Use the next code snippet to listen to this event and renew the subscription on the Connectycube back-end: ```dart ConnectycubeFlutterCallKit.onTokenRefreshed = (token) { subscribe(token); }; ``` After correctly performing the steps above the [ConnectyCube Flutter Call Kit](https://pub.dev/packages/connectycube_flutter_call_kit) plugin automatically will show the CallKit screen for iOS and the Incoming Call notification for Android. > **Note**: Pay attention: the **Android** platform requires some preparations for showing the notifications, working in the background, and starting the app from a notification. It includes next: * Request the permission on showing notifications (using the [permission\_handler](https://pub.dev/packages/permission_handler) plugin): ```dart requestNotificationsPermission() async { var isPermissionGranted = await Permission.notification.isGranted; if(!isPermissionGranted){ await Permission.notification.request(); } } ``` * Request permission for starting the app from notification (using the [permission\_handler](https://pub.dev/packages/permission_handler) plugin): ```dart Future checkSystemAlertWindowPermission(BuildContext context) async { if (Platform.isAndroid) { var androidInfo = await DeviceInfoPlugin().androidInfo; var sdkInt = androidInfo.version.sdkInt!; if (sdkInt >= 31) { if (await Permission.systemAlertWindow.isDenied) { showDialog( context: context, builder: (BuildContext context) { return Expanded( child: AlertDialog( title: Text('Permission required'), content: Text( 'For accepting the calls in the background you should provide access to show System Alerts from the background. Would you like to do it now?'), actions: [ TextButton( onPressed: () { Permission.systemAlertWindow.request().then((status) { if (status.isGranted) { Navigator.of(context).pop(); } }); }, child: Text( 'Allow', ), ), TextButton( onPressed: () { Navigator.of(context).pop(); }, child: Text( 'Later', ), ), ], ), ); }, ); } } } } ``` * Start/Stop foreground service when navigating the app to the background/foreground during the call (using [flutter\_background](https://pub.dev/packages/flutter_background) plugin): ```dart Future startBackgroundExecution() async { if (Platform.isAndroid) { return initForegroundService().then((_) { return FlutterBackground.enableBackgroundExecution(); }); } else { return Future.value(true); } } Future stopBackgroundExecution() async { if (Platform.isAndroid && FlutterBackground.isBackgroundExecutionEnabled) { return FlutterBackground.disableBackgroundExecution(); } else { return Future.value(true); } } ``` Follow the official [plugin’s doc](https://pub.dev/packages/flutter_background) for more details. ### Listen to the callbacks from [ConnectyCube Flutter Call Kit](https://pub.dev/packages/connectycube_flutter_call_kit) plugin [Section titled “Listen to the callbacks from ConnectyCube Flutter Call Kit plugin”](#listen-to-the-callbacks-from-connectycube-flutter-call-kit-plugin) After displaying the CallKit/Call Notification you need to react to callbacks produced by this screen. Use the next code snippets to start listening to them: ```dart ConnectycubeFlutterCallKit.instance.init( onCallAccepted: _onCallAccepted, onCallRejected: _onCallRejected, ); if (Platform.isIOS) { ConnectycubeFlutterCallKit.onCallMuted = _onCallMuted; } ConnectycubeFlutterCallKit.onCallRejectedWhenTerminated = onCallRejectedWhenTerminated; Future _onCallMuted(bool mute, String uuid) async { // Called when the system or user mutes a call currentCall?.setMicrophoneMute(mute); } Future _onCallAccepted(CallEvent callEvent) async { // Called when the user answers an incoming call via Call Kit ConnectycubeFlutterCallKit.setOnLockScreenVisibility(isVisible: true); // useful on Android when accept the call from the Lockscreen currentCall?.acceptCall(); } Future _onCallRejected(CallEvent callEvent) async { // Called when the user ends an incoming call via Call Kit if (!CubeChatConnection.instance.isAuthenticated()) { // reject the call via HTTP request rejectCall( callEvent.sessionId, {...callEvent.opponentsIds, callEvent.callerId}); } else { currentCall?.reject(); } } /// This provided handler must be a top-level function and cannot be /// anonymous otherwise an [ArgumentError] will be thrown. @pragma('vm:entry-point') Future onCallRejectedWhenTerminated(CallEvent callEvent) async { var currentUser = await SharedPrefs.getUser(); initConnectycubeContextLess(); return rejectCall( callEvent.sessionId, {...callEvent.opponentsIds.where((userId) => currentUser!.id != userId), callEvent.callerId}); } initConnectycubeContextLess() { CubeSettings.instance.applicationId = config.APP_ID; CubeSettings.instance.authorizationKey = config.AUTH_KEY; CubeSettings.instance.authorizationSecret = config.AUTH_SECRET; CubeSettings.instance.onSessionRestore = () { return SharedPrefs.getUser().then((savedUser) { return createSession(savedUser); }); }; } ``` Also, when performing any operations e.g. start call, accept, reject, stop, etc, we need to report back to CallKit lib - to have both app UI and CallKit UI in sync: ```dart ConnectycubeFlutterCallKit.reportCallAccepted(sessionId: callUUID); ConnectycubeFlutterCallKit.reportCallEnded(sessionId: callUUID); ``` For the `callUUID` we will use call’s `currentCall!.sessionId`. > All the above code snippets can be found in a ready [Flutter P2P Calls sample](https://github.com/ConnectyCube/connectycube-flutter-samples/tree/master/p2p_call_sample) with CallKit integrated.
# Multiparty Video Conferencing feature overview
> Discover the simplicity of integrating conference video calling into your Flutter app with our easy-to-use API. Empower users to connect from anywhere.
ConnectyCube **Multiparty Video Conferencing API** is built on top of [WebRTC](https://webrtc.org/) protocol and based on top of [WebRTC SFU](https://webrtcglossary.com/sfu/) architecture. Max people per Conference call is 12. Video Conferencing is available starting from [Advanced plan](https://connectycube.com/pricing/). > To get a difference between **P2P calling** and **Conference calling** please read our [ConnectyCube Calling API comparison](https://connectycube.com/2020/04/15/connectycube-calling-api-comparison/) blog page. ## Features supported [Section titled “Features supported”](#features-supported) * Video/Audio Conference with up to 12 people * Join-Rejoin video room functionality (like Skype) * Guest rooms (coming soon) * Mute/Unmute audio/video streams * Display bitrate * Display mic level * Switch video input device (camera) * Switch audio input device (microphone) * Switch audio output device (desktop platforms and chrome-based browsers) * Screen sharing * Simulcasting ## Preparations [Section titled “Preparations”](#preparations) ### Required preparations for supported platforms [Section titled “Required preparations for supported platforms”](#required-preparations-for-supported-platforms) #### iOS [Section titled “iOS”](#ios) Add the following entries to your *Info.plist* file, located in `/ios/Runner/Info.plist`: ```xml NSCameraUsageDescription$(PRODUCT_NAME) Camera Usage!NSMicrophoneUsageDescription$(PRODUCT_NAME) Microphone Usage! ``` This entries allow your app to access the camera and microphone. #### Android [Section titled “Android”](#android) Ensure the following permission is present in your Android Manifest file, located in `/android/app/src/main/AndroidManifest.xml`: ```xml ``` If you need to use a Bluetooth device, please add: ```xml ``` The Flutter project template adds it, so it may already be there. Also you will need to set your build settings to Java 8, because official WebRTC jar now uses static methods in `EglBase` interface. Just add this to your app level `build.gradle`: ```groovy android { //... compileOptions { sourceCompatibility JavaVersion.VERSION_1_8 targetCompatibility JavaVersion.VERSION_1_8 } } ``` If necessary, in the same `build.gradle` you will need to increase `minSdkVersion` of `defaultConfig` up to `18` (currently default Flutter generator set it to `16`). #### macOS [Section titled “macOS”](#macos) Add the following entries to your *\*.entitlements* files, located in `/macos/Runner`: ```xml com.apple.security.network.clientcom.apple.security.device.audio-inputcom.apple.security.device.camera ``` This entries allow your app to access the internet, microphone, and camera. #### Windows [Section titled “Windows”](#windows) It does not require any special preparations. #### Web [Section titled “Web”](#web) It does not require any special preparations. #### Linux [Section titled “Linux”](#linux) It does not require any special preparations. ## Create meeting [Section titled “Create meeting”](#create-meeting) In order to have a conference call, a meeting object has to be created. ```dart int now = DateTime.now().millisecondsSinceEpoch ~/ 1000; CubeMeeting meeting = CubeMeeting() ..name = 'My meeting' ..attendees = [ CubeMeetingAttendee(userId: 123, email: '...'), CubeMeetingAttendee(userId: 124, email: '...') ] ..startDate = now ..endDate = now + 60 * 60 ..withChat = false ..record = false ..public = true // ..notify = true //notify feature is available starting from the [Advanced plan](https://connectycube.com/pricing/) // ..notifyBefore = CubeMeetingNotifyBefore(TimeMetric.HOURS, 1) //notify feature is available starting from the [Advanced plan](https://connectycube.com/pricing/) ..scheduled = false; createMeeting(meeting) .then((createdMeeting) { var confRoomId = createdMeeting.meetingId; }) .catchError((onError) {}); ``` * `name` - the meeting name. * As for `attendees` - either ConnectyCube users ids or external emails can be provided. * `start_date` - the date when meeting starts. * `end_date` - the date when meeting ends. * Pass `withChat = true` if you want to have a chat connected to meeting. * Pass `record = true` if you want to have a meeting call recorded. Read more about Recording feature Once meeting is created, you can use `meeting.meetingId` as a conf room identifier in the below requests when join a call. ## ConferenceClient setup [Section titled “ConferenceClient setup”](#conferenceclient-setup) To manage Conference calls in flutter you should use `ConferenceClient`. Please see code below to find out possible functionality. ```dart ConferenceClient callClient = ConferenceClient.instance; // returns instance of ConferenceClient ``` ## Create call session [Section titled “Create call session”](#create-call-session) In order to use Conference Calling API you need to create a call session object - set your current user and a type of session (VIDEO or AUDIO optional). `ConferenceSession `creates via `ConferenceClient `: ```dart ConferenceClient callClient = ConferenceClient.instance; int callType = CallType.VIDEO_CALL; // or CallType.AUDIO_CALL ConferenceSession callSession = await callClient.createCallSession(currentUserId, callType: callType); ``` ## Events [Section titled “Events”](#events) There are following events you can listen for: ```dart callSession.onLocalStreamReceived = (mediaStream) { // called when local media stream completely prepared // display the stream in UI // ... }; callSession.onRemoteStreamTrackReceived = (callSession, opponentId, mediaStream, {String? trackId}) { // called when remote media stream received from opponent }; callSession.onPublishersReceived = (publishers) { // called when received new opponents/publishers }; callSession.onPublisherLeft= (publisher) { // called when opponent/publisher left room }; callSession.onError= (ex) { // called when received some exception from conference }; callSession.onSessionClosed = (callSession){ // called when current session was closed }; ``` Also, there are a few callbacks in the `callSession` to manage the connection state with user: ```dart callSession.onPublisherLeft = (userId){ }; callSession.onSubscribedOnPublisher = (userId){ }; callSession.onSubscriberAttached = (userId){ }; ``` ## Join video room [Section titled “Join video room”](#join-video-room) Just join the room and for example, send invite to some opponent: ```dart callSession.joinDialog(roomId, ((publishers) { startCall(roomId, opponents, callSession.currentUserId);// event by system message e.g. } })); ``` ## List online participants [Section titled “List online participants”](#list-online-participants) To list online users in a room: ```dart callSession.listOnlineParticipants().then((participants) { }).catchError((error) {}); ``` ## Subscribe/unsubscribe [Section titled “Subscribe/unsubscribe”](#subscribeunsubscribe) The SDK automatically subscribes to publishers when get the *onPublishersReceived* event, but you may need to subscribe manually (for example after unsubscribing) to the active publisher: ```dart callSession.subscribeToPublisher(publisher) ``` To unsubscribe from publisher: ```dart callSession.unsubscribeFromPublisher(publisher); ``` ## Leave [Section titled “Leave”](#leave) To leave current room session: ```dart callSession.leave(); ``` ## Mute audio [Section titled “Mute audio”](#mute-audio) ```dart bool mute = true; // false - to unmute, default value is false callSession.setMicrophoneMute(mute); ``` ## Switch audio output [Section titled “Switch audio output”](#switch-audio-output) For iOS/Android platforms use: ```dart bool enabled = false; // true - to switch to sreakerphone, default value is false callSession.enableSpeakerphone(enable); ``` For Chrome-based browsers and Desktop platforms use: ```dart if (kIsWeb) { remoteRenderers.forEach(renderer) { renderer.audioOutput(deviceId); }); } else { callSession.selectAudioOutput(deviceId); } ``` ## Mute video [Section titled “Mute video”](#mute-video) ```dart bool enabled = false; // true - to enable local video track, default value for video calls is true callSession.setVideoEnabled(enabled); ``` ## Switch video cameras [Section titled “Switch video cameras”](#switch-video-cameras) For iOS/Android platforms use: ```dart callSession.switchCamera().then((isFrontCameraSelected){ if(isFrontCameraSelected) { // front camera selected } else { // back camera selected } }).catchError((error) { // switching camera failed }); ``` For the Web platform and Desktop platforms use: ```dart callSession.switchCamera(deviceId: deviceId); ``` ## Get available cameras list [Section titled “Get available cameras list”](#get-available-cameras-list) ```dart var cameras = await callSession.getCameras(); // call only after `initLocalMediaStream()` ``` ## Get available Audio input devices list [Section titled “Get available Audio input devices list”](#get-available-audio-input-devices-list) ```dart var audioInputs = await callSession.getAudioInputs(); // call only after `initLocalMediaStream()` ``` ## Get available Audio output devices list [Section titled “Get available Audio output devices list”](#get-available-audio-output-devices-list) ```dart var audioOutputs = await callSession.getAudioOutputs(); // call only after `initLocalMediaStream()` ``` ## Use the custom media stream [Section titled “Use the custom media stream”](#use-the-custom-media-stream) ```dart MediaStream customMediaStream; callSession.replaceMediaStream(customMediaStream); ``` ## Toggle the torch [Section titled “Toggle the torch”](#toggle-the-torch) ```dart var enable = true; // false - to disable the torch callSession.setTorchEnabled(enable); ``` ## Screen Sharing [Section titled “Screen Sharing”](#screen-sharing) The Screen Sharing feature allows you to share the screen from your device to other call members. Currently the Connectycube Flutter SDK supports the Screen Sharing feature for all supported platforms. For switching to the screen sharing during the call use next code snippet: ```dart ConferenceSession callSession; // the existing call session callSession.enableScreenSharing(true, requestAudioForScreenSharing: true); // for switching to the screen sharing callSession.enableScreenSharing(false); // for switching to the camera streaming ``` ### Android specifics of targeting the `targetSdkVersion` to the version **31** and above [Section titled “Android specifics of targeting the targetSdkVersion to the version 31 and above”](#android-specifics-of-targeting-the-targetsdkversion-to-the-version-31-and-above) After updating the `targetSdkVersion` to the version **31** you can encounter an error: ```log java.lang.SecurityException: Media projections require a foreground service of type ServiceInfo.FOREGROUND_SERVICE_TYPE_MEDIA_PROJECTION ``` To avoid it do the next changes and modifications in your project: 1. Connect the `flutter_background` plugin to your project using: ```yaml flutter_background: ^x.x.x ``` 2. Add to the file `app_name/android/app/src/main/AndroidManifest.xml` to section `manifest` next permissions: ```xml ``` 3. Add to the file `app_name/android/app/src/main/AndroidManifest.xml` to section `application` next service: ```xml ``` 4. Create the next function somewhere in your project: ```dart Future initForegroundService() async { final androidConfig = FlutterBackgroundAndroidConfig( notificationTitle: 'App name', notificationText: 'Screen sharing is in progress', notificationImportance: AndroidNotificationImportance.Default, notificationIcon: AndroidResource( name: 'ic_launcher_foreground', defType: 'drawable'), ); return FlutterBackground.initialize(androidConfig: androidConfig); } ``` and call it somewhere after the initialization of the app or before starting the screen sharing. 5. Call the function `FlutterBackground.enableBackgroundExecution()` just before starting the screen sharing and function `FlutterBackground.disableBackgroundExecution()` after ending the screen sharing or finishing the call. ### IOS screen sharing using the Screen Broadcasting feature. [Section titled “IOS screen sharing using the Screen Broadcasting feature.”](#ios-screen-sharing-using-the-screen-broadcasting-feature) The Connectycube Flutter SDK supports two types of Screen sharing on the iOS platform. There are **In-app screen sharing** and **Screen Broadcasting**. The **In-app screen sharing** doesn’t require any additional preparation on the app side. But the **Screen Broadcasting** feature requires some. All required features we already added to our [P2P Calls sample](https://github.com/ConnectyCube/connectycube-flutter-samples/tree/master/p2p_call_sample). Below is the step-by-step guide on adding it to your app. It contains the following steps: 1. Add the `Broadcast Upload Extension`; 2. Add required files from our sample to your iOS project; 3. Update project configuration files with your credentials; #### Add the `Broadcast Upload Extension` [Section titled “Add the Broadcast Upload Extension”](#add-the-broadcast-upload-extension) For creating the extension you need to add a new target to your application, selecting the `Broadcast Upload Extension` template. Fill in the desired name, change the language to Swift, make sure `Include UI Extension` (see screenshot) is not selected, as we don’t need custom UI for our case, then press Finish. You will see that a new folder with the extension’s name was added to the project’s tree, containing the `SampleHandler.swift` class. Also, make sure to update the Deployment Info, for the newly created extension, to iOS 14 or newer. To learn more about creating App Extensions check the [official documentation](https://developer.apple.com/library/archive/documentation/General/Conceptual/ExtensibilityPG/ExtensionCreation.html). `` #### Add the required files from our sample to your own iOS project [Section titled “Add the required files from our sample to your own iOS project”](#add-the-required-files-from-our-sample-to-your-own-ios-project) After adding the extension you should add prepared files from our sample to your own project. Copy next files from our [`Broadcast Extension`](https://github.com/ConnectyCube/connectycube-flutter-samples/tree/master/p2p_call_sample/ios/Broadcast%20Extension) directory: `Atomic.swift`, `Broadcast Extension.entitlements` (the name can be different according to your extension’s name), `DarwinNotificationCenter.swift`, `SampleHandler.swift` (replace the automatically created file), `SampleUploader.swift`, `SocketConnection.swift`. Then open your project in Xcode and link these files with your iOS project using Xcode tools. For it, call the context menu of your extension directory, select ‘Add Files to “Runner”…’ (see screenshot) and select files copied to your extension directory before. `` #### Update project configuration files [Section titled “Update project configuration files”](#update-project-configuration-files) Do the following for your iOS project configuration files: 1. Add both the app and the extension to the same App Group. For it, add to both (app and extension) `*.entitlements` files next lines: ```xml com.apple.security.application-groupsgroup.com.connectycube.flutter ``` where the `group.com.connectycube.flutter` is your App group. To learn about working with app groups, see [Adding an App to an App Group](https://developer.apple.com/library/archive/documentation/Miscellaneous/Reference/EntitlementKeyReference/Chapters/EnablingAppSandbox.html#//apple_ref/doc/uid/TP40011195-CH4-SW19). We recommend you create the app group in the Apple Developer Console before. Next, add the App group id value to the app’s `Info.plist` of your app for the `RTCAppGroupIdentifier` key: ```xml RTCAppGroupIdentifiergroup.com.connectycube.flutter ``` where the `group.com.connectycube.flutter` is your App group. 2. Add a new key `RTCScreenSharingExtension` to the app’s `Info.plist` with the extension’s `Bundle Identifier` as the value: ```xml RTCScreenSharingExtensioncom.connectycube.flutter.p2p-call-sample.app.Broadcast-Extension ``` where the `com.connectycube.flutter.p2p-call-sample.app.Broadcast-Extension` is the Bundle ID of your Broadcast Extension. Take it from the Xcode `` 3. Update `SampleHandler.swift`’s `appGroupIdentifier` constant with the App Group name your app and extension are both registered to. ```swift static let appGroupIdentifier = "group.com.connectycube.flutter" ``` where the `group.com.connectycube.flutter` is your app group. 4. Make sure `voip` is added to `UIBackgroundModes`, in the app’s `Info.plist`, in order to work when the app is in the background. ```xml UIBackgroundModesremote-notificationvoipaudio ``` After performing mentioned actions you can switch to Screen sharing during the call using `useIOSBroadcasting = true`: ```dart _callSession.enableScreenSharing(true, useIOSBroadcasting: true); ``` ### Requesting desktop capture source [Section titled “Requesting desktop capture source”](#requesting-desktop-capture-source) Desktop platforms require the capture source (Screen or Window) for screen sharing. We prepared a widget ready for using that requests the available sources from the system and provides them to a user for selection. After that, you can use it as the source for screen sharing. In code it can look in a next way: ```dart var desktopCapturerSource = isDesktop ? await showDialog( context: context, builder: (context) => ScreenSelectDialog()) : null; callSession.enableScreenSharing(true, desktopCapturerSource: desktopCapturerSource); ``` The default capture source (usually it is the default screen) will be captured if set `null` as a capture source for the desktop platform. ## WebRTC Stats reporting [Section titled “WebRTC Stats reporting”](#webrtc-stats-reporting) Stats reporting is an insanely powerful tool that can provide detailed info about a call. There is info about the media, peer connection, codecs, certificates, etc. To enable stats report you should first set stats reporting frequency using `RTCConfig`. ```dart RTCConfig.instance.statsReportsInterval = 200; // receive stats report every 200 milliseconds ``` Then you can subscribe to the stream with reports using the instance of the call session: ```dart _callSession.statsReports.listen((event) { var userId = event.userId; // the user's id the stats related to var stats = event.stats; // available stats }); ``` To disable fetching Stats reports set this parameter as 0. ### Monitoring mic level and video bitrate using Stats [Section titled “Monitoring mic level and video bitrate using Stats”](#monitoring-mic-level-and-video-bitrate-using-stats) Also, we prepared the helpful manager `CubeStatsReportsManager` for processing Stats reports and getting some helpful information like the opponent’s mic level and video bitrate. For its work, you just need to configure the `RTCConfig` as described above. Then create the instance of `CubeStatsReportsManager` and initialize it with the call session. ```dart final CubeStatsReportsManager _statsReportsManager = CubeStatsReportsManager(); _statsReportsManager.init(_callSession); ``` After that you can subscribe on the interested data: ```dart _statsReportsManager.micLevelStream.listen((event) { var userId = event.userId; var micLevel = event.micLevel; // the mic level from 0 to 1 }); _statsReportsManager.videoBitrateStream.listen((event) { var userId = event.userId; var bitRate = event.bitRate; // the video bitrate in kbits/sec }); ``` After finishing the call you should dispose of the manager for avoiding memory leaks. You can do it in the `onSessionClosed` callback: ```dart void _onSessionClosed(session) { // ... _statsReportsManager.dispose(); // .. } ``` ## Configurations [Section titled “Configurations”](#configurations) ConnectyCube Flutter SDK provides possibility to change some default parameters for call session. ### Media stream configurations [Section titled “Media stream configurations”](#media-stream-configurations) Use instance of `RTCMediaConfig` class to change some default media stream configs. ```dart RTCMediaConfig mediaConfig = RTCMediaConfig.instance; mediaConfig.minHeight = 720; // sets preferred minimal height for local video stream, default value is 320 mediaConfig.minWidth = 1280; // sets preferred minimal width for local video stream, default value is 480 mediaConfig.minFrameRate = 30; // sets preferred minimal framerate for local video stream, default value is 25 mediaConfig.simulcastConfig = SimulcastConfig( highVideoBitrate: 1024, mediumVideoBitrate: 512, lowVideoBitrate: 96, ); // sets the bitrate for different stream's qualities ``` ### Call connection configurations [Section titled “Call connection configurations”](#call-connection-configurations) ```dart ConferenceConfig.instance.url = SERVER_ENDPOINT // 'wss://...:8989'; ``` # Signaling implementation [Section titled “Signaling implementation”](#signaling-implementation) To implement regular calls with events such as call, reject, hang up there should be used some signaling mechanism. ## Signaling [Section titled “Signaling”](#signaling) As signaling mechanism there can be used [ConnectyCube system-messages](/flutter/messaging#system-messages) with predefined custom properties. ## Start Call [Section titled “Start Call”](#start-call) Just join the room and send an invitation start call message to opponents: ```dart var systemMessagesManager = CubeChatConnection.instance.systemMessagesManager; ... sendCallMessage(String roomId, List participantIds) { List callMsgList = _buildCallMessages(roomId, participantIds); callMsgList.forEach((callMsg) { callMsg.properties["callStart"] = '1'; callMsg.properties["participantIds"] = participantIds.join(','); }); callMsgList.forEach((msg) => systemMessagesManager.sendSystemMessage(msg)); } List buildCallMessages(String roomId, List participantIds) { return participantIds.map((userId) { var msg = CubeMessage(); msg.recipientId = userId; msg.properties = {"janusRoomId": roomId}; return msg; }).toList(); } ``` ## Reject Call [Section titled “Reject Call”](#reject-call) Send reject message when *decline/busy* call: ```dart sendRejectMessage(String roomId, bool isBusy, int participantId) { List callMsgList = buildCallMessages(roomId, [participantId]); callMsgList.forEach((callMsg) { callMsg.properties["callRejected"] = '1'; callMsg.properties["busy"] = isBusy.toString(); }); callMsgList.forEach((msg) => systemMessagesManager.sendSystemMessage(msg)); } ``` ## End call [Section titled “End call”](#end-call) Send end call message when *hangup/answer\_timeout* call: ```dart sendEndCallMessage(String roomId, List participantIds) { List callMsgList = _buildCallMessages(roomId, participantIds); callMsgList.forEach((callMsg) { callMsg.properties["callEnd"] = '1'; }); callMsgList.forEach((msg) => systemMessagesManager.sendSystemMessage(msg)); } ``` ## Get call events [Section titled “Get call events”](#get-call-events) Listen and parse all call events with *systemMessagesManager*: ```dart systemMessagesManager.systemMessagesStream.listen((cubeMessage) => parseCallMessage(cubeMessage)); ... parseCallMessage(CubeMessage cubeMessage) { final properties = cubeMessage.properties; if(properties.containsKey("callStart")) { String roomId = properties["janusRoomId"]; List participantIds = properties["participantIds"].split(',').map((id) => int.parse(id)).toList(); if(this._roomId == null) { this._roomId = roomId; this._initiatorId = cubeMessage.senderId; this._participantIds = participantIds; // handleNewCall(); } } else if(properties.containsKey("callRejected")) { String roomId = properties["janusRoomId"]; bool isBusy = properties["busy"] == 'true'; if(this._roomId == roomId) { // handleRejectCall(); } } else if(properties.containsKey("callEnd")) { String roomId = properties["janusRoomId"]; if(this._roomId == roomId) { // handleEndCall(); } } } ``` ## Adding user to call [Section titled “Adding user to call”](#adding-user-to-call) For adding user to current call you can send invite message with current *roomId* and *participantIds*: ```dart sendCallMessage(String roomId, List participantIds) { List callMsgList = _buildCallMessages(roomId, participantIds); callMsgList.forEach((callMsg) { callMsg.properties["callStart"] = '1'; callMsg.properties["participantIds"] = participantIds.join(','); }); callMsgList.forEach((msg) => systemMessagesManager.sendSystemMessage(msg)); } ``` And then on the receiver side when the new user successfully joins the room, he automatically subscribes to all active participants in current call (at the same time, other participants will receive *onPublishersReceived* and will be able to subscribe to that new user). ## Retrieve meetings [Section titled “Retrieve meetings”](#retrieve-meetings) Retrieve a meeting by id: ```dart getMeetings({'_id': meetingId}) .then((meetings) {}) .catchError((onError) {}); ``` Retrieve a list of meetings: ```dart getMeetings() .then((meetings) {}) .catchError((onError) {}); ``` or use the `getMeetingsPaged` for requesting meeting using the pagination feature: ```dart getMeetingsPaged(limit: 10, skip: 20, params: {'scheduled': true}) .then((result) async { var meetings = result.items; }) .catchError((onError) {}); ``` ## Edit meeting [Section titled “Edit meeting”](#edit-meeting) A meeting creator can edit a meeting: ```dart CubeMeeting originalMeeting; //some meeting which was created before, should cantain `meetingId` originalMeeting.name = updatedName; originalMeeting.startDate = updatedStartDate; originalMeeting.endDate = updatedEndDate; originalMeeting.attendees = [ CubeMeetingAttendee( userId: 125, email: 'test@email.com'), ]; updateMeeting(originalMeeting) .then((updatedMeeting) {}) .catchError((onError){}); ``` or use the method `updateMeetingById` for updating only some [fields](/server/meetings#parameters-2) of the meeting model: ```dart updateMeetingById(meetingId, {'record': true}) .then((updatedMeeting) {}) .catchError((onError){}); ``` ## Delete meeting [Section titled “Delete meeting”](#delete-meeting) A meeting creator can delete a meeting: ```dart deleteMeeting(meetingId) .then((voidResult) {}) .catchError((onError) {}); ``` ## Recording [Section titled “Recording”](#recording) Server-side recording is available. Read more about Recording feature ## Simulcasting [Section titled “Simulcasting”](#simulcasting) Simulcast is a feature in video conferencing that enables the simultaneous broadcasting of multiple versions of the same video stream, each with different resolutions and bitrates. This feature is commonly used to optimize the video quality for all participants in a video call, especially when some participants have slower or less reliable internet connections. In a video call, the video stream is sent from the sender’s device to the recipient’s device. If the recipient has a slow or unreliable internet connection, the video quality may suffer, and the video may lag or freeze. Simulcast allows the sender to send multiple versions of the video stream, each with different resolutions and bitrates. Overall, simulcast is a useful feature in video conferencing that can help improve the quality and reliability of video calls, especially when participants have different network conditions. ### Request preferred quality of incoming streams [Section titled “Request preferred quality of incoming streams”](#request-preferred-quality-of-incoming-streams) Use the next code snippet to request the preferred quality of the remote stream for user: ```dart var confCallSession; // some `ConferenceSession` var userId; // user's id you want to change the quality of the received stream var streamType = StreamType.low; // the type of the stream you want to request for user, there are tree possible values `StreamType.high`, `StreamType.medium` and `StreamType.low` confCallSession.requestPreferredStreamForOpponent(userId, streamType); ``` Or there is a separate method for requesting the different qualities using a single request for the set of users: ```dart var confCallSession; // some `ConferenceSession` var config = { 123: StreamType.low, 124: StreamType.high }; // is the map where key is the opponent's id and the value is the required quality of the video stream confCallSession.requestPreferredStreamsForOpponents(config); ``` ### Limit the bitrate of your own stream [Section titled “Limit the bitrate of your own stream”](#limit-the-bitrate-of-your-own-stream) The sender can limit the bitrate of the own video stream according to the app logic using the next code snippet: ```dart var confCallSession; // some `ConferenceSession` confCallSession.setMaxBandwidth(960); // set `0` or `null` to remove any limitations ``` ### Listen to the stream quality changes [Section titled “Listen to the stream quality changes”](#listen-to-the-stream-quality-changes) When the sender limits the stream’s quality or the server limits the stream’s bitrate according to its internal logic the receivers will receive a notification about it. To listen to these events just subscribe to the next event broadcaster: ```dart var confCallSession; // some `ConferenceSession` confCallSession.onSubStreamChanged = onSubStreamChanged; void onSubStreamChanged(int userId, StreamType streamType) { log("[onSubStreamChanged] userId: $userId, streamType: $streamType", TAG); } ``` ### Temporal layers [Section titled “Temporal layers”](#temporal-layers) During a conference call, video is typically transmitted in real-time between multiple participants. However, the quality of the video may suffer due to network bandwidth limitations, especially when there are multiple participants with varying network conditions. Temporal layers allow for the efficient transmission of video by dividing the video frames into different layers. The lower layers contain basic information about the video, such as color and shape, while the higher layers contain more detailed information, such as facial expressions or small movements. #### Request the layer of the stream [Section titled “Request the layer of the stream”](#request-the-layer-of-the-stream) By default, the server sends the layer with the highest quality but you can request another one according to your app needs. Use the next code snippet for requesting of the preferred layer: ```dart var confCallSession; // some `ConferenceSession` var userId; // user's id you want to change the FPS of the received stream var layer; // there available three layers: `0` - lowest FPS, `1` - medium FPS and `2` - highest FPS confCallSession.requestPreferredLayerForOpponentStream(userId, layer) ``` Or use the next method for requesting different layers for a lot of users in a single request: ```dart var confCallSession; // some `ConferenceSession` var config = { 123: 0, 124: 2, }; confCallSession.requestPreferredLayersForOpponentsStreams(config); ``` > **Note**: Pay attention: not all platforms support the layer feature in full. For example, iOS/Android platforms support three layers and the Chrome browser supports only one layer, etc. #### Listen to the stream layer changes [Section titled “Listen to the stream layer changes”](#listen-to-the-stream-layer-changes) After manually requesting the preferred layer the server sends the event the about success of changing the layer for user. To listen to these events just subscribe to the next event broadcaster: ```dart var confCallSession; // some `ConferenceSession` confCallSession.onLayerChanged = onLayerChanged; void onLayerChanged(int userId, int layer) { log("[onLayerChanged] userId: $userId, layer: $layer", TAG); } ```
# Address Book
> Effortlessly upload, sync, and access ConnectyCube users from your phone contacts in your Flutter app with Address Book API.
Address Book API provides an interface to work with phone address book, upload it to server and retrieve already registered ConnectyCube users from your address book. With conjunction of [User authentication via phone number](/flutter/authentication-and-users#authentication-via-phone-number) you can easily organize a modern state of the art logic in your App where you can easily start chatting with your phone contacts, without adding them manually as friends - the same what you can see in WhatsApp, Telegram, Facebook Messenger and Viber. ## Upload Address Book [Section titled “Upload Address Book”](#upload-address-book) First of all you need to upload your Address Book to the backend. It’s a normal practice to do a full upload for the 1st time and then upload diffs on future app logins. ```dart List contacts = []; contacts.add(CubeContact("Gordie Kann", "1879108395")); contacts.add(CubeContact("Wildon Gilleon", "2759108396")); contacts.add(CubeContact("Gaston Center", "3759108396")); String uuid = ""; // unique identificator for Addressbook, skip it to use global Addressbook for user bool force = true; // true - to overwrite Addressbook, false - to update uploadAddressBook(contacts, force, uuid) .then((addressBookResult) {}) .catchError((error) {}); ``` * You also can edit an existing contact by providing a new name for it. * You also can upload more contacts, not just all in one request - they will be added to your address book on the backend. If you want to override the whole address book on the backend - just provide `force = true` option. * You also can remove a contact by setting `destroy: true`. * A device UDID is used in cases where user has 2 or more devices and contacts sync is off. Otherwise - user has a single global address book. ## Retrieve Address Book [Section titled “Retrieve Address Book”](#retrieve-address-book) If you want you can retrieve your uploaded address book: ```dart String uuid = ""; // unique identificator for Addressbook, skip it to use global Addressbook for user getAddressBook(uuid) .then((contactsList) {}) .catchError((error) {}); ``` ## Retrieve Registered Users [Section titled “Retrieve Registered Users”](#retrieve-registered-users) Using this request you can easily retrieve the ConnectyCube users - you phone Address Book contacts that already\ registered in your app, so you can start communicate with these users right away: ```dart bool compact = true; // true - server will return only id, phone and addressBookName fields of User. Otherwise - all User's fields will be returned. String uuid = ""; // unique identificator for Addressbook, skip it to use global Addressbook for user getRegisteredUsersFromAddressBook(compact, uuid) .then((usersList) {}) .catchError((error) {}); ``` ## Push notification on new contact joined [Section titled “Push notification on new contact joined”](#push-notification-on-new-contact-joined) There is a way to get a push notification when some contact from your Address Book registered in an app. You can enable this feature at [ConnectyCube Dashboard](https://admin.connectycube.com), Users module, Settings tab: 
# Authentication and Users
> Simplify user authentication in your Flutter app with our definitive API guide. Fortify your app's defenses and protect user data effectively.
Every user has to authenticate with ConnectyCube before using any ConnectyCube functionality. When someone connects with an application using ConnectyCube, the application will need to obtain a session token which provides temporary, secure access to ConnectyCube APIs. A session token is an opaque string that identifies a user and an application. ## Create session token [Section titled “Create session token”](#create-session-token) As a starting point, the user’s session token needs to be created allowing user any further actions within the app. Pass login/email and password to identify a user: ```dart CubeUser user = CubeUser(login: "user_login", password: "super_sequre_password"); createSession(user) .then((cubeSession) {}) .catchError((error){}); ``` **Note:** With the request above, **the user is created automatically on the fly upon session creation** using the login (or email) and password from the request parameters. **Important:** For better security it is recommended to deny the session creation without an existing user.\ For this, set ‘Session creation without an existing user entity’ to **Deny** under the **Application -> Overview -> Permissions** in the [admin panel](https://admin.connectycube.com/apps). ### Authentication via social provider [Section titled “Authentication via social provider”](#authentication-via-social-provider) Flutter SDK provides support for next social providers: * `CubeProvider.FACEBOOK`; * `CubeProvider.TWITTER`; The generalized method for signing-in via social provider is: ```dart String socialProvider; // possible providers CubeProvider.FACEBOOK, CubeProvider.TWITTER String accessToken; String accessTokenSecret; // required only for CubeProvider.TWITTER provider createSessionUsingSocialProvider(socialProvider, accessToken, accessTokenSecret) .then((cubeUser) {}) .catchError((error){}); ``` #### Get Facebook Access token [Section titled “Get Facebook Access token”](#get-facebook-access-token) In order to use Facebook authentication you need to get an Access token first. Flutter has a few plugins that provide this feature. We will use the [flutter\_facebook\_auth](https://pub.dev/packages/flutter_facebook_auth) in our example. First, you must configure each supported platform according to the plugin [official documentation](https://facebook.meedu.app) web page. Then you can request the login via Facebook API and sign in to ConnectyCube using its credentials. Follow the code below on how to do this: ```dart FacebookAuth.instance.login(permissions: ['email', 'public_profile']).then((result) { if (result.status == LoginStatus.success) { var accessToken = result.accessToken!.token; createSessionUsingSocialProvider(CubeProvider.FACEBOOK, accessToken).then((cubeUser) { // `cubeUser` - the instance of the signed-in CubeUser }).catchError((onError){ // process an error of signing-in to the ConnectyCube }); } else { // process other statuses (cancelled, failed, operationInProgress) } }); ``` #### Get Twitter Auth token and Auth Token Secret [Section titled “Get Twitter Auth token and Auth Token Secret”](#get-twitter-auth-token-and-auth-token-secret) In order to use Twitter authentication you need to get an Auth token and Auth Token Secret first. Flutter has a few plugins that provide this feature. We will use the [twitter\_login](https://pub.dev/packages/twitter_login) in our example. First, you must configure each supported platform according to the plugin [README](https://pub.dev/packages/twitter_login). Then you can request the login via Twitter API and sign in to ConnectyCube using its credentials. Follow the code below on how to do this: ```dart var apiKey = ''; // the API Key from the Twitter developer console var apiSecretKey = ''; // the API Secret from the Twitter developer console var redirectURI = ''; // the registered Callback URLs in TwitterApp TwitterLogin(apiKey: apiKey, apiSecretKey: apiSecretKey, redirectURI: redirectURI).loginV2(forceLogin: true).then((authResult) { if (authResult.status == TwitterLoginStatus.loggedIn) { var authToken = authResult.authToken!; var authSecret = authResult.authTokenSecret!; createSessionUsingSocialProvider(CubeProvider.TWITTER, authToken, authSecret).then((cubeUser) { // `cubeUser` - the instance of the signed-in CubeUser }).catchError((onError){ // process an error of signing-in to the ConnectyCube }); } else { // process other statuses (cancelledByUser, error) } }); ``` ### Authentication via phone number [Section titled “Authentication via phone number”](#authentication-via-phone-number) Sign In with phone number is supported with [Firebase Phone Authentication](https://firebase.google.com/docs/auth/flutter/phone-auth). The detailed guides on [How to configure Firebase in your project](/flutter/firebase-setup-guide#connect-firebase-sdk) and [How to get `accessToken`](/flutter/firebase-setup-guide#firebase-phone-authentication) are presented in our separated section [How to Setup Firebase](/flutter/firebase-setup-guide#how-to-setup-firebase). After receiving the `accessToken` you can use it for authentication using next API: ```dart createSessionUsingFirebasePhone(projectId, accessToken).then((cubeUser) { // user successfully authenticated on the Connectycube }).catchError((onError){ // error occurs during authentication on the Connectycube }); ``` ### Authentication via Firebase Email/Google Sign-In: [Section titled “Authentication via Firebase Email/Google Sign-In:”](#authentication-via-firebase-emailgoogle-sign-in) This authentication method supports [Firebase Email/password sign-in](https://firebase.google.com/docs/auth/flutter/password-auth) and [Google Sign-In](https://firebase.google.com/docs/auth/flutter/federated-auth#google). The detailed guides on [How to configure Firebase in your project](/flutter/firebase-setup-guide#connect-firebase-sdk) and [How to get `accessToken`](/flutter/firebase-setup-guide#firebase-e-mail-authentication) are presented in our separated section [How to Setup Firebase](/flutter/firebase-setup-guide#how-to-setup-firebase). After receiving the `accessToken` you can use it for authentication using next API: ```dart createSessionUsingFirebaseEmail( DefaultFirebaseOptions.currentPlatform.projectId, idToken) .then((cubeUser) { // user successfully authenticated on the Connectycube }).catchError((onError) { // error occurs during authentication on the Connectycube }); ``` ### Authentication via external identity provider [Section titled “Authentication via external identity provider”](#authentication-via-external-identity-provider) **Custom Identity Provider (CIdP)** feature is necessary if you have your own user database and want to authenticate users in ConnectyCube against it. It works the same way as Facebook/Twitter SSO. With Custom Identity Provider feature you can continue use your user database instead of storing/copying user data to ConnectyCube database. #### CIdP high level integration flow [Section titled “CIdP high level integration flow”](#cidp-high-level-integration-flow) To get started with **CIdP** integration, check the [Custom Identity Provider guide](/guides/custom-identity-provider) which describes high level integration flow. #### How to login via CIdP [Section titled “How to login via CIdP”](#how-to-login-via-cidp) Once you done with the setup mapping in ConnectyCube Dashboard, it’s time to verify the integration. To perform CIdP login, the same ConnectyCube [User Login API](/flutter/authentication-and-users/#upgrade-session-token-user-login) is used. You just use existing login request params to pass your external user token: ```dart CubeUser user = CubeUser(login: "eyJhbGciOiJIUzI1NiIsInR5cCI6IkpXVCJ9.eyJpZCI6MTIzNDU2Nzg5LCJuYW1lIjoiSm9zZXBoIn0.OpOSSw7e485LOP5PrzScxHb7SR6sAOMRckfFwi4rp7o"); createSession(user) .then((cubeUser) {}) .catchError((error){}); ``` Once the login is successful, ConnectyCube will create an underalying User entity, so then you can use ConnectyCube APIs in a same way as you do with a normal login. With CIdP we do not have/store any user password in ConnectyCube User entity. Following further integration, you may need to connect to Chat. In a case of CIdP login, you do not have a user password. In such cases you should use ConnectyCube session token as a password for chat connection. [Follow the Connect to Chat with CIdP guide](/flutter/messaging/#connect-to-chat-using-custom-authentication-providers). ### Create guest session [Section titled “Create guest session”](#create-guest-session) To create a session with guest user use the following code: ```dart var user = CubeUser(isGuest: true, fullName: 'Awesome Smith'); createSession(user) .then((cubeSession) {}) .catchError((error){}); ``` ## Session expiration [Section titled “Session expiration”](#session-expiration) Expiration time for session token is 2 hours after last request to API. If you perform query with expired token,\ you will receive the error **Required session does not exist**. In this case you need to recreate a session token. Use `CubeSessionManager` to get information about current session state. ```dart bool isValid = CubeSessionManager.instance.isActiveSessionValid(); /// isValid == true - you have an active session /// isValid == false - you have an expired session and you should create new one ``` ConnectyCube Flutter SDK has the special callbаck for automatic session restoring. Just set it during the initialization ConnectyCube Flutter SDK in your project. ```dart initConnectyCube() { init("XXX", "XXXXXXXXXXXXXXX", "XXXXXXXXXXXXXXX", onSessionRestore: restoreSession); } Future restoreSession() { CubeUser savedUser; //some CubeUser, which was saved before return createSession(savedUser); } ``` ## Destroy session token [Section titled “Destroy session token”](#destroy-session-token) To destroy a session use the following code: ```dart int sessionId = 12345; // skip this parameter to delete current session deleteSession(sessionId) .then((voidResult) {}) .catchError((error){}); // used to delete all session except current deleteSessionsExceptCurrent() .then((voidResult) {}) .catchError((error){}); ``` ## User signup [Section titled “User signup”](#user-signup) Only login (or email) + password are required for user to be created. Other parameters are optional: ```dart CubeUser user = CubeUser( login: 'marvin18', password: 'supersecurepwd', email: 'awesomeman@gmail.com', fullName: 'Marvin Simon', phone: '47802323143', website: 'https://dozensofdreams.com', customData: "{middle_name: 'Bartoleo'}"); signUp(user) .then((cubeUser) {}) .catchError((error){}); ``` ## User profile update [Section titled “User profile update”](#user-profile-update) ```dart CubeUser user = CubeUser( login: 'marvin18', fullName: 'Marvin Simon'); updateUser(user) .then((updatedUser) {}) .catchError((error) {}); ``` If you want to change your password, you need to provide 2 fields: `password` and `oldPassword`. Updated `user` entity will be returned. ```dart CubeUser user = CubeUser( login: 'marvin18', password: "newPassword", oldPassword: "oldPassword"); updateUser(user) .then((updatedUser) {}) .catchError((error) {}); ``` ## User avatar [Section titled “User avatar”](#user-avatar) You can set a user’s avatar. You just need to upload it to the ConnectyCube cloud storage and then connect to user. ```dart File file; //some file from device storage CubeUser user; // some user to set avatar uploadFile(file, false) .then((cubeFile) { user.avatar = cubeFile.uid; return updateUser(user); }) .catchError((error) {}); ``` Now, other users can get you avatar: ```dart CubeUser user; // some user with avatar String avatarUrl = getPrivateUrlForUid(user.avatar); ``` ## Password reset [Section titled “Password reset”](#password-reset) It’s possible to reset a password via email: ```dart resetPassword("awesomeman@gmail.com") .then((voidResult) {}) .catchError((error) {}); ``` If provided email is valid - an email with password reset instruction will be sent to it. ## Retrieve users [Section titled “Retrieve users”](#retrieve-users) ### Retrieve user by ID [Section titled “Retrieve user by ID”](#retrieve-user-by-id) ```dart int userId = 22; getUserById(userId) .then((cubeUser) {}) .catchError((error) {}); ``` ### Retrieve users by IDs [Section titled “Retrieve users by IDs”](#retrieve-users-by-ids) ```dart Set ids = {22, 33}; getAllUsersByIds(ids) .then((pagedResult) {}) .catchError((error) {}); ``` ### Retrieve user by login [Section titled “Retrieve user by login”](#retrieve-user-by-login) ```dart String login = "marvin18"; getUserByLogin(login) .then((cubeUser) {}) .catchError((error) {}); ``` ### Retrieve user by email [Section titled “Retrieve user by email”](#retrieve-user-by-email) ```dart String email = "marvin18@example.com"; getUserByEmail(email) .then((cubeUser) {}) .catchError((error) {}); ``` ### Retrieve users by full name [Section titled “Retrieve users by full name”](#retrieve-users-by-full-name) ```dart String fullName = "Marvin Samuel"; getUsersByFullName(fullName) .then((pagedResult) {}) .catchError((error) {}); ``` ### Retrieve user by phone number [Section titled “Retrieve user by phone number”](#retrieve-user-by-phone-number) ```dart String phoneNumber = "47802323143"; getUserByPhoneNumber(phoneNumber) .then((cubeUser) {}) .catchError((error) {}); ``` ### Retrieve user by external ID [Section titled “Retrieve user by external ID”](#retrieve-user-by-external-id) ```dart var externalUserId = '6304a4399cf9db00200c1bd7'; getUserByExternalUserId(externalUserId) .then((cubeUser) {}) .catchError((error) {}); ``` ### Retrieve users by tags [Section titled “Retrieve users by tags”](#retrieve-users-by-tags) ```dart Set tags = {"apple"}; getUsersByTags(tags) .then((pagedResult) {}) .catchError((error) {}); ``` ### Retrieve users by parameters [Section titled “Retrieve users by parameters”](#retrieve-users-by-parameters) There is an available function for getting users by all available parameters and filters provided by [link](/server/users#retrieve-users-v2) ```dart var paginator = RequestPaginator(50, page: 0); var sorter = RequestSorter.desc('created_at'); var parameters = { 'login': 'smith1', 'phone': '6754987345566', 'user_tags[nin]': ['vip'], 'updated_at[lte]': '2018-12-06T09:21:41Z' }; getUsers(parameters, paginator: paginator, sorter: sorter).then((response) { var foundUsers = response?.items; }).catchError((onError){ }); ``` ## Delete user [Section titled “Delete user”](#delete-user) A user can delete himself from the platform: ```dart int userId = 123456; deleteUser(userId) .then((cubeUser) {}) .catchError((error) {}); ```
# Custom Data
> Maximize your Flutter app's potential with customizable data cloud storage solutions. Tailor data structures to match your application's unique requirements.
Custom Data, also known as cloud tables or custom objects, provide users with the flexibility to define and manage data in a way that is specific to their application’s requirements. Here are some common reasons why you might need use custom data in your app: * Custom Data allows you to define data structures that align precisely with your application’s needs. This is particularly useful when dealing with complex or unique data types that don’t fit well into standard ConnectyCube models. * In certain applications, there may be entities or objects that are unique to that particular use case. Custom Data enable the representation of these entities in the database, ensuring that the data storage is optimized for the application’s logic. * Custom Data allows you to extend the functionality of the app by introducing new types of data that go beyond what the ConnectyCube platform’s standard models support. Custom Data empower you to introduce these extensions and additional features. * In situations where data needs to be migrated from an existing system or transformed in a specific way, Custom Data offer the flexibility to accommodate these requirements. * Your application needs to integrate with external systems or APIs, Custom Data can be designed to align seamlessly with the data structures of your external systems. ## Get started with SDK [Section titled “Get started with SDK”](#get-started-with-sdk) Follow the [Getting Started guide](/flutter/) on how to connect ConnectyCube SDK and start building your first app. ## Preparations [Section titled “Preparations”](#preparations) In order to start using Custom Data you need first create the data scheme in the ConnectyCube Admin panel. For it navigate to **`Home -> Your App -> Custom -> List`** then click on **`ADD`** and from the dropdown menu select **`ADD NEW CLASS`**. In the opened dialog, enter your model name and add the necessary fields. The ConnectyCube Custom Data models’ fields support various data types or arrays (except `Location`). These include: * Integer([`int`](https://api.dart.dev/stable/dart-core/int-class.html)\` in the **Dart**); * Float ([`double`](https://api.dart.dev/stable/dart-core/double-class.html) in the **Dart**); * Boolean ([`bool`](https://dart.dev/language/built-in-types#booleans) in the **Dart**); * String ([`String`](https://dart.dev/language/built-in-types#strings) in the **Dart**); * Location (the array what consist of **two** `double`s); After adding all the required fields, click the **`CREATE CLASS`** button to save your scheme.  Newly created class is now available and contains the following data: * **\_id** - record identifier generated by system automatically * **user\_id** - identifier of user who created a record * **\_parent\_id** - by default is null * **field\_1** - field defined in a scheme * **field\_2** - field defined in a scheme * … * **field\_N** - field defined in a scheme * **created\_at** - date and time when a record is created  After that you can perform all **CRUD** operations with your Custom Data. > **Note**: The **Class name** field will be represented as the DB table name and will be used for identification of your requests during the work with Custom Data. ## Permissions [Section titled “Permissions”](#permissions) Access control list (ACL) is a list of permissions attached to some object. An ACL specifies which users have an access to objects, as well as what operations are allowed with such objects. Each entry in a typical ACL specifies a subject and an operation. ACL models may be applied to collections of objects as well as to individual entities within the system’s hierarchy. Adding the Access Control list is only available within the Custom Data module. ### Permissions scheme [Section titled “Permissions scheme”](#permissions-scheme) ConnectyCube permission scheme contains five permissions levels: * **Open** (open) - any user within the application can access the record(s) in the class and perform actions with the record * **Owner** (owner) - only the Owner (the user who created a record) is authorized to perform actions with the record * **Not allowed** (not\_allowed) - no one (except the Account Administrator) can proceed with a chosen action * **Open for groups** (open\_for\_groups) - users with the specified tag(s) will be included in the group that is authorized to perform actions with a record. Multiple groups can be specified (number of groups is not limited). * **Open for users ids** (open\_for\_users\_ids) - only users with listed IDs can perform actions with a record. Actions for work with an entity: * **Create** - create a new record * **Read** - retrieve information about a record and view it in the read-only mode * **Update** - update any parameter of the chosen record that can be updated by user * **Delete** - delete a record To set a permission schema for the Class, go to ConnectyCube dashboard and find a required class within Custom Data module Click on **`EDIT PERMISSION`** button to open permissions schema to edit. Each listed action has a separate permission level to select. The exception is a ‘Create’ action that isn’t available for ‘Owner’ permission level.  ### Permission levels [Section titled “Permission levels”](#permission-levels) Two access levels are available in the ConnectyCube: access to Class and access to Record. Only one permission schema can be applied for the record. Using the Class permission schema means that the Record permission schema won’t be affected on a reсord. **Class entity** **Class** is an entity that contains records. Class can be created via ConnectyCube dashboard only within Custom data module. Operations with Class entity are not allowed in API. All actions (Create, Read, Update and Delete) that are available for the ‘Class’ entity are also applicable for all records within a class. Default Class permission schema is using during the creation of a class: * **Create:** Open * **Read:** Open * **Update:** Owner * **Delete:** Owner To enable applying Class permissions for any of the action types, ‘Use Class permissions’ check box should be ticked. It means that the record permission schema (if existing) won’t be affected on a record. **Record entity** **Record** is an entity within the Class in the Custom Data module that can be created in ConnectyCube dashboard and via API. Each record within a Class has its own permission level. Unlike Class entity, ‘Not allowed’ permission level isn’t available for a record as well as only three actions are available to work with a record - read, update and delete. Default values for Record permission scheme: * Read: Open * Update: Owner * Delete: Owner To set a separate permission scheme for a record, open a record to edit and click on **`SET PERMISSION ON RECORD`** button:  Define the permission level for each of available actions. ## Create a new record [Section titled “Create a new record”](#create-a-new-record) Create a new record with the defined parameters in the class. Fields that weren’t defined in the request but are available in the scheme (class) will have null values. ```dart var className = 'call_history_item'; CubeCustomObject cubeCustomObject = CubeCustomObject(className); cubeCustomObject.fields = { 'call_name': 'Group call', 'call_participants': [2325293, 563541, 563543], 'call_start_time': 1701789791673, 'call_end_time': 0, 'call_duration': 0, 'call_state': 'accepted', 'is_group_call': true, 'call_id': 'f8c3de3d-1fea-4d7c-a8b0-29f63c4c3454', 'user_id': 2325293, 'caller_location': [50.004444, 36.234380] }; createCustomObject(cubeCustomObject).then((createdObject) { var objectFields = createdObject.fields; // the fields of your object saved on the ConnectyCube server }).catchError((onError) {}); ``` The Dart language allows you to use serialization and deserialization [feature](https://docs.flutter.dev/data-and-backend/serialization/json) for your objects. You can use it here for the serialization and deserialization of your objects. In this case, the code will appear as follows: ```dart var className = 'call_history_item'; CubeCustomObject cubeCustomObject = CubeCustomObject(className); CallItem callItem; // the instance of the class that implements the `toJson()` method and has the CallItem.fromJson(Map json) constructor cubeCustomObject.fields = callItem.toJson(); createCustomObject(cubeCustomObject).then((createdObject) { var callItem = CallItem.fromJson(createdObject.fields); }).catchError((onError) {}); ``` ### Create a record with permissions [Section titled “Create a record with permissions”](#create-a-record-with-permissions) To create a new record with permissions, add the `permissions` parameter to the instance of the `CubeCustomObject` you use to create the object. In this case, the request will look like this: ```dart var className = 'call_history_item'; CubeCustomObject cubeCustomObject = CubeCustomObject(className); CallItem callItem; // the instance of the class that implements the `toJson()` method and has the CallItem.fromJson(Map json) constructor cubeCustomObject.fields = callItem.toJson(); CubeCustomObjectPermission updatePermission = CubeCustomObjectPermission(Level.OPEN_FOR_USERS_IDS, ids: [2325293, 563541, 563543]); CubeCustomObjectPermissions permissions = CubeCustomObjectPermissions(updatePermission: updatePermission); cubeCustomObject.permissions = permissions; createCustomObject(cubeCustomObject).then((createdObject) { var permissions = createdObject.permissions; // the permissions of the created object }).catchError((onError) {}); ``` ## Retrieve record by ID [Section titled “Retrieve record by ID”](#retrieve-record-by-id) Retrieve the record by specifying its identifier. ```dart var className = 'call_history_item'; var id = '656f407e29d6c5002fce89dc'; getCustomObjectById(className, id).then((record) async { var foundRecord = record; // the found record or null if requested record not found }).catchError((onError) {}); ``` ## Retrieve records by IDs [Section titled “Retrieve records by IDs”](#retrieve-records-by-ids) Retrieve records by specifying their identifiers. ```dart var className = 'call_history_item'; var ids = ['656f407e29d6c5002fce89dc', '5f985984ca8bf43530e81233']; getCustomObjectsByIds(className, ids).then((result) async { var foundItems = result.items; // the list of the found items }).catchError((onError) {}); ``` ## Retrieve records within a class [Section titled “Retrieve records within a class”](#retrieve-records-within-a-class) Search records within the particular class. > **Note:** If you are sorting records by time, use the `_id` field. It is indexed and it will be much faster than sorting by `created_at` field. The list of additional parameter for sorting, filtering, aggregation of the search response is provided by link ```dart var className = 'call_history_item'; var params = { 'call_start_time[gt]': 1701789791673 }; getCustomObjectsByClassName(className, params).then((result) async { var foundItems = result.items; // the list of the found items }).catchError((onError) {}); ``` ## Retrieve the record’s permissions [Section titled “Retrieve the record’s permissions”](#retrieve-the-records-permissions) > **Note:** record permissions are checked during request processing. Only the owner has an ability to view a record’s permissions. ```dart var className = 'call_history_item'; var id = '656f407e29d6c5002fce89dc'; getCustomObjectPermissions(className, id).then((permissions) async { var recordPermissions = permissions; // the permissions applied for a searched record }).catchError((onError) {}); ``` ## Update record by ID [Section titled “Update record by ID”](#update-record-by-id) Update record data by specifying its ID. ```dart var className = 'call_history_item'; var id = '656f407e29d6c5002fce89dc'; var params = { 'call_end_time': 1701945033120, }; updateCustomObject(className, id, params).then((updatedObject) async { var updatedCustomObject = updatedObject.fields; // updated object // or // `CallItem` class that implements the `toJson()` method and has the CallItem.fromJson(Map json) constructor var updatedItem = CallItem.fromJson(updatedObject.fields); // updated object }).catchError((onError) {}); ``` ## Update records by criteria [Section titled “Update records by criteria”](#update-records-by-criteria) Update records found by the specified search criteria with a new parameter(s). The structure of the parameter `search_criteria` and the list of available operators provided by link ```dart var className = 'call_history_item'; var params = { 'search_criteria': { 'user_id': 1234567 }, 'call_name': 'Deleted user' }; updateCustomObjectsByCriteria(className, params).then((result) async { var updatedItems = result.items; // the list of updated items }).catchError((onError) {}); ``` ## Delete record by ID [Section titled “Delete record by ID”](#delete-record-by-id) Delete a record from a class by record identifier. ```dart var className = 'call_history_item'; var id = '656f407e29d6c5002fce89dc'; deleteCustomObjectById(className, id).then((_) { // the record was successfully deleted }).catchError((onError) {}); ``` ## Delete several records by their IDs [Section titled “Delete several records by their IDs”](#delete-several-records-by-their-ids) Delete several records from a class by specifying their identifiers. If one or more records can not be deleted, an appropriate error is returned for that record(s). ```dart var className = 'call_history_item'; var ids = ['656f407e29d6c5002fce89dc', '5f998d3bca8bf4140543f79a']; deleteCustomObjectsByIds(className, ids).then((result) { // `result` is the result of the deleting records request }).catchError((onError) {}); ``` ## Delete records by criteria [Section titled “Delete records by criteria”](#delete-records-by-criteria) Delete records from the class by specifying a criteria to find records to delete. The search query format is provided by link ```dart var className = 'call_history_item'; var params = { 'call_id[in]': ['f8c3de3d-1fea-4d7c-a8b0-29f63c4c3454'] }; deleteCustomObjectsByCriteria(className, params).then((totalDeleted) { // `totalDeleted` is the count of deleted items }).catchError((onError) {}); ``` ## Relations [Section titled “Relations”](#relations) Objects (records) in different classes can be linked with a `parentId` field. If the record from the **Class 1** is pointed with a record from **Class 2** via its `parentId`, the `parentId` field will contain an ID of a record from the **Class 2**. If a record from the **Class 2** is deleted, all its children (records of the **Class 1** with `parentId` field set to the **Class 2** record ID) will be automatically deleted as well. The linked children can be retrieved with `_parent_id={id_of_parent_class_record}` parameter.
# How to Setup Firebase
> A complete, step-by-step installation guide to integrate Firebase to your Flutter application, empowering to easily create feature-rich, scalable applications.
You might need to use Firebase for the following reasons: 1. Firebase authentication of users in your app via phone number. 2. Firebase Cloud Messaging (FCM) push notifications (former GCM). It might look a bit scary at first. But don’t panic and let’s check how to do this right step by step. ## Firebase account and project registration [Section titled “Firebase account and project registration”](#firebase-account-and-project-registration) Follow these steps to register your Firebase account and create a Firebase project: 1. **Register a Firebase account** at [Firebase console](https://console.firebase.google.com/) . You can use your Google account to authenticate at Firebase. 2. Click **Create a project**  > **Note**: If you have a Google project registered for your mobile app, select it from the \*\* Project name\*\* dropdown menu. You can also edit your **Project ID** if you need. A unique ID is assigned automatically to each project. This ID is used in publicly visible Firebase features. For example, it will be used in database URLs and in your Firebase Hosting subdomain. If you need to use a specific subdomain, you can change it. 3. Fill in the fields required (Project name, Project ID, etc.) and click **Continue**.   4. Configure Google Analytics for your project and click **Create project**.  Then click Continue.  5. Select platform for which you need Firebase  ## Connect Firebase SDK [Section titled “Connect Firebase SDK”](#connect-firebase-sdk) The Firebase team has developed the convenient tool for integration the Firebase features to your **Flutter** project. For using this tool just do few steps provided in the guide. The main steps include: * [Install the Firebase CLI](https://firebase.google.com/docs/cli?authuser=1\&hl=en#install_the_firebase_cli) You can install the Firebase CLI using a method that matches your operating system, experience level, and/or use case. Regardless of how you install the CLI, you have access to the same functionality and the `firebase` command. [**`Windows`**](https://firebase.google.com/docs/cli?authuser=1\&hl=en#install-cli-windows) [**`macOS/Linux`**](https://firebase.google.com/docs/cli?authuser=1\&hl=en#install-cli-mac-linux) * [Log in the Firebase CLI](https://firebase.google.com/docs/cli?authuser=1\&hl=en#sign-in-test-cli) After installing the CLI, you must authenticate. Then you can confirm authentication by listing your Firebase projects. 1. Log into Firebase using your Google account by running the following command: ```commandline firebase login ``` This command connects your local machine to Firebase and grants you access to your Firebase projects. 2. Install the FlutterFire CLI by running the following command from any directory: ```commandline dart pub global activate flutterfire_cli ``` * [Configure your app to use Firebase](https://firebase.google.com/docs/flutter/setup?platform=ios#configure-firebase) Use the FlutterFire CLI to configure your Flutter apps to connect to Firebase. From your Flutter project directory, run the following command to start the app configuration workflow: ```commandline flutterfire configure ``` The `flutterfire configure` workflow does the following: * Asks you to select the platforms (iOS, Android, Web) supported in your Flutter app. For each selected platform, the FlutterFire CLI creates a new Firebase app in your Firebase project.\ \ You can select either to use an existing Firebase project or to create a new Firebase project. If you already have apps registered in an existing Firebase project, the FlutterFire CLI will attempt to match them based on your current Flutter project configuration. * Creates a Firebase configuration file (`firebase_options.dart`) and adds it to your `lib/` directory. * (for Crashlytics or Performance Monitoring on Android) Adds the required product-specific Gradle plugins to your Flutter app. > **Note**: After this initial running of `flutterfire configure`, you need to re-run the command any time that you:\ > - Start supporting a new platform in your Flutter app.\ > - Start using a new Firebase service or product in your Flutter app, especially if you start using sign-in with Google, Crashlytics, Performance Monitoring, or Realtime Database. > > Re-running the command ensures that your Flutter app’s Firebase configuration is up-to-date and (for Android) automatically adds any required Gradle plugins to your app. * [Initialize Firebase in your app](https://firebase.google.com/docs/flutter/setup?platform=ios#initialize-firebase) 1. From your Flutter project directory, run the following command to install the core plugin: ```commandline flutter pub add firebase_core ``` 2. From your Flutter project directory, run the following command to ensure that your Flutter app’s Firebase configuration is up-to-date: ```commandline flutterfire configure ``` 3. In your `lib/main.dart` file, import the Firebase core plugin and the configuration file you generated earlier: ```dart import 'package:firebase_core/firebase_core.dart'; import 'firebase_options.dart'; ``` 4. Also in your `lib/main.dart` file, initialize Firebase using the `DefaultFirebaseOptions` object exported by the configuration file: ```dart await Firebase.initializeApp(options: DefaultFirebaseOptions.currentPlatform); ``` 5. Rebuild your Flutter application: ```commandline flutter run ``` ## Firebase Phone authentication [Section titled “Firebase Phone authentication”](#firebase-phone-authentication) This option allows users in your app authenticate themselves via phone number. If you use this method for user authentication, the user receives an SMS with verification code and authenticates via that code in your app. You need to follow these steps to add Firebase authentication to your Flutter project: 1. Setup the Firebase console for using Phone auth per every supported platform your project support according [this guide](https://firebase.google.com/docs/auth/flutter/phone-auth#setup). 2. Install the [**Firebase UI Auth**](https://pub.dev/packages/firebase_ui_auth) plugin in your project using next command: ```commandline flutter pub add firebase_ui_auth ``` 3. Configure the routing of your project for opening needed screens according to the plugin logic: ```dart MaterialApp( routes: { // ...other routes '/phone': (context) => PhoneInputScreen( actions: [ SMSCodeRequestedAction((context, action, flowKey, phoneNumber) { Navigator.of(context).push( MaterialPageRoute( builder: (context) => SMSCodeInputScreen( flowKey: flowKey, ), ), ); }), ] ), } ); ``` 4. Add the action for listening the auth state changes and using it for the ConnectyCube API requests: ```dart AuthStateChangeAction( (context, state) { state.user?.getIdToken().then((idToken) { signInUsingFirebasePhone( DefaultFirebaseOptions.currentPlatform.projectId, idToken ).then((cubeUser) { // the user was successfully signed in // start required logic (processing the user, opening screen with chats, etc.) Navigator.of(context).popUntil((route) { return route.isFirst; }); }); }); }); ``` After it the rout will look similar to the next: ```dart MaterialApp( routes: { // ...other routes '/phone': (context) => PhoneInputScreen( actions: [ SMSCodeRequestedAction((context, action, flowKey, phoneNumber) { Navigator.of(context).push( MaterialPageRoute( builder: (context) => SMSCodeInputScreen( flowKey: flowKey, actions: [ AuthStateChangeAction( (context, state) { state.user?.getIdToken().then((idToken) { signInUsingFirebasePhone( DefaultFirebaseOptions.currentPlatform.projectId, idToken ).then((cubeUser) { // the user was successfully signed in // start required logic (processing the user, opening screen with chats, etc.) // in our example we just go to the first screen Navigator.of(context).popUntil((route) { return route.isFirst; }); }); }); }) ], ), ), ); }), ] ), } ); ``` 5. Try running a test. Once your user is logged in successfully, you will find him/her in your **Dashboard >> Your App >> Users >> Users List** section.  > The simplest method for using the Firebase Phone Auth feature in your Flutter project was provided. It is available the manual user verification without using the [`firebase_ui_auth`](https://pub.dev/packages/firebase_ui_auth) plugin too. Use [this guide](https://firebase.google.com/docs/auth/flutter/phone-auth#usage) for manual implementation of the Firebase Phone Auth feature. ## Firebase E-mail authentication [Section titled “Firebase E-mail authentication”](#firebase-e-mail-authentication) This option allows users in your app authenticate themselves via **Firebase Email/Password** or **Firebase OAuth (Google Sign In)**. The Firebase E-mail authentication setup flow is very similar to the [Firebase Phone authentication](./flutter/firebase-setup-guide#firebase-phone-authentication) but has its own features. As this authentication type supports two auth providers [EmailAuthProvider](https://github.com/firebase/flutterfire/blob/master/packages/firebase_ui_auth/doc/providers/email.md#firebase-ui-email-auth-provider) and [GoogleProvider](https://github.com/firebase/flutterfire/blob/master/packages/firebase_ui_auth/doc/providers/oauth.md#google-sign-in) we will separate this guide on two sub-sections: * [Firebase Email auth](./flutter/firebase-setup-guide#firebase-email-auth-provider); * [Google Sign In](./flutter/firebase-setup-guide#google-sign-in); ### Firebase Email auth provider [Section titled “Firebase Email auth provider”](#firebase-email-auth-provider) The official FlutterFire [guide](https://github.com/firebase/flutterfire/blob/master/packages/firebase_ui_auth/doc/providers/email.md#firebase-ui-email-auth-provider) is detailed enough and we will just provide the main aspects of required configurations. 1. To support email as a provider, first ensure that the “Email/Password” provider is enabled in the [Firebase Console](https://console.firebase.google.com/project/_/authentication/providers): * In the Firebase console’s **Authentication** section, open the [Sign in method](https://console.firebase.google.com/project/_/authentication/providers?_gl=1*9tft23*_ga*ODk2NjM0OTA4LjE2NzY0NjQ2MDM.*_ga_CW55HF8NVT*MTY5MTU3MjY2NC4zOS4xLjE2OTE1NzMwNzguMC4wLjA.) page; * From the **Sign in method** page, enable the **Email/password sign-in** method and click **Save**.  2. Install the [**Firebase UI Auth**](https://pub.dev/packages/firebase_ui_auth) plugin in your project using next command: ```commandline flutter pub add firebase_ui_auth ``` 3. Configure the routing of your project for opening the `SignInScreen` that contains the suggestion to input the e-mail and password of the Firebase user: ```dart MaterialApp( routes: { // ...other routes '/firebase-email': (context) => SignInScreen( providers: [EmailAuthProvider()], ), } ); ``` 4. Add the action(s) for listening the auth state changes and using it for the ConnectyCube API requests: ```dart actions: [ AuthStateChangeAction((context, state) { state.user?.getIdToken().then((idToken) { if (idToken != null) { signInUsingFirebaseEmail( DefaultFirebaseOptions.currentPlatform.projectId, idToken) .then((cubeUser) { // user successfully authenticated on the Connectycube }).catchError((onError) { // error occurs during authentication on the Connectycube }); } }); }), ], ``` ```plaintext After it the rout will look similar to the next: ``` ```dart MaterialApp( routes: { // ...other routes '/firebase-email': (context) => SignInScreen( providers: [EmailAuthProvider()], actions: [ AuthStateChangeAction((context, state) { state.user?.getIdToken().then((idToken) { if (idToken != null) { signInUsingFirebaseEmail( DefaultFirebaseOptions.currentPlatform.projectId, idToken) .then((cubeUser) { // user successfully authenticated on the Connectycube }).catchError((onError) { // error occurs during authentication on the Connectycube }); } }); }), ], );, } ); ``` Starting this point the app will show separated screen for authentication via Firebase Email provider. After successful login to the Firebase the action `SignedIn` will be performed and the request to the Connectycube will run. ### Google Sign In [Section titled “Google Sign In”](#google-sign-in) The configuration of the Firebase Google OAuth requires few veri simple steps: 1. Install the official [google\_sign\_in](https://pub.dev/packages/google_sign_in) plugin to your project as described in the README. > **Note**: you need go through configuration steps for each platform as described on the [README](https://pub.dev/packages/google_sign_in). 2. Enable the “Google” provider in the Firebase Console and configure it: * In the Firebase console’s **Authentication** section, open the [Sign in method](https://console.firebase.google.com/project/_/authentication/providers?_gl=1*9tft23*_ga*ODk2NjM0OTA4LjE2NzY0NjQ2MDM.*_ga_CW55HF8NVT*MTY5MTU3MjY2NC4zOS4xLjE2OTE1NzMwNzguMC4wLjA.) page; * From the **Sign in method** page, enable the **Google** method and click **Save**.  > To ensure cross-platform support, please ensure you have followed installation instructions for both the `google_sign_in` package and the provider on the Firebase Console (such as adding a [SHA1 fingerprint](https://developers.google.com/android/guides/client-auth?authuser=0) for Android applications). 3. Install the [firebase\_ui\_oauth\_google](https://pub.dev/packages/firebase_ui_oauth_google) plugin: ```commandline flutter pub add firebase_ui_oauth_google ``` 4. Copy and save the `clientId` property (which can be found in the Firebase Console):  Almost done. After these configurations your app is ready for requesting the Google data from user. The `firebase_ui_oauth_google` support few variants of requesting the data. We will use the `OAuthProviderButton` with the `GoogleProvider`: ```dart AuthStateListener( listener: (oldState, newState, controller) { if (newState is SignedIn) { newState.user?.getIdToken().then((idToken) { if (idToken != null) { signInUsingFirebaseEmail( DefaultFirebaseOptions.currentPlatform.projectId, idToken) .then((cubeUser) { // user successfully authenticated on the Connectycube }).catchError((onError) { // error occurs during authentication on the Connectycube }); } }); } }, child: OAuthProviderButton( provider: GoogleProvider( clientId: ''), // set the `clientId` from the value copied in the p.4 of this guide ), ) ``` So now you know how to use Firebase features in your ConnectyCube apps. If you have any difficulties - please let us know via [support channel](mailto:support@connectycube.com)
# Push Notifications
> Elevate your Flutter app's performance with push notifications API guide. Keep users engaged with real-time updates, ensuring seamless interaction on the go.
Push Notifications provide a way to deliver some information to users while they are not using your app actively. The following use cases can be covered additionally with push notifications: * send a chat message when a recipient is offline (a push notification will be initiated automatically in this case) * make a video call with offline opponents (need to send a push notification manually) ## Configuration [Section titled “Configuration”](#configuration) In order to start work with push notifications you need to configure it for all required platforms. ### iOS and macOS [Section titled “iOS and macOS”](#ios-and-macos) 1. First of all you need to generate Apple push certificate (\*.p12 file) and upload it to ConnectyCube dashboard. Here is a guide on how to create a certificate 2. Upload Apple push certificate (\*.p12 file) to ConnectyCube dashboard: * Open your ConnectyCube Dashboard at [admin.connectycube.com](https://admin.connectycube.com) * Go to **Push notifications** module, **Credentials** page * Upload the newly created APNS certificate on **Apple Push Notification Service (APNS)** form.  3. Lastly, open Xcode project of your Flutter app and enable Push Notifications capabilities. Open Xcode, choose your project file, Signing & Capabilities tab and then add a Push Notifications capability. Also - tick a ‘Remote notifications’ checkbox in Background Modes section.  ### Android and Web [Section titled “Android and Web”](#android-and-web) #### Configure Firebase project and Service account key (recommended) [Section titled “Configure Firebase project and Service account key (recommended)”](#configure-firebase-project-and-service-account-key-recommended) In order to start working with push notifications functionality you need to configure it. 1. Create and configure your [Firebase project](https://console.firebase.google.com) and obtain the **Service account key**. If you have any difficulties with Firebase project registration, [follow our guide](/android/firebase-setup-guide). To find your **FCM service account key** go to your **Firebase console > Cloud Messaging > Manage Service Accounts** section:  2. Select and configure **Manage Keys** option:  3. Select **ADD KEY**, **Create new key**:  4. Select **Key type** (json recommended) and create:  5. Save it locally:  6. Browse your saved **FCM Service account key** in your **Dashboard > Your App > Push Notifications > Credentials**, select the environment for which you are adding the key. Use the same key for development and production zones.  7. Copy **Sender ID** value from your Firebase console **Cloud Messaging** section. You may require it later.  8. In order to use push notifications on Android, you need to create `google-services.json` file and copy it into project’s `android/app` folder. Also, you need to update the `applicationId` in `android/app/build.gradle` to the one which is specified in `google-services.json`, so they must match. If you have no existing API project yet, the easiest way to go about in creating one is using this [step-by-step installation process](https://firebase.google.com/docs/android/setup) #### Configure Firebase project and Server key (DEPRECATED) [Section titled “Configure Firebase project and Server key (DEPRECATED)”](#configure-firebase-project-and-server-key-deprecated) 1. Create and configure your [Firebase project](https://console.firebase.google.com) and obtain the **Server key**. If you have any difficulties with Firebase project registration, [follow our guide](/android/firebase-setup-guide). To find your **FCM server key** go to your **Firebase console > Cloud Messaging** section:  2. Copy your **FCM server key** to your **Dashboard > Your App > Push Notifications > Credentials**, select the environment for which you are adding the key and hit **Save key**. Use the same key for development and production zones.  3. Copy **Sender ID** value from your Firebase console **Cloud Messaging** section. You may require it later.  4. In order to use push notifications on Android, you need to create `google-services.json` file and copy it into project’s `android/app` folder. Also, you need to update the `applicationId` in `android/app/build.gradle` to the one which is specified in `google-services.json`, so they must match. If you have no existing API project yet, the easiest way to go about in creating one is using this [step-by-step installation process](https://firebase.google.com/docs/android/setup) ### Config `firebase_messaging` plugin [Section titled “Config firebase\_messaging plugin”](#config-firebase_messaging-plugin) > Note: Below provided the short guide for configuring the `firebase_messaging`. For more details and specific platform configs please follow the [FlutterFire](https://firebase.flutter.dev/docs/overview) official documentation. There is [**firebase\_messaging**](https://pub.dev/packages/firebase_messaging) plugin’s official repo. #### Add dependency [Section titled “Add dependency”](#add-dependency) Add this to your package’s `pubspec.yaml` file: ```yaml dependencies: ... firebase_core: ^x.x.x firebase_messaging: ^x.x.x ... ``` #### Install it [Section titled “Install it”](#install-it) You can install packages from the command line: ```bash flutter pub get ``` #### Add classpath for goggle services plugin [Section titled “Add classpath for goggle services plugin”](#add-classpath-for-goggle-services-plugin) Add classpath to your `build.gradle` file by path `android/build.gradle` ```groovy buildscript { ... } dependencies { ... classpath 'com.google.gms:google-services:4.3.3' } } ``` #### Apply Google Services plugin [Section titled “Apply Google Services plugin”](#apply-google-services-plugin) Add at bottom of `android/app/build.gradle` next line: ```groovy apply plugin: 'com.google.gms.google-services' ``` #### Add required files from Firebase development console [Section titled “Add required files from Firebase development console”](#add-required-files-from-firebase-development-console) * add `google-services.json` to Android project; * add `GoogleService-Info.plist` to iOS project; #### Add imports [Section titled “Add imports”](#add-imports) ```dart import 'package:firebase_core/firebase_core.dart'; import 'package:firebase_messaging/firebase_messaging.dart'; ``` #### Init and configure plugin in your app [Section titled “Init and configure plugin in your app”](#init-and-configure-plugin-in-your-app) ```dart ... void init() { Firebase.initializeApp(); FirebaseMessaging firebaseMessaging = FirebaseMessaging.instance; // request permissions for showing notification in iOS firebaseMessaging.requestPermission(alert: true, badge: true, sound: true); // add listener for foreground push notifications FirebaseMessaging.onMessage.listen((remoteMessage) { log('[onMessage] message: $remoteMessage'); showNotification(remoteMessage); }); // set listener for push notifications, which will be received when app in background or killed FirebaseMessaging.onBackgroundMessage(onBackgroundMessage); } ``` ### Automatic config using FlutterFire CLI [Section titled “Automatic config using FlutterFire CLI”](#automatic-config-using-flutterfire-cli) There is alternative way for configuring the FCM in your Flutter project. It is the [FlutterFire CLI](https://firebase.flutter.dev/docs/cli/). Using this tool you can configure FCM in automatic mode. Just follow the guide on how to generate and use the configuration file. ## Subscribe to push notifications [Section titled “Subscribe to push notifications”](#subscribe-to-push-notifications) In order to start receiving push notifications you need to subscribe your current device. First of all you have to get `token`: ```dart FirebaseMessaging firebaseMessaging = FirebaseMessaging.instance; String token; if (Platform.isAndroid || kIsWeb) { token = await firebaseMessaging.getToken(); } else if (Platform.isIOS || Platform.isMacOS) { token = await firebaseMessaging.getAPNSToken(); } if (!isEmpty(token)) { subscribe(token); } firebaseMessaging.onTokenRefresh.listen((newToken) { subscribe(newToken); }); ``` Then you can subscribe for push notifications using `token`: ```dart subscribe(String token) async { log('[subscribe] token: $token'); bool isProduction = bool.fromEnvironment('dart.vm.product'); CreateSubscriptionParameters parameters = CreateSubscriptionParameters(); parameters.environment = isProduction ? CubeEnvironment.PRODUCTION : CubeEnvironment.DEVELOPMENT; if (Platform.isAndroid) { parameters.channel = NotificationsChannels.GCM; parameters.platform = CubePlatform.ANDROID; parameters.bundleIdentifier = "com.connectycube.flutter.chat_sample"; } else if (Platform.isIOS) { parameters.channel = NotificationsChannels.APNS; parameters.platform = CubePlatform.IOS; parameters.bundleIdentifier = Platform.isIOS ? "com.connectycube.flutter.chatSample.app" : "com.connectycube.flutter.chatSample.macOS"; } String deviceId = await DeviceId.getID; parameters.udid = deviceId; parameters.pushToken = token; createSubscription(parameters.getRequestParameters()) .then((cubeSubscription) {}) .catchError((error) {}); } ``` ### FCM on the iOS/macOS [Section titled “FCM on the iOS/macOS”](#fcm-on-the-iosmacos) Alternatively, there is a way to use Firebase (FCM) push notifications on the iOS and macOS platforms. While we **recommend use native Apple push notifications on iOS** (as described above), you may have a requirement to use (FCM) push notifications on iOS. The configuration of the Flutter project is easy and you can do it in a few simple steps by following the official [FlutterFire documentation](https://firebase.flutter.dev/docs/messaging/overview#4-apple-integration). The main steps include: * [Configuring your app](https://firebase.flutter.dev/docs/messaging/apple-integration#configuring-your-app); * [Enable Push Notifications](https://firebase.flutter.dev/docs/messaging/apple-integration#enable-push-notifications) (in the same way as for APNS); * [Enable Background Modes](https://firebase.flutter.dev/docs/messaging/apple-integration#enable-background-modes-ios-only) (iOS only) (in the same way as for APNS); * [Linking APNs with FCM](https://firebase.flutter.dev/docs/messaging/apple-integration#linking-apns-with-fcm); After that you can use the FCM push notifications on the iOS/macOS in the same way as the Android/Web. It means that you should use the FCM configuration for making the subscription on the iOS/macOS, namely: ```dart CreateSubscriptionParameters parameters = CreateSubscriptionParameters(); if (Platform.isAndroid || kIsWeb) { parameters.channel = NotificationsChannels.GCM; parameters.platform = CubePlatform.ANDROID; } else if (Platform.isIOS || Platform.isMacOS) { parameters.channel = NotificationsChannels.GCM; parameters.platform = CubePlatform.IOS; } FirebaseMessaging firebaseMessaging = FirebaseMessaging.instance; var token = await firebaseMessaging.getToken(); parameters.pushToken = token; // and other required parameters for subscription on the push notifications ``` ## Send push notifications [Section titled “Send push notifications”](#send-push-notifications) You can manually initiate a push notification to user/users on any event in your application. To do so you need to form a push notification parameters (payload) and set the push recipients: ```dart bool isProduction = bool.fromEnvironment('dart.vm.product'); CreateEventParams params = CreateEventParams(); params.parameters = { 'message': "Some message in push", // 'message' field is required 'custom_parameter1': "custom parameter value 1", 'custom_parameter2': "custom parameter value 2", 'ios_voip': 1 // to send VoIP push notification to iOS //more standard parameters you can found by link https://developers.connectycube.com/server/push_notifications#universal-push-notifications }; params.notificationType = NotificationType.PUSH; params.environment = isProduction ? CubeEnvironment.PRODUCTION : CubeEnvironment.DEVELOPMENT; params.usersIds = [88707, 88708]; createEvent(params.getEventForRequest()) .then((cubeEvent) {}) .catchError((error) {}); ``` ## Receive push notifications [Section titled “Receive push notifications”](#receive-push-notifications) Depending on a devices state, incoming messages are handled differently. They will be received in one of the registered callbacks which you set during initialisation plugin according to [documentation](https://firebase.flutter.dev/docs/messaging/usage#handling-messages). ```dart FirebaseMessaging.onMessage.listen((RemoteMessage message) { log('[onMessage] message: $message', TAG); showNotification(message); }); FirebaseMessaging.onBackgroundMessage(onBackgroundMessage); Future onBackgroundMessage(RemoteMessage message) { log('[onBackgroundMessage] message: $message'); showNotification(message); return Future.value(); } ``` Here you can add an appropriate logic in your app. The things can be one of the following: * If this is a chat message, once clicked on it - we can redirect a user to an appropriate chat by **dialog\_id** data param * Raise a local notification with an alternative info to show for a user ## Unsubscribe [Section titled “Unsubscribe”](#unsubscribe) In order to unsubscribe and stop receiving push notifications you need to list your current subscriptions and then choose those to be deleted: ```dart getSubscriptions() .then((subscriptionsList) { int subscriptionIdToDelete = subscriptionsList[0].id; // or other subscription's id return deleteSubscription(subscriptionIdToDelete); }) .then((voidResult) {}) .catchError((error) {}); ``` ## VoIP push notifications [Section titled “VoIP push notifications”](#voip-push-notifications) ConnectyCube supports iOS VoIP push notifications via same API described above. The main use case for iOS VoIP push notifications is to show a native calling interface on incoming call when an app is in killed/background state - via CallKit. The common flow of using VoIP push notifications is the following: * for VoIP pushes it requires to generate a separated VoIP device token. The Flutter platform has a lot of plugins for getting the VoIP token from the system. There are: * [connectycube\_flutter\_call\_kit](https://pub.dev/packages/connectycube_flutter_call_kit); * [firebase\_messaging](https://pub.dev/packages/firebase_messaging); * [flutter\_voip\_push\_notification](https://pub.dev/packages/flutter_voip_push_notification); * etc. We will use our own development [connectycube\_flutter\_call\_kit](https://pub.dev/packages/connectycube_flutter_call_kit) in examples below. So, get the VoIP token: ```dart var token = await ConnectycubeFlutterCallKit.getToken(); ``` * then when token is retrieved, you need to subscribe to voip pushes by passing a `notification_channel: apns_voip` channel in a subscription request: ```dart var token = await ConnectycubeFlutterCallKit.getToken(); subscribe(String token) async { CreateSubscriptionParameters parameters = CreateSubscriptionParameters(); parameters.pushToken = token; bool isProduction = kReleaseMode ? CubeEnvironment.PRODUCTION : CubeEnvironment.DEVELOPMENT; if (Platform.isIOS) { parameters.channel = NotificationsChannels.APNS_VOIP; parameters.platform = CubePlatform.IOS; } String? deviceId = await PlatformDeviceId.getDeviceId; parameters.udid = deviceId; var packageInfo = await PackageInfo.fromPlatform(); parameters.bundleIdentifier = packageInfo.packageName; createSubscription(parameters.getRequestParameters()) .then((cubeSubscriptions) { log('[subscribe] subscription SUCCESS', TAG); }).catchError((error) { log('[subscribe] subscription ERROR: $error', TAG); }); } ``` * then when you want to send a voip push notification, use `ios_voip: 1` parameter in a push payload in a create event request: ```dart P2PSession callSession; // the call session created before CreateEventParams params = CreateEventParams(); params.parameters = { 'message': "Incoming ${callSession.callType == CallType.VIDEO_CALL ? "Video" : "Audio"} call", 'call_type': callSession.callType, 'session_id': callSession.sessionId, 'caller_id': callSession.callerId, 'caller_name': callerName, 'call_opponents': callSession.opponentsIds.join(','), 'signal_type': 'startCall', 'ios_voip': 1, }; params.notificationType = NotificationType.PUSH; params.environment = kReleaseMode ? CubeEnvironment.PRODUCTION : CubeEnvironment.DEVELOPMENT; params.usersIds = callSession.opponentsIds.toList(); createEvent(params.getEventForRequest()).then((cubeEvent) { // event was created }).catchError((error) { // something went wrong during event creation }); ```
# Whiteboard
> Enable dynamic collaboration in chat with ConnectyCube Whiteboard API. Ideal for remote meetings, teaching environments, sales demos, real-time workflows.
ConnectyCube **Whiteboard API** allows to create whiteboard functionality and associate it with a chat dialog. Chat dialog’s users can collaborate and draw simultaneously on a whiteboard. You can do freehand drawing with a number of tools, add shapes, lines, text and erase. To share boards, you just get an easy link which you can email. Your whiteboard stays safe in the cloud until you’re ready to return to it.  The most popular use cases for using the whiteboard: * Remote meetings * Remote teaching * Sales presentations * Workflows * Real-time collaboration ## Get started with SDK [Section titled “Get started with SDK”](#get-started-with-sdk) Follow the [Getting Started guide](/flutter/) on how to connect ConnectyCube SDK and start building your first app. ## Preparations [Section titled “Preparations”](#preparations) In order to start using whiteboard, an additional config has to be provided: ```dart CubeSettings.instance.whiteboardUrl = 'https://whiteboard.connectycube.com'; ``` Then, ConnectyCube whiteboard is associated with a chat dialog. In order to create a whiteboard, you need to have a chat dialog. Refer to [chat dialog creation API](/flutter/messaging#create-new-dialog). ## Create whiteboard [Section titled “Create whiteboard”](#create-whiteboard) When create a whiteboard you need to pass a name (any) and a chat dialog id to which whiteboard will be connected. ```dart CubeWhiteboard whiteboard = CubeWhiteboard() ..name = "New Whiteboard" ..chatDialogId = "5356c64ab35c12bd3b108a41"; createWhiteboard(whiteboard) .then((createdWhiteboard) { var wid = createdWhiteboard.whiteboardId; }) .catchError((onError) {}); ``` Once a whiteboard is created - a user can display it in the app in a WebView using the URL from the following method `whiteboard.getUrlForUser(username)`. For `username` any value can be provided but it should contain only Latin symbols. This is to display a text hint near the drawing arrow. You can build URL by yourself, for it use next template `https://whiteboard.connectycube.com?whiteboardid=&username=&title=` ## Retrieve whiteboards [Section titled “Retrieve whiteboards”](#retrieve-whiteboards) Use the following code snippet to retrieve a list of whiteboards associated with a chat dialog: ```dart var chatDialogId = "5356c64ab35c12bd3b108a41"; getWhiteboards(chatDialogId) .then((whiteboards) {}) .catchError((onError) {}); ``` ## Update whiteboard [Section titled “Update whiteboard”](#update-whiteboard) A whiteboard can be updated, e.g. its name: ```dart var whiteboardId = "5456c64ab35c17bd3b108a76"; var updatedName = 'Updated Name'; updateWhiteboard(whiteboardId, updatedName) .then((updatedWhiteboard) {}) .catchError((onError) {}); ``` ## Delete whiteboard [Section titled “Delete whiteboard”](#delete-whiteboard) ```dart var whiteboardId = "5456c64ab35c17bd3b108a76";; deleteWhiteboard(whiteboardId) .then((voidResult) {}) .catchError((onError) {}); ```
# Send first chat message
> Step-by-step guide to sending your first chat message using ConnectyCube Cordova Chat SDK - what exactly to do when you want to build a chat.
The **ConnectyCube Chat API** is a set of tools that enables developers to integrate real-time messaging into their web and mobile applications. With this API, users can build powerful chat functionalities that support one-on-one messaging, group chats, typing indicators, message history, delivery receipts, and push notifications. If you’re planning to build a new app, we recommend starting with one of our [code samples apps](/cordova/getting-started/code-samples/) as a foundation for your client app.\ If you already have an app and you are looking to add a chat to it, proceed with this guide. This guide walks you through installing the ConnectyCube SDK in your app, configure it and then sending your first message to the opponent in 1-1 chat. ## Before you start [Section titled “Before you start”](#before-you-start) Before you start, make sure: 1. You have access to your ConnectyCube account. If you don’t have an account, [sign up here](https://admin.connectycube.com/register). 2. An app created in ConnectyCube dashboard. Once logged into [your ConnectyCube account](https://admin.connectycube.com), create a new application and make a note of the app credentials (app ID and auth key) that you’ll need for authentication. ## Step 1: Configure SDK [Section titled “Step 1: Configure SDK”](#step-1-configure-sdk) To use chat in a client app, you should install, import and configure ConnectyCube SDK. **Note:** If the app is already created during the onboarding process and you followed all the instructions, you can skip the ‘Configure SDK’ step and start with [Create and Authorise User](#step-2-create-and-authorise-user). ### Install SDK [Section titled “Install SDK”](#install-sdk) Сonnect SDK js file as a normal script: ```html ``` ### Initialize SDK [Section titled “Initialize SDK”](#initialize-sdk) Initialize the SDK with your ConnectyCube application credentials. You can access your application credentials in [ConnectyCube Dashboard](https://admin.connectycube.com): * SDK v4 ```javascript const CREDENTIALS = { appId: 21, authKey: 'hhf87hfushuiwef', }; ConnectyCube.init(CREDENTIALS); ``` * SDK v3 ```javascript const CREDENTIALS = { appId: 21, authKey: 'hhf87hfushuiwef', authSecret: 'jjsdf898hfsdfk', }; ConnectyCube.init(CREDENTIALS); ``` ## Step 2: Create and Authorise User [Section titled “Step 2: Create and Authorise User”](#step-2-create-and-authorise-user) As a starting point, the user’s session token needs to be created allowing to send and receive messages in chat. ```javascript const userCredentials = { login: "marvin18", password: "supersecurepwd" }; // const userCredentials = { email: 'awesomeman@gmail.com', password: 'supersecurepwd' }; // const userCredentials = { provider: 'facebook', keys: {token: 'a876as7db...asg34dasd8wqe'} }; ConnectyCube.createSession(userCredentials) .then((user) => {}) .catch((error) => {}); ``` **Note:** With the request above, **the user is created automatically on the fly upon session creation** using the login (or email) and password from the request parameters. **Important:** such approach with the automatic user creation works well for testing purposes and while the application isn’t launched on production. For better security it is recommended to deny the session creation without an existing user.\ For this, set ‘Session creation without an existing user entity’ to **Deny** under the **Application -> Overview -> Permissions** in the [admin panel](https://admin.connectycube.com/apps). ## Step 3: Connect User to chat [Section titled “Step 3: Connect User to chat”](#step-3-connect-user-to-chat) Connecting to the chat is an essential step in enabling real-time communication. By establishing a connection, the user is authenticated on the chat server, allowing them to send and receive messages instantly. Without this connection, the app won’t be able to interact with other users in the chat. ```javascript const userCredentials = { userId: 4448514, password: "supersecurepwd", }; ConnectyCube.chat .connect(userCredentials) .then(() => { // connected }) .catch((error) => {}); ``` ## Step 4: Create 1-1 chat [Section titled “Step 4: Create 1-1 chat”](#step-4-create-1-1-chat) Creating a 1-1 chat is essential because it gives a unique conversation ID to correctly route and organize your message to the intended user. You need to pass `type: 3` (1-1 chat) and an id of an opponent you want to create a chat with: ```javascript const params = { type: 3, occupants_ids: [56], }; ConnectyCube.chat.dialog .create(params) .then((dialog) => {}) .catch((error) => {}); ``` ## Step 5: Send / Receive messages [Section titled “Step 5: Send / Receive messages”](#step-5-send--receive-messages) Once the 1-1 chat is set up, you can use it to exchange messages seamlessly. This code example demonstrates how to send and receive messages in the created 1-1 chat: ```javascript const dialog = ...; const opponentId = 56; const message = { type: dialog.type === 3 ? 'chat' : 'groupchat', body: "How are you today?", extension: { save_to_history: 1, dialog_id: dialog._id } }; message.id = ConnectyCube.chat.send(opponentId, message); // ... ConnectyCube.chat.onMessageListener = onMessage; function onMessage(userId, message) { console.log('[ConnectyCube.chat.onMessageListener] callback:', userId, message) } ``` Congratulations! You’ve mastered the basics of sending a chat message in ConnectyCube. #### What’s next? [Section titled “What’s next?”](#whats-next) To take your chat experience to the next level, explore ConnectyCube advanced functionalities, like adding typing indicators, using emojis, sending attachments, and more. Follow the [Chat API documentation](/cordova/messaging) to enrich your app and engage your users even further!
# Make first call
> A guide with the essential steps of how to make the first call via ConnectyCube Android Video SDK - from session creation to initialising and accepting the call.
**ConnectyCube Video Calling Peer-to-Peer (P2P) API** provides a solution for integrating real-time video and audio calling into your application. This API enables you to create smooth one-on-one and group video calls, supporting a wide range of use cases like virtual meetings, telemedicine consultations, social interactions, and more. The P2P approach ensures that media streams are transferred directly between users whenever possible, minimizing latency and delivering high-quality audio and video. If you’re planning to build a new app, we recommend starting with one of our [code samples apps](/cordova/getting-started/code-samples/) as a foundation for your client app.\ If you already have an app and you are looking to add chat and voice/video calls to it, proceed with this guide. This guide walks you through installing the ConnectyCube SDK in your app, configure it and then initiating the call to the opponent. ## Before you start [Section titled “Before you start”](#before-you-start) Before you start, make sure: 1. You have access to ConnectyCube account. If you don’t have an account, [sign up here](https://admin.connectycube.com/register). 2. An app created in ConnectyCube dashboard. Once logged into [your ConnectyCube account](https://admin.connectycube.com/signin), create a new application and make a note of the app credentials (app ID, auth key) that you’ll need for authentication. ## Step 1: Configure SDK [Section titled “Step 1: Configure SDK”](#step-1-configure-sdk) To use chat in a client app, you should install, import and configure ConnectyCube SDK. **Note:** If the app is already created during the onboarding process and you followed all the instructions, you can skip the ‘Configure SDK’ step and start with [Create and Authorise User](#step-2-create-and-authorise-user). ### Install SDK [Section titled “Install SDK”](#install-sdk) Сonnect SDK js file as a normal script: ```html ``` ### Initialize SDK [Section titled “Initialize SDK”](#initialize-sdk) Initialize the SDK with your ConnectyCube application credentials. You can access your application credentials in [ConnectyCube Dashboard](https://admin.connectycube.com): * SDK v4 ```javascript const CREDENTIALS = { appId: 21, authKey: 'hhf87hfushuiwef', }; ConnectyCube.init(CREDENTIALS); ``` * SDK v3 ```javascript const CREDENTIALS = { appId: 21, authKey: 'hhf87hfushuiwef', authSecret: 'jjsdf898hfsdfk', }; ConnectyCube.init(CREDENTIALS); ``` ## Step 2: Create and Authorise User [Section titled “Step 2: Create and Authorise User”](#step-2-create-and-authorise-user) As a starting point, the user’s session token needs to be created allowing to participate in calls. ```javascript const userCredentials = { login: "marvin18", password: "supersecurepwd" }; // const userCredentials = { email: 'awesomeman@gmail.com', password: 'supersecurepwd' }; // const userCredentials = { provider: 'facebook', keys: {token: 'a876as7db...asg34dasd8wqe'} }; ConnectyCube.createSession(userCredentials) .then((user) => {}) .catch((error) => {}); ``` **Note:** With the request above, **the user is created automatically on the fly upon session creation** using the login (or email) and password from the request parameters. **Important:** such approach with the automatic user creation works well for testing purposes and while the application isn’t launched on production. For better security it is recommended to deny the session creation without an existing user.\ For this, set ‘Session creation without an existing user entity’ to **Deny** under the **Application -> Overview -> Permissions** in the [admin panel](https://admin.connectycube.com/apps). ## Step 3: Connect User to chat [Section titled “Step 3: Connect User to chat”](#step-3-connect-user-to-chat) Connecting to the chat is an essential step in enabling real-time communication. To start using Video Calling API you need to connect user to Chat as ConnectyCube Chat API is used as a signalling transport for Video Calling API: ```javascript const userCredentials = { userId: 4448514, password: "supersecurepwd", }; ConnectyCube.chat .connect(userCredentials) .then(() => { // connected }) .catch((error) => {}); ``` ## Step 4: Connect WebRTC lib [Section titled “Step 4: Connect WebRTC lib”](#step-4-connect-webrtc-lib) For Android - there is nothing extra required. Android Cordova WebView supports all the WebRTC API stack. For iOS - a [cordova-plugin-iosrtc](https://github.com/cordova-rtc/cordova-plugin-iosrtc) has to be used. ## Step 5: Create video session [Section titled “Step 5: Create video session”](#step-5-create-video-session) In order to use Video Calling API you need to create a call session object - choose your opponents with whom you will have a call and a type of session (VIDEO or AUDIO): ```javascript const calleesIds = [56, 76, 34]; // User's ids const sessionType = ConnectyCube.videochat.CallType.VIDEO; // AUDIO is also possible const additionalOptions = {}; const session = ConnectyCube.videochat.createNewSession(calleesIds, sessionType, additionalOptions); ``` ## Step 6: Access local media stream [Section titled “Step 6: Access local media stream”](#step-6-access-local-media-stream) To have a video chat session you need to get an access to the user’s devices (webcam / microphone): ```javascript const mediaParams = { audio: true, video: true }; session .getUserMedia(mediaParams) .then((localStream) => { // display local stream session.attachMediaStream("myVideoElementId", localStream, { muted: true, mirror: true, }); }) .catch((error) => {}); ``` This method lets the browser ask the user for permission to use devices. You should allow this dialog to access the stream. Otherwise, the browser can’t obtain access and will throw an error for `getUserMedia` callback function. For more information about possible audio/video constraints, here is a good code sample from WebRTC team how to work with getUserMedia constraints: ## Step 7: Initiate call [Section titled “Step 7: Initiate call”](#step-7-initiate-call) Initiate Call function sets up the foundational connection between the caller and the selected opponents: ```javascript const extension = {}; session.call(extension, (error) => {}); ``` The extension is used to pass any extra parameters in the request to your opponents. After this, your opponents will receive a callback call: ```javascript ConnectyCube.videochat.onCallListener = function (session, extension) {}; ``` Or if your opponents are offline or did not answer the call request: ```javascript ConnectyCube.videochat.onUserNotAnswerListener = function (session, userId) {}; ``` ## Step 8: Accept a call [Section titled “Step 8: Accept a call”](#step-8-accept-a-call) To accept a call the following code snippet is used: ```javascript ConnectyCube.videochat.onCallListener = function (session, extension) { // Here we need to show a dialog with 2 buttons - Accept & Reject. // By accepting -> run the following code: // // 1. await session.getUserMedia (...) // // 2. Accept call request: const extension = {}; session.accept(extension); }; ``` After this, you will get a confirmation in the following callback: ```javascript ConnectyCube.videochat.onAcceptCallListener = function (session, userId, extension) {}; ``` Also, both the caller and opponents will get a special callback with the remote stream: ```javascript ConnectyCube.videochat.onRemoteStreamListener = function (session, userID, remoteStream) { // attach the remote stream to DOM element session.attachMediaStream("remoteOpponentVideoElementId", remoteStream); }; ``` From this point, you and your opponents should start seeing and hearing each other. #### What’s next? [Section titled “What’s next?”](#whats-next) To enhance your calling feature with advanced functionalities, such as call recording, screen sharing, or integrating emojis and attachments during calls, follow the API guides below. These additions will help create a more dynamic and engaging experience for your users! * [Voice/video calling SDK documentation](/cordova/videocalling) * [Conference calling SDK documentation](/cordova/videocalling-conference)
# Chat
> Integrate powerful chat functionality into your Cordova app effortlessly with our versatile Chat APIs. Enhance user communication and engagement.
ConnectyCube Chat API is built on top of Real-time(XMPP) protocol. In order to use it you need to setup real-time connection with ConnectyCube Chat server and use it to exchange data. By default Real-time Chat works over secure TLS connection. ## Connect to chat [Section titled “Connect to chat”](#connect-to-chat) ```javascript const userCredentials = { userId: 4448514, password: "awesomepwd", }; ConnectyCube.chat .connect(userCredentials) .then(() => { // connected }) .catch((error) => {}); ``` ### Connect to chat using custom authentication providers [Section titled “Connect to chat using custom authentication providers”](#connect-to-chat-using-custom-authentication-providers) In some cases we don’t have a user’s password, for example when login via: * Facebook * Twitter * Firebase phone authorization * Custom identity authentication * etc. In such cases ConnectyCube API provides possibility to use ConnectyCube session token as a password for chat connection: ```java // get current ConnectyCube session token and set as user's password const token = ConnectyCube.service.sdkInstance.session.token; const userCredentials = { userId: 4448514, password: token }; ``` ## Connection status [Section titled “Connection status”](#connection-status) The following snippet can be used to determine whether a user is connected to chat or not: ```javascript const isConnected = ConnectyCube.chat.isConnected; ``` ## Disconnect [Section titled “Disconnect”](#disconnect) ```javascript ConnectyCube.chat.disconnect(); ConnectyCube.chat.onDisconnectedListener = onDisconnectedListener; function onDisconnectedListener() {} ``` ## Reconnection [Section titled “Reconnection”](#reconnection) The SDK reconnects automatically when connection to Chat server is lost. The following 2 callbacks are used to track the state of connection: ```javascript ConnectyCube.chat.onDisconnectedListener = onDisconnectedListener; ConnectyCube.chat.onReconnectListener = onReconnectListener; function onDisconnectedListener() {} function onReconnectListener() {} ``` ## Dialogs [Section titled “Dialogs”](#dialogs) All chats between users are organized in dialogs. The are 4 types of dialogs: * 1-1 chat - a dialog between 2 users. * group chat - a dialog between specified list of users. * public group chat - an open dialog. Any user from your app can chat there. * broadcast - chat where a message is sent to all users within application at once. All the users from the application are able to join this group. Broadcast dialogs can be created only via Admin panel. You need to create a new dialog and then use it to chat with other users. You also can obtain a list of your existing dialogs. ## Create new dialog [Section titled “Create new dialog”](#create-new-dialog) ### Create 1-1 chat [Section titled “Create 1-1 chat”](#create-1-1-chat) You need to pass `type: 3` (1-1 chat) and an id of an opponent you want to create a chat with: ```javascript const params = { type: 3, occupants_ids: [56], }; ConnectyCube.chat.dialog .create(params) .then((dialog) => {}) .catch((error) => {}); ``` ### Create group chat [Section titled “Create group chat”](#create-group-chat) You need to pass `type: 2` and ids of opponents you want to create a chat with: ```javascript const params = { type: 2, name: "Friday party", occupants_ids: [29085, 29086, 29087], description: "lets dance the night away", photo: "party.jpg", }; ConnectyCube.chat.dialog .create(params) .then((dialog) => {}) .catch((error) => {}); ``` ### Create public group chat [Section titled “Create public group chat”](#create-public-group-chat) It’s possible to create a public group chat, so any user from you application can join it. There is no a list with occupants, this chat is just open for everybody. You need to pass `type: 4` and ids of opponents you want to create a chat with: ```javascript const params = { type: 4, name: "Blockchain trends", }; ConnectyCube.chat.dialog .create(params) .then((dialog) => {}) .catch((error) => {}); ``` Response example from `ConnectyCube.chat.dialog.create(params)` - [see](/server/chat#response-1) ### Chat metadata [Section titled “Chat metadata”](#chat-metadata) A dialog can have up to 3 custom sub-fields to store additional information that can be linked to chat. To start using extensions, allowed fields should be added first. Go to [Admin panel](https://admin.connectycube.com) > Chat > Custom Fields and provide allowed custom fields.  When create a dialog, the `extensions` field object must contain allowed fields only. Others fields will be ignored. The values will be casted to string. ```javascript const params = { type: 2, name: "Friday party", occupants_ids: [29085, 29086, 29087], description: "lets dance the night away", extensions: {location: "Sun bar"}, }; ConnectyCube.chat.dialog .create(params) .then((dialog) => {}) .catch((error) => {}); ``` When remove custom field in Admin panel, this field will be removed in all dialogs respectively. These parameters also can be used as a filter for retrieving dialogs. ### Chat permissions [Section titled “Chat permissions”](#chat-permissions) Chat could have different permissions to managa data access. This is managed via `permissions` field. At the moment, only one permission available - `allow_preview` - which allows to retrieve dialog’s messages for user who is not a member of dialog. This is useful when implement feature like Channels where a user can open chat and preview messages w/o joining it. ## List dialogs [Section titled “List dialogs”](#list-dialogs) It’s common to request all your dialogs on every app login: ```javascript const filters = {}; ConnectyCube.chat.dialog .list(filters) .then((result) => {}) .catch((error) => {}); ``` Response example from `ConnectyCube.chat.dialog.list(filters)` - [see](/server/chat#response) More filters available [here](/server/chat#retrieve-chat-dialogs) If you want to retrieve only dialogs updated after some specific date time, you can use `updated_at[gt]` filter. This is useful if you cache dialogs somehow and do not want to obtain the whole list of your dialogs on every app start. ## Update dialog [Section titled “Update dialog”](#update-dialog) User can update group chat name, photo or add/remove occupants: ```javascript const dialogId = "5356c64ab35c12bd3b108a41"; const toUpdateParams = { name: "Crossfit2" }; ConnectyCube.chat.dialog .update(dialogId, toUpdateParams) .then((dialog) => {}) .catch((error) => {}); ``` ## Add/Remove occupants [Section titled “Add/Remove occupants”](#addremove-occupants) To add more occupants use `push_all` operator. To remove yourself from the dialog use `pull_all` operator: ```javascript const dialogId = "5356c64ab35c12bd3b108a41"; const toUpdateParams = { push_all: { occupants_ids: [97, 789] } }; ConnectyCube.chat.dialog .update(dialogId, toUpdateParams) .then((dialog) => {}) .catch((error) => {}); ``` Response example from `ConnectyCube.chat.dialog.update(dialogId, toUpdateParams)` - [see](/server/chat#response-2) > **Note** > > Only group chat owner can remove other users from group chat. ## Remove dialog [Section titled “Remove dialog”](#remove-dialog) The following snippet is used to delete a dialog: ```javascript const dialogId = "5356c64ab35c12bd3b108a41"; // const dialogIds = ['5356c64ab35c12bd3b108a41', ..., '5356c64ab35c12bd3b108a84'] ConnectyCube.chat.dialog.delete(dialogId).catch((error) => {}); ``` This request will remove this dialog for current user, but other users still will be able to chat there. Only group chat owner can remove the group dialog for all users. You can also delete multiple dialogs in a single request. ## Subscribe to dialog [Section titled “Subscribe to dialog”](#subscribe-to-dialog) In order to be able to chat in public dialog, you need to subscribe to it: ```javascript const dialogId = "5356c64ab35c12bd3b108a41"; ConnectyCube.chat.dialog .subscribe(dialogId) .then((dialog) => {}) .catch((error) => {}); ``` It’s also possible to subscribe to group chat dialog. Response example from `ConnectyCube.chat.dialog.subscribe(dialogId)` - [see](/server/chat#response-5) ## Unsubscribe from dialog [Section titled “Unsubscribe from dialog”](#unsubscribe-from-dialog) ```javascript const dialogId = "5356c64ab35c12bd3b108a41"; ConnectyCube.chat.dialog.unsubscribe(dialogId).catch((error) => {}); ``` ## Retrieve public dialog occupants [Section titled “Retrieve public dialog occupants”](#retrieve-public-dialog-occupants) A public chat dialog can have many occupants. There is a separated API to retrieve a list of public dialog occupants: ```javascript const dialogId = "5356c64ab35c12bd3b108a41"; ConnectyCube.chat.dialog .getPublicOccupants(dialogId) .then((result) => { // result.items }) .catch((error) => {}); ``` Response example from `ConnectyCube.chat.dialog.getPublicOccupants(dialogId)`: ```json { "items": [ { "id": 51941, "full_name": "Dacia Kail", "email": "dacia_k@domain.com", "login": "Dacia", "phone": "+6110797757", "website": null, "created_at": "2018-12-06T09:16:26Z", "updated_at": "2018-12-06T09:16:26Z", "last_request_at": null, "external_user_id": 52691165, "facebook_id": "91234409", "twitter_id": "83510562734", "blob_id": null, "custom_data": null, "avatar": null, "user_tags": null }, { "id": 51946, "full_name": "Gabrielle Corcoran", "email": "gabrielle.corcoran@domain.com", "login": "gabby", "phone": "+6192622155", "website": "http://gabby.com", "created_at": "2018-12-06T09:29:57Z", "updated_at": "2018-12-06T09:29:57Z", "last_request_at": null, "external_user_id": null, "facebook_id": "95610574", "twitter_id": null, "blob_id": null, "custom_data": "Responsible for signing documents", "avatar": null, "user_tags": "vip,accountant" } ... ] } ``` ## Add / Remove admins [Section titled “Add / Remove admins”](#add--remove-admins) Options to add or remove admins from the dialog can be done by Super admin (dialog’s creator) only. Options are supported in group chat, public or broadcast. Up to 5 admins can be added to chat. ```javascript const dialogId = "5356c64ab35c12bd3b108a41"; const adminsUsersIds = [45, 89]; ConnectyCube.chat.dialog .addAdmins(dialogId, adminsUsersIds) .then((dialog) => {}) .catch((error) => {}); ``` ```javascript const dialogId = "5356c64ab35c12bd3b108a41"; const adminsUsersIds = [45, 89]; ConnectyCube.chat.dialog .removeAdmins(dialogId, adminsUsersIds) .then((dialog) => {}) .catch((error) => {}); ``` Response example from `ConnectyCube.chat.dialog.addAdmins(dialogId, adminsUsersIds)`/`ConnectyCube.chat.dialog.removeAdmins(dialogId, adminsUsersIds)` - [see](/server/chat#response-7) ## Update notifications settings [Section titled “Update notifications settings”](#update-notifications-settings) A user can turn on/off push notifications for offline messages in a dialog. By default push notification are turned ON, so offline user receives push notifications for new messages in a chat. ```javascript const dialogId = "5356c64ab35c12bd3b108a41"; const enabled = false; ConnectyCube.chat.dialog .updateNotificationsSettings(dialogId, enabled) .then((result) => {}) .catch((error) => {}); ``` Response example from `ConnectyCube.chat.dialog.updateNotificationsSettings(dialogId, enabled)` - [see](/server/chat#response-8) ## Get notifications settings [Section titled “Get notifications settings”](#get-notifications-settings) Check a status of notifications setting - either it is ON or OFF for a particular chat. Available responses: 1 - enabled, 0 - disabled. ```javascript const dialogId = "5356c64ab35c12bd3b108a41"; ConnectyCube.chat.dialog .getNotificationsSettings(dialogId) .then((result) => {}) .catch((error) => {}); ``` Response example from `ConnectyCube.chat.dialog.getNotificationsSettings(dialogId)` - [see](/server/chat#response-9) ## Chat history [Section titled “Chat history”](#chat-history) Every chat dialog stores its chat history which you can retrieve: ```javascript const dialogId = "5356c64ab35c12bd3b108a41"; const params = { chat_dialog_id: dialogId, sort_desc: "date_sent", limit: 100, skip: 0, }; ConnectyCube.chat.message .list(params) .then((messages) => {}) .catch((error) => {}); ``` Response example from `ConnectyCube.chat.message.list(params)` - [see](/server/chat#response-10) If you want to retrieve chat messages that were sent after or before specific date time only, you can use `date_sent[gt]` or `date_sent[lt]` filter. This is useful if you implement pagination for loading messages in your app. ## Send/Receive chat messages [Section titled “Send/Receive chat messages”](#sendreceive-chat-messages) ### 1-1 chat [Section titled “1-1 chat”](#1-1-chat) ```javascript const dialog = ...; const opponentId = 78; const message = { type: dialog.type === 3 ? 'chat' : 'groupchat', body: "How are you today?", extension: { save_to_history: 1, dialog_id: dialog._id } }; message.id = ConnectyCube.chat.send(opponentId, message); // ... ConnectyCube.chat.onMessageListener = onMessage; function onMessage(userId, message) { console.log('[ConnectyCube.chat.onMessageListener] callback:', userId, message) } ``` ### Group chat [Section titled “Group chat”](#group-chat) > The group chat join is not a required step anymore. You can send/receive chat messages in a group chat w/o joining it. Before you start chatting in a group dialog, you need to join it by calling `join` function: ```javascript const dialog = ...; ConnectyCube.chat.muc.join(dialog._id).catch(error => {}); ``` Then you are able to send/receive messages: ```javascript const message = { type: dialog.type === 3 ? "chat" : "groupchat", body: "How are you today?", extension: { save_to_history: 1, dialog_id: dialog._id, } }; message.id = ConnectyCube.chat.send(dialog._id, message); // ... ConnectyCube.chat.onMessageListener = onMessage; function onMessage(userId, message) { console.log("[ConnectyCube.chat.onMessageListener] callback:", userId, message); } ``` When it’s done you can leave the group dialog by calling `leave` function: ```javascript ConnectyCube.chat.muc.leave(dialog._id).catch((error) => {}); ``` ## Message metadata [Section titled “Message metadata”](#message-metadata) A chat message can have custom sub-fields to store additional information that can be linked to the particular chat message. When create a message, the custom data can be attached via `extension` field: ```javascript const message = { ... extension: { field_one: "value_one", field_two: "value_two" } }; ``` ## ‘Sent’ status [Section titled “‘Sent’ status”](#sent-status) There is a ‘sent’ status to ensure that message is delivered to the server. In order to use the feature you need to enable it when you pass config in `ConnectyCube.init`: ```javascript chat: { streamManagement: { enable: true; } } ``` The following callback is used to track it: ```javascript ConnectyCube.chat.onSentMessageCallback = function (messageLost, messageSent) {}; ``` ## ‘Delivered’ status [Section titled “‘Delivered’ status”](#delivered-status) The following callback is used to track the ‘delivered’ status: ```javascript ConnectyCube.chat.onDeliveredStatusListener = function (messageId, dialogId, userId) { console.log("[ConnectyCube.chat.onDeliveredStatusListener] callback:", messageId, dialogId, userId); }; ``` The SDK sends the ‘delivered’ status automatically when the message is received by the recipient. This is controlled by `markable: 1` parameter when you send a message. If `markable` is `0` or omitted, then you can send the delivered status manually: ```javascript const params = { messageId: "557f1f22bcf86cd784439022", userId: 21, dialogId: "5356c64ab35c12bd3b108a41", }; ConnectyCube.chat.sendDeliveredStatus(params); ``` ## ‘Read’ status [Section titled “‘Read’ status”](#read-status) Send the ‘read’ status: ```javascript const params = { messageId: "557f1f22bcf86cd784439022", userId: 21, dialogId: "5356c64ab35c12bd3b108a41", }; ConnectyCube.chat.sendReadStatus(params); // ... ConnectyCube.chat.onReadStatusListener = function (messageId, dialogId, userId) { console.log("[ConnectyCube.chat.onReadStatusListener] callback:", messageId, dialogId, userId); }; ``` ## ‘Is typing’ status [Section titled “‘Is typing’ status”](#is-typing-status) The following ‘typing’ notifications are supported: * typing: The user is composing a message. The user is actively interacting with a message input interface specific to this chat session (e.g., by typing in the input area of a chat window) * stopped: The user had been composing but now has stopped. The user has been composing but has not interacted with the message input interface for a short period of time (e.g., 30 seconds) Send the ‘is typing’ status: ```javascript const opponentId = 78; // for 1-1 chats // const dialogJid = ..; // for group chat ConnectyCube.chat.sendIsTypingStatus(opponentId); ConnectyCube.chat.sendIsStopTypingStatus(opponentId); // ... ConnectyCube.chat.onMessageTypingListener = function (isTyping, userId, dialogId) { console.log("[ConnectyCube.chat.onMessageTypingListener] callback:", isTyping, userId, dialogId); }; ``` ## Attachments (photo / video) [Section titled “Attachments (photo / video)”](#attachments-photo--video) Chat attachments are supported with the cloud storage API. In order to send a chat attachment you need to upload the file to ConnectyCube cloud storage and obtain a link to the file (file UID). Then you need to include this UID into chat message and send it. ```javascript // for example, a file from HTML form input field const inputFile = $("input[type=file]")[0].files[0]; const fileParams = { name: inputFile.name, file: inputFile, type: inputFile.type, size: inputFile.size, public: false, }; const prepareMessageWithAttachmentAndSend = (file) => { const message = { type: dialog.type === 3 ? "chat" : "groupchat", body: "attachment", extension: { save_to_history: 1, dialog_id: dialog._id, attachments: [{ uid: file.uid, id: file.id, type: "photo" }], }, }; // send the message message.id = ConnectyCube.chat.send(dialog._id, message); }; ConnectyCube.storage .createAndUpload(fileParams) .then(prepareMessageWithAttachmentAndSend) .catch((error) => {}); ``` Response example from `ConnectyCube.storage.createAndUpload(fileParams)`: ```json { "account_id": 7, "app_id": 12, "blob_object_access": { "blob_id": 421517, "expires": "2020-10-06T15:51:38Z", "id": 421517, "object_access_type": "Write", "params": "https://s3.amazonaws.com/cb-shared-s3?Content-Type=text%2Fplain..." }, "blob_status": null, "content_type": "text/plain", "created_at": "2020-10-06T14:51:38Z", "id": 421517, "name": "awesome.txt", "public": false, "set_completed_at": null, "size": 11, "uid": "7cafb6030d3e4348ba49cab24c0cf10800", "updated_at": "2020-10-06T14:51:38Z" } ``` If you are running **Node.js** environment, the following code snippet can be used to access a file: ```javascript const fs = require("fs"); const imagePath = __dirname + "/dog.jpg"; let fileParams; fs.stat(imagePath, (error, stats) => { fs.readFile(srcIMG, (error, data) => { if (error) { throw error; } else { fileParams = { file: data, name: "image.jpg", type: "image/jpeg", size: stats.size, }; // upload // ... } }); }); ``` The same flow is supported on the receiver’s side. When you receive a message, you need to get the file UID and then download the file from the cloud storage. ```javascript ConnectyCube.chat.onMessageListener = (userId, message) => { if (message.extension.hasOwnProperty("attachments")) { if (message.extension.attachments.length > 0) { const fileUID = message.extension.attachments[0].uid; const fileUrl = ConnectyCube.storage.privateUrl(fileUID); const imageHTML = ""; // insert the imageHTML as HTML template } } }; ``` In a case you want remove a shared attachment from server: ```javascript ConnectyCube.storage .delete(file.id) .then(() => {}) .catch((error) => {}); ``` ## Attachments (location) [Section titled “Attachments (location)”](#attachments-location) Sharing location attachments is nothing but sending 2 numbers: **latitude** and **longitude**. These values can be accessed using any JS library available in npm registry. ```javascript const latitude = "64.7964274"; const longitude = "-23.7391878"; const message = { type: dialog.type === 3 ? "chat" : "groupchat", body: "attachment", extension: { save_to_history: 1, dialog_id: dialog._id, attachments: [{ latitude, longitude, type: "place" }], }, }; // send the message message.id = ConnectyCube.chat.send(dialog._id, message); ``` On the receiver’s side the location attachment can be accessed the following way: ```javascript ConnectyCube.chat.onMessageListener = (userId, message) => { if (message.extension.hasOwnProperty("attachments")) { if (message.extension.attachments.length > 0) { const attachment = message.extension.attachments[0]; const latitude = attachment.latitude; const longitude = attachment.longitude; // and now display the map // ... } } }; ``` ## Edit message [Section titled “Edit message”](#edit-message) Use the following code snippet to edit a message (correct message body). Other user(s) will receive the ‘edit’ message info via callback: ```javascript ConnectyCube.chat.editMessage({ to: 123, // either a user id if this is 1-1 chat or a chat dialog id dialogId: "52e6a9c8a18f3a3ea6001f18", body: "corrected message body", originMessageId: "58e6a9c8a1834a3ea6001f15", // origin message id to edit last: false // pass 'true' if edit last (the newest) message in history }) ... ConnectyCube.chat.onMessageUpdateListener = (messageId, isLast, updatedBody, dialogId, userId) => { } ``` Also, you can update a message via HTTP API: ```javascript // const messageIds = ""; // to update all const messageIds = ["55fd42369575c12c2e234c64", "55fd42369575c12c2e234c68"].join(","); // or one - "55fd42369575c12c2e234c64" const params = { read: 1, // mark message as read delivered: 1, // mark message as delivered message: "corrected message body", // update message body chat_dialog_id: "5356c64ab35c12bd3b108a41", }; ConnectyCube.chat.message .update(messageIds, params) .then(() => {}) .catch((error) => {}); ``` ## Message reactions [Section titled “Message reactions”](#message-reactions) ### Add/Remove reactions [Section titled “Add/Remove reactions”](#addremove-reactions) User can add/remove message reactions and listen message reaction events Add ```javascript const messageId = '58e6a9c8a1834a3ea6001f15' const reaction = '🔥' ConnectyCube.chat.message.addReaction(messageId, reaction) .then(() => {}) .catch(err => {}) ``` Remove ```javascript const messageId = '58e6a9c8a1834a3ea6001f15' const reaction = '👎' ConnectyCube.chat.message.removeReaction(messageId, reaction) .then(() => {}) .catch(err => {}) ``` Add/Remove ```javascript const messageId = '58e6a9c8a1834a3ea6001f15' const reactionToAdd = '👎' const reactionToRemove = '🚀' ConnectyCube.chat.message.updateReaction(messageId, reactionToAdd, reactionToRemove) .then(() => {}) .catch(err => {}) ``` ### Listen reactions [Section titled “Listen reactions”](#listen-reactions) ```javascript ConnectyCube.chat.onMessageReactionsListener = (messageId, userId, dialogId, addReaction, removeReaction) => { } ``` ### List message reactions [Section titled “List message reactions”](#list-message-reactions) User can list message reactions ```javascript const messageId = '58e6a9c8a1834a3ea6001f15' ConnectyCube.chat.message.listReactions(messageId) .then(reactions => reactions) .catch(err => {}) ``` Response example from `ConnectyCube.chat.message.listReactions(messageId)` - [see](/server/chat#response-19) ## Delete messages [Section titled “Delete messages”](#delete-messages) Use the following code snippet to delete a message. Other user(s) will receive the ‘delete’ message info via callback: ```javascript ConnectyCube.chat.deleteMessage({ to: 123, // either a user id if this is 1-1 chat or a chat dialog id dialogId: "52e6a9c8a18f3a3ea6001f18", messageId: "58e6a9c8a1834a3ea6001f15" // message id to delete }) ... ConnectyCube.chat.onMessageDeleteListener = (messageId, dialogId, userId) => { } ``` If you want to delete a message for yourself only, use the following API: ```javascript const messageIds = ["55fd42369575c12c2e234c64", "55fd42369575c12c2e234c68"].join(","); const params = {}; ConnectyCube.chat.message .delete(messageIds, params) .then((result) => {}) .catch((error) => {}); ``` Response example from `ConnectyCube.chat.message.delete(messageIds)` - [see](/server/chat#response-14) This request will remove the messages from current user history only, without affecting the history of other users. ## Unread messages count [Section titled “Unread messages count”](#unread-messages-count) You can request total unread messages count and unread count for particular dialog: ```javascript const params = { dialogs_ids: ["5356c64ab35c12bd3b108a41"] }; ConnectyCube.chat.message .unreadCount(params) .then((result) => {}) .catch((error) => {}); ``` Response example from `ConnectyCube.chat.message.unreadCount(params)` - [see](/server/chat#response-11) ## Mark as read all chat messages [Section titled “Mark as read all chat messages”](#mark-as-read-all-chat-messages) The following snippet is used to mark all messages as read on a backend for dialog ID: ```javascript const messageIds = ""; // use "" to update all const params = { read: 1, chat_dialog_id: "5356c64ab35c12bd3b108a41", }; ConnectyCube.chat.message .update("", params) .then(() => {}) .catch((error) => {}); ``` ## Search [Section titled “Search”](#search) The following API is used to search for messages and chat dialogs: ```javascript const params = { /* ... */ }; ConnectyCube.chat .search(params) .then((result) => {}) .catch((error) => {}); ``` Response example from `ConnectyCube.chat.search(params)` - [see](/server/chat#response-15) Please refer to [Global search parameters](/server/chat#global-search) for more info on how to form search params. ## Chat alerts [Section titled “Chat alerts”](#chat-alerts) When you send a chat message and the recipient/recipients is offline, then automatic push notification will be fired. In order to receive push notifications you need to subscribe for it. Please refer to [Push Notifications](/cordova/push-notifications) guide. To configure push template which users receive - go to [Dashboard Console, Chat Alerts page](https://admin.connectycube.com/) Also, here is a way to avoid automatically sending push notifications to offline recipient/recipients. For it add the `silent` parameter with value `1` to the `extension` of the message. ```javascript const message = { ... extension: { ... silent: 1, }, }; ``` After sending such a message, the server won’t create the push notification for offline recipient/recipients. > **Note** > > Currently push notifications are supported on mobile environment only. ## Mark a client as Active/Inactive [Section titled “Mark a client as Active/Inactive”](#mark-a-client-as-activeinactive) When you send a chat message and the recipient/recipients is offline, then automatic push notification will be fired. Sometimes a client app can be in a background mode, but still online. In this case it’s useful to let server know that a user wants to receive push noificattions while still is connected to chat. For this particular case we have 2 handy methods: ‘markInactive’ and ‘markActive’: ```javascript ConnectyCube.chat.markInactive(); ``` ```javascript ConnectyCube.chat.markActive(); ``` The common use case for these APIs is to call ‘markInactive’ when an app goes to background mode and to call ‘markActive’ when an app goes to foreground mode. ## Get last activity [Section titled “Get last activity”](#get-last-activity) There is a way to get an info when a user was active last time, in seconds. This is a modern approach for messengers apps, e.g. to display this info on a Contacts screen or on a User Profile screen. ```javascript const userId = 123234; ConnectyCube.chat .getLastUserActivity(userId) .then((result) => { const userId = result.userId; const seconds = result.seconds; // 'userId' was 'seconds' ago }) .catch((error) => {}); ``` ## Last activity subscription [Section titled “Last activity subscription”](#last-activity-subscription) Listen to user last activity status via subscription. ```javascript ConnectyCube.chat.subscribeToUserLastActivityStatus(userId); ConnectyCube.chat.unsubscribeFromUserLastActivityStatus(userId); ConnectyCube.chat.onLastUserActivityListener = (userId, seconds) => {}; ``` ## System messages [Section titled “System messages”](#system-messages) In a case you want to send a non text message data, e.g. some meta data about chat, some events or so - there is a system notifications API to do so: ```javascript const userId = 123234; const msg = { body: "dialog/UPDATE_DIALOG", extension: { photo_uid: '7cafb6030d3e4348ba49cab24c0cf10800', name: 'Our photos', }, }; ConnectyCube.chat.sendSystemMessage(userId, msg); ConnectyCube.chat.onSystemMessageListener = function (msg) {}; ``` ## Moderation [Section titled “Moderation”](#moderation) The moderation capabilities help maintain a safe and respectful chat environment. We have options that allow users to report inappropriate content and manage their personal block lists, giving them more control over their experience. ### Report user [Section titled “Report user”](#report-user) For user reporting to work, it requires the following: 1. Go to [ConnectyCube Daashboard](https://admin.connectycube.com/) 2. select your Application 3. Navigate to **Custom** module via left sidebar 4. Create new table called **UserReports** with the following fields: * **reportedUserId** - integer * **reason** - string  Once the table is created, you can create a report with the following code snippet and then see all the reports in Dashboard: ```javascript const reportedUserId = 45 const reason = "User is spamming with bad words" await ConnectyCube.data.create('UserReports', { reportedUserId, reason }); ``` ### Report message [Section titled “Report message”](#report-message) For message reporting to work, the same approach to user reporting above could be used. You need to create new table called **MessageReports** with the following fields: * **reportedMessageId** - integer * **reason** - string Once the table is created, you can create a report with the following code snippet and then see all the reports in Dashboard: ```javascript const reportedMessageId = "58e6a9c8a1834a3ea6001f15" const reason = "The message contains phishing links" await ConnectyCube.data.create('MessageReports', { reportedMessageId, reason }); ``` ### Block user [Section titled “Block user”](#block-user) Block list (aka Privacy list) allows enabling or disabling communication with other users. You can create, modify, or delete privacy lists, define a default list. > The user can have multiple privacy lists, but only one can be active. #### Create privacy list [Section titled “Create privacy list”](#create-privacy-list) A privacy list must have at least one element in order to be created. You can choose a type of blocked logic. There are 2 types: * Block in one way. When you blocked a user, but you can send messages to him. * Block in two ways. When you blocked a user and you also can’t send messages to him. ```javascript const users = [ { user_id: 34, action: "deny" }, { user_id: 48, action: "deny", mutualBlock: true }, // it means you can't write to user { user_id: 18, action: "allow" }, ]; const list = { name: "myList", items: users }; ConnectyCube.chat.privacylist.create(list).catch((error) => {}); ``` > In order to be used the privacy list should be not only set, but also activated(set as default). #### Activate privacy list [Section titled “Activate privacy list”](#activate-privacy-list) In order to activate rules from a privacy list you should set it as default: ```javascript const listName = "myList"; ConnectyCube.chat.privacylist.setAsDefault(listName).catch((error) => {}); ``` #### Update privacy list [Section titled “Update privacy list”](#update-privacy-list) There is a rule you should follow to update a privacy list: * If you want to update or set new privacy list instead of current one, you should decline current default list first. ```javascript const listName = "myList"; const list = { name: listName, items: [{ user_id: 34, action: "allow" }], }; ConnectyCube.chat.privacylist .setAsDefault(null) .then(() => ConnectyCube.chat.privacylist.update(list)) .then(() => ConnectyCube.chat.privacylist.setAsDefault(listName)) .catch((error) => {}); ``` #### Retrieve privacy list names [Section titled “Retrieve privacy list names”](#retrieve-privacy-list-names) To get a list of all your privacy lists’ names use the following request: ```javascript let names; ConnectyCube.chat.privacylist .getNames() .then((response) => (names = response.names)) .catch((error) => {}); ``` Response example from `ConnectyCube.chat.privacylist.getNames()`: ```json { "active": null, "default": null, "names": ["myList", "blockedusers"] } ``` #### Retrieve privacy list with name [Section titled “Retrieve privacy list with name”](#retrieve-privacy-list-with-name) To get the privacy list by name you should use the following method: ```javascript const listName = "myList"; let name, items; ConnectyCube.chat.privacylist.getList(listName).then((response) => { name = response.name; items = response.items; }); ``` Response example from `ConnectyCube.chat.privacylist.getList(listName)`: ```json { "name": "myList", "items": [ { "user_id": 34, "action": "deny" }, { "user_id": 48, "action": "deny", "mutualBlock": true }, { "user_id": 18, "action": "allow" } ] } ``` #### Remove privacy list [Section titled “Remove privacy list”](#remove-privacy-list) To delete a list you can call a method below or you can edit a list and set items to `nil`. ```javascript const listName = "myList"; ConnectyCube.chat.privacylist.delete(listName).catch((error) => {}); ``` #### Blocked user attempts to communicate with user [Section titled “Blocked user attempts to communicate with user”](#blocked-user-attempts-to-communicate-with-user) Blocked users will be receiving an error when trying to chat with a user in a 1-1 chat and will be receiving nothing in a group chat: ```javascript ConnectyCube.chat.onMessageErrorListener = function (messageId, error) {}; ``` ## Ping server [Section titled “Ping server”](#ping-server) Sometimes, it can be cases where TCP connection to Chat server can go down without the application layer knowing about it. To check that chat connection is still alive or to keep it to be alive there is a ping method: ```javascript const PING_TIMEOUT = 3000; // default is 5000 ms ConnectyCube.chat.pingWithTimeout(PING_TIMEOUT) .then(() => { // Chat connection is alive }).catch((error) => { // No connection with chat server // Let's try to re-connect }) ``` ### Pause chat connection when ping fails [Section titled “Pause chat connection when ping fails”](#pause-chat-connection-when-ping-fails) Temporarily stop the chat connection if the server does not respond to the ping request. This allows the client to attempt automatic reconnection as soon as the chat connection becomes available again: ```javascript const PING_TIMEOUT = 1000; try { await ConnectyCube.chat.pingWithTimeout(PING_TIMEOUT) } catch (error) { ConnectyCube.chat.terminate() } ``` ### Handle application offline event with ping check [Section titled “Handle application offline event with ping check”](#handle-application-offline-event-with-ping-check) You can use the [cordova-plugin-network-information](https://cordova.apache.org/docs/en/latest/reference/cordova-plugin-network-information/index.html) plugin to detect network changes in a Cordova. Listen for the Cordova’s `offline` event and try to ping the chat server if the event fires: ```javascript const PING_TIMEOUT = 3000; window.addEventListener("offline", () => { try { await ConnectyCube.chat.pingWithTimeout(PING_TIMEOUT); } catch (error) { ConnectyCube.chat.terminate(); } }); ``` ### Maintain chat connection with periodic pings (VPN-friendly) [Section titled “Maintain chat connection with periodic pings (VPN-friendly)”](#maintain-chat-connection-with-periodic-pings-vpn-friendly) Regularly send pings to check if the chat connection is still alive. If a ping fails, send another ping after a short delay to handle cases where the first failure was temporary; terminate the connection if the second ping also fails: ```javascript const PING_INTERVAL = 40000; const PING_TIMEOUT = 1000; const PING_DELAY = 3000; let pingInterval = null; const startPingWithInterval = () => { pingInterval = setInterval(async () => { try { await ConnectyCube.chat.pingWithTimeout(PING_TIMEOUT); } catch (error) { setTimeout(async () => { try { await ConnectyCube.chat.pingWithTimeout(PING_TIMEOUT); } catch (error) { ConnectyCube.chat.terminate(); } }, PING_DELAY); } }, PING_INTERVAL); } const stopPingWithInterval = () => { if (pingInterval) { clearInterval(pingInterval); pingInterval = null; } } ```
# Video Calling
> Empower your Cordova applications with our Video Calling P2P API. Enable secure and immersive peer-to-peer video calls for enhanced user experience
ConnectyCube **Video Calling P2P API** is built on top of [WebRTC](https://webrtc.org/) protocol and based on top of [WebRTC Mesh](https://webrtcglossary.com/mesh/) architecture. Max people per P2P call is 4. > To get a difference between **P2P calling** and **Conference calling** please read our [ConnectyCube Calling API comparison](https://connectycube.com/2020/04/15/connectycube-calling-api-comparison/) blog page. ## Preparations [Section titled “Preparations”](#preparations) [ConnectyCube Chat API](/cordova/messaging) is used as a signaling transport for Video Calling API, so in order to start using Video Calling API you need to [connect user to Chat](/cordova/messaging#connect-to-chat). ### Connect WebRTC lib [Section titled “Connect WebRTC lib”](#connect-webrtc-lib) For Android - there is nothing extra required. Android Cordova WebView supports all the WebRTC API stack. For iOS - a [cordova-plugin-iosrtc](https://github.com/cordova-rtc/cordova-plugin-iosrtc) has to be used. ## Create video session [Section titled “Create video session”](#create-video-session) In order to use Video Calling API you need to create a call session object - choose your opponents with whom you will have a call and a type of session (VIDEO or AUDIO): ```javascript const calleesIds = [56, 76, 34]; // User's ids const sessionType = ConnectyCube.videochat.CallType.VIDEO; // AUDIO is also possible const additionalOptions = {}; const session = ConnectyCube.videochat.createNewSession(calleesIds, sessionType, additionalOptions); ``` > **Note**: In a case of low bandwidth network, you can try to limit the call bandwidth cap to get better quality vs stability results. It can be done by passing `const additionalOptions = {bandwidth: 256};` or 128 value. ## Access local media stream [Section titled “Access local media stream”](#access-local-media-stream) In order to have a video chat session you need to get an access to the user’s devices (webcam / microphone): ```javascript const mediaParams = { audio: true, video: true }; session .getUserMedia(mediaParams) .then((localStream) => {}) .catch((error) => {}); ``` This method lets the browser ask the user for permission to use devices. You should allow this dialog to access the stream. Otherwise, the browser can’t obtain access and will throw an error for `getUserMedia` callback function. For more information about possible audio/video constraints, here is a good code sample from WebRTC team how to work with getUserMedia constraints: ## Call quality [Section titled “Call quality”](#call-quality) **Limit bandwidth** Despite WebRTC engine uses automatic quality adjustement based on available Internet bandwidth, sometimes it’s better to set the max available bandwidth cap which will result in a better and smoother user experience. For example, if you know you have a bad internet connection, you can limit the max available bandwidth to e.g. 256 Kbit/s. This can be done either when initiate a call (see below ‘Initiate a call’ API documentation): ```javascript session.call({maxBandwidth: 256}); // default is 0 - unlimited ``` which will result in limiting the max vailable bandwidth for ALL participants or/and during a call: ```javascript session.setMaxBandwidth(512); // set 0 to remove the limit ``` which will result in limiting the max available bandwidth for current user only. ## Attach local media stream [Section titled “Attach local media stream”](#attach-local-media-stream) Then you should attach your local media stream to HTML video element. For **Web-like environments**, including Cordova - use the following method: ```javascript session.attachMediaStream("myVideoElementId", localStream, { muted: true, mirror: true, }); ``` ## Initiate a call [Section titled “Initiate a call”](#initiate-a-call) ```javascript const extension = {}; session.call(extension, (error) => {}); ``` The extension is used to pass any extra parameters in the request to your opponents. After this, your opponents will receive a callback call: ```javascript ConnectyCube.videochat.onCallListener = function (session, extension) {}; ``` Or if your opponents are offline or did not answer the call request: ```javascript ConnectyCube.videochat.onUserNotAnswerListener = function (session, userId) {}; ``` ## Accept a call [Section titled “Accept a call”](#accept-a-call) To accept a call the following code snippet is used: ```javascript ConnectyCube.videochat.onCallListener = function (session, extension) { // Here we need to show a dialog with 2 buttons - Accept & Reject. // By accepting -> run the following code: // // 1. await session.getUserMedia (...) // // 2. Accept call request: const extension = {}; session.accept(extension); }; ``` After this, you will get a confirmation in the following callback: ```javascript ConnectyCube.videochat.onAcceptCallListener = function (session, userId, extension) {}; ``` Also, both the caller and opponents will get a special callback with the remote stream: ```javascript ConnectyCube.videochat.onRemoteStreamListener = function (session, userID, remoteStream) { // attach the remote stream to DOM element session.attachMediaStream("remoteOpponentVideoElementId", remoteStream); }; ``` From this point, you and your opponents should start seeing each other. ## Receive a call in background [Section titled “Receive a call in background”](#receive-a-call-in-background) For mobile apps, it can be a situation when an opponent’s user app is either in closed (killed) or background (inactive) state. In this case, to be able to still receive a call request, you can use Push Notifications. The flow should be as follows: * a call initiator should send a push notification along with a call request * when an opponent’s app is killed or in background state - an opponent will receive a push notification about an incoming call, and will be able to accept/reject the call. If accepted or pressed on a push notification - an app will be opened, a user should auto login and connect to chat and then will be able to join an incoming call. Please refer to Push Notifications API guides regarding how to integrate Push Notifications in your app: * [Push Notifications API guide: Cordova](/cordova/push-notifications) For even better integration - CallKit and VoIP push notifications can be used. Please check `CallKit and VoIP push notifications` section on each platform Push Notifications API guide page. ## Reject a call [Section titled “Reject a call”](#reject-a-call) ```javascript const extension = {}; session.reject(extension); ``` After this, the caller will get a confirmation in the following callback: ```javascript ConnectyCube.videochat.onRejectCallListener = function (session, userId, extension) {}; ``` Sometimes, it could a situation when you received a call request and want to reject, but the call sesison object has not arrived yet. It could be in a case when you integrated CallKit to receive call requests while an app is in background/killed state. To do a reject in this case, the following snippet can be used: ```javascript const params = { sessionID: callId, recipientId: callInitiatorID, platform: 'android' }; await ConnectyCube.videochat.callRejectRequest(params); ``` ## End a call [Section titled “End a call”](#end-a-call) ```javascript const extension = {}; session.stop(extension); ``` After this, the opponents will get a confirmation in the following callback: ```javascript ConnectyCube.videochat.onStopCallListener = function (session, userId, extension) {}; ``` ## Mute audio [Section titled “Mute audio”](#mute-audio) ```javascript session.mute("audio"); session.unmute("audio"); ``` ## Mute video [Section titled “Mute video”](#mute-video) ```javascript session.mute("video"); session.unmute("video"); ``` ## Switch video cameras [Section titled “Switch video cameras”](#switch-video-cameras) First of all you need to obtain all your device’s available cameras: ```javascript let deviceInfo, deviceId, deviceLabel; ConnectyCube.videochat .getMediaDevices("videoinput") .then((devices) => { if (devices.length) { // here is a list of all available cameras for (let i = 0; i !== devices.length; ++i) { deviceInfo = devices[i]; deviceId = deviceInfo.deviceId; deviceLabel = deviceInfo.label; } } }) .catch((error) => {}); ``` Then you can choose some `deviceId` and switch the video stream to exact this device: ```javascript const constraints = { video: deviceId }; session .switchMediaTracks(constraints) .then((stream) => {}) .catch((error) => {}); ``` ## Switch audio output [Section titled “Switch audio output”](#switch-audio-output) For switching audio - use the same above flow for switching camera. Just replace a `videoinput` to `audioinput` in `getMediaDevices` and `video` to `audio` in `constraints`. ## Screen Sharing [Section titled “Screen Sharing”](#screen-sharing) Not available as for now. ## Group video calls [Section titled “Group video calls”](#group-video-calls) Because of [Mesh architecture](https://webrtcglossary.com/mesh/) we use for multipoint where every participant sends and receives its media to all other participants, current solution supports group calls with up to 4 people. Also ConnectyCube provides an alternative solution for up to 12 people - [Multiparty Video Conferencing API](/cordova/videocalling-conference). ## Monitor connection state [Section titled “Monitor connection state”](#monitor-connection-state) There is a callback function to track the session connection state: ```javascript ConnectyCube.videochat.onSessionConnectionStateChangedListener = ( session, userID, connectionState ) => { }; ``` The possible values of connectionState are those of an enum of type `ConnectyCube.videochat.SessionConnectionState`: * ConnectyCube.videochat.SessionConnectionState.UNDEFINED * ConnectyCube.videochat.SessionConnectionState.CONNECTING * ConnectyCube.videochat.SessionConnectionState.CONNECTED * ConnectyCube.videochat.SessionConnectionState.DISCONNECTED * ConnectyCube.videochat.SessionConnectionState.FAILED * ConnectyCube.videochat.SessionConnectionState.CLOSED * ConnectyCube.videochat.SessionConnectionState.COMPLETED ## Tackling Network changes [Section titled “Tackling Network changes”](#tackling-network-changes) If a user’s network environment changes (e.g., switching from Wi-Fi to mobile data), the existing call connection might no longer be valid. Normally, in a case of short network interruptions, the ConnectyCube SDK will automatically restore the call so you can see via `onSessionConnectionStateChangedListener` callback with `connectionState` changing to `DISCONNECTED` and then again to `CONNECTED`. But not all cases are the same, and in some of them the connection needs to be **manually** refreshed due to various issues like NAT or firewall behavior changes or even longer network environment changes, e.g. when a user is offline for more than 30 seconds. This is where ICE restart helps to re-establish the connection to find a new network path for communication. The correct and recommended way for an application to handle all such ‘bad’ cases is to trigger an ICE restart when the connection state goes to either `FAILED` or `DISCONNECTED` for an extended period of time (e.g. > 30 seconds). Following is the preliminary code snippet regarding how to work with ICE restart: * Firstly, we have to disable the call termination logic after the network is disconnected for > 30 seconds by increasing the `videochat.disconnectTimeInterval` value to e.g. 5 mins. ```plaintext const appConfig = { videochat: { disconnectTimeInterval: 300, } }; ConnectyCube.init(credentials, appConfig); ``` * Secondly, define a variable which can track the Internet connection state: ```plaintext let isOnline = window.navigator.onLine; window.onoffline = () => { isOnline = false; }; window.ononline = () => { isOnline = true; }; ``` * Thirdly, define a function that will perform ICE restart: ```plaintext async maybeDoIceRestart(session, userID) { try { // firstly let's check if we are still connected to chat await ConnectyCube.chat.pingWithTimeout(); // do ICE restart if (session.canInitiateIceRestart(userID)) { session.iceRestart(userID); } } catch (error) { console.error(error.message); // chat ping request has timed out, // so need to reconnect to Chat await ConnectyCube.chat.disconnect(); await ConnectyCube.chat.connect({ userId: currentUser.id, password: currentUser.password, }) // do ICE restart if (session.canInitiateIceRestart(userID)) { session.iceRestart(userID); } } } ``` * Fourthly, define a `ConnectyCube.videochat.onSessionConnectionStateChangedListener` callback and try to perform ICE restart if not automatic call restoration happened after 30 seconds: ```plaintext iceRestartTimeout = null; needIceRestartForUsersIds = []; ConnectyCube.videochat.onSessionConnectionStateChangedListener = ( session, userID, connectionState ) => { console.log( "[onSessionConnectionStateChangedListener]", userID, connectionState ); const { DISCONNECTED, FAILED, CONNECTED, CLOSED } = ConnectyCube.videochat.SessionConnectionState; if (connectionState === DISCONNECTED || connectionState === FAILED) { iceRestartTimeout = setTimeout(() => { // Connection not restored within 30 seconds, trying ICE restart... if (isOnline) { maybeDoIceRestart(session, userID); } else { // Skip ICE restart, no Internet connection this.needIceRestartForUsersIds.push(userID); } }, 30000); } else if (connectionState === CONNECTED) { clearTimeout(iceRestartTimeout); iceRestartTimeout = null; needIceRestartForUsersIds = []; } else if (connectionState === CLOSED) { needIceRestartForUsersIds = []; } }; ``` * Finally, in a case a user got working Internet connection later, do ICE restart there: ```plaintext window.ononline = () => { if (!isOnline) { if (session && needIceRestartForUsersIds.length > 0) { for (let userID of needIceRestartForUsersIds) { maybeDoIceRestart(session, userID); } } } isOnline = true; }; ``` After these changes the call connection should be restored to working state again. ## Configuration [Section titled “Configuration”](#configuration) There are various calling related configs that can be changed. ### alwaysRelayCalls [Section titled “alwaysRelayCalls”](#alwaysrelaycalls) The `alwaysRelayCalls` config sets the WebRTC `RTCConfiguration.iceTransportPolicy` [config](/js/#default-configuration). Setting it to `true` means the calling media will be routed through TURN server all the time, and not directly P2P between users even if the network path allows it: ```javascript const appConfig = { videochat: { alwaysRelayCalls: true, }, }; ``` ## Recording [Section titled “Recording”](#recording) > **Note**: The recording feature may work at Android environment only as for now. For the recording feature implementation you can use [MediaStream Recording API](https://developer.mozilla.org/en-US/docs/Web/API/MediaStream_Recording_API) The recorder accepts a media stream and record it to file. Both local and remote streams can be recorded and saved to file. There is also a good article about client-side recording implementation ## Continue calling in background [Section titled “Continue calling in background”](#continue-calling-in-background) If you are developing dedicated apps for iOS and Android - it’s required to apply additional configure for the app to continue playing calling audio when it goes into the background. On iOS: there is no way to continue a video call in background because of some OS restrictions. What is supported there is to continue with voice calling while an app is in background. Basically, the recommended to achieve this is to switch off device camera when an app goes to background and then switch camera on back when an app goes to foreground. Furthermore, even voice background call are blocked by default on iOS. To unblock - you need to setup proper background mode capabilities in your project. Please find the [Enabling Background Audio link](https://developer.apple.com/documentation/avfoundation/media_playback_and_selection/creating_a_basic_video_player_ios_and_tvos/enabling_background_audio) with more information how to do it properly. Generally speaking, you need to enable `Voice over IP` and `Remote notifications` capabilities:  For Android, we also recommend to implement the same camera switch flow when go to background and then return to foreground.
# Video Conferencing
> Discover the simplicity of integrating conference video calling into your Cordova app with our easy-to-use API. Empower users to connect from anywhere.
ConnectyCube **Multiparty Video Conferencing API** is built on top of [WebRTC](https://webrtc.org/) protocol and based on top of [WebRTC SFU](https://webrtcglossary.com/sfu/) architecture. Max people per Conference call is 12. Video Conferencing is available starting from [Advanced plan](https://connectycube.com/pricing/). > To get a difference between **P2P calling** and **Conference calling** please read our [ConnectyCube Calling API comparison](https://connectycube.com/2020/04/15/connectycube-calling-api-comparison/) blog page. ## Features supported [Section titled “Features supported”](#features-supported) * Video/Audio Conference with up to 12 people * Join-Rejoin video room functionality (like Skype) * Guest rooms * Mute/Unmute audio/video streams * Display bitrate * Switch video input device (camera) * Switch audio input device (microphone) ## Preparations [Section titled “Preparations”](#preparations) ### Connect adapter.js [Section titled “Connect adapter.js”](#connect-adapterjs) Make sure you connected the latest version of [adapter.js](https://github.com/webrtc/adapter/tree/master/release) Note If you use Chrome browser and emulate iOS device - you may get “The adapter.js addTrack polyfill only supports a single stream which is associated with the specified track” error. That’s a known issue with adapter.js where it wrongly parses the user agent. Either use real iOS device or Safari browser to test iOS behaviour. ### Connect WebRTC lib [Section titled “Connect WebRTC lib”](#connect-webrtc-lib) For Android - there is nothing extra required. Android Cordova WebView supports all the WebRTC API stack. For iOS - a [cordova-plugin-iosrtc](https://github.com/cordova-rtc/cordova-plugin-iosrtc) has to be used. ### Set up config [Section titled “Set up config”](#set-up-config) In order to start working with Multiparty Video Conferencing API you need to initialize a client: ```javascript const credentials = { appId: ..., authKey: "...", } const MULTIPARTY_SERVER_ENDPOINT = 'wss://...:8989'; const appConfig = { debug: { mode: 1 }, conference: { server: MULTIPARTY_SERVER_ENDPOINT }, } ConnectyCube.init(credentials, appConfig) ``` > Default multiparty server endpoint is wss\://janus.connectycube.com:8989 ([see](/js/#default-configuration)). ## Create meeting [Section titled “Create meeting”](#create-meeting) In order to have a conference call, a meeting object has to be created. ```javascript const params = { name: "My meeting", start_date: timestamp, end_date: timestamp attendees: [ {id: 123, email: "..."}, {id: 124, email: "..."} ], record: false, chat: false }; ConnectyCube.meeting.create(params) .then(meeting => { const confRoomId = meeting._id; }) .catch(error => { }); ``` * As for `attendees` - either ConnectyCube users ids or external emails can be provided. * If you want to schedule a meeting - pass `start_date` and `end_date`. * Pass `chat: true` if you want to have a chat connected to meeting. * Pass `record: true` if you want to have a meeting call recorded. Read more about Recording feature Once meeting is created, you can use `meeting._id` as a conf room identifier in the below requests when join a call. ## Create call session [Section titled “Create call session”](#create-call-session) Once a meeting is created/retrieved, you can create a conf call session: ```javascript const session = ConnectyCube.videochatconference.createNewSession(); ``` Once a session is created, you can interact with a Video Conferencing API. ## Access local media stream [Section titled “Access local media stream”](#access-local-media-stream) In order to have a video chat session you need to get an access to the user’s devices (webcam / microphone): ```javascript const mediaParams = { audio: true, video: true, }; session .getUserMedia(mediaParams) .then((localStream) => {}) .catch((error) => {}); ``` This method lets the browser ask the user for permission to use devices. You should allow this dialog to access the stream. Otherwise, the browser can’t obtain access and will throw an error for `getUserMedia` callback function. For more information about possible audio/video constraints, here is a good code sample from WebRTC team how to work with getUserMedia constraints: ## Attach local media stream [Section titled “Attach local media stream”](#attach-local-media-stream) Then you should attach your local media stream to HTML video element. For **Web-like environments**, including Cordova - use the following method: ```javascript session.attachMediaStream("myVideoElementId", localStream, { muted: true, mirror: true, }); ``` ## Join room [Section titled “Join room”](#join-room) To jump into video chat with users you should join it: ```javascript session .join(roomId, userId, userDisplayName) .then(() => {}) .catch((error) => {}); ``` To check current joined video room use the following property: ```javascript const roomId = session.currentRoomId; ``` ## Join as listener [Section titled “Join as listener”](#join-as-listener) It can be a requirement where it needs to join a room as listener only, w/o publishing own media stream. It can be useful for a case with a teacher and many students where normally students join a call as listeners and only a teacher publishes own media stream: ```javascript session .joinAsListener(confRoomId, userId, userDisplayName) .then(() => {}) .catch((error) => {}); ``` ## List online participants [Section titled “List online participants”](#list-online-participants) To list online users in a room: ```javascript session .listOfOnlineParticipants() .then((participants) => {}) .catch((error) => {}); ``` ## Events [Section titled “Events”](#events) There are 6 events you can listen for: ```javascript ConnectyCube.videochatconference.onParticipantJoinedListener = ( session, userId, userDisplayName, isExistingParticipant ) => {}; ConnectyCube.videochatconference.onParticipantLeftListener = (session, userId) => {}; ConnectyCube.videochatconference.onRemoteStreamListener = (session, userId, stream) => {}; ConnectyCube.videochatconference.onSlowLinkListener = (session, userId, uplink, nacks) => {}; ConnectyCube.videochatconference.onRemoteConnectionStateChangedListener = (session, userId, iceState) => {}; ConnectyCube.videochatconference.onSessionConnectionStateChangedListener = (session, iceState) => {}; ``` ## Mute/Unmute audio [Section titled “Mute/Unmute audio”](#muteunmute-audio) You can mute/unmute your own audio: ```javascript // mute session.muteAudio(); // unmute session.unmuteAudio(); //check mute state session.isAudioMuted(); // true/false ``` ## Mute/Unmute video [Section titled “Mute/Unmute video”](#muteunmute-video) You can mute/unmute your own video: ```javascript // mute session.muteVideo(); // unmute session.unmuteVideo(); //check mute state session.isVideoMuted(); // true/false ``` ## List of devices [Section titled “List of devices”](#list-of-devices) ```javascript // get all devices ConnectyCube.videochatconference .getMediaDevices() .then((allDevices) => {}) .catch((error) => {}); // only video devices ConnectyCube.videochatconference .getMediaDevices(ConnectyCube.videochatconference.DEVICE_INPUT_TYPES.VIDEO) .then((videoDevices) => {}) .catch((error) => {}); // only audio devices ConnectyCube.videochatconference .getMediaDevices(ConnectyCube.videochatconference.DEVICE_INPUT_TYPES.AUDIO) .then((audioDevices) => {}) .catch((error) => {}); ``` ## Switch video(camera)/audio(microphone) input device [Section titled “Switch video(camera)/audio(microphone) input device”](#switch-videocameraaudiomicrophone-input-device) ```javascript const deviceId = "..."; // switch video session .switchMediaTracks({ video: deviceId }) .then((updatedLocaStream) => {}) // you can reattach local stream .catch((error) => {}); // switch audio session .switchMediaTracks({ audio: deviceId }) .then((updatedLocaStream) => {}) // you can reattach local stream .catch((error) => {}); ``` ## Screen Sharing [Section titled “Screen Sharing”](#screen-sharing) Not available as for now ## Get remote user bitrate [Section titled “Get remote user bitrate”](#get-remote-user-bitrate) ```javascript const bitrate = session.getRemoteUserBitrate(userId); ``` ## Get remote user mic level [Section titled “Get remote user mic level”](#get-remote-user-mic-level) ```javascript const micLevel = session.getRemoteUserVolume(userId); ``` ## Leave room and destroy conf session [Section titled “Leave room and destroy conf session”](#leave-room-and-destroy-conf-session) To leave current joined video room: ```javascript session .leave() .then(() => {}) .catch((error) => {}); ``` ## Retrieve meetings [Section titled “Retrieve meetings”](#retrieve-meetings) Retrieve a meeting by id: ```javascript const params = { _id: meetingId, }; ConnectyCube.meeting .get(params) .then((meeting) => {}) .catch((error) => {}); ``` Retrieve a list of meetings: ```javascript const params = { limit: 5, offset: 0 }; ConnectyCube.meeting .get(params) .then((meetings) => {}) .catch((error) => {}); ``` ## Edit meeting [Section titled “Edit meeting”](#edit-meeting) A meeting creator can edit a meeting: ```javascript const params = { name, start_date, end_date }; ConnectyCube.meeting .update(meetingId, params) .then((meeting) => {}) .catch((error) => {}); ``` ## Delete meeting [Section titled “Delete meeting”](#delete-meeting) A meeting creator can delete a meeting: ```javascript ConnectyCube.meeting .delete(meetingId) .then(() => {}) .catch((error) => {}); ``` ## Recording [Section titled “Recording”](#recording) Server-side recording is available. Read more about Recording feature ### Retrieve recordings with download url [Section titled “Retrieve recordings with download url”](#retrieve-recordings-with-download-url) ```javascript ConnectyCube.meeting .getRecordings(meetingId) .then(() => {}) .catch((error) => {}); ``` ## Continue calling in background [Section titled “Continue calling in background”](#continue-calling-in-background) If you are developing dedicated apps for iOS and Android - it’s required to apply additional configure for the app to continue playing calling audio when it goes into the background. On iOS: there is no way to continue a video call in background because of some OS restrictions. What is supported there is to continue with voice calling while an app is in background. Basically, the recommended to achieve this is to switch off device camera when an app goes to background and then switch camera on back when an app goes to foreground. Furthermore, even voice background call are blocked by default on iOS. To unblock - you need to setup proper background mode capabilities in your project. Please find the [Enabling Background Audio link](https://developer.apple.com/documentation/avfoundation/media_playback_and_selection/creating_a_basic_video_player_ios_and_tvos/enabling_background_audio) with more information how to do it properly. Generally speaking, you need to enable `Voice over IP` and `Remote notifications` capabilities:  For Android, we also recommend to implement the same camera switch flow when go to background and then return to foreground.
# Address Book
> Effortlessly upload, sync, and access ConnectyCube users from your phone contacts in your Cordova app with Address Book API.
Address Book API provides an interface to work with phone address book, upload it to server and retrieve already registered ConnectyCube users from your address book. With conjunction of [User authentication via phone number](/cordova/authentication-and-users#authentication-via-phone-number) you can easily organise a state of the art logic in your App where you can easily start chatting with your phone contacts, without adding them manually as friends - the same what you can see in WhatsApp, Telegram, Facebook Messenger and Viber. ## Upload Address Book [Section titled “Upload Address Book”](#upload-address-book) First of all you need to upload your Address Book to the backend. It’s a normal practice to do a full upload for the 1st time and then upload diffs on future app logins. ```javascript const CONTACTS = [ { name: "Gordie Kann", phone: "1879108395", }, { name: "Wildon Gilleon", phone: "2759108396", }, { name: "Gaston Center", phone: "3759108396", }, ]; const options = {}; // const options = {'force': 1, 'udid': 'XXX'}; ConnectyCube.addressbook .uploadAddressBook(CONTACTS, options) .then(() => {}) .catch((error) => {}); ``` Response example from `ConnectyCube.addressbook.uploadAddressBook(params)` - [see](/server/address_book#response) * You also can edit an existing contact by providing a new name for it. * You also can upload more contacts, not just all in one request - they will be added to your address book on the backend. If you want to override the whole address book on the backend - just provide `force: 1` option. * You also can remove a contact by setting `contact.destroy = 1;` * A device UDID is used in cases where user has 2 or more devices and contacts sync is off. Otherwise - user has a single global address book. ## Retrieve Address Book [Section titled “Retrieve Address Book”](#retrieve-address-book) If you want you can retrieve your uploaded address book: ```javascript ConnectyCube.addressbook .get() .then((result) => {}) .catch((error) => {}); ``` or with UDID: ```javascript const UDID = "XXX"; ConnectyCube.addressbook .get(UDID) .then((result) => {}) .catch((error) => {}); ``` Response example from `ConnectyCube.addressbook.get()` - [see](/server/address_book#response-1) ## Retrieve Registered Users [Section titled “Retrieve Registered Users”](#retrieve-registered-users) Using this request you can easily retrieve the ConnectyCube users - you phone Address Book contacts that already registered in your app, so you can start communicate with these users right away: ```javascript ConnectyCube.addressbook .getRegisteredUsers() .then((result) => {}) .catch((error) => {}); ``` Response example from `ConnectyCube.addressbook.getRegisteredUsers()` - [see](/server/address_book#response-2) If isCompact = true - server will return only id and phone fields of User. Otherwise - all User’s fields will be returned. ## Push notification on new contact joined [Section titled “Push notification on new contact joined”](#push-notification-on-new-contact-joined) There is a way to get a push notification when some contact from your Address Book registered in an app. You can enable this feature at [ConnectyCube Dashboard](https://admin.connectycube.com), Users module, Settings tab: 
# Authentication and Users
> Simplify user authentication in your Cordova app with our definitive API guide. Fortify your app's defenses and protect user data effectively.
Every user has to authenticate with ConnectyCube before using any ConnectyCube functionality. When someone connects with an application using ConnectyCube, the application will need to obtain a session token which provides temporary, secure access to ConnectyCube APIs. A session token is an opaque string that identifies a user and an application. ## Create session token [Section titled “Create session token”](#create-session-token) As a starting point, the user’s session token needs to be created allowing user any further actions within the app. Pass login/email and password to identify a user: ```javascript const userCredentials = { login: "cubeuser", password: "awesomepwd" }; ConnectyCube.createSession(userCredentials) .then((session) => {}) .catch((error) => {}); ``` **Note:** With the request above, **the user is created automatically on the fly upon session creation** using the login (or email) and password from the request parameters. **Important:** For better security it is recommended to deny the session creation without an existing user.\ For this, set ‘Session creation without an existing user entity’ to **Deny** under the **Application -> Overview -> Permissions** in the [admin panel](https://admin.connectycube.com/apps). ### Authentication via phone number [Section titled “Authentication via phone number”](#authentication-via-phone-number) Sign In with phone number is supported with ([Firebase integration](https://firebase.google.com/docs/auth/web/phone-auth)). You need to create Firebase `project_id` and obtain Firebase `access_token` after SMS code verification, then pass these parameters to `login` method: ```javascript const userCredentials = { provider: "firebase_phone", "firebase_phone[project_id]": "...", "firebase_phone[access_token]": "...", }; ConnectyCube.createSession(userCredentials) .then((user) => {}) .catch((error) => {}); ``` > **Note** > > in order to login via phone number you need to create a session token first. ### Authentication via Firebase email [Section titled “Authentication via Firebase email”](#authentication-via-firebase-email) Sign In with email is supported with ([Firebase integration](https://firebase.google.com/docs/auth/web/password-auth)). You need to create Firebase `project_id` and obtain Firebase `access_token` after email/password verification, then pass these parameters to `login` method: ```javascript const userCredentials = { provider: 'firebase_email', firebase_email: { project_id: 'XXXXXXXXXXX', access_token: 'XXXXXXXXXXXYYYYYY' } }; ConnectyCube.createSession(userCredentials) .then((user) => {}) .catch((error) => {}); ``` > **Note** > > in order to login via email you need to create a session token first. ### Authentication via external identity provider [Section titled “Authentication via external identity provider”](#authentication-via-external-identity-provider) **Custom Identity Provider (CIdP)** feature is necessary if you have your own user database and want to authenticate users in ConnectyCube against it. It works the same way as Facebook/Twitter SSO. With Custom Identity Provider feature you can continue use your user database instead of storing/copying user data to ConnectyCube database. #### CIdP high level integration flow [Section titled “CIdP high level integration flow”](#cidp-high-level-integration-flow) To get started with **CIdP** integration, check the [Custom Identity Provider guide](/guides/custom-identity-provider) which describes high level integration flow. #### How to login via CIdP [Section titled “How to login via CIdP”](#how-to-login-via-cidp) Once you done with the setup mapping in ConnectyCube Dashboard, it’s time to verify the integration. To perform CIdP login, the same ConnectyCube [User Login API](/cordova/authentication-and-users/#upgrade-session-token-user-login) is used. You just use existing login request params to pass your external user token: ```javascript const userCredentials = { login: "eyJhbGciOiJIUzI1NiIsInR5cCI6IkpXVCJ9.eyJpZCI6MTIzNDU2Nzg5LCJuYW1lIjoiSm9zZXBoIn0.OpOSSw7e485LOP5PrzScxHb7SR6sAOMRckfFwi4rp7o" }; ConnectyCube.createSession(userCredentials) .then((user) => {}) .catch((error) => {}); ``` Once the login is successful, ConnectyCube will create an underalying User entity, so then you can use ConnectyCube APIs in a same way as you do with a normal login. With CIdP we do not have/store any user password in ConnectyCube User entity. Following further integration, you may need to connect to Chat. In a case of CIdP login, you do not have a user password. In such cases you should use ConnectyCube session token as a password for chat connection. [Follow the Connect to Chat with CIdP guide](/cordova/messaging/#connect-to-chat-using-custom-authentication-providers). ### Create guest session [Section titled “Create guest session”](#create-guest-session) To create a session with guest user use the following code: ```javascript const guestUserCredentials = { guest: '1', full_name: 'Awesome Smith' }; ConnectyCube.createSession(guestUserCredentials) .then((session) => {}) .catch((error) => {}); ``` ## Session expiration [Section titled “Session expiration”](#session-expiration) Expiration time for session token is 2 hours after last request to API. If you perform query with expired token, you will receive the error **Required session does not exist**. In this case you need to recreate a session token. There is a special callback function to handle this case: ```javascript const CONFIG = { on: { sessionExpired: (handleResponse, retry) => { // call handleResponse() if you do not want to process a session expiration, // so an error will be returned to origin request // handleResponse(); ConnectyCube.createSession() .then(retry) .catch((error) => {}); }, }, }; ConnectyCube.init(CREDENTIALS, CONFIG); ``` ## Destroy session token [Section titled “Destroy session token”](#destroy-session-token) To destroy a session use the following code: ```javascript ConnectyCube.destroySession().catch((error) => {}); ``` ## User signup [Section titled “User signup”](#user-signup) ```javascript const userProfile = { login: "marvin18", password: "supersecurepwd", email: "awesomeman@gmail.com", full_name: "Marvin Simon", phone: "47802323143", website: "https://dozensofdreams.com", tag_list: ["iphone", "apple"], custom_data: JSON.stringify({ middle_name: "Bartoleo" }), }; ConnectyCube.users .signup(userProfile) .then((user) => {}) .catch((error) => {}); ``` Response example from `ConnectyCube.users.signup(userProfile)`: ```json { "id": 81, "full_name": "Marvin Simon", "email": "awesomeman@gmail.com", "login": "marvin18", "phone": "47802323143", "website": "https://dozensofdreams.com", "created_at": "2018-06-15T14:20:54Z", "updated_at": "2018-12-05T11:58:02Z", "last_request_at": "2018-12-05T11:58:02Z", "external_user_id": null, "facebook_id": null, "twitter_id": null, "custom_data": "{\"middle_name\":\"Bartoleo\"}", "blob_id": null, "avatar": "", "user_tags": "iphone,apple" } ``` Only login (or email) + password are required. ## User profile update [Section titled “User profile update”](#user-profile-update) ```javascript const updatedUserProfile = { login: "marvin18sim", full_name: "Mar Sim", }; ConnectyCube.users .update(updatedUserProfile) .then((user) => {}) .catch((error) => {}); ``` Response example from `ConnectyCube.users.update(updatedUserProfile)`: ```json { "id": 81, "full_name": "Mar Sim", "email": "awesomeman@gmail.com", "login": "marv18sim", "phone": "47802323143", "website": "https://dozensofdreams.com", "created_at": "2018-06-15T14:20:54Z", "updated_at": "2018-12-05T11:58:02Z", "last_request_at": "2018-12-05T11:58:02Z", "external_user_id": null, "facebook_id": null, "twitter_id": null, "custom_data": "{\"middle_name\": \"Bartoleo\"}", "blob_id": null, "avatar": "", "user_tags": "iphone,apple" } ``` If you want to change your password, you need to provide 2 parameters: `password` and `old_password`. Updated `user` entity will be returned. ## User avatar [Section titled “User avatar”](#user-avatar) You can set a user’s avatar. You just need to upload it to the ConnectyCube cloud storage and then connect to user. ```javascript // for example, a file from HTML form input field const inputFile = $("input[type=file]")[0].files[0]; const fileParams = { name: inputFile.name, file: inputFile, type: inputFile.type, size: inputFile.size, public: false, }; const updateUser = (uploadedFile) => { const updatedUserProfile = { avatar: uploadedFile.uid }; return ConnectyCube.users.update(updatedUserProfile); }; ConnectyCube.storage .createAndUpload(fileParams) .then(updateUser) .then((updatedUser) => {}) .catch((error) => {}); ``` Response example from `ConnectyCube.storage.createAndUpload(fileParams)`: ```json { "account_id": 7, "app_id": 12, "blob_object_access": { "blob_id": 421517, "expires": "2020-10-06T15:51:38Z", "id": 421517, "object_access_type": "Write", "params": "https://s3.amazonaws.com/cb-shared-s3?Content-Type=text%2Fplain..." }, "blob_status": null, "content_type": "text/plain", "created_at": "2020-10-06T14:51:38Z", "id": 421517, "name": "awesome.txt", "public": false, "set_completed_at": null, "size": 11, "uid": "7cafb6030d3e4348ba49cab24c0cf10800", "updated_at": "2020-10-06T14:51:38Z" } ``` Now, other users can get you avatar: ```javascript const avatarUID = updatedUser.avatar; const avatarURL = ConnectyCube.storage.privateUrl(avatarUID); const avatarHTML = ""; ``` ## Password reset [Section titled “Password reset”](#password-reset) It’s possible to reset a password via email: ```javascript ConnectyCube.users .resetPassword("awesomeman@gmail.com") .then((result) => {}) .catch((error) => {}); ``` If provided email is valid - an email with password reset instruction will be sent to it. ## Retrieve users V2 [Section titled “Retrieve users V2”](#retrieve-users-v2) ### Examples [Section titled “Examples”](#examples) Retrieve users by ID ```javascript const searchParams = { limit: 10, offset: 50, id: { in: [51941, 51946] } } ConnectyCube.users.getV2(searchParams) .then((result) => {}) .catch((error) => {}); ``` Retrieve users by login ```javascript const searchParams = { login: 'adminFirstUser' } ConnectyCube.users.getV2(searchParams) .then((result) => {}) .catch((error) => {}); ``` Retrieve users by last\_request\_at ```javascript const date = new Date(2017, 10, 10) const searchParams = { last_request_at: { gt: date } } ConnectyCube.users.getV2(searchParams) .then((result) => {}) .catch((error) => {}); ``` More information (fields, operators, request rules) available [here](/server/users#retrieve-users-v2) ## Retrieve users V1 (**Deprecated**) [Section titled “Retrieve users V1 (Deprecated)”](#retrieve-users-v1-deprecated) ### Retrieve users by ID (**Deprecated**) [Section titled “Retrieve users by ID (Deprecated)”](#retrieve-users-by-id-deprecated) ```javascript const params = { page: 1, per_page: 5, filter: { field: "id", param: "in", value: [51941, 51946], }, }; ConnectyCube.users .get(params) .then((result) => {}) .catch((error) => {}); ``` Response example from `ConnectyCube.users.get(params)` - [see](/server/users#response-1) ### Retrieve user by login (**Deprecated**) [Section titled “Retrieve user by login (Deprecated)”](#retrieve-user-by-login-deprecated) ```javascript const searchParams = { login: "marvin18" }; ConnectyCube.users .get(searchParams) .then((result) => {}) .catch((error) => {}); ``` ### Retrieve user by email (**Deprecated**) [Section titled “Retrieve user by email (Deprecated)”](#retrieve-user-by-email-deprecated) ```javascript const searchParams = { email: "marvin18@example.com" }; ConnectyCube.users .get(searchParams) .then((result) => {}) .catch((error) => {}); ``` ### Retrieve users by full name (**Deprecated**) [Section titled “Retrieve users by full name (Deprecated)”](#retrieve-users-by-full-name-deprecated) ```javascript const searchParams = { full_name: "Marvin Samuel" }; ConnectyCube.users .get(searchParams) .then((result) => {}) .catch((error) => {}); ``` ### Retrieve user by phone number (**Deprecated**) [Section titled “Retrieve user by phone number (Deprecated)”](#retrieve-user-by-phone-number-deprecated) ```javascript const searchParams = { phone: "44678162873" }; ConnectyCube.users .get(searchParams) .then((result) => {}) .catch((error) => {}); ``` ### Retrieve user by external ID (**Deprecated**) [Section titled “Retrieve user by external ID (Deprecated)”](#retrieve-user-by-external-id-deprecated) ```javascript const searchParams = { external_user_id: "675373912" }; ConnectyCube.users .get(searchParams) .then((result) => {}) .catch((error) => {}); ``` ### Retrieve users by tags (**Deprecated**) [Section titled “Retrieve users by tags (Deprecated)”](#retrieve-users-by-tags-deprecated) ```javascript const searchParams = { tags: ["apple"] }; ConnectyCube.users .get(searchParams) .then((result) => {}) .catch((error) => {}); ``` ## Delete user [Section titled “Delete user”](#delete-user) A user can delete himself from the platform: ```javascript ConnectyCube.users .delete() .then((result) => {}) .catch((error) => {}); ```
# Custom Data
> Maximize your Cordova app's potential with customizable data cloud storage solutions. Tailor data structures to match your application's unique requirements.
Custom Data, also known as cloud tables or custom objects, provide users with the flexibility to define and manage data in a way that is specific to their application’s requirements. Here are some common reasons why you might need use custom data in your app: * Custom Data allows you to define data structures that align precisely with your application’s needs. This is particularly useful when dealing with complex or unique data types that don’t fit well into standard ConnectyCube models. * In certain applications, there may be entities or objects that are unique to that particular use case. Custom Data enable the representation of these entities in the database, ensuring that the data storage is optimized for the application’s logic. * Custom Data allows you to extend the functionality of the app by introducing new types of data that go beyond what the ConnectyCube platform’s standard models support. Custom Data empower you to introduce these extensions and additional features. * In situations where data needs to be migrated from an existing system or transformed in a specific way, Custom Data offer the flexibility to accommodate these requirements. * Your application needs to integrate with external systems or APIs, Custom Data can be designed to align seamlessly with the data structures of your external systems. ## Get started with SDK [Section titled “Get started with SDK”](#get-started-with-sdk) Follow the [Getting Started guide](/js/) on how to connect ConnectyCube SDK and start building your first app. ## Preparations [Section titled “Preparations”](#preparations) In order to start using Custom Data you need first create the data scheme in the ConnectyCube Admin panel. For it navigate to **`Home -> Your App -> Custom -> List`** then click on **`ADD`** and from the dropdown menu select **`ADD NEW CLASS`**. In the opened dialog, enter your model name and add the necessary fields. The ConnectyCube Custom Data models’ fields support various data types or arrays (except `Location`). These include: * Integer (e.g. `8222456`); * Float (e.g. `1.25`); * Boolean (`true` or `false`); * String (e.g. `"some text"`); * Location (the array what consist of **two** `numbers`s); After adding all the required fields, click the **`CREATE CLASS`** button to save your scheme.  Newly created class is now available and contains the following data: * **\_id** - record identifier generated by system automatically * **user\_id** - identifier of user who created a record * **\_parent\_id** - by default is null * **field\_1** - field defined in a scheme * **field\_2** - field defined in a scheme * … * **field\_N** - field defined in a scheme * **created\_at** - date and time when a record is created  After that you can perform all **CRUD** operations with your Custom Data. > **Note**: The **Class name** field will be represented as the DB table name and will be used for identification of your requests during the work with Custom Data. ## Permissions [Section titled “Permissions”](#permissions) Access control list (ACL) is a list of permissions attached to some object. An ACL specifies which users have an access to objects, as well as what operations are allowed with such objects. Each entry in a typical ACL specifies a subject and an operation. ACL models may be applied to collections of objects as well as to individual entities within the system’s hierarchy. Adding the Access Control list is only available within the Custom Data module. ### Permissions scheme [Section titled “Permissions scheme”](#permissions-scheme) ConnectyCube permission scheme contains five permissions levels: * **Open** (open) - any user within the application can access the record(s) in the class and perform actions with the record * **Owner** (owner) - only the Owner (the user who created a record) is authorized to perform actions with the record * **Not allowed** (not\_allowed) - no one (except the Account Administrator) can proceed with a chosen action * **Open for groups** (open\_for\_groups) - users with the specified tag(s) will be included in the group that is authorized to perform actions with a record. Multiple groups can be specified (number of groups is not limited). * **Open for users ids** (open\_for\_users\_ids) - only users with listed IDs can perform actions with a record. Actions for work with an entity: * **Create** - create a new record * **Read** - retrieve information about a record and view it in the read-only mode * **Update** - update any parameter of the chosen record that can be updated by user * **Delete** - delete a record To set a permission schema for the Class, go to ConnectyCube dashboard and find a required class within Custom Data module Click on **`EDIT PERMISSION`** button to open permissions schema to edit. Each listed action has a separate permission level to select. The exception is a ‘Create’ action that isn’t available for ‘Owner’ permission level.  ### Permission levels [Section titled “Permission levels”](#permission-levels) Two access levels are available in the ConnectyCube: access to Class and access to Record. Only one permission schema can be applied for the record. Using the Class permission schema means that the Record permission schema won’t be affected on a reсord. **Class entity** **Class** is an entity that contains records. Class can be created via ConnectyCube dashboard only within Custom data module. Operations with Class entity are not allowed in API. All actions (Create, Read, Update and Delete) that are available for the ‘Class’ entity are also applicable for all records within a class. Default Class permission schema is using during the creation of a class: * **Create:** Open * **Read:** Open * **Update:** Owner * **Delete:** Owner To enable applying Class permissions for any of the action types, ‘Use Class permissions’ check box should be ticked. It means that the record permission schema (if existing) won’t be affected on a record. **Record entity** **Record** is an entity within the Class in the Custom Data module that can be created in ConnectyCube dashboard and via API. Each record within a Class has its own permission level. Unlike Class entity, ‘Not allowed’ permission level isn’t available for a record as well as only three actions are available to work with a record - read, update and delete. Default values for Record permission scheme: * Read: Open * Update: Owner * Delete: Owner To set a separate permission scheme for a record, open a record to edit and click on **`SET PERMISSION ON RECORD`** button:  Define the permission level for each of available actions. ## Create a new record [Section titled “Create a new record”](#create-a-new-record) Create a new record with the defined parameters in the class. Fields that weren’t defined in the request but are available in the scheme (class) will have null values. ```javascript const className = 'call_history_item'; const record = { 'call_name': 'Group call', 'call_participants': [2325293, 563541, 563543], 'call_start_time': 1701789791673, 'call_end_time': 0, 'call_duration': 0, 'call_state': 'accepted', 'is_group_call': true, 'call_id': 'f8c3de3d-1fea-4d7c-a8b0-29f63c4c3454', 'user_id': 2325293, 'caller_location': [50.004444, 36.234380] } try { const result = await ConnectyCube.data.create(className, record); console.log(result) } catch (error) { console.error(error) } ``` ### Create a record with permissions [Section titled “Create a record with permissions”](#create-a-record-with-permissions) To create a new record with permissions, add the `permissions` parameter to a record. In this case, the request will look like this: ```javascript const className = 'call_history_item'; const record = { call_name: 'Group call', call_participants: [2325293, 563541, 563543], call_start_time: 1701789791673, call_end_time: 0, call_duration: 0, call_state: 'accepted', is_group_call: true, call_id: 'f8c3de3d-1fea-4d7c-a8b0-29f63c4c3454', user_id: 2325293, caller_location: [50.004444, 36.234380], permissions: { read: { access: 'owner' }, update: { access: 'open_for_users_ids', ids: [563541, 563543] }, delete: { access: 'open_for_groups', groups: ['group87', 'group108'] } } } try { const result = await ConnectyCube.data.create(className, record); console.log(result) } catch (error) { console.error(error) } ``` ## Create multi records [Section titled “Create multi records”](#create-multi-records) Create several new records in the class. Fields that weren’t defined in the request but available in the scheme would have null values. ```javascript const className = 'call_history_item'; const record_1 = { 'call_name': 'Group call 1', 'call_participants': [2325293, 563541, 563543], 'call_start_time': 1701789791673, 'call_end_time': 0, 'call_duration': 0, 'call_state': 'accepted', 'is_group_call': true, 'call_id': 'f8c3de3d-1fea-4d7c-a8b0-29f63c4c3454', 'user_id': 2325293, 'caller_location': [50.004444, 36.234380] } const record_2 = { 'call_name': 'Group call 2', 'call_participants': [2325293, 563541, 563543], 'call_start_time': 1701789832955, 'call_end_time': 0, 'call_duration': 0, 'call_state': 'accepted', 'is_group_call': true, 'call_id': 'a2a7bc3f-2eeb-3d72-11b0-566d3c4c2748', 'user_id': 2325293, 'caller_location': [50.004444, 36.234380] } const records = [record_1, record_2] try { const result = await ConnectyCube.data.create(className, records); console.log(result.items) } catch (error) { console.error(error) } ``` ## Retrieve record by ID [Section titled “Retrieve record by ID”](#retrieve-record-by-id) Retrieve the record by specifying its identifier. ```javascript const className = 'call_history_item'; const id = '656f407e29d6c5002fce89dc'; try { const result = await ConnectyCube.data.list(className, id); console.log(result.items) } catch (error) { console.error(error) } ``` ## Retrieve records by IDs [Section titled “Retrieve records by IDs”](#retrieve-records-by-ids) Retrieve records by specifying their identifiers. ```javascript const className = 'call_history_item'; const ids = ['656f407e29d6c5002fce89dc', '5f985984ca8bf43530e81233']; // or `const ids = '656f407e29d6c5002fce89dc,5f985984ca8bf43530e81233'`; try { const result = await ConnectyCube.data.list(className, ids); console.log(result.items) } catch (error) { console.error(error) } ``` ## Retrieve records within a class [Section titled “Retrieve records within a class”](#retrieve-records-within-a-class) Search records within the particular class. > **Note:** If you are sorting records by time, use the `_id` field. It is indexed and it will be much faster than sorting by `created_at` field. The list of additional parameter for sorting, filtering, aggregation of the search response is provided by link ```javascript const className = 'call_history_item'; const filters = { call_start_time: { gt: 1701789791673 } }; try { const result = await ConnectyCube.data.list(className, filter); console.log(result.items) } catch (error) { console.error(error) } ``` ## Retrieve the record’s permissions [Section titled “Retrieve the record’s permissions”](#retrieve-the-records-permissions) > **Note:** record permissions are checked during request processing. Only the owner has an ability to view a record’s permissions. ```javascript const className = 'call_history_item'; const id = '656f407e29d6c5002fce89dc'; try { const result = await ConnectyCube.data.readPermissions(className, id); console.log(result.permissions) console.log(result.record_is) } catch (error) { console.error(error) } ``` ## Update record by ID [Section titled “Update record by ID”](#update-record-by-id) Update record data by specifying its ID. ```javascript const className = 'call_history_item'; const params = { id: '656f407e29d6c5002fce89dc', call_end_time: 1701945033120, }; try { const result = await ConnectyCube.data.update(className, params); console.log(result) } catch (error) { console.error(error) } ``` ## Update records by criteria [Section titled “Update records by criteria”](#update-records-by-criteria) Update records found by the specified search criteria with a new parameter(s). The structure of the parameter `search_criteria` and the list of available operators provided by link ```javascript const className = 'call_history_item'; const params = { search_criteria: { user_id: 1234567 }, call_name: 'Deleted user' }; try { const result = await ConnectyCube.data.update(className, params); console.log(result.items) } catch (error) { console.error(error) } ``` ## Update multi records [Section titled “Update multi records”](#update-multi-records) Update several records within a class by specifying new values. ```javascript const className = 'call_history_item'; const params = [{ id: '656f407e29d6c5002fce89dc', call_end_time: 1701945033120, }, { id: '5f998d3bca8bf4140543f79a', call_end_time: 1701945033120, }]; try { const result = await ConnectyCube.data.update(className, params); console.log(result.items) } catch (error) { console.error(error) } ``` ## Delete record by ID [Section titled “Delete record by ID”](#delete-record-by-id) Delete a record from a class by record identifier. ```javascript const className = 'call_history_item'; const id = '5f998d3bca8bf4140543f79a'; try { await ConnectyCube.data.delete(className, id); } catch (error) { console.error(error) } ``` ## Delete several records by their IDs [Section titled “Delete several records by their IDs”](#delete-several-records-by-their-ids) Delete several records from a class by specifying their identifiers. If one or more records can not be deleted, an appropriate error is returned for that record(s). ```javascript const className = 'call_history_item'; const ids = ['656f407e29d6c5002fce89dc', '5f998d3bca8bf4140543f79a']; try { const result = await ConnectyCube.data.delete(className, id); console.log(result) } catch (error) { console.error(error) } ``` ## Delete records by criteria [Section titled “Delete records by criteria”](#delete-records-by-criteria) Delete records from the class by specifying a criteria to find records to delete. The search query format is provided by link ```javascript const className = 'call_history_item'; const params = { call_id: { in: ['f8c3de3d-1fea-4d7c-a8b0-29f63c4c3454'] } }; try { const result = await ConnectyCube.data.delete(className, params); console.log(result) } catch (error) { console.error(error) } ``` ## Relations [Section titled “Relations”](#relations) Objects (records) in different classes can be linked with a `parentId` field. If the record from the **Class 1** is pointed with a record from **Class 2** via its `parentId`, the `parentId` field will contain an ID of a record from the **Class 2**. If a record from the **Class 2** is deleted, all its children (records of the **Class 1** with `parentId` field set to the **Class 2** record ID) will be automatically deleted as well. The linked children can be retrieved with `_parent_id={id_of_parent_class_record}` parameter.
# Push Notifications
> Elevate your Cordova app's performance with push notifications API guide. Keep users engaged with real-time updates, ensuring seamless interaction on the go.
Push Notifications provide a way to deliver some information to users while they are not using your app actively. The following use cases can be covered additionally with push notifications: * send a chat message when a recipient is offline (a push notification will be initiated automatically in this case) * make a video call with offline opponents (need to send a push notification manually) ## Configuration [Section titled “Configuration”](#configuration) In order to start work with push notifications you need to configure it. There are various client-side libs for Cordova push notifications: * [cordova-plugin-firebasex](https://github.com/dpa99c/cordova-plugin-firebasex) * [cordova-plugin-firebase](https://github.com/arnesson/cordova-plugin-firebase) This guide is based on **cordova-plugin-firebasex** lib. First of all we need to install it. Just follow the [cordova-plugin-firebasex installation](https://github.com/dpa99c/cordova-plugin-firebasex#installation) guide in the lib’s README. Then make sure you followed [cordova-plugin-firebasex Firebase config setup](https://github.com/dpa99c/cordova-plugin-firebasex#firebase-config-setup) Then follow the platform specific steps. ### iOS [Section titled “iOS”](#ios) 1. First of all you need to generate Apple push certificate (\*.p12 file) and upload it to ConnectyCube dashboard. Here is a guide on how to create a certificate 2. Upload Apple push certificate (\*.p12 file) to ConnectyCube dashboard: * Open your ConnectyCube Dashboard at [admin.connectycube.com](https://admin.connectycube.com) * Go to **Push notifications** module, **Credentials** page * Upload the newly created APNS certificate on **Apple Push Notification Service (APNS)** form.  3. Lastly, open Xcode project of your Flutter app and enable Push Notifications capabilities. Open Xcode, choose your project file, Signing & Capabilities tab and then add a Push Notifications capability. Also - tick a ‘Remote notifications’ checkbox in Background Modes section.  ### Android [Section titled “Android”](#android) #### Configure Firebase project and Service account key (recommended) [Section titled “Configure Firebase project and Service account key (recommended)”](#configure-firebase-project-and-service-account-key-recommended) In order to start working with push notifications functionality you need to configure it. 1. Create and configure your [Firebase project](https://console.firebase.google.com) and obtain the **Service account key**. If you have any difficulties with Firebase project registration, [follow our guide](/android/firebase-setup-guide). To find your **FCM service account key** go to your **Firebase console > Cloud Messaging > Manage Service Accounts** section:  2. Select and configure **Manage Keys** option:  3. Select **ADD KEY**, **Create new key**:  4. Select **Key type** (json recommended) and create:  5. Save it locally:  6. Browse your saved **FCM Service account key** in your **Dashboard > Your App > Push Notifications > Credentials**, select the environment for which you are adding the key. Use the same key for development and production zones.  7. Copy **Sender ID** value from your Firebase console **Cloud Messaging** section. You may require it later.  8. In order to use push notifications on Android, you need to create `google-services.json` file and copy it into project’s `android/app` folder. Also, you need to update the `applicationId` in `android/app/build.gradle` to the one which is specified in `google-services.json`, so they must match. If you have no existing API project yet, the easiest way to go about in creating one is using this [step-by-step installation process](https://firebase.google.com/docs/android/setup) #### Configure Firebase project and Server key (DEPRECATED) [Section titled “Configure Firebase project and Server key (DEPRECATED)”](#configure-firebase-project-and-server-key-deprecated) 1. Create and configure your [Firebase project](https://console.firebase.google.com) and obtain the **Server key**. If you have any difficulties with Firebase project registration, [follow our guide](/android/firebase-setup-guide). To find your **FCM server key** go to your **Firebase console > Cloud Messaging** section:  2. Copy your **FCM server key** to your **Dashboard > Your App > Push Notifications > Credentials**, select the environment for which you are adding the key and hit **Save key**. Use the same key for development and production zones.  3. Copy **Sender ID** value from your Firebase console **Cloud Messaging** section. You may require it later.  4. In order to use push notifications on Android, you need to create `google-services.json` file and copy it into project’s `android/app` folder. Also, you need to update the `applicationId` in `android/app/build.gradle` to the one which is specified in `google-services.json`, so they must match. If you have no existing API project yet, the easiest way to go about in creating one is using this [step-by-step installation process](https://firebase.google.com/docs/android/setup) ## cordova-plugin-firebasex API [Section titled “cordova-plugin-firebasex API”](#cordova-plugin-firebasex-api) The list of available methods for the **cordova-plugin-firebasex** plugin is described here . It’s useful to have a quick overview before further integration. ## Init cordova-plugin-firebasex lib [Section titled “Init cordova-plugin-firebasex lib”](#init-cordova-plugin-firebasex-lib) Next step is to initialize the **cordova-plugin-firebasex** lib. The following code requests permissions for iOS and then does the initialization of main functions: ```javascript document.addEventListener('deviceready', () => { if (typeof device !== 'undefined') { if (device.platform === 'iOS') { try { FirebasePlugin.grantPermission(hasPermission => { console.log("Permission was " + (hasPermission ? "granted" : "denied")); }); firebaseSetup(); } catch (e) { console.error("FirebasePlugin grantPermission error", e); } } else { firebaseSetup(); } } }) ... firebaseSetup() { const isOniOS = return typeof device !== "undefined" && !!device.platform && device.platform.toUpperCase() === "IOS"; // We use FCM only for Android. For iOS - we use plain APNS if (!isOniOS) { FirebasePlugin.onTokenRefresh(fcmToken => { console.log(fcmToken); }, error => { console.error(error); }); } // iOS device token FirebasePlugin.onApnsTokenReceived(apnsToken => { console.log(apnsToken); }, error => { console.error(error); }); FirebasePlugin.onMessageReceived(message => { console.log(message); }, error => { console.error(error); }); } ``` ## Subscribe to push notifications [Section titled “Subscribe to push notifications”](#subscribe-to-push-notifications) In order to start receiving push notifications you need to subscribe your current device as follows: ```javascript const isOniOS = return typeof device !== "undefined" && !!device.platform && device.platform.toUpperCase() === "IOS"; // We use FCM only for Android. For iOS - we use plain APNS if (!isOniOS) { FirebasePlugin.onTokenRefresh(fcmToken => { if (token && token.trim().length > 0) { this.subscribeToPushNotification(fcmToken); } }, error => { console.error(error); }); } // iOS device token FirebasePlugin.onApnsTokenReceived(apnsToken => { if (token && token.trim().length > 0) { this.subscribeToPushNotification(apnsToken); } }, error => { console.error(error); }); ... subscribeToPushNotification(deviceToken) { const isOniOS = return typeof device !== "undefined" && !!device.platform && device.platform.toUpperCase() === "IOS"; const platform = isOniOS ? "ios" : "android"; // https://stackoverflow.com/questions/51585819/how-to-detect-environment-in-a-cordova-android-application let IS_DEV_ENV; cordova.plugins.IsDebug.getIsDebug(isDebug => { IS_DEV_ENV = isDebug; }, err => { console.error("cordova.plugins.IsDebug error", err); }); const params = { // for iOS VoIP it should be 'apns_voip' notification_channel: isOniOS ? 'apns' : 'gcm', device: { platform: platform, udid: device.uuid }, push_token: { environment: IS_DEV_ENV ? 'development' : 'production', client_identification_sequence: deviceToken, bundle_identifier: "com.your.app.package.id" } } ConnectyCube.pushnotifications.subscriptions.create(params) .then(result => {}) .catch(error => {}); } ``` ## Send push notifications [Section titled “Send push notifications”](#send-push-notifications) You can manually initiate a push notification to user/users on any event in your application. To do so you need to form a push notification parameters (payload) and set the push recipients: ```javascript const payload = JSON.stringify({ message: "Alice is calling you", ios_badge: 1, // ios_voip: 1 }); // https://stackoverflow.com/questions/51585819/how-to-detect-environment-in-a-cordova-android-application let IS_DEV_ENV; cordova.plugins.IsDebug.getIsDebug( (isDebug) => { IS_DEV_ENV = isDebug; }, (err) => { console.error("cordova.plugins.IsDebug error", err); } ); const pushParameters = { notification_type: "push", user: { ids: [21, 12] }, // recipients. environment: IS_DEV_ENV ? "development" : "production", message: ConnectyCube.pushnotifications.base64Encode(payload), }; ConnectyCube.pushnotifications.events .create(pushParameters) .then((result) => {}) .catch((error) => {}); ``` Please refer [Universal Push Notifications standard parameters](/server/push_notifications#universal-push-notifications) section on how to form the payload. ## Receive push notifications [Section titled “Receive push notifications”](#receive-push-notifications) When any notification is opened or received the callback `onMessageReceived` is called passing an object with the notification data: ```javascript FirebasePlugin.onMessageReceived( (message) => { console.dir(message); }, (error) => {} ); ``` You can check more details about a `message` object fields Here you can add an appropriate logic in your app. The things can be one of the following: * If this is a chat message, once clicked on it - we can redirect a user to an appropriate chat by **dialog\_id** data param * Raise a local notification with an alternative info to show for a user ## Unsubscribe from push notifications [Section titled “Unsubscribe from push notifications”](#unsubscribe-from-push-notifications) In order to unsubscribe and stop receiving push notifications you need to list your current subscriptions and then choose those to be deleted: ```javascript FirebasePlugin.unregister(); const deleteSubscription = (subscriptions) => { let subscriptionIdToDelete; subscriptions.forEach((sbs) => { if (sbs.subscription.device.platform === "ios" && sbs.subscription.device.udid === device.uuid) { subscriptionIdToDelete = sbs.subscription.id; } }); if (subscriptionIdToDelete) { ConnectyCube.pushnotifications.subscriptions.delete(subscriptionIdToDelete); } }; ConnectyCube.pushnotifications.subscriptions .list() .then(deleteSubscription) .catch((error) => {}); ``` ## CallKit and VoIP push notifications [Section titled “CallKit and VoIP push notifications”](#callkit-and-voip-push-notifications) In a case you need to show a native calling interface on incoming call - you need to integrate a CallKit functionality via the following libs - [CordovaCall](https://github.com/WebsiteBeaver/CordovaCall) or [cordova-plugin-callkit](https://github.com/mattkhaw/cordova-plugin-callkit) For iOS, this will also require to integrate VoIP push notifications along with it. A [cordova-ios-voip-push](https://github.com/Hitman666/cordova-ios-voip-push) can be used for it. ConnectyCube supports iOS VoIP push notifications via same API described above: * for VoIP pushes it requires to generate a separated VoIP device token. * then when token is retrieved, you need to subscribe to voip pushes by passing a `notification_channel: apns_voip` channel in a subscription request * then when you want to send a voip push notification, use `ios_voip: 1` parameter in a push payload in a create event request. ## CallKit and VoIP push notifications (Ionic) [Section titled “CallKit and VoIP push notifications (Ionic)”](#callkit-and-voip-push-notifications-ionic) The above flow is valid for Ionic. The following Ionic libs can be used for it: * [ionic-plugin-callkit](https://github.com/Taracque/ionic-plugin-callkit) for CallKit * [cordova-ios-voip-push](https://github.com/Hitman666/cordova-ios-voip-push) for VoIP push notifications
# Streaming
> Leverage ConnectyCube's streaming feature for dynamic real-time interactions in Cordova app. Ideal for interactive sessions, such as teachers broadcasting to multiple students.
ConnectyCube streaming is built on top of [WebRTC](https://webrtc.org/) protocol. The main use case for streaming is with a teacher and many students where normally students join a call as listeners and only a teacher publishes own media stream: **Streaming API** is built on top of [Video Conferencing API](/cordova/videocalling-conference), hence same API documentation should be followed. The only difference is when join a room - a `session.joinAsListener(...)` API should be used at students side instead of `session.join(...)` API at teacher’s side. This method allows to join a conference room w/o publishing own media stream.
# Whiteboard
> Enable dynamic collaboration in chat with ConnectyCube Whiteboard API. Ideal for remote meetings, teaching environments, sales demos, real-time workflows.
ConnectyCube **Whiteboard API** allows to create whiteboard functionality and associate it with a chat dialog. Chat dialog’s users can collaborate and draw simultaneously on a whiteboard. You can do freehand drawing with a number of tools, add shapes, lines, text and erase. To share boards, you just get an easy link which you can email. Your whiteboard stays safe in the cloud until you’re ready to return to it.  The most popular use cases for using the whiteboard: * Remote meetings * Remote teaching * Sales presentations * Workflows * Real-time collaboration ## Get started with SDK [Section titled “Get started with SDK”](#get-started-with-sdk) Follow the [Getting Started guide](/cordova/) on how to connect ConnectyCube SDK and start building your first app. ## Preparations [Section titled “Preparations”](#preparations) In order to start using whiteboard, an additional config has to be provided: ```javascript const CONFIG = { ... whiteboard: { server: 'https://whiteboard.connectycube.com' } } ConnectyCube.init(CREDS, CONFIG); ``` Then, ConnectyCube whiteboard is associated with a chat dialog. In order to create a whiteboard, you need to have a chat dialog. Refer to [chat dialog creation API](/js/messaging#create-new-dialog). ## Create whiteboard [Section titled “Create whiteboard”](#create-whiteboard) When create a whiteboard you need to pass a name (any) and a chat dialog id to which whiteboard will be connected. ```javascript const params = { name: 'New Whiteboard', chat_dialog_id: "5356c64ab35c12bd3b108a41" }; ConnectyCube.whiteboard.create(params) .then(whiteboard => { const wid = whiteboard._id; }) .catch(error => { }); ``` Once whiteboard is created - a user can display it in app in a WebView using the following url: `https://whiteboard.connectycube.com?whiteboardid=<_id>&username=&title=` For `username` - any value can be provided. This is to display a text hint near the drawing arrow. ## Retrieve whiteboards [Section titled “Retrieve whiteboards”](#retrieve-whiteboards) Use the following code snippet to retrieve a list of whiteboards associated with a chat dialog: ```javascript const params = {chat_dialog_id: "5456c64ab35c17bd3b108a76"}; ConnectyCube.whiteboard.get(params) .then(whiteboard => { }) .catch(error => { }); ``` ## Update whiteboard [Section titled “Update whiteboard”](#update-whiteboard) A whiteboard can be updated, e.g. its name: ```javascript const whiteboardId = "5456c64ab35c17bd3b108a76"; const params = { name: 'New Whiteboard', }; ConnectyCube.whiteboard.update(whiteboardId, params) .then(whiteboard => { }) .catch(error => { }); ``` ## Delete whiteboard [Section titled “Delete whiteboard”](#delete-whiteboard) ```javascript const whiteboardId = "5456c64ab35c17bd3b108a76"; ConnectyCube.whiteboard.delete(whiteboardId) .then(whiteboard => { }) .catch(error => { }); ```
# Getting Started
> Implement a chat widget on your website with our concrete, step-by-step guide.
The ConnectyCube Web Chat Widget is designed to simplify the process of adding chat functionality to your Web apps. This widget offers an out-of-the-box solution for embedding chat features - such as instant messaging, user presence, and file sharing - without the overhead of building a complete chat system from scratch. Key benefits include: * **Easy integration:** plug the widget into your existing Web projects. * **Customizable interface:** adjust the look and feel to match your brand. * **Real-time messaging:** leverage ConnectyCube’s reliable backend for instant communication. * **Responsive design:** works seamlessly on both desktop and mobile devices. * **Modular and extensible:** adapt the widget to your unique requirements. ## Demo [Section titled “Demo”](#demo) [](https://connectycube-chat-widget.onrender.com)\ \ `` ### Code samples [Section titled “Code samples”](#code-samples) See chat widget [code samples](https://github.com/ConnectyCube/connectycube-chat-widget-samples) as a reference for faster integration. ## Installation [Section titled “Installation”](#installation) * React ```bash # npm npm install @connectycube/chat-widget # yarn yarn add @connectycube/chat-widget ``` * Vanilla JS Add the following scripts on your html page somewhere in `head` element: ```html ``` * Angular ```bash # npm npm install @connectycube/chat-widget-angular # yarn yarn add @connectycube/chat-widget-angular ``` As this component uses wrapped `@connectycube/chat-widget`, install types for React and ReactDOM as `devDependencies`: ```bash # npm npm install --save-dev @types/react @types/react-dom # yarn yarn add --dev @types/react @types/react-dom ``` ## Display widget [Section titled “Display widget”](#display-widget) ### Before you start [Section titled “Before you start”](#before-you-start) Before you start, make sure: 1. You have access to your ConnectyCube account. If you don’t have an account, [sign up here](https://admin.connectycube.com/register). 2. An app created in ConnectyCube dashboard. Once logged into [your ConnectyCube account](https://admin.connectycube.com/), create a new application and make a note of the app credentials (**App ID** and **Auth Key**) that you’ll need for authentication. ### React [Section titled “React”](#react) Import and place the following component in your app: ```js import ConnectyCubeChatWidget from "@connectycube/chat-widget"; ... // userName - how other users will see your user name // userId - a User Id from your system ``` See chat widget [code samples](https://github.com/ConnectyCube/connectycube-chat-widget-samples) as a reference for faster integration. Detailed YouTube guide **how to add ConnectyCube Chat Widget to React app**: [Play](https://youtube.com/watch?v=jmCQtCC6o1M) #### React version support [Section titled “React version support”](#react-version-support) Since v0.35.0, the default build of the widget targets React 19 and is provided as an ESM module. For React 18 projects, use the dedicated ESM-only build: ```js // v0.35.0 and later: import ConnectyCubeChatWidget from '@connectycube/chat-widget'; // default: React 19 import ConnectyCubeChatWidget from '@connectycube/chat-widget/react19'; // explicit React 19 build import ConnectyCubeChatWidget from '@connectycube/chat-widget/react18'; // dedicated React 18 build // v0.34.0 and earlier: import ConnectyCubeChatWidget from '@connectycube/chat-widget'; // default: React 18 import ConnectyCubeChatWidget from '@connectycube/chat-widget/react19'; // React 19 build ``` ### Vanilla JS [Section titled “Vanilla JS”](#vanilla-js) Place the following script in your app: ```html ``` See chat widget [code samples](https://github.com/ConnectyCube/connectycube-chat-widget-samples) as a reference for faster integration. Detailed YouTube guide **how to add ConnectyCube Chat Widget to Vanilla JS app**: [Play](https://youtube.com/watch?v=P9mUtWE6u1M) ### Angular [Section titled “Angular”](#angular) Import and connect the `ConnectyCubeChatWidgetComponent` to your component (e.g., in `app.ts`): ```js import { RouterOutlet } from '@angular/router'; import { ConnectyCubeChatWidgetComponent } from '@connectycube/chat-widget-angular'; @Component({ selector: 'app-root', imports: [RouterOutlet, ConnectyCubeChatWidgetComponent], templateUrl: './app.html', styleUrl: './app.css', }) export class App { ... protected readonly connectycubeChatWidgetProps = { appId: 111, authKey: '11111111-2222-3333-4444-55555555', config: { debug: { mode: 1 } }, userId: '112233', // a User Id from your system userName: 'Samuel', // how other users will see your user name showOnlineUsersTab: false, splitView: true, }; } ``` Place the `` component in your template (`app.html`) and pass the props: ```html
...
... ``` ## Feature configuration [Section titled “Feature configuration”](#feature-configuration) This section explains how to control specific features of the chat widget by enabling or disabling them through configuration [props](#props). Customize your widget behavior to meet your specific requirements without having to modify the core code. ### Notifications [Section titled “Notifications”](#notifications) This section allows you to configure how users are notified about new messages. You can control notifications, browser push notifications, and notification sounds independently for a fully customizable experience: * **showNotifications** - show browser notifications about new messages received * **webPushNotifications** - show browser push notifications about new messages received * **playSound** - play sound about new messages received ### Online users [Section titled “Online users”](#online-users) We can displays a dedicated tab within the chat widget that lists all currently online users. This feature is useful in team or community-based chat environments where it’s helpful to see who’s available before starting a conversation. * React ```js ``` * Vanilla JS ```js const props = { ... showOnlineUsersTab: true, }; ``` * Angular ```ts @Component({ ... }) export class MyComponent { props = { ... showOnlineUsersTab: true, }; } ``` To make this feature work you also need to enable **Online Users API** in [ConnectyCube Daashboard](https://admin.connectycube.com/) in your app’s permissions  ### Toggle Button visibility [Section titled “Toggle Button visibility”](#toggle-button-visibility) **hideWidgetButton** - controls the visibility of the floating button that users click to open or close the chat widget. This is useful when you want to launch the widget programmatically or embed it inside a custom UI element instead of showing the default button. Read how to open a widget [by clicking on custom button](#open-widget-on-custom-button) ### New chat buttons [Section titled “New chat buttons”](#new-chat-buttons) These settings let you control whether users can start new chats or initiate one-on-one conversations. Use them to restrict chat creation in specific environments or use cases, such as read-only communities or customer support-only contexts. * **hideNewChatButton** - controls the visibility of the main “New Chat” button in the chat widget interface. * **hideNewUserChatOption** - hides the option to start a new 1-on-1 conversation from within the “Create Chat” flow. This is useful when you only want to allow group chats or predefined channels. ### Moderation [Section titled “Moderation”](#moderation) The moderation settings help maintain a safe and respectful chat environment. These options allow users to report inappropriate content and manage their personal block lists, giving them more control over their experience. At then moment the following moderation features supported: * **enableContentReporting** - users can report messages via a UI action * **enableBlockList** - users can block and unblock others from their profile #### Report user [Section titled “Report user”](#report-user) To enable Report user feature, you need to pass `enableContentReporting: true` prop. This will display a **Report** button in user profile: 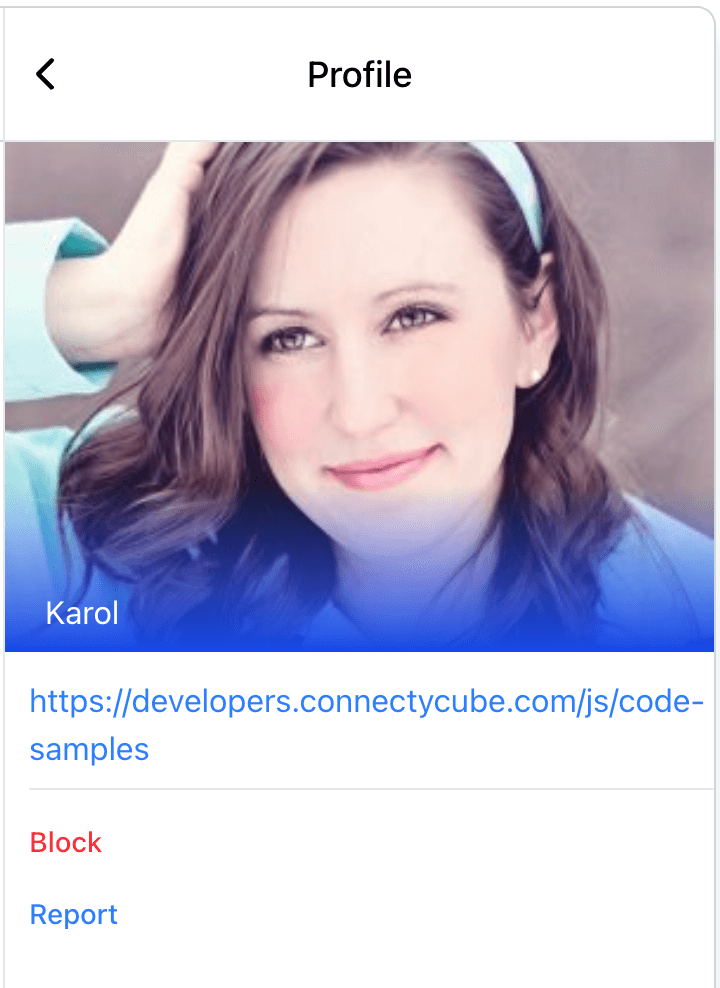 For user reporting to work properly, it requires the following: 1. Go to [ConnectyCube Daashboard](https://admin.connectycube.com/) 2. select your Application 3. Navigate to **Custom** module via left sidebar 4. Create new table called **UserReports** with the following fields: * **reportedUserId** - integer * **reason** - string  Once the table is created, you can test the user reporting in Widget. You will see the reports appear in this table. #### Block user [Section titled “Block user”](#block-user) To enable Block user feature, you need to pass `enableBlockList: true` prop. This will display a **Block** button in user profile (see above). ### Voice & video calls [Section titled “Voice & video calls”](#voice--video-calls) To enable audio and video calling in the chat widget, simply set the `enableCalls` prop to true: * React ```js ``` * Vanilla JS ```js const props = { ... enableCalls: true, }; ``` * Angular ```ts @Component({ ... }) export class MyComponent { props = { ... enableCalls: true, }; } ``` This will activate the call buttons in the chat UI, allowing users to initiate audio or video calls directly from the widget. ### AI [Section titled “AI”](#ai) The chat widget comes with advanced AI features to make conversations more effective and personalized. At then moment the following AI features supported: * **changeMessageTone** - adjust the tone of their messages before sending * **textSummarization** - instead of scrolling through long chats, users can generate concise summaries of past conversations. #### Change message tone [Section titled “Change message tone”](#change-message-tone) Users can adjust the tone of their messages before sending. Whether they want to sound formal, casual, friendly, or professional, the widget helps rephrase messages instantly—ensuring the right style for every context. * React ```js ``` * Vanilla JS ```js const props = { ... ai: { changeMessageTone: true, apiKey: 'AIza1231231231231231231231-wHBRQv1M', }, }; ``` * Angular ```ts @Component({ ... }) export class MyComponent { props = { ... ai: { changeMessageTone: true, apiKey: 'AIza1231231231231231231231-wHBRQv1M', }, }; } ``` 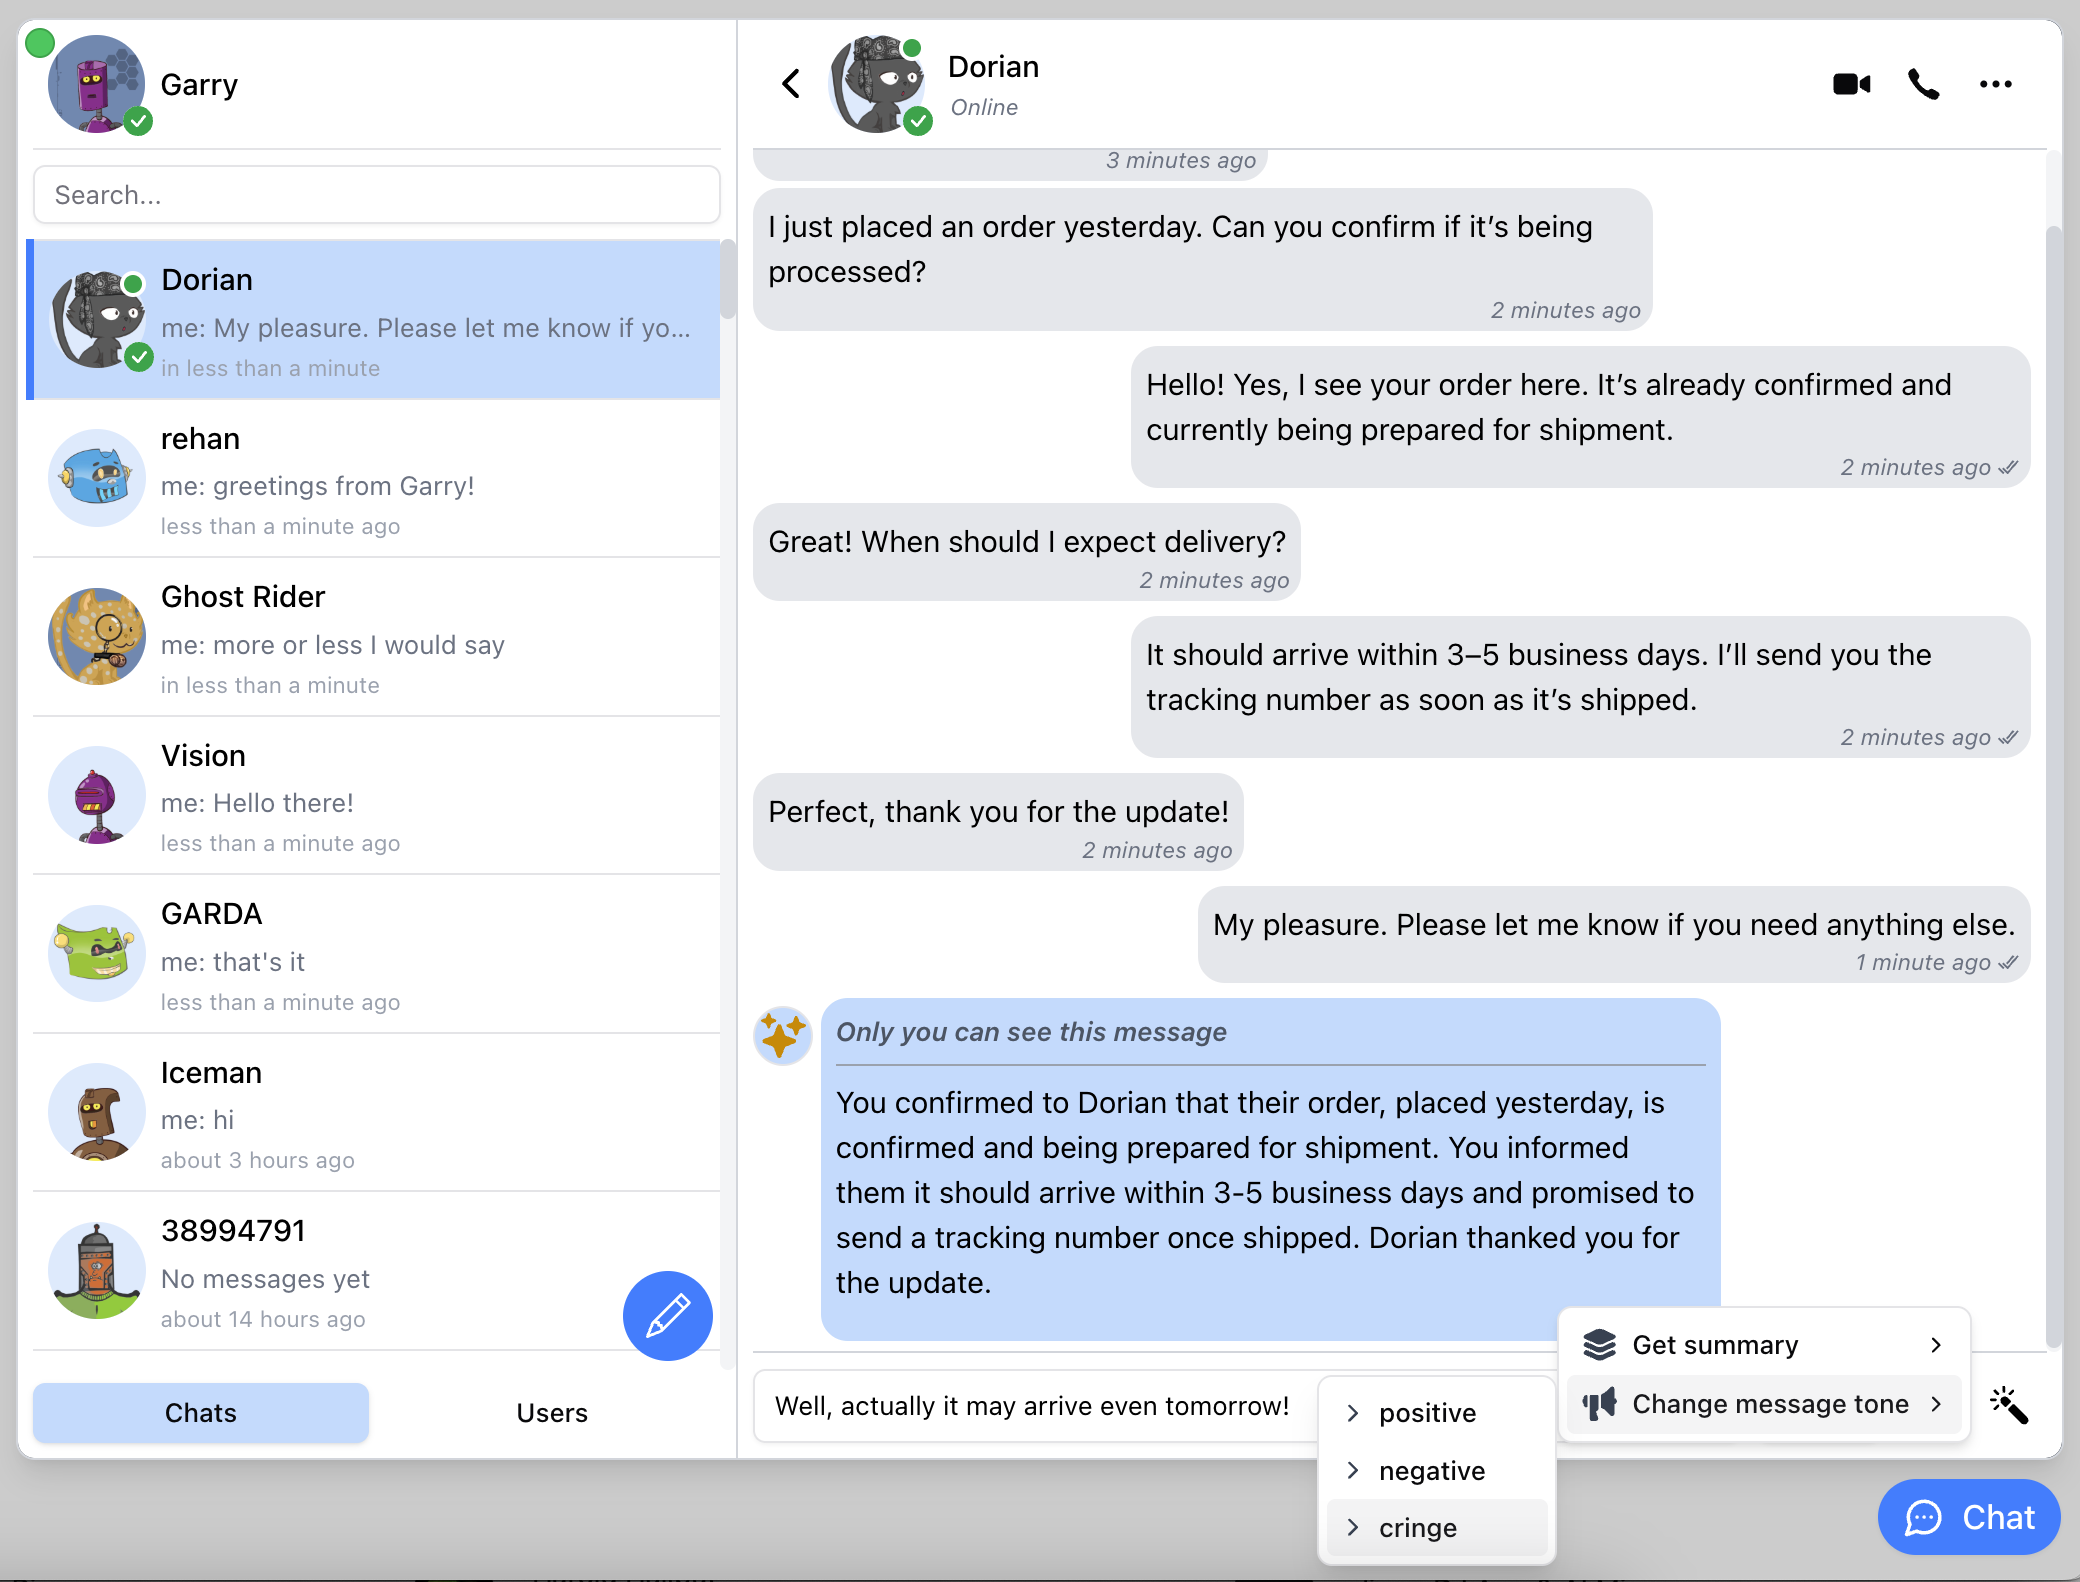\ 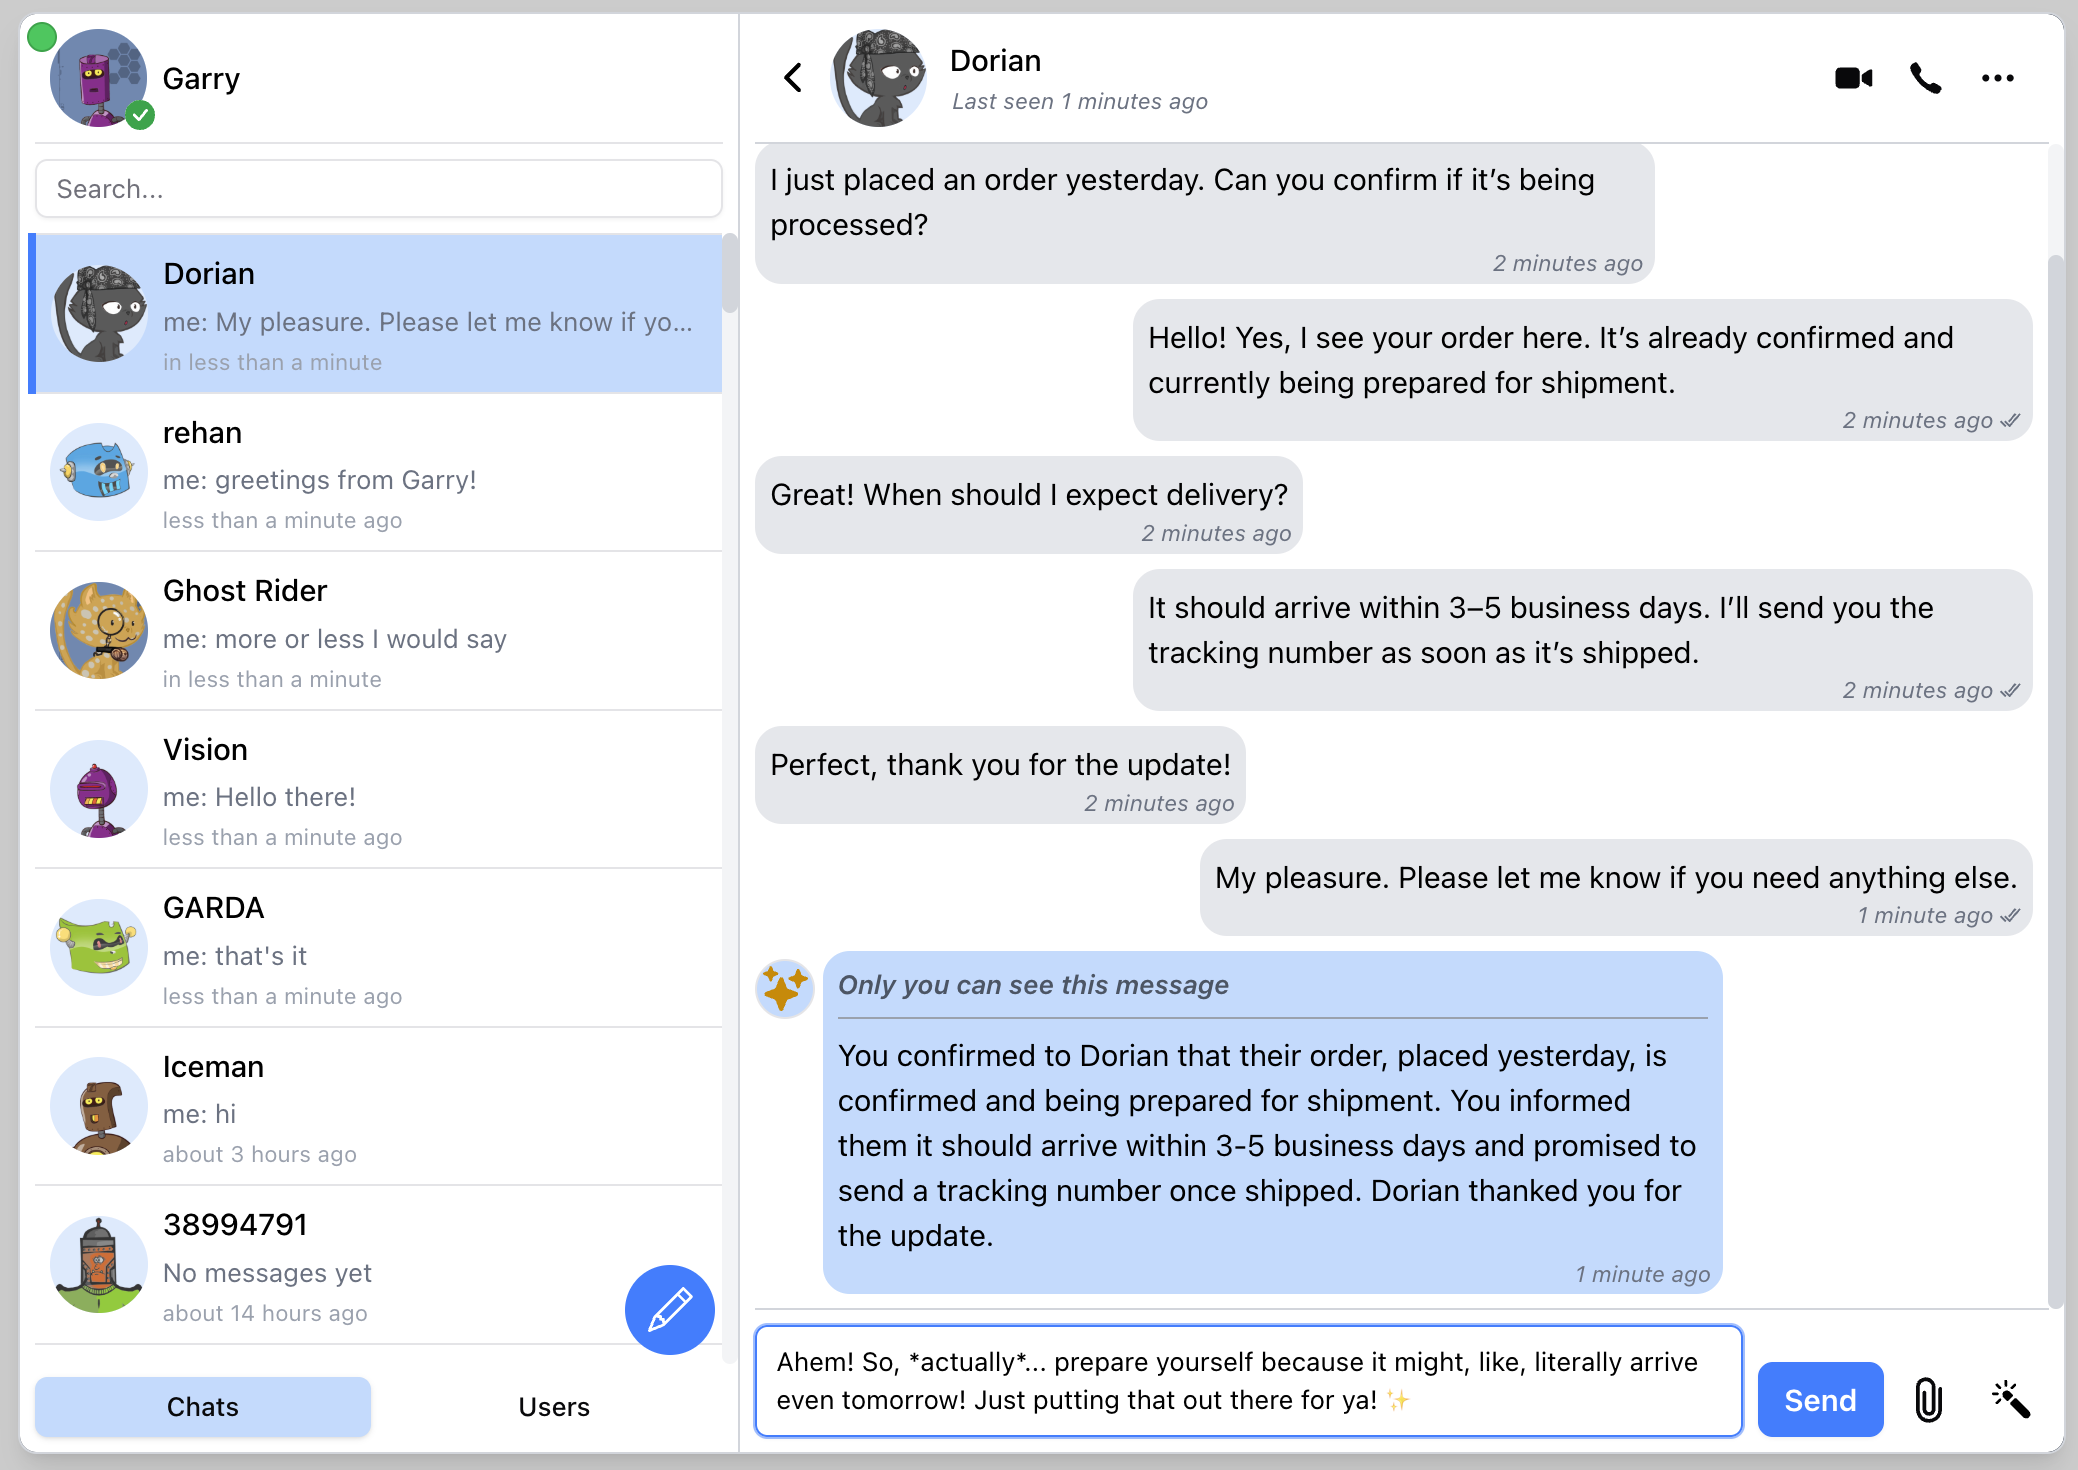 #### Chat history summarisation [Section titled “Chat history summarisation”](#chat-history-summarisation) Instead of scrolling through long chats, users can generate concise summaries of past conversations. This helps quickly recall key points, decisions, and action items without reading every single message. * React ```js ``` * Vanilla JS ```js const props = { ... ai: { textSummarization: true, apiKey: 'AIza1231231231231231231231-wHBRQv1M', }, }; ``` * Angular ```ts @Component({ ... }) export class MyComponent { props = { ... ai: { textSummarization: true, apiKey: 'AIza1231231231231231231231-wHBRQv1M', }, }; } ``` 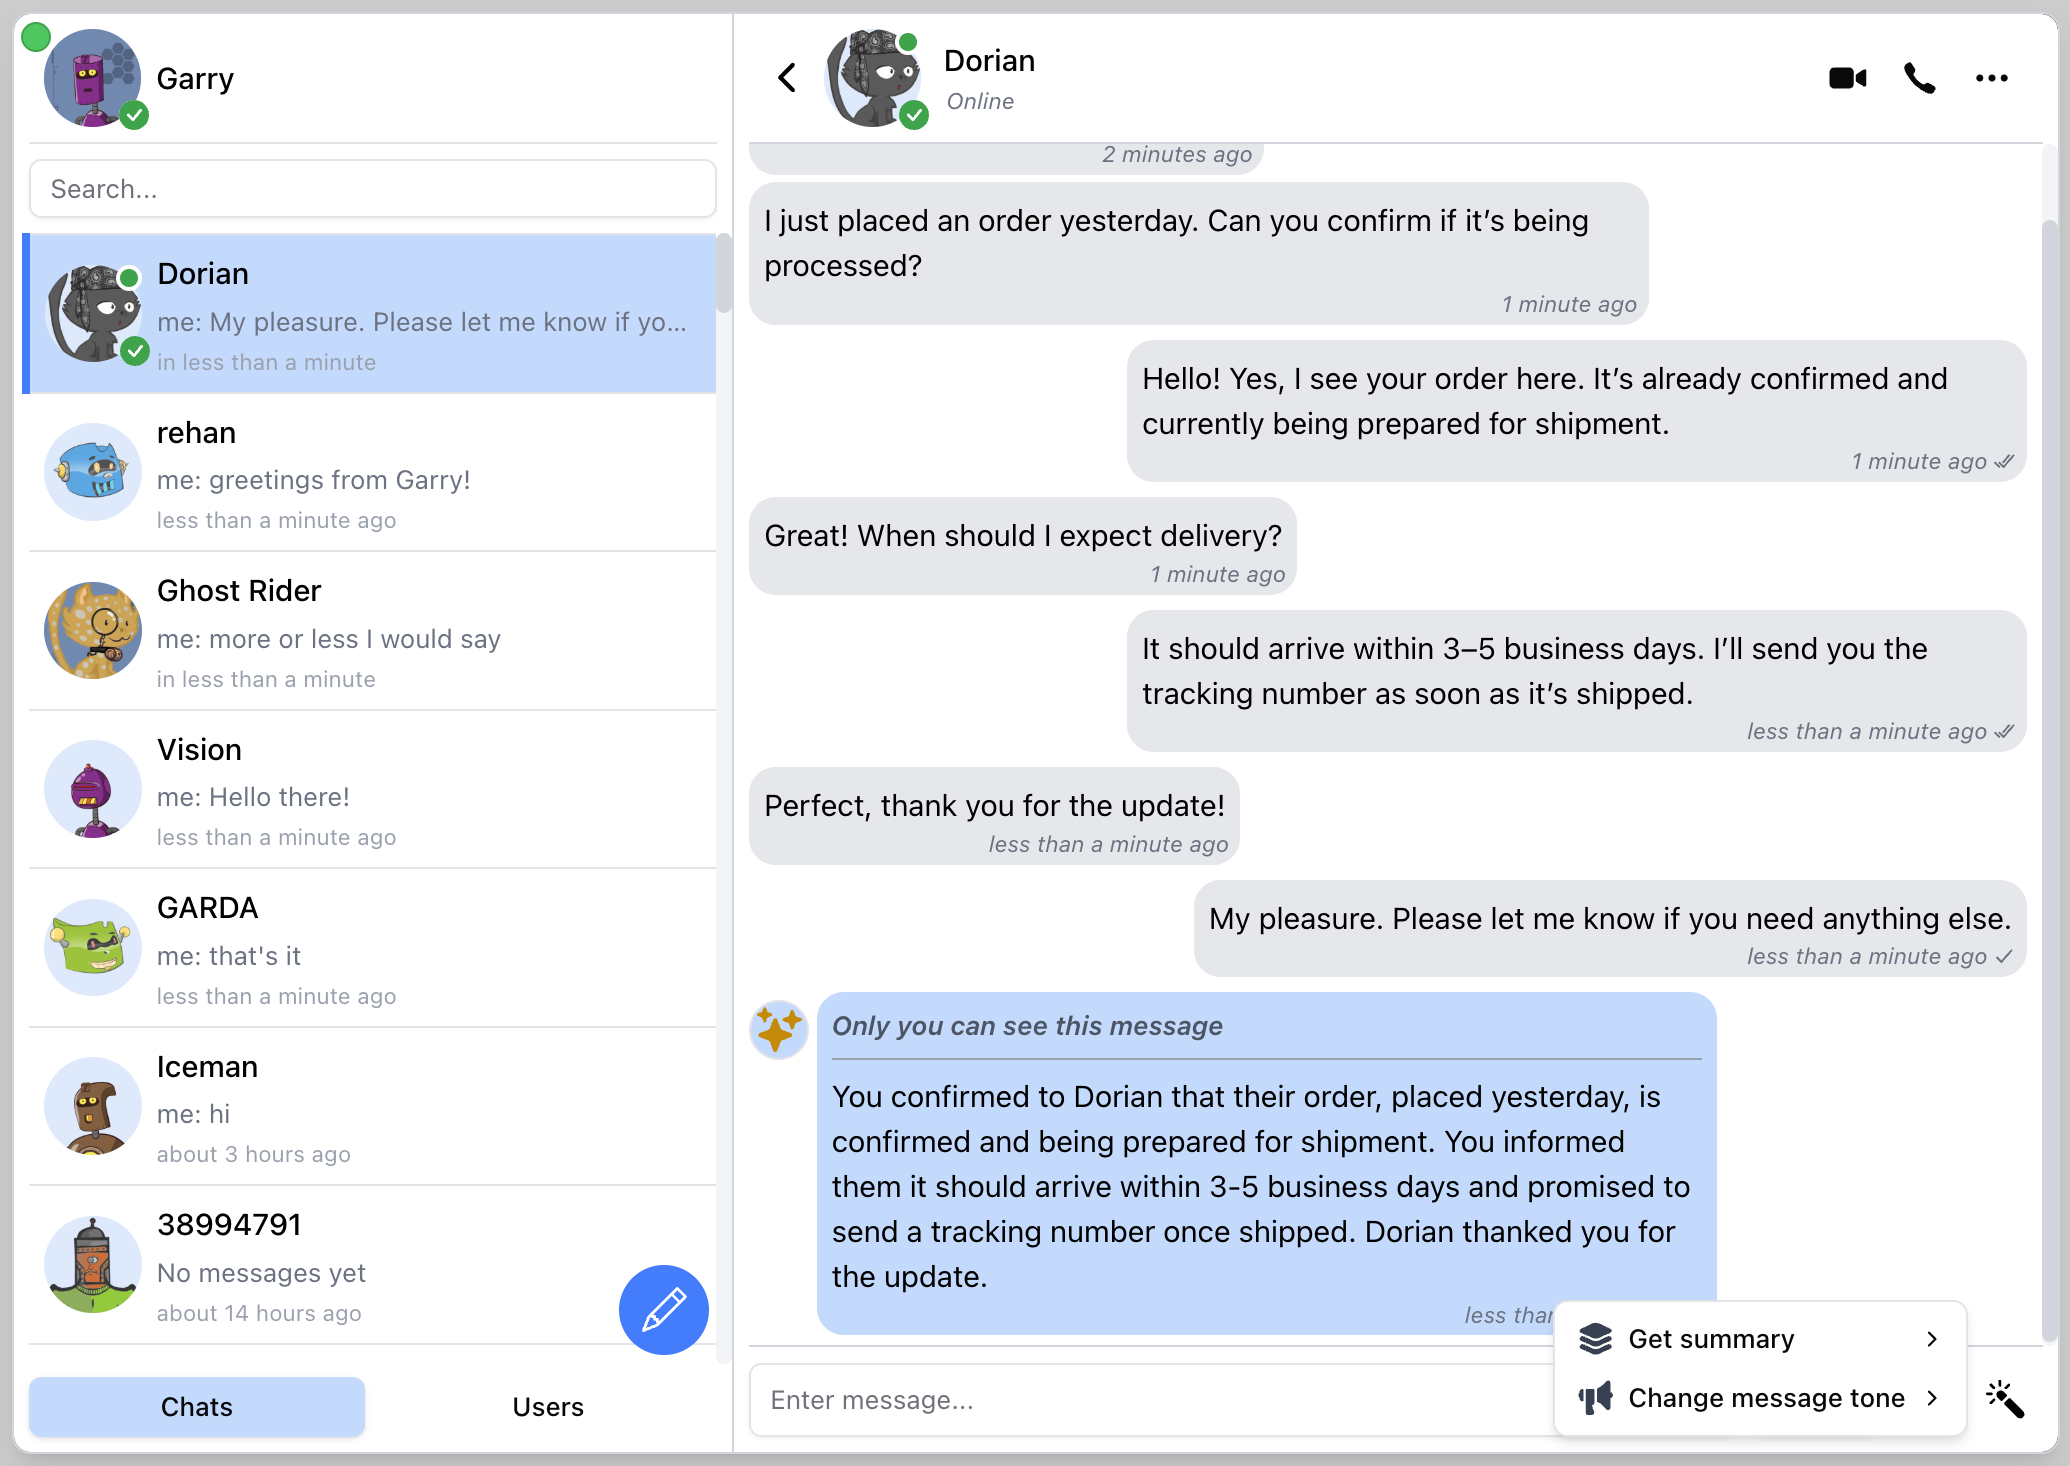 ## Appearance & Styling [Section titled “Appearance & Styling”](#appearance--styling) The Appearance & Styling settings let you fully customize the visual presentation of the chat widget. You can control the look of the toggle button, badge, and chat portal using inline styles or CSS class names. This ensures your widget blends seamlessly into your app or site design. ### Chat toggle button [Section titled “Chat toggle button”](#chat-toggle-button) * **buttonTitle** - sets the accessible title (title attribute) of the chat toggle button. This is typically used for accessibility or tooltip text when hovering over the button * **buttonStyle** - applies inline styles to the chat toggle button ### Portal [Section titled “Portal”](#portal) * **portalStyle** - applies inline styles to the main chat window (portal) ### Badge [Section titled “Badge”](#badge) * **badgeStyle** - applies inline styles to the notification badge that appears on the toggle button (e.g., unread messages count) ## Props [Section titled “Props”](#props) | Prop Name | Type | Description | Default Value | | -------------------------- | -------------------------- | ------------------------------------------------------------------------------------------------------------------------------------------------------------------------------------------------------- | ------------- | | `appId` | `number \| string` | The ConnectyCube Application ID | | | `authKey` | `string` | The ConnectyCube Authentication Key | | | `config` | `object` | *(Optional)* Configuration options for ConnectyCube SDK | | | `userId` | `string` | A User Id from your system | | | `userName` | `string` | User name. This is how other users will see your user name | | | `userAvatar` | `string` | *(Optional)* User Avatar URL | | | `userProfileLink` | `string` | *(Optional)* User profile link URL | | | `enableUserLogin` | `boolean` | *(Optional)* Enables user login/register feature | false | | `translation` | `string` | *(Optional)* Specifies the language for the chat widget. See [Supported Translations](#supported-translations) | ”en” | | `disableClickOutside` | `boolean` | *(Optional)* Hide chat widget by click or touch outside the widget’s containers | false | | `disableEscKeyPress` | `boolean` | *(Optional)* Hide chat widget by press “Escape” button | false | | `hideWidgetButton` | `boolean` | *(Optional)* Allows to hide the button that opens/hides the chat widget | false | | `buttonTitle` | `string` | *(Optional)* The text displayed on the chat button | ”Chat” | | `portalStyle` | `React.CSSProperties` | *(Optional)* Inline styles for the portal | | | `overlayStyle` | `React.CSSProperties` | *(Optional)* Inline styles for the overlay | | | `buttonStyle` | `React.CSSProperties` | *(Optional)* Inline styles for the button | | | `badgeStyle` | `React.CSSProperties` | *(Optional)* Inline styles for the unread messages badge | | | `onlineBadgeStyle` | `React.CSSProperties` | *(Optional)* Inline styles for the online users count badge | | | `open` | `boolean` | *(Optional)* To control the visibility state of the chat widget | false | | `embedView` | `boolean` | *(Optional)* Embeds chat view by filling parent block. Props `open` and `hideNewChatButton` won’t react and will be `true` by default | false | | `splitView` | `boolean` | *(Optional)* Displays the widget in split view (chats list and chat) or mobile view (only chats list or active chat) | false | | `showChatStatus` | `boolean` | *(Optional)* Displays the chat connection status indicator | false | | `showOnlineUsersTab` | `boolean` | *(Optional)* Displays users tab with the list of online users | false | | `hideNewChatButton` | `boolean` | *(Optional)* Allows to hide the chat creation button | false | | `hideNewUserChatOption` | `boolean` | *(Optional)* Allows to hide the New Message option in New Chat dropdown | false | | `hideNewGroupChatOption` | `boolean` | *(Optional)* Allows to hide the New Group option in New Chat dropdown | false | | `imgLogoSource` | `string` | *(Optional)* Allows to use custom logo source that is a relative path to the site’s `index.html` | ”/logo.png” | | `muted` | `boolean` | *(Optional)* Mutes or unmutes notifications and sounds | false | | `showNotifications` | `boolean` | *(Optional)* Allows receiving browser notifications | false | | `playSound` | `boolean` | *(Optional)* Enables or disables playing sound on incoming messages | true | | `webPushNotifications` | `boolean` | *(Optional)* Allows receiving browser push notifications | false | | `webPushVapidPublicKey` | `string` | *(Optional)* Vapid Public Key for push notifications | false | | `serviceWorkerPath` | `string` | *(Optional)* Path to service worker for push notifications | false | | `attachmentsAccept` | `string \| null` | *(Optional)* This prop sets to the accept attribute in [HTML \](https://www.w3schools.com/TAGs/att_input_accept.asp). Set `null` to disable the feature and hide attachment button | ”\*/\*“ | | `enableCalls` | `boolean` | *(Optional)* Enables the calls feature | false | | `enableUserStatuses` | `boolean` | *(Optional)* Enable user statuses, such as “Available”, “Busy” and “Away” | false | | `enableLastSeen` | `boolean` | *(Optional)* Displays green dot on user avatar in chats list when user is online and last seen information on chat header | false | | `enableContentReporting` | `boolean` | *(Optional)* Enable reporting bad content feature (will show Report button in user profile) | false | | `enableBlockList` | `boolean` | *(Optional)* Enable block user feature (will show Block button in user profile) | false | | `enableOnlineUsersBadge` | `boolean` | *(Optional)* Displays online users badge on chat widget button | false | | `getOnlineUsersInterval` | `number` | *(Optional)* Allows to set how frequently the badge should be updated, in seconds. Min is 30 seconds | 300 | | `enableUrlPreview` | `boolean` | *(Optional)* Allows to unfurl a link once posted in chat | false | | `limitUrlsPreviews` | `number` | *(Optional)* Allows to set maximum displayed URLs preview in single message. Max is 5 | 1 | | `quickActions` | `object` | *(Optional)* Configuration for quick actions dialog. See [Quick Actions](#quick-actions) | | | `defaultChat` | `object` | *(Optional)* Force widget to open particular chat. See [Default Chat](#default-chat) | | | `singleView` | `boolean` | *(Optional)* Enables customer support mode, allowing direct chat between users and product support teams. | false | | `singleViewChat` | `object` | *(Optional)* The chat widget will launch in support chat mode. Prop `singleView` must be enabled and [Quick Actions](#quick-actions) must be set. See [Single View Chat](#single-view-chat) | | | `termsAndConditions` | `string` | *(Optional)* Specifies the link for “Terms and Conditions” shown in the confirm email form when `singleView` is enabled. | | | `ai` | `object` | *(Optional)* Allows to enable and use AI features, such as get chat summary and change tone of a typed messages. See [AI](#ai) | | | `onUnreadCountChange` | `(count: boolean) => void` | *(Optional)* Callback function to get update about unread messages count | | | `onOnlineUsersCountChange` | `(count: boolean) => void` | *(Optional)* Callback function to get update about online users count | | | `onOpenChange` | `(open: boolean) => void` | *(Optional)* Callback function to get update about chat widget visibility | | ### Quick Actions [Section titled “Quick Actions”](#quick-actions) | Prop Name | Type | Description | | ------------- | ---------- | ------------------------------------------------ | | `title` | `string` | *(Optional)* Title for the quick actions section | | `description` | `string` | *(Optional)* Description for the quick actions | | `actions` | `string[]` | List of action strings | `` ### Supported Translations [Section titled “Supported Translations”](#supported-translations) | Language Code | Language | | ------------- | --------- | | `en` | English | | `el` | Greek | | `ua` | Ukrainian | ### Default Chat [Section titled “Default Chat”](#default-chat) | Prop Name | Type | Description | | ---------------- | -------- | --------------------------------------------------------------------------------------------------------------- | | `id` | `string` | A key that will be used to identify the chat. Must be same value for each particular user between page reloads. | | `opponentUserId` | `string` | User id to create chat with. Must be a User Id from your system, similar to **userId** prop | | `type` | `string` | Type of chat to create if not exist: 1on1 or group | | `name` | `string` | Name of chat | | `metadata` | `map` | Chat metadata | ### Single View [Section titled “Single View”](#single-view) | Prop Name | Type | Description | | ----------------- | -------- | ------------------------------------------------------------------------------------------------------------------------------------------------------------------------------------------------------- | | `id` | `string` | A key that will be used to identify the chat. Must be same value for each particular user between page reloads. | | `opponentUserIds` | `string` | Opponent(s) ID/IDs for a support chat. Use separators, such as `","`, `", "`, or `" "`, or array of strings to add more IDs to the chat. Must be a User Id from your system, similar to **userId** prop | | `name` | `string` | *(Optional)* Name of support chat | | `photo` | `string` | *(Optional)* Photo of support chat. Relative path to an image file, a URL, or ConnectyCube file’s UID | ### Push notifications [Section titled “Push notifications”](#push-notifications) Push notifications allow to receive a message while the browser tab with widget is closed. For push notifications to work it need to do the following: 1. pass `webPushNotifications: true` prop 2. go to [ConnectyCube Dashboard](https://admin.connectycube.com/), Push Notifications, Credentials, WEBPUSH NOTIFICATIONS and fill all the required fields (Subject, PublicKey, PrivateKey) 3. for `webPushVapidPublicKey` prop to set the same PublicKey which you set in ConnectyCube Dashboard. 4. create a service worker and provide path to it via `serviceWorkerPath` prop. See chat widget [code samples](https://github.com/ConnectyCube/connectycube-chat-widget-samples) as a reference. ### AI [Section titled “AI”](#ai-1) | Prop Name | Type | Description | | ------------------- | --------- | -------------------------------------------------------------------------------------------------------------------------------- | | `apiKey` | `string` | An `GOOGLE_GENERATIVE_AI_API_KEY` for Google AI “gemini-2.5-flash” model. Register here | | `textSummarization` | `boolean` | *(Optional)* Activates the ability to get a summary of a conversation for the selected time period | | `changeMessageTone` | `boolean` | *(Optional)* Allows the ability to change the tone of a typed message to “positive”, “negative”, or “cringe” | ## Recipes [Section titled “Recipes”](#recipes) ### Split view [Section titled “Split view”](#split-view) To display a widget with 2 separate UI blocks: left for chats list and the right one for messages stream. * React ```js ``` * Vanilla JS ```js const props = { ... splitView: true, }; ``` * Angular ```ts @Component({ ... }) export class MyComponent { props = { ... splitView: false, }; } ``` `` ### Mobile view [Section titled “Mobile view”](#mobile-view) To display a widget with 1 UI block, which displays chats list and once selected a chat - it will display the messages stream. * React ```js ``` * Vanilla JS ```js const props = { ... splitView: false, }; ``` * Angular ```ts @Component({ ... }) export class MyComponent { props = { ... splitView: true, }; } ``` `` ### Embedded view [Section titled “Embedded view”](#embedded-view) To embed the widget onto a page and display it e.g. full screen. * React ```js ``` * Vanilla JS ```js const props = { ... embedView: true, }; ``` * Angular ```ts @Component({ ... }) export class MyComponent { props = { ... embedView: true, }; } ``` `` ### Single View [Section titled “Single View”](#single-view-1) To display a widget in a single view mode - most popular for support chat use case. * React ```js ``` * Vanilla JS ```js const props = { ..., singleView: true, termsAndConditions: 'https://cats-store.com/terms-and-conditions', singleViewChat: { name: 'Cats Store', photo: 'https://cataas.com/cat', opponentUserIds: ['cat_support#007', 'cat_support#069'], }, quickActions: { title: 'Quick Actions', description: 'Select an action from the options below or type a first message to start a conversation.', actions: [ '🛒 I have a question about my order', '💳 I need help with payment or billing', '⚙️ I’m having a technical issue', '❓ Something else – connect me to support', ], }, }; ``` * Angular ```ts @Component({ ... }) export class MyComponent { props = { ..., singleView: true, termsAndConditions: 'https://cats-store.com/terms-and-conditions', singleViewChat: { name: 'Cats Store', photo: 'https://cataas.com/cat', opponentUserIds: ['cat_support#007', 'cat_support#069'], }, quickActions: { title: 'Quick Actions', description: 'Select an action from the options below or type a first message to start a conversation.', actions: [ '🛒 I have a question about my order', '💳 I need help with payment or billing', '⚙️ I’m having a technical issue', '❓ Something else – connect me to support', ], }, } } ``` `` ### Display Chat button bottom left [Section titled “Display Chat button bottom left”](#display-chat-button-bottom-left) * React ```js ``` * Vanilla JS ```js const props = { ... buttonStyle: {"left": "0.5rem", "right": "auto"} portalStyle: {"left": "0.5rem", "right": "auto"}, }; ``` * Angular ```ts @Component({ ... }) export class MyComponent { props = { ... buttonStyle: {"left": "0.5rem", "right": "auto"} portalStyle: {"left": "0.5rem", "right": "auto"}, }; } ``` ### Open widget on custom button [Section titled “Open widget on custom button”](#open-widget-on-custom-button) * React ```js import { useState } from 'react'; import { ConnectyCubeChatWidget } from '@connectycube/chat-widget'; export default function App() { const [visible, setVisible] = useState(false); return (
``` ## Have an issue? [Section titled “Have an issue?”](#have-an-issue) Join our [Discord](https://discord.com/invite/zqbBWNCCFJ) for quick answers to your questions ## Changelog [Section titled “Changelog”](#changelog)
# Send first chat message
> Step-by-step guide to sending your first chat message using ConnectyCube Android Chat SDK - what exactly to do when you want to build a chat.
The **ConnectyCube Chat API** is a set of tools that enables developers to integrate real-time messaging into their web and mobile applications. With this API, users can build powerful chat functionalities that support one-on-one messaging, group chats, typing indicators, message history, delivery receipts, and push notifications. If you’re planning to build a new app, we recommend starting with one of our [code samples apps](/android/getting-started/code-samples/) as a foundation for your client app.\ If you already have an app and you are looking to add chat to it, proceed with this guide. This guide walks you through installing the ConnectyCube SDK in your app, configure it and then sending your first message to the opponent in 1-1 chat. ## Before you start [Section titled “Before you start”](#before-you-start) Before you start, make sure: 1. You have access to your ConnectyCube account. If you don’t have an account, [sign up here](https://admin.connectycube.com/register). 2. An app created in ConnectyCube dashboard. Once logged into [your ConnectyCube account](https://admin.connectycube.com/signin), create a new application and make a note of the app credentials (app ID and auth key ) that you’ll need for authentication. ## Step 1: Configure SDK [Section titled “Step 1: Configure SDK”](#step-1-configure-sdk) To use chat in a client app, you should install, import and configure ConnectyCube SDK. **Note:** If the app is already created during the onboarding process and you followed all the instructions, you can skip the ‘Configure SDK’ step and start with [Create and Authorise User](#step-2-create-and-authorise-user). ### Install SDK [Section titled “Install SDK”](#install-sdk) To get the ConnectyCube SDK project running you will need [Android Studio](https://developer.android.com/studio/) and [Maven](https://maven.apache.org/) installed. The repository contains binary distributions of ConnectyCube Android SDK and an instruction how to connect SDK to your project. Check it out. Include reference to sdk repository in your build.gradle file at the app level (top level): ```groovy repositories { maven { url "https://github.com/ConnectyCube/connectycube-android-sdk-releases/raw/master/" } } ``` Then include dependencies to particular sdk-modules in build.gradle project file: ```groovy dependencies { implementation "com.connectycube.sdk:connectycube-android:2.0.0-beta05" } ``` ### Import SDK [Section titled “Import SDK”](#import-sdk) Add the following import statement to start using all classes and methods. ```kotlin import com.connectycube.ConnectyCubeAndroid; ``` ### Initialize SDK [Section titled “Initialize SDK”](#initialize-sdk) Initialize the SDK with your ConnectyCube application credentials. You can access your application credentials in [ConnectyCube Dashboard](https://admin.connectycube.com): ```kotlin ConnectyCubeAndroid.init(APP_ID, AUTH_KEY, context = applicationContext) ``` ## Step 2: Create and Authorise User [Section titled “Step 2: Create and Authorise User”](#step-2-create-and-authorise-user) As a starting point, the user’s session token needs to be created allowing to send and receive messages in chat.\ With the request below, the user is created automatically on the fly upon session creation using the login (or email) and password from the parameters: ```kotlin val user = ConnectycubeUser(login = "marvin18", password = "supersecurepwd") ConnectyCube.createSession(user, { session -> }, { error -> }) ``` **Note:** With the request above, **the user is created automatically on the fly upon session creation** using the login (or email) and password from the request parameters. **Important:** such approach with the automatic user creation works well for testing purposes and while the application isn’t launched on production. For better security it is recommended to deny the session creation without an existing user.\ For this, set ‘Session creation without an existing user entity’ to **Deny** under the **Application -> Overview -> Permissions** in the [admin panel](https://admin.connectycube.com/apps). ## Step 3: Connect User to chat [Section titled “Step 3: Connect User to chat”](#step-3-connect-user-to-chat) Connecting to the chat is an essential step in enabling real-time communication. By establishing a connection, the user is authenticated on the chat server, allowing them to send and receive messages instantly. Without this connection, the app won’t be able to interact with other users in the chat. ```kotlin val user = ConnectycubeUser().apply { id = 21 password = "supersecurepwd" } // or just // val user = user { // id = 21 // password = "supersecurepwd" //} ConnectyCube.chat.login(user, {}, { ex -> Log.d(tag, "login ex= $ex") }) ``` ## Step 4: Create 1-1 chat [Section titled “Step 4: Create 1-1 chat”](#step-4-create-1-1-chat) Creating a 1-1 chat is essential because it gives a unique conversation ID to correctly route and organize your message to the intended user. You need to pass `ConnectycubeDialogType.PRIVATE` as a type and an **id** of an opponent you want to create a chat with: ```kotlin val dialog = ConnectycubeDialog(type = ConnectycubeDialogType.PRIVATE, occupantsIds = occupantIds) ConnectyCube.createDialog(cubeDialog, { dialog -> }, { error -> }) ``` ## Step 5: Send / Receive messages [Section titled “Step 5: Send / Receive messages”](#step-5-send--receive-messages) **Receive messages** In order to send and receive messages, first it is required to add listener. There is `IncomingMessagesManager` to listen for all incoming messages from all dialogs. ```kotlin ConnectyCube.chat.addMessageListener(object: ConnectycubeMessageListener { override fun onError(message: ConnectycubeMessage, ex: Throwable) { } override fun onMessage(message: ConnectycubeMessage) { } }) ``` **Send messages in 1-1 chat** Creating a 1-1 chat is essential because it gives a unique conversation ID to correctly route and organize your message to the intended user. ```kotlin ConnectyCube.chat.sendMessage(message { recipientId = dialog.getRecipientId() body = "How are you today?" }) ``` That’s it! You’ve mastered the basics of sending a chat message in 1-1 chat in ConnectyCube. #### What’s next? [Section titled “What’s next?”](#whats-next) To take your chat experience to the next level, explore ConnectyCube advanced functionalities, like adding typing indicators, using emojis, sending attachments, and more. Follow the [Chat API documentation](/android/messaging/) to enrich your app and engage your users even further!
# Make first call
> A guide with the essential steps of how to make the first call via ConnectyCube Android Video SDK - from session creation to initialising and accepting the call
**ConnectyCube Video Calling Peer-to-Peer (P2P) API** provides a solution for integrating real-time video and audio calling into your application. This API enables you to create smooth one-on-one and group video calls, supporting a wide range of use cases like virtual meetings, telemedicine consultations, social interactions, and more. The P2P approach ensures that media streams are transferred directly between users whenever possible, minimizing latency and delivering high-quality audio and video. If you’re planning to build a new app, we recommend starting with one of our [code samples apps](/android/getting-started/code-samples/) as a foundation for your client app.\ If you already have an app and you are looking to add chat and voice/video calls to it, proceed with this guide. This guide walks you through installing the ConnectyCube SDK in your app, configure it and then initiating the call to the opponent. ## Before you start [Section titled “Before you start”](#before-you-start) Before you start, make sure: 1. You have access to ConnectyCube account. If you don’t have an account, [sign up here](https://admin.connectycube.com/register). 2. An app created in ConnectyCube dashboard. Once logged into [your ConnectyCube account](https://admin.connectycube.com/signin), create a new application and make a note of the app credentials (app ID and auth key) that you’ll need for authentication. ## Step 1: Configure SDK [Section titled “Step 1: Configure SDK”](#step-1-configure-sdk) To use chat in a client app, you should install, import and configure ConnectyCube SDK. **Note:** If the app is already created during the onboarding process and you followed all the instructions, you can skip the ‘Configure SDK’ step and start with [Create and Authorise User](#step-2-create-and-authorise-user). ### Install SDK [Section titled “Install SDK”](#install-sdk) To get the ConnectyCube SDK project running you will need [Android Studio](https://developer.android.com/studio/) and [Maven](https://maven.apache.org/) installed. The repository contains binary distributions of ConnectyCube Android SDK and an instruction how to connect SDK to your project. Check it out. Include reference to sdk repository in your build.gradle file at the app level (top level): ```groovy repositories { maven { url "https://github.com/ConnectyCube/connectycube-android-sdk-releases/raw/master/" } } ``` Then include dependencies to particular sdk-modules in build.gradle project file: ```groovy dependencies { implementation "com.connectycube.sdk:connectycube-android:2.0.0-beta05" } ``` ### Import SDK [Section titled “Import SDK”](#import-sdk) Add the following import statement to start using all classes and methods. ```kotlin import com.connectycube.ConnectyCubeAndroid; ``` ### Initialize SDK [Section titled “Initialize SDK”](#initialize-sdk) Initialize the SDK with your ConnectyCube application credentials. You can access your application credentials in [ConnectyCube Dashboard](https://admin.connectycube.com): ```kotlin ConnectyCubeAndroid.init(APP_ID, AUTH_KEY, context = applicationContext) ``` ## Step 2: Create and Authorise User [Section titled “Step 2: Create and Authorise User”](#step-2-create-and-authorise-user) As a starting point, the user’s session token needs to be created allowing to participate in calls.\ With the request below, the user is created automatically on the fly upon session creation using the login (or email) and password from the parameters: ```kotlin val user = ConnectycubeUser(login = "marvin18", password = "supersecurepwd") ConnectyCube.createSession(user, { session -> }, { error -> }) ``` **Note:** With the request above, **the user is created automatically on the fly upon session creation** using the login (or email) and password from the request parameters. **Important:** such approach with the automatic user creation works well for testing purposes and while the application isn’t launched on production. For better security it is recommended to deny the session creation without an existing user.\ For this, set ‘Session creation without an existing user entity’ to **Deny** under the **Application -> Overview -> Permissions** in the [admin panel](https://admin.connectycube.com/apps). ## Step 3: Connect User to chat [Section titled “Step 3: Connect User to chat”](#step-3-connect-user-to-chat) Connecting to the chat is an essential step in enabling real-time communication. To start using Video Calling API you need to connect user to Chat as [ConnectyCube Chat API](/android/messaging) is used as a signalling transport for Video Calling API: ```kotlin val user = ConnectycubeUser().apply { id = 21 password = "supersecurepwd" } // or just // val user = user { // id = 21 // password = "supersecurepwd" //} ConnectyCube.chat.login(user, {}, { ex -> Log.d(tag, "login ex= $ex") }) ``` ## Step 4: Permissions to access camera, microphone and internet [Section titled “Step 4: Permissions to access camera, microphone and internet”](#step-4-permissions-to-access-camera-microphone-and-internet) Before starting the audio / video calling with the opponent(s), the video chat module requires camera, microphone and internet permissions. Make sure you add relevant permissions to your app manifest: ```xml ``` You can get more info on how to work with app permissions at [Android Permissions Overview](https://developer.android.com/guide/topics/permissions/overview) ## Step 5: Initiate a call [Section titled “Step 5: Initiate a call”](#step-5-initiate-a-call) To call users, you should create a session and start a call: ```kotlin val opponents: MutableList = ArrayList() opponents.add(21) // User can pass an additional info along with the call request val userInfo: HashMap = HashMap() userInfo["key1"] = "value1" //Init session val session = P2PCalls.createSession(opponents, CallType.VIDEO) session.startCall(userInfo) ``` After this, your opponents will receive a call request callback `onReceiveNewSession` via `RTCClientSessionCallbacks`. ## Step 6: Accept a call [Section titled “Step 6: Accept a call”](#step-6-accept-a-call) You will receive all incoming call requests in `RTCClientSessionCallbacks.onReceiveNewSession(session)` callback. To accept the call request use the following code snippet: ```kotlin // RTCCallSessionCallback override fun onReceiveNewSession(session: P2PSession) { // obtain received user info // val userInfo = session.getUserInfo() // set your user info if needed val userInfo = HashMap() userInfo["key1"] = "value1" // Accept the incoming call session.acceptCall(userInfo) } ``` After this, you will receive an accept callback: ```kotlin // RTCSessionEventsCallback override fun onCallAcceptByUser(session: P2PSession, opponentId: Int, userInfo: Map?) { } ``` Great work! You’ve completed the essentials of making a call in ConnectyCube. From this point, you and your opponents should start seeing and hearing each other. #### What’s next? [Section titled “What’s next?”](#whats-next) To enhance your calling feature with advanced functionalities, such as call recording, screen sharing, or integrating emojis and attachments during calls, follow the API guides below. These additions will help create a more dynamic and engaging experience for your users! * [Voice/video calling SDK documentation](/android/videocalling) * [Conference calling SDK documentation](/android/videocalling-conference)
# Chat
> Integrate powerful chat functionality into your Android app effortlessly with our versatile Chat APIs. Enhance user communication and engagement.
ConnectyCube Chat API is built on top of Real-time(XMPP) protocol. In order to use it you need to setup real-time connection with ConnectyCube Chat server and use it to exchange data. By default Real-time Chat works over secure TLS connection. ## Connect to chat [Section titled “Connect to chat”](#connect-to-chat) * SDK v2 kotlin ```kotlin val user = ConnectycubeUser().apply { id = 21 password = "supersecurepwd" } // or just val user = user { id = 21 password = "supersecurepwd" } ConnectyCube.chat.login(user, {}, { ex -> Log.d(tag, "login ex= $ex") }) ``` * SDK v1 kotlin (deprecated) ```kotlin // Provide chat connection configuration val chatServiceConfigurationBuilder = ConfigurationBuilder().apply { socketTimeout = 60 isKeepAlive = true isUseTls = true //By default TLS is disabled. } ConnectycubeChatService.setConnectionFabric(TcpChatConnectionFabric(chatServiceConfigurationBuilder)) val chatService = ConnectycubeChatService.getInstance() val user = ConnectycubeUser().apply { id = 21 password = "supersecurepwd" } chatService.login(user, object : EntityCallback { override fun onError(error: ResponseException) { } override fun onSuccess(result: Void?, args: Bundle) { } }) ``` * SDK v1 java (deprecated) ```java // Provide chat connection configuration ConnectycubeChatService.ConfigurationBuilder chatServiceConfigurationBuilder = new ConnectycubeChatService.ConfigurationBuilder(); chatServiceConfigurationBuilder.setSocketTimeout(60); chatServiceConfigurationBuilder.setKeepAlive(true); chatServiceConfigurationBuilder.setUseTls(true); //By default TLS is disabled. ConnectycubeChatService.setConfigurationBuilder(chatServiceConfigurationBuilder); ConnectycubeChatService chatService = ConnectycubeChatService.getInstance(); final ConnectycubeUser user = new ConnectycubeUser(); user.setId(21); user.setPassword("supersecurepwd"); chatService.login(user, new EntityCallback() { @Override public void onSuccess() { } @Override public void onError(ResponseException errors) { } }); ``` Use **ConnectionListener** to handle different connection states: * SDK v2 kotlin ```kotlin ConnectyCube.chat.addConnectionListener(object : ConnectycubeConnectionListener { override fun onConnected() { } override fun onDisconnected() { } }) ``` * SDK v1 kotlin (deprecated) ```kotlin val connectionListener: ConnectionListener = object : ConnectionListener { override fun connected(connection: XMPPConnection) { } override fun connectionClosed() { } override fun connectionClosedOnError(e: Exception) { } override fun reconnectingIn(seconds: Int) { } override fun reconnectionSuccessful() { } override fun authenticated(connection: XMPPConnection, resumed: Boolean) { } override fun reconnectionFailed(e: Exception) { } } ConnectycubeChatService.getInstance().addConnectionListener(connectionListener) ``` * SDK v1 java (deprecated) ```java ConnectionListener connectionListener = new ConnectionListener() { @Override public void connected(XMPPConnection connection) { } @Override public void authenticated(XMPPConnection connection) { } @Override public void connectionClosed() { } @Override public void connectionClosedOnError(Exception e) { } @Override public void reconnectingIn(int seconds) { } @Override public void reconnectionSuccessful() { } @Override public void reconnectionFailed(Exception e) { } }; ConnectycubeChatService.getInstance().addConnectionListener(connectionListener); ``` ### Connect to chat using custom authentication providers [Section titled “Connect to chat using custom authentication providers”](#connect-to-chat-using-custom-authentication-providers) In some cases we don’t have a user’s password, for example when login via: * Facebook * Twitter * Firebase phone authorization * Custom identity authentication * etc. In such cases ConnectyCube API provides possibility to use ConnectyCube session token as a password for chat connection: * SDK v2 kotlin ```kotlin val token = ConnectycubeSessionManager.getToken() val user = ConnectycubeUser().apply { id = 21 password = token } ``` * SDK v1 kotlin (deprecated) ```kotlin // get current ConnectyCube session token and set as user's password val token = ConnectycubeSessionManager.getInstance().token val user = ConnectycubeUser().apply { id = 21 password = token } ``` * SDK v1 java (deprecated) ```java // get current ConnectyCube session token and set as user's password String token = ConnectycubeSessionManager.getInstance().getToken(); final ConnectycubeUser user = new ConnectycubeUser(); user.setId(21); user.setPassword(token); ``` ## Disconnect [Section titled “Disconnect”](#disconnect) To **logout from chat** connection use logout method: * SDK v2 kotlin ```kotlin val isLoggedIn = ConnectyCube.chat.isLoggedIn() if (!isLoggedIn) { return } ConnectyCube.chat.logout({}, { ex -> Log.d(tag, "logout ex= $ex") }) ``` * SDK v1 kotlin (deprecated) ```kotlin val isLoggedIn = chatService.isLoggedIn if (!isLoggedIn) { return } chatService.logout(object : EntityCallback { override fun onError(error: ResponseException) { } override fun onSuccess(result: Void?, args: Bundle) { } }) ``` * SDK v1 java (deprecated) ```java boolean isLoggedIn = chatService.isLoggedIn(); if(!isLoggedIn){ return; } chatService.logout(new EntityCallback() { @Override public void onSuccess() { } @Override public void onError(ResponseException errors) { } }); ``` To **fully destroy** chat connection use destroy method: * SDK v2 kotlin ```kotlin ConnectyCube.chat.destroy() ``` * SDK v1 kotlin (deprecated) ```kotlin chatService.destroy() ``` * SDK v1 java (deprecated) ```java chatService.destroy(); ``` ## Reconnection [Section titled “Reconnection”](#reconnection) The SDK reconnects automatically when connection to Chat server is lost. There is a way to disable it and then manage it manually: * SDK v2 kotlin ```kotlin //Coming soon ``` * SDK v1 kotlin (deprecated) ```kotlin ConnectycubeChatService.getInstance().isReconnectionAllowed = false ``` * SDK v1 java (deprecated) ```java ConnectycubeChatService.getInstance().setReconnectionAllowed(false); ``` ## Dialogs [Section titled “Dialogs”](#dialogs) All chats between users are organized in dialogs. The are 4 types of dialogs: * 1-1 chat - a conversation between 2 users. * group chat - a conversation between specified list of users. * public chat - an open conversation. Any user from your app can subscribe to it. * broadcast - chat where a message is sent to all users within application at once. All the users from the application are able to join this group. Broadcast dialogs can be created only via Admin panel. You need to create a new dialog and then use it to chat with other users. You also can obtain a list of your existing dialogs. ## Create new dialog [Section titled “Create new dialog”](#create-new-dialog) ### Create 1-1 chat [Section titled “Create 1-1 chat”](#create-1-1-chat) You need to pass `ConnectycubeDialogType.PRIVATE` as a type and an id of an opponent you want to create a chat with: * SDK v2 kotlin ```kotlin val dialog = ConnectycubeDialog(type = ConnectycubeDialogType.PRIVATE, occupantsIds = occupantIds) ConnectyCube.createDialog(cubeDialog, { dialog -> }, { error -> }) ``` * SDK v1 kotlin (deprecated) ```kotlin val occupantIds = ArrayList().apply { add(34) } val dialog = ConnectycubeChatDialog().apply { type = ConnectycubeDialogType.PRIVATE setOccupantsIds(occupantIds) } // or just use DialogUtils // val dialog = DialogUtils.buildPrivateDialog(34) ConnectycubeRestChatService.createChatDialog(dialog) .performAsync(object : EntityCallback { override fun onSuccess(createdDialog: ConnectycubeChatDialog, params: Bundle) { } override fun onError(exception: ResponseException) { } }) ``` * SDK v1 java (deprecated) ```java ArrayList occupantIds = new ArrayList(); occupantIds.add(34); ConnectycubeChatDialog dialog = new ConnectycubeChatDialog(); dialog.setType(ConnectycubeDialogType.PRIVATE); dialog.setOccupantsIds(occupantIds); //or just use DialogUtils //ConnectycubeChatDialog dialog = DialogUtils.buildPrivateDialog(recipientId); ConnectycubeRestChatService.createChatDialog(dialog).performAsync(new EntityCallback() { @Override public void onSuccess(ConnectycubeChatDialog createdDialog, Bundle params) { } @Override public void onError(ResponseException exception) { } }); ``` ### Create group chat [Section titled “Create group chat”](#create-group-chat) You need to pass `ConnectycubeDialogType.GROUP` as a type and ids of opponents you want to create a chat with: * SDK v2 kotlin ```kotlin val dialog = ConnectycubeDialog( type = ConnectycubeDialogType.GROUP, name = "Hawaii party", occupantsIds = occupantIds) ConnectyCube.createDialog(cubeDialog, { dialog -> }, { error -> }) ``` * SDK v1 kotlin (deprecated) ```kotlin val occupantIds = ArrayList().apply { add(34) add(35) add(36) } val dialog = ConnectycubeChatDialog().apply { type = ConnectycubeDialogType.GROUP name = "Hawaii party" // photo = "..." // description = "..." setOccupantsIds(occupantIds) } //or just use DialogUtils //val dialog = DialogUtils.buildDialog("Hawaii party", ConnectycubeDialogType.GROUP, occupantIds).apply { // photo = "..." // description = "..." //} ConnectycubeRestChatService.createChatDialog(dialog) .performAsync(object : EntityCallback { override fun onSuccess(createdDialog: ConnectycubeChatDialog, params: Bundle) { } override fun onError(exception: ResponseException) { } }) ``` * SDK v1 java (deprecated) ```java ArrayList occupantIds = new ArrayList(); occupantIds.add(34); occupantIds.add(35); occupantIds.add(36); ConnectycubeChatDialog dialog = new ConnectycubeChatDialog(); dialog.setType(ConnectycubeDialogType.GROUP); dialog.setOccupantsIds(occupantIds); dialog.setName("Hawaii party"); //dialog.setPhoto("..."); //dialog.setDescription("..."); //or just use DialogUtils //ConnectycubeChatDialog dialog = DialogUtils.buildDialog("Hawaii party", ConnectycubeDialogType.GROUP, occupantIds); ConnectycubeRestChatService.createChatDialog(dialog).performAsync(new EntityCallback() { @Override public void onSuccess(ConnectycubeChatDialog createdDialog, Bundle params) { } @Override public void onError(ResponseException exception) { } }); ``` ### Create public chat [Section titled “Create public chat”](#create-public-chat) It’s possible to create a public chat, so any user from your application can subscribe to it. You need to pass `ConnectycubeDialogType.PUBLIC` as a type to create a chat with: * SDK v2 kotlin ```kotlin val dialog = ConnectycubeDialog(type = ConnectycubeDialogType.PUBLIC, name = "Blockchain trends") ConnectyCube.createDialog(cubeDialog, { dialog -> }, { error -> }) ``` * SDK v1 kotlin (deprecated) ```kotlin val dialog = ConnectycubeChatDialog().apply { type = ConnectycubeDialogType.PUBLIC name = "Blockchain trends" // photo = "..." // description = "..." } ConnectycubeRestChatService.createChatDialog(dialog) .performAsync(object : EntityCallback { override fun onSuccess(createdDialog: ConnectycubeChatDialog, params: Bundle) { } override fun onError(exception: ResponseException) { } }) ``` * SDK v1 java (deprecated) ```java ConnectycubeChatDialog dialog = new ConnectycubeChatDialog(); dialog.setType(ConnectycubeDialogType.PUBLIC); dialog.setName("Blockchain trends"); //dialog.setPhoto("..."); //dialog.setDescription("..."); ConnectycubeRestChatService.createChatDialog(dialog).performAsync(new EntityCallback() { @Override public void onSuccess(ConnectycubeChatDialog createdDialog, Bundle params) { } @Override public void onError(ResponseException exception) { } }); ``` With public dialog ID any a user can subscribe to the public dialog via the following code: * SDK v2 kotlin ```kotlin ConnectyCube.subscribeToDialog(dialogId, { dialog -> }, { error -> }) ``` * SDK v1 kotlin (deprecated) ```kotlin ConnectycubeRestChatService.subscribePublicDialog(dialogID) .performAsync(object : EntityCallback { override fun onSuccess(dialog: ConnectycubeChatDialog, params: Bundle) { } override fun onError(responseException: ResponseException) { } }) ``` * SDK v1 java (deprecated) ```java ConnectycubeRestChatService.subscribePublicDialog(dialogID).performAsync(new EntityCallback() { @Override public void onSuccess(ConnectycubeChatDialog dialog, Bundle params) { } @Override public void onError(ResponseException responseException) { } }); ``` After dialog subscription, this dialog will be listed in retrieve dialogs request and you also will be able to chat in it. You also can unsubscribe if you do not want to be in this public dialog anymore: * SDK v2 kotlin ```kotlin ConnectyCube.unSubscribeFromDialog(dialogId, { }, { error -> }) ``` * SDK v1 kotlin (deprecated) ```kotlin ConnectycubeRestChatService.unsubscribePublicDialog(dialogID) .performAsync(object : EntityCallback { override fun onSuccess(result: ConnectycubeChatDialog, params: Bundle) { } override fun onError(responseException: ResponseException) { } }) ``` * SDK v1 java (deprecated) ```java ConnectycubeRestChatService.unsubscribePublicDialog(dialogID).performAsync(new EntityCallback() { @Override public void onSuccess(ConnectycubeChatDialog result, Bundle params) { } @Override public void onError(ResponseException responseException) { } }); ``` ### Chat metadata [Section titled “Chat metadata”](#chat-metadata) A dialog can have up to 3 custom sub-fields to store additional information that can be linked to chat. To start using extensions, allowed fields should be added first. Go to [Admin panel](https://admin.connectycube.com) > Chat > Custom Fields and provide allowed custom fields.  When create a dialog, the `extensions` field object must contain allowed fields only. Others fields will be ignored. The values will be casted to string. * SDK v2 kotlin ```kotlin val dialog = ConnectycubeDialog(ConnectycubeDialogType.GROUP) dialog.name = "Friday party" dialog.occupantsIds = arrayListOf(29085, 29086, 29087) dialog.description = "lets dance the night away" dialog.extensions = hashMapOf("location" to "Sun bar") ConnectyCube.createDialog(dialog, { createdDialog -> }, { error -> }) ``` When remove custom field in Admin panel, this field will be removed in all dialogs respectively. These parameters also can be used as a filter for retrieving dialogs. ### Chat permissions [Section titled “Chat permissions”](#chat-permissions) Chat could have different permissions to managa data access. This is managed via `permissions` field. At the moment, only one permission available - `allow_preview` - which allows to retrieve dialog’s messages for user who is not a member of dialog. This is useful when implement feature like Channels where a user can open chat and preview messages w/o joining it. > **Note** > > To preview messages w/o joining to dialog pass `preview` operator in request to get messages. ## Retrieve list of dialogs [Section titled “Retrieve list of dialogs”](#retrieve-list-of-dialogs) It’s common to request all your conversations on every app login: * SDK v2 kotlin ```kotlin val params: HashMap = hashMapOf( "limit" to 50, "skip" to 100 ) ConnectyCube.getDialogs(params, successCallback = { resultDialogs -> }, errorCallback = { error -> }) ``` * SDK v1 kotlin (deprecated) ```kotlin val requestBuilder = RequestGetBuilder().apply { limit = 50 skip = 100 // sortAsc(Consts.DIALOG_LAST_MESSAGE_DATE_SENT_FIELD_NAME) } ConnectycubeRestChatService.getChatDialogs(null as ConnectycubeDialogType, requestBuilder) .performAsync(object : EntityCallback> { override fun onSuccess(dialogs: ArrayList, params: Bundle) { val totalEntries = params.getInt(Consts.TOTAL_ENTRIES) } override fun onError(exception: ResponseException) { } }) ``` * SDK v1 java (deprecated) ```java RequestGetBuilder requestBuilder = new RequestGetBuilder(); requestBuilder.setLimit(50); requestBuilder.setSkip(100); //requestBuilder.sortAsc(Consts.DIALOG_LAST_MESSAGE_DATE_SENT_FIELD_NAME); ConnectycubeRestChatService.getChatDialogs((ConnectycubeDialogType)null, requestBuilder).performAsync(new EntityCallback>() { @Override public void onSuccess(ArrayList dialogs, Bundle params) { int totalEntries = params.getInt(Consts.TOTAL_ENTRIES); } @Override public void onError(ResponseException exception) { } }); ``` It will return all your 1-1 dialogs, group dialog and also public dialogs your are subscribed to. If you want to retrieve only conversations updated after some specific date time, you can use `requestBuilder.gt("updated_at", "1455098137");` filter. This is useful if you cache conversations somehow and do not want to obtain the whole list of your conversations on every app start. ## Update dialog’s name, description, photo [Section titled “Update dialog’s name, description, photo”](#update-dialogs-name-description-photo) User can update group chat name, description, photo: * SDK v2 kotlin ```kotlin val dialogId = "5356c64ab35c12bd3b108a41" val params = UpdateDialogParams() //class-helper to simple config search request params.newName = "Hawaii party" params.newPhoto = "https://new_photo_url" params.newDescription = "New dialog description" ConnectyCube.updateDialog(dialogId, params.getUpdateDialogParams(), successCallback = { resultDialog -> }, errorCallback = { error -> }) ``` * SDK v1 kotlin (deprecated) ```kotlin val dialog = ConnectycubeChatDialog().apply { dialogId = "5356c64ab35c12bd3b108a41" name = "Hawaii party" photo = "https://new_photo_url" // or it can be an ID to some file in Storage module description = "New dialog description" } ConnectycubeRestChatService.updateChatDialog(dialog, null) .performAsync(object : EntityCallback { override fun onSuccess(updatedDialog: ConnectycubeChatDialog, bundle: Bundle) { } override fun onError(error: ResponseException) { } }) ``` * SDK v1 java (deprecated) ```java ConnectycubeChatDialog dialog = new ConnectycubeChatDialog(); dialog.setDialogId("5356c64ab35c12bd3b108a41"); dialog.setName("Hawaii party"); dialog.setPhoto("https://new_photo_url"); // or it can be an ID to some file in Storage module dialog.setDescription("New dialog description"); ConnectycubeRestChatService.updateChatDialog(dialog, null).performAsync(new EntityCallback() { @Override public void onSuccess(ConnectycubeChatDialog updatedDialog, Bundle bundle) { } @Override public void onError(ResponseException error) { } }); ``` ## Add/Remove occupants [Section titled “Add/Remove occupants”](#addremove-occupants) You can add/remove occupants in group and public dialogs: * SDK v2 kotlin ```kotlin val dialogId = "5356c64ab35c12bd3b108a41" val params = UpdateDialogParams() params.addOccupantIds = hashSetOf(378) // params.deleteOccupantIds = hashSetOf(22) ConnectyCube.updateDialog(dialogId, params.getUpdateDialogParams(), successCallback = { resultDialog -> }, errorCallback = { error -> }) ``` * SDK v1 kotlin (deprecated) ```kotlin val requestBuilder = DialogRequestBuilder().apply { addUsers(378) // removeUsers(22) } val dialog = ConnectycubeChatDialog("5356c64ab35c12bd3b108a41") ConnectycubeRestChatService.updateChatDialog(dialog, requestBuilder) .performAsync(object : EntityCallback { override fun onSuccess(updatedDialog: ConnectycubeChatDialog, bundle: Bundle) { } override fun onError(error: ResponseException) { } }) ``` * SDK v1 java (deprecated) ```java DialogRequestBuilder requestBuilder = new DialogRequestBuilder(); requestBuilder.addUsers(378); // requestBuilder.removeUsers(22); ConnectycubeChatDialog dialog = new ConnectycubeChatDialog(); dialog.setDialogId("5356c64ab35c12bd3b108a41"); ConnectycubeRestChatService.updateChatDialog(dialog, requestBuilder).performAsync(new EntityCallback() { @Override public void onSuccess(ConnectycubeChatDialog updatedDialog, Bundle bundle) { } @Override public void onError(ResponseException error) { } }); ``` > **Note** > > Only group chat owner and admins can remove other users from group chat. ## Add / Remove admins [Section titled “Add / Remove admins”](#add--remove-admins) Admins it’s a special role in chats. They have the same permissions as a dialog’s creator except add/remove other admins and remove dialog. Owner of the group chat dialog can add admins: * SDK v2 kotlin ```kotlin val dialogId = "5356c64ab35c12bd3b108a41" val params = UpdateDialogParams() params.addAdminIds = hashSetOf(17616, 17617) ConnectyCube.updateDialog(dialogId, params.getUpdateDialogParams(), successCallback = { resultDialog -> }, errorCallback = { error -> }) ``` * SDK v1 kotlin (deprecated) ```kotlin val updateBuilder = DialogRequestBuilder().apply { addAdminsIds(17616, 17617) } ConnectycubeRestChatService.updateChatDialog(groupDialog, updateBuilder) .performAsync(object : EntityCallback { override fun onSuccess(result: ConnectycubeChatDialog, params: Bundle) { } override fun onError(responseException: ResponseException) { } }) ``` * SDK v1 java (deprecated) ```java DialogRequestBuilder updateBuilder = new DialogRequestBuilder(); updateBuilder.addAdminsIds(17616, 17617); ConnectycubeRestChatService.updateChatDialog(groupDialog, updateBuilder).performAsync(new EntityCallback() { @Override public void onSuccess(ConnectycubeChatDialog result, Bundle params) { } @Override public void onError(ResponseException responseException) { } }); ``` and remove: * SDK v2 kotlin ```kotlin val dialogId = "5356c64ab35c12bd3b108a41" val params = UpdateDialogParams() params.deleteAdminIds = hashSetOf(17616, 17617) ConnectyCube.updateDialog(dialogId, params.getUpdateDialogParams(), successCallback = { resultDialog -> }, errorCallback = { error -> }) ``` * SDK v1 kotlin (deprecated) ```kotlin val updateBuilder = DialogRequestBuilder().apply { removeAdminsIds(17616, 17617) } ConnectycubeRestChatService.updateChatDialog(groupDialog, updateBuilder) .performAsync(object : EntityCallback { override fun onSuccess(result: ConnectycubeChatDialog, params: Bundle) { } override fun onError(responseException: ResponseException) { } }) ``` * SDK v1 java (deprecated) ```java DialogRequestBuilder updateBuilder = new DialogRequestBuilder(); updateBuilder.removeAdminsIds(17616, 17617); ConnectycubeRestChatService.updateChatDialog(groupDialog, updateBuilder).performAsync(new EntityCallback() { @Override public void onSuccess(ConnectycubeChatDialog result, Bundle params) { } @Override public void onError(ResponseException responseException) { } }); ``` ## Pin messages [Section titled “Pin messages”](#pin-messages) Pinning a message allows group owner or chat admins to easily store messages which are important, so that all users in chat have a quick access to them. The following code pins some messages to a particular group dialog: * SDK v2 kotlin ```kotlin val dialogId = "5356c64ab35c12bd3b108a41" val params = UpdateDialogParams() params.addPinnedMsgIds = hashSetOf("5356c64ab35c12bd3b10ba32", "5356c64ab35c12bd3b10wa65") // params.deletePinnedMsgIds = hashSetOf("5356c64ab35c12bd3b10ba32", "5356c64ab35c12bd3b10wa65") ConnectyCube.updateDialog(dialogId, params.getUpdateDialogParams(), successCallback = { resultDialog -> }, errorCallback = { error -> }) ``` * SDK v1 kotlin (deprecated) ```kotlin val updateBuilder = DialogRequestBuilder().apply { addPinnedMessagesIds( "5356c64ab35c12bd3b10ba32", "5356c64ab35c12bd3b10wa65" ) // removePinnedMessagesIds( // "5356c64ab35c12bd3b10ba32", // "5356c64ab35c12bd3b10wa65" // ) } ConnectycubeRestChatService.updateChatDialog(groupDialog, updateBuilder) .performAsync(object : EntityCallback { override fun onSuccess(result: ConnectycubeChatDialog, params: Bundle) { } override fun onError(responseException: ResponseException) { } }) ``` * SDK v1 java (deprecated) ```java DialogRequestBuilder updateBuilder = new DialogRequestBuilder(); updateBuilder.addPinnedMessagesIds("5356c64ab35c12bd3b10ba32", "5356c64ab35c12bd3b10wa65"); //updateBuilder.removePinnedMessagesIds("5356c64ab35c12bd3b10ba32", "5356c64ab35c12bd3b10wa65"); ConnectycubeRestChatService.updateChatDialog(groupDialog, updateBuilder).performAsync(new EntityCallback() { @Override public void onSuccess(ConnectycubeChatDialog result, Bundle params) { } @Override public void onError(ResponseException responseException) { } }); ``` ## Remove dialog [Section titled “Remove dialog”](#remove-dialog) The following snippet is used to delete a conversation: * SDK v2 kotlin ```kotlin val dialogId = "5356c64ab35c12bd3b108a41" val forceDelete = false ConnectyCube.deleteDialog(dialogId, forceDelete, successCallback = { }, errorCallback = { }) ``` * SDK v1 kotlin (deprecated) ```kotlin val dialogId = "5356c64ab35c12bd3b108a41" val forceDelete = false ConnectycubeRestChatService.deleteDialog(dialogId, forceDelete) .performAsync(object : EntityCallback { override fun onSuccess(aVoid: Void?, bundle: Bundle) { } override fun onError(error: ResponseException) { } }) ``` * SDK v1 java (deprecated) ```java String dialogId = "5356c64ab35c12bd3b108a41"; boolean forceDelete = false; ConnectycubeRestChatService.deleteDialog(dialogId, forceDelete).performAsync(new EntityCallback() { @Override public void onSuccess(Void aVoid, Bundle bundle) { } @Override public void onError(ResponseException error) { } }); ``` This request will remove this conversation for current user, but other users still will be able to chat there. **The** `forceDelete` **parameter is used to completely remove the dialog.** Only group chat owner can remove the group conversation for all users. You can also delete multiple conversations in a single request. ## Chat history [Section titled “Chat history”](#chat-history) Every chat conversation stores its chat history which you can retrieve: * SDK v2 kotlin ```kotlin val dialogId = "5356c64ab35c12bd3b108a41" val messageGetBuilder: GetMessagesParameters = GetMessagesParameters().also { it.limit = 100; it.markAsRead = false; it.sorter = RequestSorter("", "date_sent", "desc")} ConnectyCube.getMessages(dialogId, messageGetBuilder.getRequestParameters(), successCallback = { pagedMessagesResult -> }, errorCallback = { error -> }) ``` * SDK v1 kotlin (deprecated) ```kotlin val chatDialog = ConnectycubeChatDialog("5356c64ab35c12bd3b108a41") val messageGetBuilder = MessageGetBuilder().apply { limit = 100 // gt(Consts.MESSAGE_DATE_SENT, "1455098137") } ConnectycubeRestChatService.getDialogMessages(chatDialog, messageGetBuilder) .performAsync(object : EntityCallback> { override fun onSuccess(messages: ArrayList, bundle: Bundle) { } override fun onError(error: ResponseException) { } }) ``` * SDK v1 java (deprecated) ```java ConnectycubeChatDialog chatDialog = new ConnectycubeChatDialog("5356c64ab35c12bd3b108a41"); MessageGetBuilder messageGetBuilder = new MessageGetBuilder(); messageGetBuilder.setLimit(100); // messageGetBuilder.gt("date_sent", "1455098137"); ConnectycubeRestChatService.getDialogMessages(chatDialog, messageGetBuilder).performAsync(new EntityCallback>() { @Override public void onSuccess(ArrayList messages, Bundle bundle) { } @Override public void onError(ResponseException error) { } }); ``` If you want to retrieve chat messages that were sent after or before specific date time only, you can use `messageGetBuilder.gt("date_sent", "1455098137")` or `messageGetBuilder.lt("date_sent", "1455098137")` filter. This is useful if you implement pagination for loading messages in your app. > **Note** > > All retrieved chat messages will be marked as read after the request. If you decided not to mark chat messages as read, then add the following parameter to your request: `messageGetBuilder.markAsRead(false);` ## Send/Receive chat messages [Section titled “Send/Receive chat messages”](#sendreceive-chat-messages) ### Receive messages [Section titled “Receive messages”](#receive-messages) There is `IncomingMessagesManager` to listen for all incoming messages from all dialogs. * SDK v2 kotlin ```kotlin ConnectyCube.chat.addMessageListener(object: ConnectycubeMessageListener { override fun onError(message: ConnectycubeMessage, ex: Throwable) { } override fun onMessage(message: ConnectycubeMessage) { } }) ``` * SDK v1 kotlin (deprecated) ```kotlin val incomingMessagesManager = chatService.incomingMessagesManager incomingMessagesManager.addDialogMessageListener(object : ChatDialogMessageListener { override fun processMessage(dialogId: String, message: ConnectycubeChatMessage, senderId: Int) { } override fun processError(dialogId: String, exception: ChatException, message: ConnectycubeChatMessage, senderId: Int) { } }) ``` * SDK v1 java (deprecated) ```java IncomingMessagesManager incomingMessagesManager = chatService.getIncomingMessagesManager(); incomingMessagesManager.addDialogMessageListener(new ChatDialogMessageListener() { @Override public void processMessage(String dialogId, ConnectycubeChatMessage message, Integer senderId) { } @Override public void processError(String dialogId, ChatException exception, ConnectycubeChatMessage message, Integer senderId) { } }); ``` > Pay attention, messages from **group & public chat dialogs** will be received in this callback only after you join the dialogs. > Pay attention, before using dialog you need to init it for ConnectycubeChatService. Call this once you’ve got dialog - `chatDialog.initForChat(ConnectycubeChatService.getInstance())`. ### 1-1 chat [Section titled “1-1 chat”](#1-1-chat) * SDK v2 kotlin ```kotlin ConnectyCube.chat.addMessageListener(object: ConnectycubeMessageListener { override fun onError(message: ConnectycubeMessage, ex: Throwable) { } override fun onMessage(message: ConnectycubeMessage) { } }) ``` * SDK v1 kotlin (deprecated) ```kotlin val privateDialog = ... val chatMessage = ConnectycubeChatMessage().apply { body = "How are you today?" setSaveToHistory(true) } privateDialog.sendMessage(chatMessage) privateDialog.addMessageListener(object: ChatDialogMessageListener { override fun processMessage(dialogId: String, message: ConnectycubeChatMessage, senderId: Int ) { } override fun processError(dialogId: String, exception: ChatException, message: ConnectycubeChatMessage, senderId: Int? ) { } }) ``` * SDK v1 java (deprecated) ```java try { ConnectycubeChatDialog privateDialog = ...; ConnectycubeChatMessage chatMessage = new ConnectycubeChatMessage(); chatMessage.setBody("How are you today?"); chatMessage.setSaveToHistory(true); privateDialog.sendMessage(chatMessage); } catch (SmackException.NotConnectedException e) { } privateDialog.addMessageListener(new ChatDialogMessageListener() { @Override public void processMessage(String dialogId, ConnectycubeChatMessage message, Integer senderId) { } @Override public void processError(String dialogId, ChatException exception, ConnectycubeChatMessage message, Integer senderId) { } }); ``` ### Group/Public chat [Section titled “Group/Public chat”](#grouppublic-chat) Before you start chatting in a group/public conversation, you need to join it by calling `join` method: * SDK v1 kotlin (deprecated) ```kotlin val groupChatDialog = ... groupChatDialog.join(object : EntityCallback { override fun onSuccess(result: Void?, args: Bundle?) { } override fun onError(exception: ResponseException) { } }) ``` * SDK v1 java (deprecated) ```java ConnectycubeChatDialog groupChatDialog = ...; groupChatDialog.join(new EntityCallback() { @Override public void onSuccess(Object o, Bundle bundle) { } @Override public void onError(ResponseException e) { } }); ``` Then you are able to send/receive messages: * SDK v2 kotlin ```kotlin val chatMessage = ConnectycubeMessage() chatMessage.dialogId = dialogId chatMessage.saveToHistory = true chatMessage.dateSent = System.currentTimeMillis() / 1000 chatMessage.markable = true if(dialog.type == ConnectycubeDialogType.PRIVATE) chatMessage.recipientId = dialog.getRecipientId() else chatMessage.type = when (dialog.type) { ConnectycubeDialogType.GROUP, ConnectycubeDialogType.PUBLIC -> ConnectycubeMessageType.Groupchat else -> ConnectycubeMessageType.Chat } chatMessage.body = "How are you today?" ConnectyCube.chat.sendMessage(chatMessage) ConnectyCube.chat.addMessageListener(object: ConnectycubeMessageListener { override fun onError(message: ConnectycubeMessage, ex: Throwable) { } override fun onMessage(message: ConnectycubeMessage) { } }) ``` * SDK v1 kotlin (deprecated) ```kotlin val chatMessage = ConnectycubeChatMessage().apply { body = "How are you today?" setSaveToHistory(true) } groupChatDialog.sendMessage(chatMessage) groupChatDialog.addMessageListener(object : ChatDialogMessageListener { override fun processMessage(dialogId: String, message: ConnectycubeChatMessage, senderId: Int ) { } override fun processError(dialogId: String, exception: ChatException, message: ConnectycubeChatMessage, senderId: Int ) { } }) ``` * SDK v1 java (deprecated) ```java try { ConnectycubeChatMessage chatMessage = new ConnectycubeChatMessage(); chatMessage.setBody("How are you today?"); chatMessage.setSaveToHistory(true); groupChatDialog.sendMessage(chatMessage); } catch (SmackException.NotConnectedException e) { } groupChatDialog.addMessageListener(new ChatDialogMessageListener() { @Override public void processMessage(String dialogId, ConnectycubeChatMessage message, Integer senderId) { } @Override public void processError(String dialogId, ChatException exception, ConnectycubeChatMessage message, Integer senderId) { } }); ``` When it’s done, you can leave the group conversation by calling `leave` method: * SDK v1 kotlin (deprecated) ```kotlin groupChatDialog.leave() ``` * SDK v1 java (deprecated) ```java try { groupChatDialog.leave(); groupChatDialog = null; } catch (XMPPException | SmackException.NotConnectedException e) { } ``` ## Message metadata [Section titled “Message metadata”](#message-metadata) A chat message can have custom sub-fields to store additional information that can be linked to the particular chat message. When create a message, the custom data can be attached via `properties` field: ```dart val message = ConnectycubeMessage() message.properties["field_one"] = "value_one" message.properties["field_two"] = "value_two" ``` ## ‘Sent’ status [Section titled “‘Sent’ status”](#sent-status) There is a ‘sent’ status to ensure that message is delivered to the server. In order to use the feature you need to enable it: * SDK v1 kotlin (deprecated) ```kotlin val chatService = ConnectycubeChatService.getInstance() chatService.setUseStreamManagement(true) chatService.login(user) ``` * SDK v1 java (deprecated) ```java ConnectycubeChatService chatService = ConnectycubeChatService.getInstance(); chatService.setUseStreamManagement(true); chatService.login(user); ``` > Pay attention: you should enable Stream Management before logging into the chat. Stream Management is initialized only during chat login step. The Stream Management defines an extension for active management of a stream between client and server, including features for stanza acknowledgements. The following callback is used to track the status: * SDK v2 kotlin ```kotlin ConnectyCube.chat.addMessageSentListener(object: ConnectycubeMessageSentListener { override fun onMessageSent(message: ConnectycubeMessage) { } override fun onMessageSentFailed(message: ConnectycubeMessage) { } }) ``` * SDK v1 kotlin (deprecated) ```kotlin val messageSentListener = object : ChatDialogMessageSentListener { override fun processMessageSent(dialogId: String, message: ConnectycubeChatMessage ) { } override fun processMessageFailed(dialogId: String, message: ConnectycubeChatMessage ) { } } val chatDialog = ... chatDialog.addMessageSentListener(messageSentListener) ``` * SDK v1 java (deprecated) ```java ChatDialogMessageSentListener messageSentListener = new ChatDialogMessageSentListener() { @Override public void processMessageSent(String dialogId, ConnectycubeChatMessage message) { } @Override public void processMessageFailed(String dialogId, ConnectycubeChatMessage message) { } }; ConnectycubeChatDialog chatDialog = ...; chatDialog.addMessageSentListener(messageSentListener); ``` ## ‘Delivered’ status [Section titled “‘Delivered’ status”](#delivered-status) The following callback is used to track the ‘delivered’ status: * SDK v2 kotlin ```kotlin ConnectyCube.chat.addMessageStatusListener(object: ConnectycubeMessageStatusListener { override fun onMessageDelivered(message: ConnectycubeMessage) { } override fun onMessageRead(message: ConnectycubeMessage) { } }) ``` * SDK v1 kotlin (deprecated) ```kotlin // call it after chat login val messageStatusesManager: MessageStatusesManager = ConnectycubeChatService.getInstance().messageStatusesManager val messageStatusListener = object : MessageStatusListener { override fun processMessageDelivered(messageId: String, dialogId: String, userId: Int ) { } override fun processMessageRead(messageId: String, dialogId: String, userId: Int ) { } } messageStatusesManager.addMessageStatusListener(messageStatusListener) ``` * SDK v1 java (deprecated) ```java private MessageStatusesManager messageStatusesManager; private MessageStatusListener messageStatusListener; // call it after chat login messageStatusesManager = ConnectycubeChatService.getInstance().getMessageStatusesManager(); messageStatusListener = new MessageStatusListener() { @Override public void processMessageDelivered(String messageId, String dialogId, Integer userId) { } @Override public void processMessageRead(String messageId, String dialogId, Integer userId) { } }; messageStatusesManager.addMessageStatusListener(messageStatusListener); ``` The SDK sends the ‘delivered’ status automatically when the message is received by the recipient. This is controlled by `chatMessage.setMarkable(true)` parameter when you send a message. If `markable` is `false` or omitted, then you can send the delivered status manually via Chat: * SDK v2 kotlin ```kotlin val chatDialog = ... val message = ... ConnectyCube.chat.sendDeliveredStatus(message) ``` * SDK v1 kotlin (deprecated) ```kotlin val chatDialog = ... val message = ... chatDialog.deliverMessage(message) ``` * SDK v1 java (deprecated) ```java ConnectycubeChatMessage message = ...; try { chatDialog.deliverMessage(message); } catch (XMPPException | SmackException.NotConnectedException e) { } ``` and via REST * SDK v2 kotlin ```kotlin val updatedParams = UpdateMessageParameters().also { it.delivered = true } ConnectyCube.updateMessage(messageId, dialogId, updatedParams.getRequestParameters(), { }, { error -> }) ``` * SDK v1 kotlin (deprecated) ```kotlin val messageUpdateBuilder = MessageUpdateBuilder().apply { markDelivered() } ConnectycubeRestChatService.updateMessage(messageId, dialogId, messageUpdateBuilder) .performAsync(object : EntityCallback { override fun onSuccess(result: Void?, params: Bundle?) { } override fun onError(responseException: ResponseException) { } }) ``` * SDK v1 java (deprecated) ```java MessageUpdateBuilder messageUpdateBuilder = new MessageUpdateBuilder(); messageUpdateBuilder.markDelivered(); ConnectycubeRestChatService.updateMessage(messageId, dialogId, messageUpdateBuilder).performAsync(new EntityCallback() { @Override public void onSuccess(Void result, Bundle params) { } @Override public void onError(ResponseException responseException) { } }); ``` ## ’Read’ status [Section titled “’Read’ status”](#read-status) Send the ‘read’ status: * SDK v2 kotlin ```kotlin ConnectyCube.chat.sendReadStatus(message) ``` * SDK v1 kotlin (deprecated) ```kotlin chatDialog.readMessage(chatMessage) ``` * SDK v1 java (deprecated) ```java try { chatDialog.readMessage(chatMessage); } catch (XMPPException | SmackException.NotConnectedException e) { } ``` Receive the ‘read’ status callback: * SDK v2 kotlin ```kotlin ConnectyCube.chat.addMessageStatusListener(object: ConnectycubeMessageStatusListener { override fun onMessageDelivered(message: ConnectycubeMessage) { } override fun onMessageRead(message: ConnectycubeMessage) { } }) ``` * SDK v1 kotlin (deprecated) ```kotlin // call it after chat login val messageStatusesManager = ConnectycubeChatService.getInstance().messageStatusesManager val messageStatusListener = object : MessageStatusListener { override fun processMessageDelivered(messageId: String, dialogId: String, userId: Int ) { } override fun processMessageRead(messageId: String, dialogId: String, userId: Int ) { } } messageStatusesManager.addMessageStatusListener(messageStatusListener) ``` * SDK v1 java (deprecated) ```java private MessageStatusesManager messageStatusesManager; private MessageStatusListener messageStatusListener; // call it after chat login messageStatusesManager = ConnectycubeChatService.getInstance().getMessageStatusesManager(); messageStatusListener = new MessageStatusListener() { @Override public void processMessageDelivered(String messageId, String dialogId, Integer userId) { } @Override public void processMessageRead(String messageId, String dialogId, Integer userId) { } }; messageStatusesManager.addMessageStatusListener(messageStatusListener); ``` ## ‘Is typing’ status [Section titled “‘Is typing’ status”](#is-typing-status) The following ‘typing’ notifications are supported: * typing: The user is composing a message. The user is actively interacting with a message input interface specific to this chat session (e.g., by typing in the input area of a chat window) * stopped: The user had been composing but now has stopped. The user has been composing but has not interacted with the message input interface for a short period of time (e.g., 30 seconds) Send the ‘is typing’ status: * SDK v2 kotlin ```kotlin ConnectyCube.chat.sendIsTypingStatus(chatDialog) ... ConnectyCube.chat.sendStopTypingStatus(chatDialog) ``` * SDK v1 kotlin (deprecated) ```kotlin chatDialog.sendIsTypingNotification() ... chatDialog.sendStopTypingNotification() ``` * SDK v1 java (deprecated) ```java try { chatDialog.sendIsTypingNotification(); } catch (XMPPException | SmackException.NotConnectedException e) { e.printStackTrace(); } ... try { chatDialog.sendStopTypingNotification(); } catch (XMPPException | SmackException.NotConnectedException e) { e.printStackTrace(); } ``` Receive the ‘is typing’ status callback: * SDK v2 kotlin ```kotlin ConnectyCube.chat.addTypingStatusListener(object: ConnectycubeChatTypingListener { override fun onUserIsTyping(dialogId: String?, userId: Int) { } override fun onUserStopTyping(dialogId: String?, userId: Int) { } }) ``` * SDK v1 kotlin (deprecated) ```kotlin val typingListener = object : ChatDialogTypingListener { override fun processUserIsTyping(dialogId: String, senderId: Int) { } override fun processUserStopTyping(dialogId: String, senderId: Int) { } } chatDialog.addIsTypingListener(typingListener) ``` * SDK v1 java (deprecated) ```java ChatDialogTypingListener typingListener = new ChatDialogTypingListener() { @Override public void processUserIsTyping(String dialogId, Integer senderId) { } @Override public void processUserStopTyping(String dialogId, Integer senderId) { } }; chatDialog.addIsTypingListener(typingListener); ``` ## Edit Message [Section titled “Edit Message”](#edit-message) The following snippet is used to edit chat message: * SDK v1 kotlin (deprecated) ```kotlin chatDialog.editMessageWithId("5356c64ab35c12bd3b10wa64", "Updated message body", true) ``` * SDK v1 java (deprecated) ```java try { dialog.editMessageWithId("5356c64ab35c12bd3b10wa64", "Updated message body", true); } catch (SmackException.NotConnectedException e) { e.printStackTrace(); } ``` Other users will receive the ‘update’ status callback: * SDK v1 kotlin (deprecated) ```kotlin val messageUpdateListener = MessageUpdateListener { messageID, dialogId, newBody, isLastMessage -> } ConnectycubeChatService.getInstance().messageStatusesManager.addMessageUpdateListener(messageUpdateListener) ``` * SDK v1 java (deprecated) ```java MessageUpdateListener messageUpdateListener = new MessageUpdateListener() { @Override public void processMessageUpdated(String messageID, String dialogId, String newBody, boolean isLastMessage) { } }; ConnectycubeChatService.getInstance().getMessageStatusesManager().addMessageUpdateListener(messageUpdateListener); ``` ## Delete chat messages [Section titled “Delete chat messages”](#delete-chat-messages) The following snippet is used to remove chat message via REST: * SDK v2 kotlin ```kotlin val messagesIds = listOf("546cc3240eda8f2dd7ee2291", "546cc3230eda8f2dd7ee2292") ConnectyCube.deleteMessages(messagesIds, true, successCallback = { deleteResult -> }, errorCallback = { error -> }) ``` * SDK v1 kotlin (deprecated) ```kotlin val messagesIds = HashSet().apply { add("546cc3240eda8f2dd7ee2291") add("546cc3230eda8f2dd7ee2292") } val forceDelete = false ConnectycubeRestChatService.deleteMessages(messagesIds, forceDelete) .performAsync(object : EntityCallback { override fun onSuccess(aVoid: Void?, bundle: Bundle?) { } override fun onError(e: ResponseException) { } }) ``` * SDK v1 java (deprecated) ```java Set messagesIds = new HashSet() {{ add("546cc3240eda8f2dd7ee2291"); add("546cc3230eda8f2dd7ee2292"); }}; boolean forceDelete = false; ConnectycubeRestChatService.deleteMessages(messagesIds, forceDelete).performAsync(new EntityCallback() { @Override public void onSuccess(Void aVoid, Bundle bundle) { } @Override public void onError(ResponseException e) { } }); ``` This request will remove the messages from current user history only, without affecting the history of other users. **The** `forceDelete` **parameter is used to completely remove messages.** The following snippet is used to remove chat message in a real time: * SDK v1 kotlin (deprecated) ```kotlin chatDialog.removeMessageWithId("5356c64ab35c12bd3b10wa64") ``` * SDK v1 java (deprecated) ```java try { dialog.removeMessageWithId("5356c64ab35c12bd3b10wa64"); } catch (SmackException.NotConnectedException e) { e.printStackTrace(); } ``` Other users will receive the ‘delete’ status callback: * SDK v1 kotlin (deprecated) ```kotlin val messageDeleteListener = MessageDeleteListener { messageID, dialogId -> //actions after success deleting message } ConnectycubeChatService.getInstance().messageStatusesManager.addMessageDeleteListener(messageDeleteListener) ``` * SDK v1 java (deprecated) ```java MessageDeleteListener messageDeleteListener = new MessageDeleteListener() { @Override public void processMessageDeleted(String messageID, String dialogId) { //actions after success deleting message } }; ConnectycubeChatService.getInstance().getMessageStatusesManager().addMessageDeleteListener(messageDeleteListener); ``` ## Self-destroy message [Section titled “Self-destroy message”](#self-destroy-message) Self-destroy messages is used if you want to implement some sort of Secret Chat where messages are visible only for some limited amount of time. It’s your responsibility to setup a timer in your app and remove messages from the client side. Self-destroy messages are not stored in server history. * SDK v1 kotlin (deprecated) ```kotlin val chatMessage = ConnectycubeChatMessage().apply { body = "Self destroy message" destroyAfter = 10 } chatDialog.sendMessage(chatMessage) chatDialog.addMessageListener(object : ChatDialogMessageListener { override fun processMessage(dialogId: String, message: ConnectycubeChatMessage, senderId: Int ) { if (message.destroyAfter > 0) { // setup a timer } } override fun processError(dialogId: String, exception: ChatException, message: ConnectycubeChatMessage, senderId: Int ) { } }) ``` * SDK v1 java (deprecated) ```java ConnectycubeChatMessage chatMessage = new ConnectycubeChatMessage(); chatMessage.setBody("Self destroy message"); chatMessage.setDestroyAfter(10); try { chatDialog.sendMessage(chatMessage); } catch (SmackException.NotConnectedException e) { e.printStackTrace(); } chatDialog.addMessageListener(new ChatDialogMessageListener() { @Override public void processMessage(String dialogId, ConnectycubeChatMessage message, Integer senderId) { if (message.getDestroyAfter() > 0) { // setup a timer } } }); ``` ## Attachments [Section titled “Attachments”](#attachments) ### Image/Video [Section titled “Image/Video”](#imagevideo) Chat attachments are supported with the cloud storage API. In order to send a chat attachment you need to upload the file to ConnectyCube cloud storage and obtain a link to the file (file UID). Then you need to include this UID into chat message and send it. * SDK v2 kotlin ```kotlin val messageAttachment = File("some_image.png") val fileIsPublic = false ConnectyCube.uploadFile(messageAttachment.path, fileIsPublic, successCallback = { cubeFile -> // create a message val chatMessage = ConnectycubeMessage() chatMessage.saveToHistory = true // attach a photo val attachment = ConnectycubeAttachment("photo") attachment.id = cubeFile.id.toString() chatMessage.attachments?.add(attachment) // send a chat message // ... }, errorCallback = { ex -> }) ``` * SDK v1 kotlin (deprecated) ```kotlin val messageAttachment = File("some_image.png") val fileIsPublic = false ConnectycubeStorage.uploadFileTask( messageAttachment, fileIsPublic ) { progress -> }.performAsync(object : EntityCallback { override fun onSuccess(storageFile: ConnectycubeFile, bundle: Bundle? ) { // create a message val chatMessage = ConnectycubeChatMessage() chatMessage.setSaveToHistory(true) // attach a photo val attachment = ConnectycubeAttachment("photo") attachment.id = storageFile.id.toString() chatMessage.addAttachment(attachment) // send a chat message // ... } override fun onError(e: ResponseException) { } }) ``` * SDK v1 java (deprecated) ```java File messageAttachment = new File("some_image.png"); Boolean fileIsPublic = false; ConnectycubeStorage.uploadFileTask(messageAttachment, fileIsPublic, new ConnectycubeProgressCallback() { @Override public void onProgressUpdate(int progressPercentages) { } }).performAsync(new EntityCallback() { @Override public void onSuccess(ConnectycubeFile storageFile, Bundle bundle) { // create a message ConnectycubeChatMessage chatMessage = new ConnectycubeChatMessage(); chatMessage.setSaveToHistory(true); // attach a photo ConnectycubeAttachment attachment = new ConnectycubeAttachment("photo"); attachment.setId(file.getId().toString()); chatMessage.addAttachment(attachment); // send a chat message // ... } @Override public void onError(ResponseException e) { } }); ``` The same flow is supported on the receiver’s side. When you receive a message, you need to get the file UID and then download the file from the cloud storage. * SDK v2 kotlin ```kotlin // ConnectycubeMessageListener ... override fun onMessage(message: ConnectycubeMessage) { message.attachments?.forEach { attachment -> val privateAvatarUrl = getPrivateUrlForUID(attachment.url) } // process url } ``` * SDK v1 kotlin (deprecated) ```kotlin // ChatDialogMessageListener ... override fun processMessage(dialogId: String, chatMessage: ConnectycubeChatMessage, senderId: Int ) { for (attachment in chatMessage.attachments) { val fileId = attachment.id // download a file ConnectycubeStorage.downloadFile(fileId).performAsync(object : EntityCallback { override fun onSuccess(inputStream: InputStream, params: Bundle ) { // process file } override fun onError(errors: ResponseException) { } }) } } ``` * SDK v1 java (deprecated) ```java // ChatDialogMessageListener ... @Override public void processMessage(String dialogId, ConnectycubeChatMessage chatMessage, Integer senderId) { for (ConnectycubeAttachment attachment : chatMessage.getAttachments()){ String fileId = attachment.getId(); // download a file ConnectycubeStorage.downloadFile(fileId).performAsync(new EntityCallback(){ @Override public void onSuccess(InputStream inputStream, Bundle params) { // process file } @Override public void onError(ResponseException errors) { } }); } } ``` ### Contact [Section titled “Contact”](#contact) A contact profile can be send via chat attachments as well: * SDK v2 kotlin ```kotlin // create a message val chatMessage = ConnectycubeMessage(saveToHistory = true) // build a contact representation val jc = JsonObject().apply { add("phone", JsonPrimitive("180032323223")) add("name", JsonPrimitive("Samuel Johnson")) } // attach a contact val attachment = ConnectycubeAttachment("contact").apply { data = jc.toString() } chatMessage.attachments?.add(attachment) // send a chat message // ... ``` * SDK v1 kotlin (deprecated) ```kotlin // create a message val chatMessage = ConnectycubeChatMessage().apply { setSaveToHistory(true) } // build a contact representation val jc = JsonObject().apply { add("phone", JsonPrimitive("180032323223")) add("name", JsonPrimitive("Samuel Johnson")) } // attach a contact val attachment = ConnectycubeAttachment("contact").apply { data = jc.toString() } chatMessage.addAttachment(attachment) // send a chat message // ... ``` * SDK v1 java (deprecated) ```java // create a message ConnectycubeChatMessage chatMessage = new ConnectycubeChatMessage(); chatMessage.setSaveToHistory(true); // build a contact representation JsonObject jc = new JsonObject(); jc.add("phone", new JsonPrimitive("180032323223")); jc.add("name", new JsonPrimitive("Samuel Johnson")); // attach a contact ConnectycubeAttachment attachment = new ConnectycubeAttachment("contact"); attachment.setData(jc.toString()); chatMessage.addAttachment(attachment); // send a chat message // ... ``` On the receiver’s side, when you receive a message, you need to get a contact data from an attachment: - SDK v2 kotlin ```kotlin // ConnectycubeMessageListener override fun onMessage(message: ConnectycubeMessage) { for (attachment in message.attachments!!) { val data = attachment.data val obj = JsonParser().parse(data).asJsonObject val phone = obj.getAsJsonPrimitive("phone").asString val name = obj.getAsJsonPrimitive("name").asString } } ``` - SDK v1 kotlin (deprecated) ```kotlin // ChatDialogMessageListener ... override fun processMessage(dialogId: String, chatMessage: ConnectycubeChatMessage, senderId: Int ) { for (attachment in chatMessage.attachments) { val data = attachment.data val obj = JsonParser().parse(data).asJsonObject val phone = obj.getAsJsonPrimitive("phone").asString val name = obj.getAsJsonPrimitive("name").asString } } ``` - SDK v1 java (deprecated) ```java // ChatDialogMessageListener ... @Override public void processMessage(String dialogId, ConnectycubeChatMessage chatMessage, Integer senderId) { for (ConnectycubeAttachment attachment : chatMessage.getAttachments()){ String data = attachment.getData(); JsonObject obj = new JsonParser().parse(data).getAsJsonObject(); String phone = obj.getAsJsonPrimitive("phone").getAsString(); String name = obj.getAsJsonPrimitive("name").getAsString(); } } ``` ## Message reactions [Section titled “Message reactions”](#message-reactions) ### Add/Remove reactions [Section titled “Add/Remove reactions”](#addremove-reactions) User can add/remove message reactions and listen message reaction events Add ```kotlin val messageId = "58e6a9c8a1834a3ea6001f15" val reaction = "🔥" ConnectyCube.addMessageReaction(messageId, reaction, { }, { error -> }) ``` Remove ```kotlin val messageId = "58e6a9c8a1834a3ea6001f15" val reaction = "👎" ConnectyCube.removeMessageReaction(messageId, reaction, { }, { error -> }) ``` Add/Remove ```kotlin val messageId = "58e6a9c8a1834a3ea6001f15" val reactionToAdd = "👎" val reactionToRemove = "🚀" ConnectyCube.updateMessageReaction(messageId, reactionToAdd, reactionToRemove, { }, { error -> }) ``` ### Listen reactions [Section titled “Listen reactions”](#listen-reactions) ```kotlin ConnectyCube.chat.addMessageReactionsListener(object : ConnectycubeMessageReactionsListener { override fun onMessageReaction(reaction: ConnectycubeReaction) { // var dialogId = reaction.dialogId // var messageId = reaction.messageId // var addReaction = reaction.addReaction // var removeReaction = reaction.removeReaction } }) ``` ### List message reactions [Section titled “List message reactions”](#list-message-reactions) User can list message reactions ```kotlin val messageId = "58e6a9c8a1834a3ea6001f15" ConnectyCube.getMessageReactions(messageId, { reactions -> // the result contains the map where key is the reaction and value is the list of users' ids who reacted with this reaction }, { error -> }) ``` Response example from `getMessageReactions(messageId)` - [see](/server/chat#response-22) ## Unread messages count [Section titled “Unread messages count”](#unread-messages-count) You can request total unread messages count and unread count for particular conversation: * SDK v2 kotlin ```kotlin val dialogsIds: MutableList = mutableListOf("546cc3240eda8f2dd7ee2291", "546cc3230eda8f2dd7ee2292") ConnectyCube.getUnreadMessagesCount(dialogsIds, successCallback = { result -> Log.i(TAG, "total unread messages: ${result["546cc3240eda8f2dd7ee2291"]}") Log.i(TAG, "total unread messages: ${result["546cc3230eda8f2dd7ee2292"]}") }, errorCallback = { error -> }) ``` * SDK v1 kotlin (deprecated) ```kotlin val dialogsIds: MutableSet = HashSet().apply { add("546cc3240eda8f2dd7ee2291") add("546cc3230eda8f2dd7ee2292") } val returnBundle = Bundle() ConnectycubeRestChatService.getTotalUnreadMessagesCount(dialogsIds, returnBundle) .performAsync(object : EntityCallback { override fun onSuccess(total: Int, params: Bundle) { Log.i(TAG, "total unread messages: $total") Log.i(TAG, "dialog Unread1: ${params?.getInt("546cc3240eda8f2dd7ee2291")}") Log.i(TAG, "dialog Unread2: ${params?.getInt("546cc3230eda8f2dd7ee2292")}") } override fun onError(e: ResponseException) { } }) ``` * SDK v1 java (deprecated) ```java Set dialogsIds = new HashSet(); dialogsIds.add("546cc3240eda8f2dd7ee2291"); dialogsIds.add("546cc3230eda8f2dd7ee2292"); ConnectycubeRestChatService.getTotalUnreadMessagesCount(dialogsIds, new Bundle()).performAsync(new EntityCallback() { @Override public void onSuccess(Integer total, Bundle params) { Log.i(TAG, "total unread messages: " + total); Log.i(TAG, "dialog Unread1: " + params.getInt("546cc3240eda8f2dd7ee2291")); Log.i(TAG, "dialog Unread2: " + params.getInt("546cc3230eda8f2dd7ee2292")); } @Override public void onError(ResponseException e) { } }); ``` ## Global search [Section titled “Global search”](#global-search) **Global search** feature was developed to simplify search of dialogs, messages and users at the same time. Similar functionality is used in most popular messengers and you can implement it in your app using Connectycube SDK. Just use request from snippet below. `SearchRequestBuilder` is **optional** parameter and it can be `null` if you don’t need additional configs for search request. * SDK v2 kotlin ```kotlin val searchText = "dialog name" // String or word. Should be longer than 4 symbols. Performs 'or' search. // For an exact search, you need to wrap the search phrase in quotes. val searchParams: GlobalSearchParams = GlobalSearchParams() //class-helper to simple config search request searchParams.dialogIds = dialogsIds // List of dialog ids. Max cam include 10 items. Optional parameter. searchParams.startDate = startDate // Closest date to now. Uses lte comparison. Optional parameter. searchParams.endDate = endDate // Shouldn't differ by more than 3 months from the start_date. Uses gte comparison. Optional parameter. searchParams.limit = 3 // Maximum number of items returned from the server in the search results. Max value - 100. Optional parameter. ConnectyCube.searchText(searchText, searchParams.getSearchParams(), successCallback = { searchResult -> val dialogs = searchResult.dialogs // found dialogs val messages = searchResult.messages // found messages val users = searchResult.users // found users }, errorCallback = { error -> }) ``` * SDK v1 kotlin (deprecated) ```kotlin val searchText // String or word. Should be longer than 4 symbols. Performs 'or' search. // For an exact search, you need to wrap the search phrase in quotes. val searchRequestBuilder = SearchRequestBuilder().apply { setDialogsIds(dialogsIds) // List of dialog ids. Max cam include 10 items. Optional parameter. setStartDate(startDate) // Closest date to now. Uses lte comparison. Optional parameter. setEndDate(endDate) // Shouldn't differ by more than 3 months from the start_date. Uses gte comparison. Optional parameter. limit = 3 // Maximum number of items returned from the server in the search results. Max value - 100. Optional parameter. } ConnectycubeRestChatService.searchByText(searchText, searchRequestBuilder).performAsync(object : EntityCallback { override fun onSuccess(result: SearchChatEntity, params: Bundle) { val dialogs = result.dialogs // found dialogs val messages = result.messages // found messages val users = result.users // found users } override fun onError(e: ResponseException) { } }) ``` * SDK v1 java (deprecated) ```java String searchText; // String or word. Should be longer than 4 symbols. Performs 'or' search. // For an exact search, you need to wrap the search phrase in quotes. SearchRequestBuilder searchRequestBuilder = new SearchRequestBuilder(); searchRequestBuilder.setDialogsIds(dialogsIds); // List of dialog ids. Max cam include 10 items. Optional parameter. searchRequestBuilder.setStartDate(startDate); // Closest date to now. Uses lte comparison. Optional parameter. searchRequestBuilder.setEndDate(endDate); // Shouldn't differ by more than 3 months from the start_date. Uses gte comparison. Optional parameter. searchRequestBuilder.setLimit(3); // Maximum number of items returned from the server in the search results. Max value - 100. Optional parameter. ConnectycubeRestChatService.searchByText(searchText, searchRequestBuilder).performAsync(new EntityCallback() { @Override public void onSuccess(SearchChatEntity result, Bundle params) { ArrayList dialogs = result.getDialogs(); // found dialogs ArrayList messages = result.getMessages(); // found messages ArrayList users = result.getUsers(); // found users } @Override public void onError(ResponseException responseException) { } }); ``` ## Chat alerts [Section titled “Chat alerts”](#chat-alerts) When you send a chat message and the recipient/recipients is offline, then automatic push notification will be fired. In order to receive push notifications you need to subscribe for it. Please refer to [Push Notifications](/android/push-notifications) guide. To configure push template which users receive - go to [Dashboard Console, Chat Alerts page](https://admin.connectycube.com/) Also, here is a way to avoid automatically sending push notifications to offline recipient/recipients. For it add the `silent` parameter with value `1` to the `properties` field of the instance of a `ConnectycubeMessage`. * SDK v2 kotlin ```kotlin val message = ConnectycubeMessage() message.properties["silent"] = "1" ``` After sending such a message, the server won’t create the push notification for offline recipient/recipients. > **Note** > > Currently push notifications are supported on mobile environment only. ## Chat notifications settings [Section titled “Chat notifications settings”](#chat-notifications-settings) ### Update notifications settings [Section titled “Update notifications settings”](#update-notifications-settings) A user can turn on/off push notifications for offline messages in a dialog. By default push notification are turned ON, so offline user receives push notifications for new messages in a chat. * SDK v2 kotlin ```kotlin val dialogId = "5356c64ab35c12bd3b108a41" val enabled = false //false - to disable push notification, true - to enable ConnectyCube.updateDialogNotificationsSettings(dialogId, enabled, { result -> }, { error -> }) ``` * SDK v1 kotlin (deprecated) ```kotlin val dialogId = "5356c64ab35c12bd3b108a41" val enabled = false //false - to disable push notification, true - to enable ConnectycubeRestChatService.updateDialogNotificationSending(dialogId, enabled).performAsync(object : EntityCallback { override fun onSuccess(result: Boolean, params: Bundle) { //if result == false - push notifications was disabled, otherwise - enabled } override fun onError(e: ResponseException) { } }) ``` * SDK v1 java (deprecated) ```java String dialogId = "5356c64ab35c12bd3b108a41"; boolean enabled = false; //false - to disable push notification, true - to enable ConnectycubeRestChatService.updateDialogNotificationSending(dialogId, enabled).performAsync(new EntityCallback() { @Override public void onSuccess(Boolean result, Bundle params) { //if result == false - push notifications was disabled, otherwise - enabled } @Override public void onError(ResponseException e) { } }); ``` ### Get notifications settings [Section titled “Get notifications settings”](#get-notifications-settings) Check a status of notifications setting - either it is ON or OFF for a particular chat. * SDK v2 kotlin ```kotlin val dialogId = "5356c64ab35c12bd3b108a41" ConnectyCube.getDialogNotificationsSettings(dialogId, { enabled -> }, { error -> }) ``` * SDK v1 kotlin (deprecated) ```kotlin val dialogId = "5356c64ab35c12bd3b108a41" ConnectycubeRestChatService.checkIsDialogNotificationEnabled(dialogId).performAsync(object : EntityCallback { override fun onSuccess(result: Boolean, params: Bundle) { //result == false - push notifications are disabled, //result == true - push notifications are enabled } override fun onError(e: ResponseException) { } }) ``` * SDK v1 java (deprecated) ```java String dialogId = "5356c64ab35c12bd3b108a41"; ConnectycubeRestChatService.checkIsDialogNotificationEnabled(dialogId).performAsync(new EntityCallback() { @Override public void onSuccess(Boolean result, Bundle params) { //result == false - push notifications are disabled, //result == true - push notifications are enabled } @Override public void onError(ResponseException e) { } }); ``` ## Mark a client as Active/Inactive [Section titled “Mark a client as Active/Inactive”](#mark-a-client-as-activeinactive) When you send a chat message and the recipient/recipients is offline, then automatic push notification will be fired. Sometimes a client app can be in a background mode, but still online. In this case it’s useful to let server know that a user wants to receive push notifications while still is connected to chat. For this particular case we have 2 handy methods: ‘enterInactiveState’ and ‘enterActiveState’: ```java ConnectycubeChatService.getInstance().enterInactiveState(); ``` ```java ConnectycubeChatService.getInstance().enterActiveState(); ``` The common use case for these APIs is to call ‘enterInactiveState’ when an app goes to background mode and to call ‘enterActiveState’ when an app goes to foreground mode. ## Get last activity [Section titled “Get last activity”](#get-last-activity) There is a way to get an info when a user was active last time, in seconds. This is a modern approach for messengers apps, e.g. to display this info on a Contacts screen or on a User Profile screen. * SDK v1 kotlin (deprecated) ```kotlin val userId = 12345 val seconds = ConnectycubeChatService.getInstance().getLastUserActivity(userId) // seconds - the difference in seconds from current time to last user activity in the chat or 0 if user is online. ``` * SDK v1 java (deprecated) ```java int userId = 12345; double seconds = ConnectycubeChatService.getInstance().getLastUserActivity(userId); // seconds - the difference in seconds from current time to last user activity in the chat or 0 if user is online. ``` ## System messages [Section titled “System messages”](#system-messages) There is a way to send system messages to other users about some events. System messages work on a separate channel and are not mixed with regular chat messages: > System messages are not stored on a server. It means messages will be delivered only to online users. * SDK v2 kotlin ```kotlin ConnectyCube.chat.addSystemMessageListener(object : ConnectycubeSystemMessageListener { override fun onMessage(message: ConnectycubeMessage) { } override fun onError(message: ConnectycubeMessage, ex: Throwable) { } }) ConnectyCube.chat.sendSystemMessage(message { recipientId = 58672 properties["param1"] = "value1" properties["param2"] = "value2" body = "some text" }) ``` * SDK v1 kotlin (deprecated) ```kotlin val systemMessagesManager = ConnectycubeChatService.getInstance().systemMessagesManager val systemMessageListener = object : SystemMessageListener { override fun processMessage(message: ConnectycubeChatMessage) { } override fun processError(exception: ChatException, message: ConnectycubeChatMessage ) { } } systemMessagesManager.addSystemMessageListener(systemMessageListener) val systemMessage = ConnectycubeChatMessage().apply { recipientId = 58672 setProperty("param1", "value1") setProperty("param2", "value2") body = "some text" } systemMessagesManager.sendSystemMessage(systemMessage) ``` * SDK v1 java (deprecated) ```java SystemMessagesManager systemMessagesManager = ConnectycubeChatService.getInstance().getSystemMessagesManager(); SystemMessageListener systemMessageListener = new SystemMessageListener() { @Override public void processMessage(ConnectycubeChatMessage message) { } @Override public void processError(ChatException exception, ConnectycubeChatMessage message) { } }; systemMessagesManager.addSystemMessageListener(systemMessageListener); ConnectycubeChatMessage systemMessage = new ConnectycubeChatMessage(); systemMessage.setRecipientId(58672); systemMessage.setProperty("param1", "value1"); systemMessage.setProperty("param2", "value2"); systemMessage.setBody("some text"); try { systemMessagesManager.sendSystemMessage(systemMessage); } catch (SmackException.NotConnectedException e) { e.printStackTrace(); } ``` ## Moderation [Section titled “Moderation”](#moderation) The moderation capabilities help maintain a safe and respectful chat environment. We have options that allow users to report inappropriate content and manage their personal block lists, giving them more control over their experience. ### Report user [Section titled “Report user”](#report-user) For user reporting to work, it requires the following: 1. Go to [ConnectyCube Daashboard](https://admin.connectycube.com/) 2. select your Application 3. Navigate to **Custom** module via left sidebar 4. Create new table called **UserReports** with the following fields: * **reportedUserId** - integer * **reason** - string  Once the table is created, you can create a report with the following code snippet and then see all the reports in Dashboard: ```kotlin val customObject: ConnectycubeCustomObject = ConnectycubeCustomObject("UserReports") customObject.fields = hashMapOf ( "reportedUserId" to 45, "reason" to "User is spamming with bad words", ) ConnectyCube.createCustomObject(customObject, { createdObject -> }, { ex -> }) ``` ### Report message [Section titled “Report message”](#report-message) For message reporting to work, the same approach to user reporting above could be used. You need to create new table called **MessageReports** with the following fields: * **reportedMessageId** - integer * **reason** - string Once the table is created, you can create a report with the following code snippet and then see all the reports in Dashboard: ```kotlin val customObject: ConnectycubeCustomObject = ConnectycubeCustomObject("MessageReports") customObject.fields = hashMapOf ( "reportedMessageId" to "58e6a9c8a1834a3ea6001f15", "reason" to "The message contains phishing links", ) ConnectyCube.createCustomObject(customObject, { createdObject -> }, { ex -> }) ``` ### Block user [Section titled “Block user”](#block-user) Block list (aka Privacy list) allows enabling or disabling communication with other users. You can create, modify, or delete privacy lists, define a default list. > The user can have multiple privacy lists, but only one can be active. #### Create privacy list [Section titled “Create privacy list”](#create-privacy-list) A privacy list must have at least one element in order to be created. **If no elements specified, then the list with given name will be deleted.** * SDK v1 kotlin (deprecated) ```kotlin val list = ConnectycubePrivacyList().apply { name = "myList" } val items = ArrayList() val item1 = ConnectycubePrivacyListItem().apply { isAllow = false type = ConnectycubePrivacyListItem.Type.USER_ID valueForType = 3678.toString() isMutualBlock = true } items.add(item1) list.items = items val privacyListsManager = chatService.privacyListsManager privacyListsManager.createPrivacyList(list) ``` * SDK v1 java (deprecated) ```java ConnectycubePrivacyList list = new ConnectycubePrivacyList(); list.setName("myList"); ArrayList items = new ArrayList(); ConnectycubePrivacyListItem item1 = new ConnectycubePrivacyListItem(); item1.setAllow(false); item1.setType(ConnectycubePrivacyListItem.Type.USER_ID); item1.setValueForType(String.valueOf(3678)); item1.setMutualBlock(true); items.add(item1); list.setItems(items); PrivacyListsManager privacyListsManager = chatService.getPrivacyListsManager(); try { privacyListsManager.createPrivacyList(list); } catch (SmackException.NotConnectedException e) { e.printStackTrace(); } catch (XMPPException.XMPPErrorException e) { e.printStackTrace(); } catch (SmackException.NoResponseException e) { e.printStackTrace(); } ``` The `ConnectycubePrivacyListItem` class takes 4 arguments: * **type** - use **USER\_ID** to block a user in 1-1 chat or **GROUP\_USER\_ID** to block in a group chat. * **valueForType** - ID of a user to apply an action * **allow** - can be true/false. * **mutualBlock** - can be true/false - to block user’s message in both directions or not. > In order to be used the privacy list should be not only set, but also activated(set as default). #### Activate privacy list [Section titled “Activate privacy list”](#activate-privacy-list) In order to activate rules from a privacy list you should set it as default: * SDK v1 kotlin (deprecated) ```kotlin privacyListsManager.applyPrivacyList("myList") ``` * SDK v1 java (deprecated) ```java try { privacyListsManager.applyPrivacyList("myList"); } catch (SmackException.NotConnectedException e) { e.printStackTrace(); } catch (XMPPException.XMPPErrorException e) { e.printStackTrace(); } catch (SmackException.NoResponseException e) { e.printStackTrace(); } ``` #### Update privacy list [Section titled “Update privacy list”](#update-privacy-list) There are some rules you should follow to update a privacy list: * Include all of the desired items (not a “delta”). * If you want to update or set new privacy list instead of current one, you should decline current default list first. - SDK v1 kotlin (deprecated) ```kotlin // Deactivate active list privacyListsManager.declinePrivacyList() // Create new list // ... // Activate again active list privacyListsManager.applyPrivacyList("myList") ``` - SDK v1 java (deprecated) ```java // Deactivate active list try { privacyListsManager.declinePrivacyList(); } catch (SmackException|XMPPException.XMPPErrorException e) { } // Create new list // ... // Activate again active list try { privacyListsManager.applyPrivacyList("myList"); } catch (SmackException.NotConnectedException e) { e.printStackTrace(); } catch (XMPPException.XMPPErrorException e) { e.printStackTrace(); } catch (SmackException.NoResponseException e) { e.printStackTrace(); } ``` #### Retrieve privacy lists [Section titled “Retrieve privacy lists”](#retrieve-privacy-lists) To get a list of all your privacy lists use the following request: * SDK v1 kotlin (deprecated) ```kotlin val privacyListsManager = ConnectycubeChatService.getInstance().privacyListsManager val lists = privacyListsManager.privacyLists ``` * SDK v1 java (deprecated) ```java PrivacyListsManager privacyListsManager = ConnectycubeChatService.getInstance().getPrivacyListsManager() List lists = null; try { lists = privacyListsManager.getPrivacyLists(); } catch (SmackException.NotConnectedException e) { e.printStackTrace(); } catch (XMPPException.XMPPErrorException e) { e.printStackTrace(); } catch (SmackException.NoResponseException e) { e.printStackTrace(); } ``` #### Retrieve privacy list with name [Section titled “Retrieve privacy list with name”](#retrieve-privacy-list-with-name) To get the privacy list by name you should use the following method: * SDK v1 kotlin (deprecated) ```kotlin var list = privacyListsManager.getPrivacyList("myList") ``` * SDK v1 java (deprecated) ```java ConnectycubePrivacyList list = null; try { list = privacyListsManager.getPrivacyList("myList"); } catch (SmackException.NotConnectedException e) { e.printStackTrace(); } catch (XMPPException.XMPPErrorException e) { e.printStackTrace(); } catch (SmackException.NoResponseException e) { e.printStackTrace(); } ``` #### Remove privacy list [Section titled “Remove privacy list”](#remove-privacy-list) > Note: Before deleting privacy list you should decline it. * SDK v1 kotlin (deprecated) ```kotlin privacyListsManager.declinePrivacyList() privacyListsManager.deletePrivacyList("myList") ``` * SDK v1 java (deprecated) ```java try { privacyListsManager.declinePrivacyList(); privacyListsManager.deletePrivacyList("myList"); } catch (SmackException.NotConnectedException e) { e.printStackTrace(); } catch (XMPPException.XMPPErrorException e) { e.printStackTrace(); } catch (SmackException.NoResponseException e) { e.printStackTrace(); } ``` #### Blocked user attempts to communicate with user [Section titled “Blocked user attempts to communicate with user”](#blocked-user-attempts-to-communicate-with-user) Blocked users will be receiving an error when trying to chat with a user in a 1-1 chat and will be receiving nothing in a group chat: * SDK v1 kotlin (deprecated) ```kotlin val chatMessage = ConnectycubeChatMessage().apply { body = "How is going on?" } val chatDialog = ... chatDialog.sendMessage(chatMessage) ... chatDialog.addMessageListener(object : ChatDialogMessageListener { override fun processMessage(dialogId: String, message: ConnectycubeChatMessage, senderId: Int ) {} override fun processError(dialogId: String, exception: ChatException, message: ConnectycubeChatMessage, senderId: Int ) { Log.e(TAG, "processError: " + exception.localizedMessage) } }) ``` * SDK v1 java (deprecated) ```java ConnectycubeChatMessage chatMessage = new ConnectycubeChatMessage(); chatMessage.setBody("How is going on?"); ConnectycubeChatDialog chatDialog = ...; chatDialog.sendMessage(chatMessage); ... privateDialog.addMessageListener(new ChatDialogMessageListener() { @Override public void processMessage(String dialogId, ConnectycubeChatMessage message, Integer senderId) { } @Override public void processError(String dialogId, ChatException exception, ConnectycubeChatMessage message, Integer senderId) { log("processError: " + exception.getLocalizedMessage()); } }); ``` ```log Log output: processError: Service not available. ``` ## Ping server [Section titled “Ping server”](#ping-server) Sometimes, it can be cases where TCP connection to Chat server can go down without the application layer knowing about it. To check that chat connection is still alive or to keep it to be alive there is a ping method: * SDK v2 kotlin ```kotlin //coming soon ```
# Video Calling
> Empower your Android applications with our Video Calling P2P API. Enable secure and immersive peer-to-peer video calls for enhanced user experience
ConnectyCube **Video Calling P2P API** is built on top of [WebRTC](https://webrtc.org/) protocol and based on top of [WebRTC Mesh](https://webrtcglossary.com/mesh/) architecture. Max people per P2P call is 4. > To get a difference between **P2P calling** and **Conference calling** please read our [ConnectyCube Calling API comparison](https://connectycube.com/2020/04/15/connectycube-calling-api-comparison/) blog page. ## Connect VideoChat SDK [Section titled “Connect VideoChat SDK”](#connect-videochat-sdk) To include video chat capabilities into your app you need to include the relevant dependencies in **build.gradle** project file (only for V1): #### SDK v1 (deprecated) [Section titled “SDK v1 (deprecated)”](#sdk-v1-deprecated) ```groovy dependencies { implementation "com.connectycube:connectycube-android-sdk-videochat:x.x.x" } ``` ## Preparations [Section titled “Preparations”](#preparations) ### Permissions [Section titled “Permissions”](#permissions) The video chat module requires camera, microphone, internet and storage permissions. Make sure you add relevant permissions to your app manifest: ```xml ``` You can get more info on how to work with app permissions at [Android Permissions Overview](https://developer.android.com/guide/topics/permissions/overview) ### Add signaling manager [Section titled “Add signaling manager”](#add-signaling-manager) [ConnectyCube Chat API](/android/messaging) is used as a signaling transport for Video Calling API, so in order to start using Video Calling API you need to [connect to Chat](/android/messaging#connect-to-chat). To be able to receive incoming video chat calls, you need to add WebRTC signaling to `RTCClient`: * SDK v2 kotlin ```kotlin //no need to add signaling manually ``` * SDK v1 kotlin (deprecated) ```kotlin ConnectycubeChatService.getInstance().videoChatWebRTCSignalingManager?.addSignalingManagerListener(object: VideoChatSignalingManagerListener { override fun signalingCreated(signaling: Signaling, createdLocally: Boolean) { if (!createdLocally) { RTCClient.getInstance(context).addSignaling(signaling as WebRTCSignaling) } } }) ``` * SDK v1 java (deprecated) ```java ConnectycubeChatService.getInstance().getVideoChatWebRTCSignalingManager().addSignalingManagerListener(new VideoChatSignalingManagerListener() { @Override public void signalingCreated(Signaling signaling, boolean createdLocally) { if (!createdLocally) { RTCClient.getInstance(this).addSignaling((WebRTCSignaling) signaling); } } }); ``` ### Prepare an Activity [Section titled “Prepare an Activity”](#prepare-an-activity) To be able to receive callbacks about current `RTCSession` instance state, about video tracks (local and remotes) and session’s peer connections states\ you must implement appropriate interfaces by calling the following methods on `RTCSession` instance: * SDK v2 kotlin ```kotlin fun addSessionStateCallbacksListener(callback: RTCSessionStateCallback) fun addVideoTrackCallbacksListener(callback: VideoTracksCallback) ``` * SDK v1 kotlin (deprecated) ```kotlin fun addSessionCallbacksListener(callback: RTCSessionConnectionCallbacks) fun addVideoTrackCallbacksListener(callback: RTCClientVideoTracksCallback) ``` * SDK v1 java (deprecated) ```java public void addSessionCallbacksListener(RTCSessionConnectionCallbacks callback) public void addVideoTrackCallbacksListener(RTCClientVideoTracksCallback callback) ``` and also the following method on `RTCClient` or `P2PCalls` instance: * SDK v2 kotlin ```kotlin fun addSessionCallbacksListener(callback: RTCSessionEventsCallback) ``` * SDK v1 kotlin (deprecated) ```kotlin fun addSessionCallbacksListener(callback: RTCClientSessionCallbacks) ``` * SDK v1 java (deprecated) ```java public void addSessionCallbacksListener(RTCClientSessionCallbacks callback) ``` ### Setup views [Section titled “Setup views”](#setup-views) Set up your layout views for remote and local video tracks: * SDK v2 kotlin ```xml ``` * SDK v1 kotlin (deprecated) / SDK v1 java (deprecated) ```xml ``` ```xml ``` `RTCSurfaceView` allows using several views on screen layout and to overlap each other which is a good feature for group video calls. `RTCSurfaceView` is a surface view (it extends `org.webrtc.SurfaceViewRenderer` class) that renderers video track. It has its own lifecycle for rendering. It uses `init()` method for preparing to render and `release()` to release resource when video track does not exist any more. `RTCSurfaceView` is automatically initialized after the surface is created - in `surfaceCreated()` method callback. You can manually initialize `RTCSurfaceView` using `Egl` context getting from `RTCClient`. Use this method only when Activity is alive and GL resources exist: * SDK v2 kotlin ```kotlin val surfaceView: RTCSurfaceView = ... val eglContext = EglBaseContext.getEglContext() surfaceView.init(eglContext.eglBaseContext, null) ``` * SDK v1 kotlin (deprecated) ```kotlin val surfaceView: RTCSurfaceView = ... val eglContext = RTCClient.getInstance(context).eglContext surfaceView.init(eglContext.eglBaseContext, null) ``` * SDK v1 java (deprecated) ```java RTCSurfaceView surfaceView = ...; EglBase eglContext = RTCClient.getInstance(getContext()).getEglContext(); surfaceView.init(eglContext.getEglBaseContext(), null); ``` Method `release()` should be called when video track is no more valid, for example, when you receive `onConnectionClosedForUser()` callback from `RTCSession` or when `RTCSession` is going to close. But you should call `release()` method before `Activity` is destroyed and while `EGLContext` is still valid. If you don’t call this method, the GL resources might leak. Here is the `RTCSurfaceView` interface: * SDK v2 kotlin ```kotlin RTCSurfaceView.init(EglBase.Context, RendererCommon.RendererEvents) //Initialize this view using webrtc Egl context, It is allowed to call init() to reinitialize the view after a previous init()/release() cycle. RTCSurfaceView.release() // releases all related GL resources RTCSurfaceView.setScalingType(RendererCommon.ScalingType) //Set how the video will fill the allowed layout area RTCSurfaceView.setMirror(Boolean) //Set if the video stream should be mirrored or not. RTCSurfaceView.requestLayout() // Request to invalidate view when something has changed ``` * SDK v1 kotlin (deprecated) ```kotlin RTCSurfaceView.init(EglBase.Context, RendererCommon.RendererEvents) //Initialize this view using webrtc Egl context, It is allowed to call init() to reinitialize the view after a previous init()/release() cycle. RTCSurfaceView.release() // releases all related GL resources RTCSurfaceView.setScalingType(RendererCommon.ScalingType) //Set how the video will fill the allowed layout area RTCSurfaceView.setMirror(Boolean) //Set if the video stream should be mirrored or not. RTCSurfaceView.requestLayout() // Request to invalidate view when something has changed ``` * SDK v1 java (deprecated) ```java RTCSurfaceView.init(EglBase.Context, RendererCommon.RendererEvents);//Initialize this view using webrtc Egl context, It is allowed to call init() to reinitialize the view after a previous init()/release() cycle. RTCSurfaceView.release(); // releases all related GL resources RTCSurfaceView.setScalingType(scalingType); //Set how the video will fill the allowed layout area RTCSurfaceView.setMirror(mirror); //Set if the video stream should be mirrored or not. RTCSurfaceView.requestLayout(); // Request to invalidate view when something has changed ``` To render received video track from an opponent use the following snippet: * SDK v2 kotlin ```kotlin fun fillVideoView(userId: Int, videoView: RTCSurfaceView, videoTrack: ConnectycubeVideoTrack ) { videoTrack.addSink(videoView.videoSink) } ``` * SDK v1 kotlin (deprecated) ```kotlin fun fillVideoView(userId: Int, videoView: RTCSurfaceView, videoTrack: RTCVideoTrack ) { videoTrack.addRenderer(videoView) } ``` * SDK v1 java (deprecated) ```java private void fillVideoView(int userId, RTCSurfaceView videoView, RTCVideoTrack videoTrack) { videoTrack.addRenderer(new VideoRenderer(videoView)); } ``` ### Notify RTCClient you are ready for processing calls [Section titled “Notify RTCClient you are ready for processing calls”](#notify-rtcclient-you-are-ready-for-processing-calls) As soon as your app is ready for calls processing and activity exists, use the following snippet in activity class: * SDK v2 kotlin ```kotlin //do nothing ``` * SDK v1 kotlin (deprecated) ```java RTCClient.getInstance(context).prepareToProcessCalls() ``` * SDK v1 java (deprecated) ```java RTCClient.getInstance(this).prepareToProcessCalls(); ``` > **Note**: Pay attention: if you forget to add signaling manager, you will not be able to process calls. ## Initiate a call [Section titled “Initiate a call”](#initiate-a-call) To call users you should create a session and start a call: * SDK v2 kotlin ```kotlin val opponents: MutableList = ArrayList() opponents.add(21) // User can pass an additional info along with the call request val userInfo: HashMap = HashMap() userInfo["key1"] = "value1" //Init session val session = P2PCalls.createSession(opponents, CallType.VIDEO) session.startCall(userInfo) ``` * SDK v1 kotlin (deprecated) ```kotlin val opponents: MutableList = ArrayList() opponents.add(21) // User can pass an additional info along with the call request val userInfo: MutableMap = HashMap() userInfo["key1"] = "value1" //Init session val session = RTCClient.getInstance(this) .createNewSessionWithOpponents(opponents, RTCTypes.ConferenceType.CONFERENCE_TYPE_VIDEO) session.startCall(userInfo) ``` * SDK v1 java (deprecated) ```java List opponents = new ArrayList(); opponents.add(21); // User can pass an additional info along with the call request Map userInfo = new HashMap<>(); userInfo.put("key1", "value1"); //Init session RTCSession session = RTCClient.getInstance(this).createNewSessionWithOpponents(opponents, CONFERENCE_TYPE_VIDEO); session.startCall(userInfo); ``` After this, your opponents will receive a call request callback `onReceiveNewSession` via `RTCClientSessionCallbacks` (read below). ## Track session callbacks [Section titled “Track session callbacks”](#track-session-callbacks) For managing all session’s states you need to implement interface `RTCClientSessionCallbacks`. * SDK v2 kotlin ```kotlin // implement interface RTCCallSessionCallback P2PCalls.addSessionCallbacksListener(this) P2PCalls.removeSessionCallbacksListener(this) ``` * SDK v1 kotlin (deprecated) ```kotlin RTCClient.getInstance(this).addSessionCallbacksListener(this) RTCClient.getInstance(this).removeSessionsCallbacksListener(this) ``` * SDK v1 java (deprecated) ```java RTCClient.getInstance(this).addSessionCallbacksListener(this); RTCClient.getInstance(this).removeSessionsCallbacksListener(this); ``` Once you called `RTCClient.getInstance(this).prepareToProcessCalls()` method and added an instance of class, that implements `RTCClientSessionCallbacks`, to `RTCClient`, via method `RTCClient.getInstance(this).addSessionCallbacksListener(listener)`, you should start receiving sessions callbacks. The interface of `RTCClientSessionCallbacks` is the following: * SDK v2 kotlin ```kotlin /** * Called each time when new session request is received. */ fun onReceiveNewSession(session: P2PSession) /\*\* - Called in case when user didn't answer within timer expiration period \*/ override fun onUserNotAnswer(session: P2PSession, opponentId: Int) {} /\*\* - Called in case when opponent has rejected your call \*/ override fun onCallRejectByUser((session: P2PSession, opponentId: Int, userInfo: Map?) {} /\*\* - Called in case when opponent has accepted your call \*/ override fun onCallAcceptByUser(session: P2PSession, opponentId: Int, userInfo: Map?) {} /\*\* - Called in case when opponent hung up \*/ override fun onReceiveHangUpFromUser(session: P2PSession, opponentId: Int, userInfo: Map?) {} /\*\* - Called in case when user didn't make any actions on received session \*/ override fun onUserNoActions(session: P2PSession, userId: Int) {} /\*\* - Called in case when session will close \*/ override fun onSessionStartClose(session: P2PSession) {} /\*\* - Called when session is closed. \*/ override fun onSessionClosed(session: P2PSession) {} ``` * SDK v1 kotlin (deprecated) ```kotlin /** * Called each time when new session request is received. */ override fun onReceiveNewSession(session: RTCSession) {} /** * Called in case when user didn't answer within timer expiration period */ override fun onUserNotAnswer(session: RTCSession, userId: Int) {} /** * Called in case when opponent has rejected your call */ override fun onCallRejectByUser(session: RTCSession, userId: Int, userInfo: MutableMap?) {} /** * Called in case when opponent has accepted your call */ override fun onCallAcceptByUser(session: RTCSession, userId: Int, userInfo: MutableMap?) {} /** * Called in case when opponent hung up */ override fun onReceiveHangUpFromUser(session: RTCSession, userId: Int, userInfo: MutableMap?) {} /** * Called in case when user didn't make any actions on received session */ override fun onUserNoActions(session: RTCSession, userId: Int) {} /** * Called in case when session will close */ override fun onSessionStartClose(session: RTCSession) {} /** * Called when session is closed. */ override fun onSessionClosed(session: RTCSession?) {} ``` * SDK v1 java (deprecated) ```java /** * Called each time when new session request is received. */ void onReceiveNewSession(RTCSession session); /\*\* - Called in case when user didn't answer within timer expiration period \*/ void onUserNotAnswer(RTCSession session, Integer userID); /\*\* - Called in case when opponent has rejected your call \*/ void onCallRejectByUser(RTCSession session, Integer userID, Map userInfo); /\*\* - Called in case when opponent has accepted your call \*/ void onCallAcceptByUser(RTCSession session, Integer userID, Map userInfo); /\*\* - Called in case when opponent hung up \*/ void onReceiveHangUpFromUser(RTCSession session, Integer userID, Map userInfo); /\*\* - Called in case when user didn't make any actions on received session \*/ void onUserNoActions(RTCSession session, Integer userID); /\*\* - Called in case when session will close \*/ void onSessionStartClose(RTCSession session); /\*\* - Called when session is closed. \*/ void onSessionClosed(RTCSession session); ``` ## Accept a call [Section titled “Accept a call”](#accept-a-call) You will receive all incoming call requests in `RTCClientSessionCallbacks.onReceiveNewSession(session)` callback. There are a few ways how to proceed: * accept incoming call; * reject incoming call. To accept the call request use the following code snippet: * SDK v2 kotlin ```kotlin // RTCCallSessionCallback override fun onReceiveNewSession(session: P2PSession) { // obtain received user info // val userInfo = session.getUserInfo() // set your user info if needed val userInfo = HashMap() userInfo["key1"] = "value1" // Accept the incoming call session.acceptCall(userInfo) } ``` * SDK v1 kotlin (deprecated) ```kotlin // RTCClientSessionCallbacks override fun onReceiveNewSession(session: RTCSession) { // obtain received user info val userInfo = session.userInfo // set your user info if needed val userInfo = HashMap() userInfo["key1"] = "value1" // Accept the incoming call session.acceptCall(userInfo) } ``` * SDK v1 java (deprecated) ```java // RTCClientSessionCallbacks public void onReceiveNewSession(RTCSession session){ // obtain received user info Map userInfo = session.getUserInfo(); // set your user info if needed Map userInfo = new HashMap<>; userInfo.put("key1", "value1"); // Accept the incoming call session.acceptCall(userInfo); } ``` After this, your opponent will receive an accept callback: * SDK v2 kotlin ```kotlin // RTCSessionEventsCallback override fun onCallAcceptByUser(session: P2PSession, opponentId: Int, userInfo: Map?) { } ``` * SDK v1 kotlin (deprecated) ```kotlin // RTCClientSessionCallbacks override fun onCallAcceptByUser(session: RTCSession, userID: Int, userInfo: Map? ) { } ``` * SDK v1 java (deprecated) ```java // RTCClientSessionCallbacks public void onCallAcceptByUser(RTCSession session, Integer userID, Map userInfo){ } ``` ## Render video stream to view [Section titled “Render video stream to view”](#render-video-stream-to-view) For managing video tracks you need to implement `RTCClientVideoTracksCallbacks` interface: * SDK v2 kotlin ```kotlin p2pSession.addVideoTrackCallbacksListener(this) p2pSession.removeVideoTrackCallbacksListener(this) ``` * SDK v1 kotlin (deprecated) ```kotlin rtcSession.addVideoTrackCallbacksListener(this) rtcSession.removeVideoTrackCallbacksListener(this) ``` * SDK v1 java (deprecated) ```java rtcSession.addVideoTrackCallbacksListener(this); rtcSession.removeVideoTrackCallbacksListener(this); ``` - SDK v2 kotlin ```kotlin /** * Called when local video track is received */ override fun onLocalVideoTrackReceive(session: P2PSession, videoTrack: ConnectycubeVideoTrack ) {} /\*\* - Called when remote video track is received \*/ override fun onRemoteVideoTrackReceive(session: P2PSession, videoTrack: ConnectycubeVideoTrack, userId: Int ) {} ``` - SDK v1 kotlin (deprecated) ```kotlin /** * Called when local video track is received */ override fun onLocalVideoTrackReceive(session: RTCSession, localVideoTrack: RTCVideoTrack ) {} /** * Called when remote video track is received */ override fun onRemoteVideoTrackReceive(session: RTCSession, remoteVideoTrack: RTCVideoTrack, userID: Int ) {} ``` - SDK v1 java (deprecated) ```java /** * Called when local video track is received */ void onLocalVideoTrackReceive(RTCSession session, RTCVideoTrack localVideoTrack); /\*\* - Called when remote video track is received \*/ void onRemoteVideoTrackReceive(RTCSession session, RTCVideoTrack remoteVideoTrack, Integer userID); ``` Once you’ve got an access to video track, you can render them to some view in your app UI: * SDK v2 kotlin ```kotlin private fun fillVideoView(userId: Int, videoView: RTCSurfaceView, videoTrack: ConnectycubeVideoTrack, remoteRenderer: Boolean ) { videoTrack.addSink(videoView.videoSink) updateVideoView(videoView, !remoteRenderer, ScalingType.SCALE_ASPECT_FILL) } private fun updateVideoView(surfaceView: RTCSurfaceView, mirror: Boolean, scalingType: ScalingType ) { surfaceView.setScalingType(scalingType) surfaceView.setMirror(mirror) surfaceView.requestLayout() } ``` * SDK v1 kotlin (deprecated) ```kotlin private fun fillVideoView(userId: Int, videoView: RTCSurfaceView, videoTrack: ConnectycubeVideoTrack, remoteRenderer: Boolean ) { videoTrack.addRenderer(videoView) updateVideoView(videoView, !remoteRenderer, ScalingType.SCALE_ASPECT_FILL) } private fun updateVideoView(surfaceView: RTCSurfaceView, mirror: Boolean, scalingType: ScalingType ) { surfaceView.setScalingType(scalingType) surfaceView.setMirror(mirror) surfaceView.requestLayout() } ``` * SDK v1 java (deprecated) ```java private void fillVideoView(int userId, RTCSurfaceView videoView, RTCVideoTrack videoTrack, boolean remoteRenderer) { videoTrack.addRenderer(new VideoRenderer(videoView)); updateVideoView(videoView, !remoteRenderer, RendererCommon.ScalingType.SCALE_ASPECT_FILL); } private void updateVideoView(RTCSurfaceView surfaceView, boolean mirror, RendererCommon.ScalingType scalingType){ surfaceView.setScalingType(scalingType); surfaceView.setMirror(mirror); surfaceView.requestLayout(); } ``` ## Obtain audio tracks [Section titled “Obtain audio tracks”](#obtain-audio-tracks) To get an access to audio tracks you need to implement `RTCClientAudioTracksCallback` interface: * SDK v2 kotlin ```kotlin p2pSession.addAudioTrackCallbacksListener(this) p2pSession.removeAudioTrackCallbacksListener(this) ``` * SDK v1 kotlin (deprecated) ```kotlin rtcSession.addAudioTrackCallbacksListener(this) rtcSession.removeAudioTrackCallbacksListener(this) ``` * SDK v1 java (deprecated) ```java rtcSession.addAudioTrackCallbacksListener(this); rtcSession.removeAudioTrackCallbacksListener(this); ``` - SDK v2 kotlin ```kotlin /** * Called when local audio track is received */ override fun onLocalAudioTrackReceive(session: P2PSession, audioTrack: ConnectycubeAudioTrack) {} /\*\* - Called when remote audio track is received \*/ override fun onRemoteAudioTrackReceive(session: P2PSession, audioTrack: ConnectycubeAudioTrack, userId: Int ) {} ``` - SDK v1 kotlin (deprecated) ```kotlin /** * Called when local audio track is received */ override fun onLocalAudioTrackReceive(session: RTCSession, audioTrack: RTCAudioTrack) {} /** * Called when remote audio track is received */ override fun onRemoteAudioTrackReceive(session: RTCSession, audioTrack: RTCAudioTrack, userID: Int ) {} ``` - SDK v1 java (deprecated) ```java /** * Called when local audio track is received */ void onLocalAudioTrackReceive(RTCSession session, RTCAudioTrack audioTrack); /\*\* - Called when remote audio track is received \*/ void onRemoteAudioTrackReceive(RTCSession session, RTCAudioTrack audioTrack, Integer userID); ``` Then you can use these audio tracks to mute/unmute audio. Read more below. ## Receive a call in background [Section titled “Receive a call in background”](#receive-a-call-in-background) For mobile apps, it can be a situation when an opponent’s user app is either in closed (killed) or background (inactive) state. In this case, to be able to still receive a call request, you can use Push Notifications. The flow should be as follows: * a call initiator should send a push notification along with a call request; * when an opponent’s app is killed or in background state - an opponent will receive a push notification about an incoming call, and will be able to accept/reject the call. If accepted or pressed on a push notification - an app will be opened, a user should auto login and connect to chat and then will be able to join an incoming call; Please refer to [Push Notifications API guides](/android/push-notifications) regarding how to integrate Push Notifications in your app. ## Reject a call [Section titled “Reject a call”](#reject-a-call) To reject a call request just use the following method: * SDK v2 kotlin ```kotlin // RTCCallSessionCallback override fun onReceiveNewSession(session: P2PSession) { // obtain received user info // val userInfo = session.userInfo // set your user info if needed val userInfo = HashMap() userInfo["key1"] = "value1" // Rejecting the incoming call session.rejectCall(userInfo) } ``` * SDK v1 kotlin (deprecated) ```kotlin // RTCClientSessionCallbacks override fun onReceiveNewSession(session: RTCSession) { // obtain received user info val userInfo = session.userInfo // set your user info if needed val userInfo = HashMap() userInfo["key1"] = "value1" // Rejecting the incoming call session.rejectCall(userInfo) } ``` * SDK v1 java (deprecated) ```java // RTCClientSessionCallbacks public void onReceiveNewSession(RTCSession session){ // obtain received user info Map userInfo = session.getUserInfo(); // set your user info if needed Map userInfo = new HashMap; userInfo.put("key1", "value1"); // Rejecting the incoming call session.rejectCall(userInfo); } ``` After this, your opponent will receive a reject callback: * SDK v2 kotlin ```kotlin // RTCSessionEventsCallback override fun onCallRejectByUser(session: P2PSession, opponentId: Int, userInfo: Map? ) {} ``` * SDK v1 kotlin (deprecated) ```kotlin // RTCClientSessionCallbacks override fun onCallRejectByUser(session: RTCSession, userID: Int, userInfo: Map? ) {} ``` * SDK v1 java (deprecated) ```java // RTCClientSessionCallbacks public void onCallRejectByUser(RTCSession session, Integer userID, Map userInfo){ } ``` ## End a call [Section titled “End a call”](#end-a-call) To end a call use the following snippet: * SDK v2 kotlin ```kotlin // set your user info if needed val userInfo = HashMap() userInfo["key1"] = "value1" session.hangUp(userInfo) ``` * SDK v1 kotlin (deprecated) ```kotlin // set your user info if needed val userInfo = HashMap() userInfo["key1"] = "value1" session.hangUp(userInfo) ``` * SDK v1 java (deprecated) ```java // set your user info if needed Map userInfo = new HashMap; userInfo.put("key1", "value1"); session.hangUp(userInfo); ``` After this, your opponent will receive a hang up callback: * SDK v2 kotlin ```kotlin override fun onReceiveHangUpFromUser(session: P2PSession, opponentId: Int, userInfo: Map?) {} ``` * SDK v1 kotlin (deprecated) ```kotlin override fun onReceiveHangUpFromUser(session: RTCSession, userID: Int, userInfo: Map?) {} ``` * SDK v1 java (deprecated) ```java public void onReceiveHangUpFromUser(RTCSession session, Integer userID, Map userInfo){ } ``` ## Release resource [Section titled “Release resource”](#release-resource) When you don’t want to receive and process video calls anymore - you need to destroy `RTCClient`: * SDK v2 kotlin ```kotlin EglBaseContext.release() P2PCalls.destroy() //P2PCalls.register() to init ``` * SDK v1 kotlin (deprecated) ```kotlin RTCClient.getInstance(this).destroy() ``` * SDK v1 java (deprecated) ```java RTCClient.getInstance(this).destroy(); ``` This method unregisters `RTCClient` from receiving any video chat events, clear session callbacks and closes existing signaling channels. ## Monitor connection state [Section titled “Monitor connection state”](#monitor-connection-state) To monitor the states of your peer connections (users) you need to implement `RTCSessionStateCallback` interface: * SDK v2 kotlin ```kotlin // RTCSessionStateCallback p2pSession.addSessionStateCallbacksListener(this) p2pSession.removeSessionStateCallbacksListener(this) ``` * SDK v1 kotlin (deprecated) ```kotlin rtcSession.addSessionCallbacksListener(this) rtcSession.removeSessionCallbacksListener(this) ``` * SDK v1 java (deprecated) ```java rtcSession.addSessionCallbacksListener(this); rtcSession.removeSessionCallbacksListener(this); ``` - SDK v2 kotlin ```kotlin /** * Called in case when connection with the opponent is established */ override fun onConnectedToUser(session: P2PSession, userId: Int){} /\*\* - Called in case when connection is closed \*/ override fun onConnectionClosedForUser(session: P2PSession, userId: Int) {} /\*\* - Called in case when the opponent is disconnected \*/ override fun onDisconnectedFromUser(session: P2PSession, userId: Int) {} /\*\* - Called in case when session state has changed \*/ override fun onStateChanged(session: P2PSession, state: BaseSession.RTCSessionState) {} ``` - SDK v1 kotlin (deprecated) ```kotlin /** * Called in case when connection with the opponent is established */ override fun onConnectedToUser(session: RTCSession, userID: Int){} /** * Called in case when connection is closed */ override fun onConnectionClosedForUser(session: RTCSession, userID: Int) {} /** * Called in case when the opponent is disconnected */ override fun onDisconnectedFromUser(session: RTCSession, userID: Int) {} /** * Called in case when connection establishment process is started */ override fun onStartConnectToUser(session: RTCSession, userID: Int) {} /** * Called in case when the opponent is disconnected by timeout */ override fun onDisconnectedTimeoutFromUser(session: RTCSession, userID: Int) {} /** * Called in case when connection has failed with the opponent */ override fun onConnectionFailedWithUser(session: RTCSession, userID: Int) {} ``` - SDK v1 java (deprecated) ```java /** * Called in case when connection with the opponent is established */ void onConnectedToUser(RTCSession session, Integer userID); /\*\* - Called in case when connection is closed \*/ void onConnectionClosedForUser(RTCSession session, Integer userID); /\*\* - Called in case when the opponent is disconnected \*/ void onDisconnectedFromUser(RTCSession session, Integer userID); /\*\* - Called in case when connection establishment process is started \*/ void onStartConnectToUser(RTCSession session, Integer userID); /\*\* - Called in case when the opponent is disconnected by timeout \*/ void onDisconnectedTimeoutFromUser(RTCSession session, Integer userID); /\*\* - Called in case when connection has failed with the opponent \*/ void onConnectionFailedWithUser(RTCSession session, Integer userID); ``` ## Tackling Network changes [Section titled “Tackling Network changes”](#tackling-network-changes) If a user’s network environment changes (e.g., switching from Wi-Fi to mobile data), the existing call connection might no longer be valid. Normally, in a case of short network interruptions, the ConnectyCube SDK will automatically restore the call so you can see via `RTCSessionStateCallback` callback with `peer connections state` changing to `onDisconnectedFromUser` and then again to `onConnectedToUser`. But not all cases are the same, and in some of them the connection needs to be **manually** refreshed due to various issues like NAT or firewall behavior changes or even longer network environment changes, e.g. when a user is offline for more than 30 seconds. This is where ICE restart helps to re-establish the connection to find a new network path for communication. The correct and recommended way for an application to handle all such ‘bad’ cases is to trigger an ICE restart when the connection state goes to either `FAILED` or `DISCONNECTED` for an extended period of time (e.g. > 30 seconds). ```kotlin code snippet with ice restart (coming soon) ``` ## Mute audio [Section titled “Mute audio”](#mute-audio) * SDK v2 kotlin ```kotlin val localAudioTrack: ConnectycubeAudioTrack? = session.mediaStreamManager.localAudioTrack // mute localAudioTrack.enabled = false // unmute localAudioTrack.enabled = true // is muted? val isEnabled = localAudioTrack.enabled ``` * SDK v1 kotlin (deprecated) ```kotlin val localAudioTrack: ConnectycubeAudioTrack? = session.mediaStreamManager.localAudioTrack // mute localAudioTrack.enabled = false // unmute localAudioTrack.enabled = true // is muted? val isEnabled = localAudioTrack.enabled ``` * SDK v1 java (deprecated) ```java RTCAudioTrack localAudioTrack = currentSession.getMediaStreamManager().getLocalAudioTrack(); // mute localAudioTrack.setEnabled(false); // unmute localAudioTrack.setEnabled(true); // is muted? boolean isEnabled = localAudioTrack.enabled(); ``` `getMediaStreamManager()` method returns an instance of `RTCMediaStreamManager`. > **Note**: Pay attention, `RTCMediaStreamManager` is attached to `RTCSession` lifecycle. According to `RTCSession` lifecycle, you should use `RTCMediaStreamManager` only when `RTCSession` is active. ## Mute video [Section titled “Mute video”](#mute-video) * SDK v2 kotlin ```kotlin val localVideoTrack: ConnectycubeVideoTrack? = session.mediaStreamManager.localVideoTrack // mute localVideoTrack.enabled = false // unmute localVideoTrack.enabled = true // is muted? val isEnabled = localVideoTrack.enabled ``` * SDK v1 kotlin (deprecated) ```kotlin val localVideoTrack: RTCVideoTrack = currentSession.getMediaStreamManager().getLocalVideoTrack() // mute localVideoTrack.setEnabled(false) // mute localVideoTrack.setEnabled(true) // is muted? val isEnabled = localVideoTrack.enabled() ``` * SDK v1 java (deprecated) ```java RTCVideoTrack localVideoTrack = currentSession.getMediaStreamManager().getLocalVideoTrack(); // mute localVideoTrack.setEnabled(false); // mute localVideoTrack.setEnabled(true); // is muted? boolean isEnabled = localVideoTrack.enabled(); ``` ## Switch camera [Section titled “Switch camera”](#switch-camera) You can switch the video camera during a call (default is front camera): * SDK v2 kotlin ```kotlin val videoCapturer = session.mediaStreamManager.videoCapturer videoCapturer.switchCamera(cameraSwitchHandler) ``` * SDK v1 kotlin (deprecated) ```kotlin val videoCapturer = currentSession.getMediaStreamManager().getVideoCapturer() as RTCCameraVideoCapturer videoCapturer.switchCamera(cameraSwitchHandler) ``` * SDK v1 java (deprecated) ```java RTCCameraVideoCapturer videoCapturer = (RTCCameraVideoCapturer)currentSession.getMediaStreamManager().getVideoCapturer(); videoCapturer.switchCamera(cameraSwitchHandler); ``` ## Screen sharing [Section titled “Screen sharing”](#screen-sharing) Screen sharing allows you to share information from your application to all of your opponents. It gives you an ability to promote your product, share a screen with formulas to students, distribute podcasts, share video/audio/photo moments of your life in real-time all over the world. > **Note**: Pay attention! Screen sharing feature works only on devices with Android 5 (LollyPop) and newer. To simplify using this feature we prepared special `RTCScreenCapturer` class. To implement this feature in your application you should do **3** simple steps: ##### 1. Request projection permission from user: [Section titled “1. Request projection permission from user:”](#1-request-projection-permission-from-user) * SDK v2 kotlin ```kotlin //Coming soon ``` * SDK v1 kotlin (deprecated) ```kotlin RTCScreenCapturer.requestPermissions(this) ``` * SDK v1 java (deprecated) ```java RTCScreenCapturer.requestPermissions(this); ``` ##### 2. Listen to granted permission inside Activity (or Fragment): [Section titled “2. Listen to granted permission inside Activity (or Fragment):”](#2-listen-to-granted-permission-inside-activity-or-fragment) * SDK v2 kotlin ```kotlin //Coming soon ``` * SDK v1 kotlin (deprecated) ```kotlin override fun onActivityResult(requestCode: Int, resultCode: Int, data: Intent?) { ... if (requestCode == RTCScreenCapturer.REQUEST_MEDIA_PROJECTION) { if (resultCode == Activity.RESULT_OK) { startScreenSharing(data!!) Log.i(TAG, "Starting screen capture") } else { Toast.makeText(applicationContext, "You cannot continue without an access to screen", Toast.LENGTH_SHORT).show() } } } ``` * SDK v1 java (deprecated) ```java @Override protected void onActivityResult(int requestCode, int resultCode, Intent data) { ... if (requestCode == RTCScreenCapturer.REQUEST_MEDIA_PROJECTION) { if (resultCode == Activity.RESULT_OK) { startScreenSharing(data); Log.i(TAG, "Starting screen capture"); } else { Toast.makeText(getApplicationContext(), "You cannot continue without an access to screen", Toast.LENGTH_SHORT).show(); } } } ``` ##### 3. Set `RTCScreenCapturer` as current video capturer: [Section titled “3. Set RTCScreenCapturer as current video capturer:”](#3-set-rtcscreencapturer-as-current-video-capturer) * SDK v2 kotlin ```kotlin //Coming soon ``` * SDK v1 kotlin (deprecated) ```kotlin rtcSession.mediaStreamManager.videoCapturer = RTCScreenCapturer(data, null) ``` * SDK v1 java (deprecated) ```java rtcSession.getMediaStreamManager().setVideoCapturer(new RTCScreenCapturer(data, null)); ``` > **Note**: To create instance of `RTCScreenCapturer` need use `data` from **permission request** ## Configure general settings [Section titled “Configure general settings”](#configure-general-settings) `RTCConfig` provides an interface to customize some SDK video chat settings: * SDK v2 kotlin ```kotlin /** * add to list ice servers. */ WebRTCConfig.iceServerList.add(ConnectycubeIceServer(uri, userName, password)) //Coming soon //DialingTimeInterval, AnswerTimeInterval ``` * SDK v1 kotlin (deprecated) ```kotlin /** * Set dialing time interval * Default value is 5 sec */ fun setDialingTimeInterval(dialingTimeInterval: Long) {} /** * Set answer time interval * Default value is 60 sec */ fun setAnswerTimeInterval(answerTimeInterval: Long) {} /** * Set max connections in conference * Default value is 10 */ fun setMaxOpponentsCount(maxOpponentsCount: Int) {} /** * Set max allowed time to repair a connection after it was lost. * Default value is 10 sec */ fun setDisconnectTime(disconnectTime: Int) {} /** * Set list of ice servers. */ fun setIceServerList(iceServerList: List) {} ``` * SDK v1 java (deprecated) ```java /** * Set dialing time interval * Default value is 5 sec */ public static void setDialingTimeInterval(long dialingTimeInterval); /\*\* - Set answer time interval - Default value is 60 sec \*/ public static void setAnswerTimeInterval(long answerTimeInterval); /\*\* - Set max connections in conference - Default value is 10 \*/ public static void setMaxOpponentsCount(Integer maxOpponentsCount); /\*\* - Set max allowed time to repair a connection after it was lost. - Default value is 10 sec \*/ public static void setDisconnectTime(Integer disconnectTime); /\*\* - Set list of ice servers. \*/ public static void setIceServerList(List iceServerList); ``` For example, you can customize a list of ICE servers that SDK uses. WebRTC engine will choose the TURN relay with the lowest round-trip time. Thus, setting multiple TURN servers allows your application to scale-up in terms of bandwidth and number of users: * SDK v2 kotlin ```kotlin WebRTCConfig.iceServerList.add( ConnectycubeIceServer( "turn:numb.default.com", "default@default.com", "default@default.com" ) ) ``` * SDK v1 kotlin (deprecated) ```kotlin val iceServerList: MutableList = LinkedList() iceServerList.add( IceServer( "turn:numb.default.com", "default@default.com", "default@default.com" ) ) RTCConfig.setIceServerList(iceServerList) ``` * SDK v1 java (deprecated) ```java List iceServerList = new LinkedList<>(); iceServerList.add(new PeerConnection.IceServer("turn:numb.default.com", "default@default.com", "default@default.com")); RTCConfig.setIceServerList(iceServerList); ``` ## Configure media settings [Section titled “Configure media settings”](#configure-media-settings) You can use `RTCMediaConfig` class instance to configure a various list of media settings like video/audio codecs, bitrate, fps etc: * SDK v2 kotlin ```kotlin //WebRTCMediaConfig var audioCodec: AudioCodec = AudioCodec.ISAC var videoCodec: VideoCodec? = null var videoWidth = 0 var videoHeight = 0 var videoFps = 0 var audioStartBitrate = 0 var videoStartBitrate = 0 var videoHWAcceleration = false var useOpenSLES = false //Allow OpenSL ES audio if device supports it var useBuildInAEC = true //Enable built-in AEC if device supports var audioProcessingEnabled = true //Enabling/Disabling audio processing - added for audio performance ``` * SDK v1 kotlin (deprecated) ```kotlin fun setAudioCodec(audioCodec: RTCMediaConfig.AudioCodec) {} fun setVideoCodec(videoCodec: VideoCodec) {} fun setVideoWidth(videoWidth: Int) {} fun setVideoHeight(videoHeight: Int) {} fun setVideoFps(videoFps: Int) {} fun setVideoStartBitrate(videoStartBitrate: Int) {} fun setAudioStartBitrate(audioStartBitrate: Int) {} fun setVideoHWAcceleration(videoHWAcceleration: Boolean) {} fun setUseBuildInAEC(useBuildInAEC: Boolean) {} // Enable built-in AEC if device supports it fun setUseOpenSLES(useOpenSLES: Boolean) {} //Allow OpenSL ES audio if device supports it fun setAudioProcessingEnabled(audioProcessingEnabled: Boolean) {} //Enabling/Disabling audio processing - added for audio performance. ``` * SDK v1 java (deprecated) ```java public static void setAudioCodec(AudioCodec audioCodec); public static void setVideoCodec(VideoCodec videoCodec); public static void setVideoWidth(int videoWidth); public static void setVideoHeight(int videoHeight); public static void setVideoFps(int videoFps); public static void setVideoStartBitrate(int videoStartBitrate); public static void setAudioStartBitrate(int audioStartBitrate); public static void setVideoHWAcceleration(boolean videoHWAcceleration); public static void setUseBuildInAEC(boolean useBuildInAEC); // Enable built-in AEC if device supports it public static void setUseOpenSLES(boolean useOpenSLES); //Allow OpenSL ES audio if device supports it public static void setAudioProcessingEnabled(boolean audioProcessingEnabled); //Enabling/Disabling audio processing - added for audio performance. ``` ## WebRTC Stats reporting [Section titled “WebRTC Stats reporting”](#webrtc-stats-reporting) Stats reporting is an insanely powerful tool which can help to debug a call if there are any problems with it (e.g. lags, missing audio/video etc.). To enable stats report you should first set stats reporting frequency using `RTCConfig` method below: * SDK v2 kotlin ```kotlin //Coming soon //ConnectycubeStatsReport ``` * SDK v1 kotlin (deprecated) ```kotlin RTCConfig.setStatsReportInterval(5) // receive stats report every 5 seconds ``` * SDK v1 java (deprecated) ```java RTCConfig.setStatsReportInterval(5); // receive stats report every 5 seconds ``` Now you will be able to receive a client delegate callback and perform operations with `RTCStatsReport` instance for the current period of time: * SDK v2 kotlin ```kotlin //Coming soon //ConnectycubeStatsReport ``` * SDK v1 kotlin (deprecated) ```kotlin val rtcSession: RTCSession = ... rtcSession.addStatsReportCallback { rtcStatsReport, userId -> Log.i(TAG, "Full report = $rtcStatsReport") Log.i(TAG, "Report by user = $userId") } ``` * SDK v1 java (deprecated) ```java RTCSession rtcSession = ...; rtcSession.addStatsReportCallback(new RTCStatsReportCallback() { @Override public void onStatsReportUpdate(RTCStatsReport rtcStatsReport, Integer userId) { Log.i(TAG, "Full report = " + rtcStatsReport); Log.i(TAG, "Report by user = " + userId); } }); ``` You can also use stats reporting to see who is currently talking in a group call. You must use `audioReceiveOutputLevel` for that. Take a look to the `RTCStatsReport` to see all of the other stats properties that might be useful for you. ## Group video calls [Section titled “Group video calls”](#group-video-calls) Because of [Mesh architecture](https://webrtcglossary.com/mesh/) we use for multipoint where every participant sends and receives its media to all other participants, current solution supports group calls with up to 4 people. Also ConnectyCube provides an alternative solution for up to 12 people - [Multiparty Video Conferencing API](/android/videocalling-conference). ## Call recording [Section titled “Call recording”](#call-recording) Coming soon
# Video Conferencing
> Discover the simplicity of integrating conference video calling into your Android app with our easy-to-use API. Empower users to connect from anywhere.
ConnectyCube **Multiparty Video Conferencing API** is built on top of [WebRTC](https://webrtc.org/) protocol and based on top of [WebRTC SFU](https://webrtcglossary.com/sfu/) architecture. Max people per Conference call is 12. Video Conferencing is available starting from [Advanced plan](https://connectycube.com/pricing/). > To get a difference between **P2P calling** and **Conference calling** please read our [ConnectyCube Calling API comparison](https://connectycube.com/2020/04/15/connectycube-calling-api-comparison/) blog page. ## Features supported [Section titled “Features supported”](#features-supported) * Video/Audio Conference with up to 12 people * Join-Rejoin video room functionality (like Skype) * Guest rooms * Mute/Unmute audio/video streams * Display bitrate * Switch video input device (camera) ## Connect SDK [Section titled “Connect SDK”](#connect-sdk) For using Video Conferencing feature you should add a dependency (only for V1): #### SDK v1 kotlin (deprecated) [Section titled “SDK v1 kotlin (deprecated)”](#sdk-v1-kotlin-deprecated) ```groovy implementation "com.connectycube:connectycube-android-sdk-videochat-conference:$sdkVersion" ``` ## Create meeting [Section titled “Create meeting”](#create-meeting) In order to have a conference call, a meeting object has to be created. ```kotlin val now = System.currentTimeMillis() / 1000 val meeting = ConnectycubeMeeting( name = "My meeting", startDate = now, endDate = now + 60 * 60, attendees = listOf(ConnectycubeAttendee(123, "superman@mail.com"), ConnectycubeAttendee(124, "superman2@mail.com")), chat = false, record = false, public = true, scheduled = false, // notify = true, //notify feature is available starting from the [Advanced plan](https://connectycube.com/pricing/) // notifyBefore = ConnectycubeNotifyBefore(ConnectycubeMeetingMetric.HOURS, 1) //notify feature is available starting from the [Advanced plan](https://connectycube.com/pricing/) ) createMeeting(meeting, { createdMeeting -> val confRoomId = createdMeeting.id }, { error -> }) ``` * `name` - the meeting name. * As for `attendees` - either ConnectyCube users ids or external emails can be provided. * `start_date` - the date when meeting starts. * `end_date` - the date when meeting ends. * Pass `withChat = true` if you want to have a chat connected to meeting. * Pass `record = true` if you want to have a meeting call recorded. Read more about Recording feature Once meeting is created, you can use `meeting.id` as a conf room identifier in the below requests when join a call. ## ConferenceSession [Section titled “ConferenceSession”](#conferencesession) * SDK v2 kotlin ```kotlin // Create session with Video or Audio type conference val conferenceType = CallType.VIDEO ConnectyCube.conferenceCalls.createSession(userId, conferenceType, object: ConferenceCallback { override fun onSuccess(result: ConferenceSession) { } override fun onError(ex: WsException) { } }) ``` * SDK v1 kotlin (deprecated) ```kotlin val client: ConferenceClient = ConferenceClient.getInstance(applicationContext) // Create session with Video or Audio type conference val conferenceType = ConferenceType.CONFERENCE_TYPE_VIDEO client.createSession(userId, conferenceType, object : ConferenceEntityCallback { override fun onSuccess(session: ConferenceSession?) { } override fun onError(exception: WsException?) { } }) ``` * SDK v1 java (deprecated) ```java ConferenceClient client = ConferenceClient.getInstance(getApplicationContext()); // Create session with Video or Audio type conference RTCTypes.ConferenceType conferenceType = RTCTypes.ConferenceType.CONFERENCE_TYPE_VIDEO; client.createSession(userID, conferenceType, new ConferenceEntityCallback() { @Override public void onSuccess(ConferenceSession session) { } }); ``` `ConferenceClient` (`ConferenceCalls` v2) instance is a client model responsible for managing conference session. `ConferenceClient` has a `setAutoSubscribeAfterJoin` (`autoSubscribeAfterJoin` v2) option, which means your client will be subscribing to all online publishers after join to some room. `ConferenceSession` is a session within certain video room, managing all current processes. ## Events [Section titled “Events”](#events) In order to have an ability to receive callbacks about current `ConferenceSession` instance state and conference events, you should implement appropriate interfaces: Implement `RTCSessionStateCallback` for tracking connection stat: * SDK v2 kotlin ```kotlin val sessionStateCallback = object: RTCSessionStateCallback { /** * Called when session state is changed */ override fun onStateChanged(session: ConferenceSession, state: BaseSession.RTCSessionState) {} /** * Called in case when opponent disconnected */ override fun onDisconnectedFromUser(session: ConferenceSession, userId: Int) {} /** * Called in case when connection with opponent is established */ override fun onConnectedToUser(session: ConferenceSession, userId: Int) {} /** * Called in case when connection closed with certain user. */ override fun onConnectionClosedForUser(session: ConferenceSession, userId: Int) {} } currentSession.addSessionStateCallbacksListener(sessionStateCallback) //currentSession.removeSessionStateCallbacksListener(sessionStateCallback) ``` * SDK v1 kotlin (deprecated) ```kotlin val sessionStateCallback = object: RTCSessionStateCallback { /** * Called when session state is changed */ override fun onStateChanged(session: ConferenceSession, state: BaseSession.RTCSessionState) {} /** * Called in case when opponent disconnected */ override fun onDisconnectedFromUser(session: ConferenceSession, userID: Int) {} /** * Called in case when connection with opponent is established */ override fun onConnectedToUser(session: ConferenceSession, userID: Int) {} /** * Called in case when connection closed with certain user. */ override fun onConnectionClosedForUser(session: ConferenceSession, userID: Int) {} } currentSession.addSessionCallbacksListener(sessionStateCallback) //currentSession.removeSessionCallbacksListener(sessionStateCallback) ``` * SDK v1 java (deprecated) ```java RTCSessionStateCallback sessionStateCallback = new RTCSessionStateCallback(){ /** * Called when session state is changed */ void onStateChanged(ConferenceSession session, BaseSession.RTCSessionState state); /** * Called in case when connection with opponent is established */ void onConnectedToUser(ConferenceSession session, Integer userID); /** * Called in case when opponent disconnected */ void onDisconnectedFromUser(ConferenceSession session, Integer userID); /** * Called in case when connection closed with certain user. */ void onConnectionClosedForUser(ConferenceSession session, Integer userID); } currentSession.addSessionCallbacksListener(sessionStateCallback); //currentSession.removeSessionCallbacksListener(sessionStateCallback); ``` Implement `ConferenceSessionCallbacks` for tracking conference events: * SDK v2 kotlin ```kotlin val conferenceSessionCallbacks: ConferenceSessionCallbacks = object : ConferenceSessionCallbacks { /** * Called when some publisher (user) joined to the video room */ override fun onPublishersReceived(publishers: List?) {} /** * Called when some publisher left room */ override fun onPublisherLeft(userId: Int?) {} /** * Called when media - audio or video type, is received */ override fun onMediaReceived(type: String?, success: Boolean ) {} /** * Called when slowLink is received. SlowLink with uplink=true means you notified several missing packets from server, while uplink=false means server is not receiving all your packets. */ override fun onSlowLinkReceived(uplink: Boolean, lost: Int) {} /** * Called when received errors from server */ override fun onError(ex: WsException?) {} /** * Called when ConferenceSession is closed */ override fun onSessionClosed(session: ConferenceSession) {} } currentSession.addConferenceSessionListener(conferenceSessionCallbacks) //currentSession.removeConferenceSessionListener(conferenceSessionCallbacks) ``` * SDK v1 kotlin (deprecated) ```kotlin val conferenceSessionCallbacks: ConferenceSessionCallbacks = object : ConferenceSessionCallbacks { /** * Called when some publisher (user) joined to the video room */ override fun onPublishersReceived(arrayList: ArrayList) {} /** * Called when some publisher left room */ override fun onPublisherLeft(integer: Int) {} /** * Called when media - audio or video type, is received */ override fun onMediaReceived(type: String, success: Boolean ) {} /** * Called when slowLink is received. SlowLink with uplink=true means you notified several missing packets from server, while uplink=false means server is not receiving all your packets. */ override fun onSlowLinkReceived(b: Boolean, i: Int) {} /** * Called when received errors from server */ override fun onError(e: WsException) {} /** * Called when ConferenceSession is closed */ override fun onSessionClosed(conferenceSession: ConferenceSession) {} } currentSession.addConferenceSessionListener(conferenceSessionCallbacks) //currentSession.removeConferenceSessionListener(conferenceSessionCallbacks) ``` * SDK v1 java (deprecated) ```java ConferenceSessionCallbacks conferenceSessionCallbacks = new ConferenceSessionCallbacks() { /** * Called when some publisher (user) joined to the video room */ @Override public void onPublishersReceived(ArrayList arrayList) { } /** * Called when some publisher left room */ @Override public void onPublisherLeft(Integer integer) { } /** * Called when media - audio or video type, is received */ @Override public void onMediaReceived(String type, boolean success) { } /** * Called when slowLink is received. SlowLink with uplink=true means you notified several missing packets from server, while uplink=false means server is not receiving all your packets. */ @Override public void onSlowLinkReceived(boolean b, int i) { } /** * Called when received errors from server */ @Override public void onError(WsException e) { } /** * Called when ConferenceSession is closed */ @Override public void onSessionClosed(ConferenceSession conferenceSession) { } }; currentSession.addConferenceSessionListener(conferenceSessionCallbacks); //currentSession.removeConferenceSessionListener(conferenceSessionCallbacks); ``` ## Video and Audio tracks [Section titled “Video and Audio tracks”](#video-and-audio-tracks) For obtaining video and audio tracks implement interface * SDK v2 kotlin ```kotlin VideoTracksCallback AudioTracksCallback ``` * SDK v1 kotlin (deprecated) ```kotlin RTCClientVideoTracksCallback RTCClientAudioTracksCallback ``` * SDK v1 java (deprecated) ```kotlin RTCClientVideoTracksCallback RTCClientAudioTracksCallback ``` For setting video track for ConferenceSession - the `ConferenceSurfaceView` (`RTCSurfaceView` v2) class is provided. ## Join video room [Section titled “Join video room”](#join-video-room) You can join room as a listener or as a publisher. As listener you subscribe only to the publishers, not giving own video and audio streams. * SDK v2 kotlin ```kotlin val conferenceRole = if (asListenerRole) ConferenceRole.LISTENER else ConferenceRole.PUBLISHER currentSession.joinDialog(dialogId, conferenceRole, object: ConferenceCallback > { ... }) ``` * SDK v1 kotlin (deprecated) ```kotlin val conferenceRole = if (asListenerRole) ConferenceRole.LISTENER else ConferenceRole.PUBLISHER currentSession.joinDialog(dialogID, conferenceRole, object: ConferenceEntityCallback > { ... }) ``` * SDK v1 java (deprecated) ```java ConferenceRole conferenceRole = asListenerRole ? ConferenceRole.LISTENER : ConferenceRole.PUBLISHER; currentSession.joinDialog(dialogID, conferenceRole, new ConferenceEntityCallback> { ... }); ``` ## List online participants [Section titled “List online participants”](#list-online-participants) To list online users in a room: ```kotlin currentSession.getOnlineParticipants(object: ConferenceCallback>(){ override fun onSuccess(result: Map) { // the result contains the map where key is the userId and value is true if this user is publisher and false if listener } override fun onError(ex: WsException) {} }) ``` ## Subscribe/unsubscribe [Section titled “Subscribe/unsubscribe”](#subscribeunsubscribe) For subscribing to the active publisher: * SDK v2 kotlin ```kotlin currentSession.subscribeToPublisher(publisherUserId) ``` * SDK v1 kotlin (deprecated) ```kotlin currentSession.subscribeToPublisher(publisherUserId) ``` * SDK v1 java (deprecated) ```java currentSession.subscribeToPublisher(publisherUserId); ``` > **Note**: You should subscribe to publishers only when session state becomes **connected**. Use `onStateChanged` callback method to track session states. If you are a listener, then you can subscribe to publishers right after successful `joinDialog`. For unsubscribing from publisher: * SDK v2 kotlin ```kotlin currentSession.unsubscribeFromPublisher(publisherUserId) ``` * SDK v1 kotlin (deprecated) ```kotlin currentSession.unsubscribeFromPublisher(publisherUserId) ``` * SDK v1 java (deprecated) ```java currentSession.unsubscribeFromPublisher(publisherUserId); ``` ## Leave [Section titled “Leave”](#leave) To leave current room session: * SDK v2 kotlin ```kotlin currentSession.leave() ``` * SDK v1 kotlin (deprecated) ```kotlin currentSession.leave() ``` * SDK v1 java (deprecated) ```java currentSession.leave(); ``` ## Mute audio [Section titled “Mute audio”](#mute-audio) ```kotlin val localAudioTrack: ConnectycubeAudioTrack? = currentSession.mediaStreamManager.localAudioTrack // mute localAudioTrack.enabled = false // unmute localAudioTrack.enabled = true // is muted? val isEnabled = localAudioTrack.enabled ``` ## Mute video [Section titled “Mute video”](#mute-video) ```kotlin val localVideoTrack: ConnectycubeVideoTrack? = currentSession.mediaStreamManager.localVideoTrack // mute localVideoTrack.enabled = false // unmute localVideoTrack.enabled = true // is muted? val isEnabled = localVideoTrack.enabled ``` ## Switch video cameras [Section titled “Switch video cameras”](#switch-video-cameras) You can switch the video camera during a call (default is front camera): ```kotlin val cameraSwitchHandler: CameraVideoCapturer.CameraSwitchHandler = object: CameraVideoCapturer.CameraSwitchHandler { override fun onCameraSwitchDone(isFrontCamera: Boolean) { } override fun onCameraSwitchError(e: String?) { } } val videoCapturer = currentSession.mediaStreamManager.videoCapturer videoCapturer.switchCamera(cameraSwitchHandler) ``` ## WebRTC Stats reporting [Section titled “WebRTC Stats reporting”](#webrtc-stats-reporting) Stats reporting is an insanely powerful tool which can help to debug a call if there are any problems with it (e.g. lags, missing audio/video etc.). To enable stats report you should first set stats reporting frequency using `WebRTCConfig` method below: ```kotlin //Coming soon //ConnectycubeStatsReport ``` ### Monitoring mic level and video bitrate using Stats [Section titled “Monitoring mic level and video bitrate using Stats”](#monitoring-mic-level-and-video-bitrate-using-stats) Also, we prepared the helpful manager `ConnectycubeStatsReport` for processing Stats reports and getting some helpful information like the opponent’s mic level and video bitrate. For its work, you just need to configure the `WebRTCConfig` as described above. Then create the instance of `ConnectycubeStatsReportsManager` and initialize it with the call session. ```kotlin //Coming soon //ConnectycubeStatsReportsManager ``` ## Recording [Section titled “Recording”](#recording) Server-side recording is available. Read more about Recording feature